How to transform a $15 grocery store bouquet into a floral work of art
Transform a grocery store bouquet into a stunning floral arrangement.
Another installment in the Floral Notes + Rue Noelle collaboration
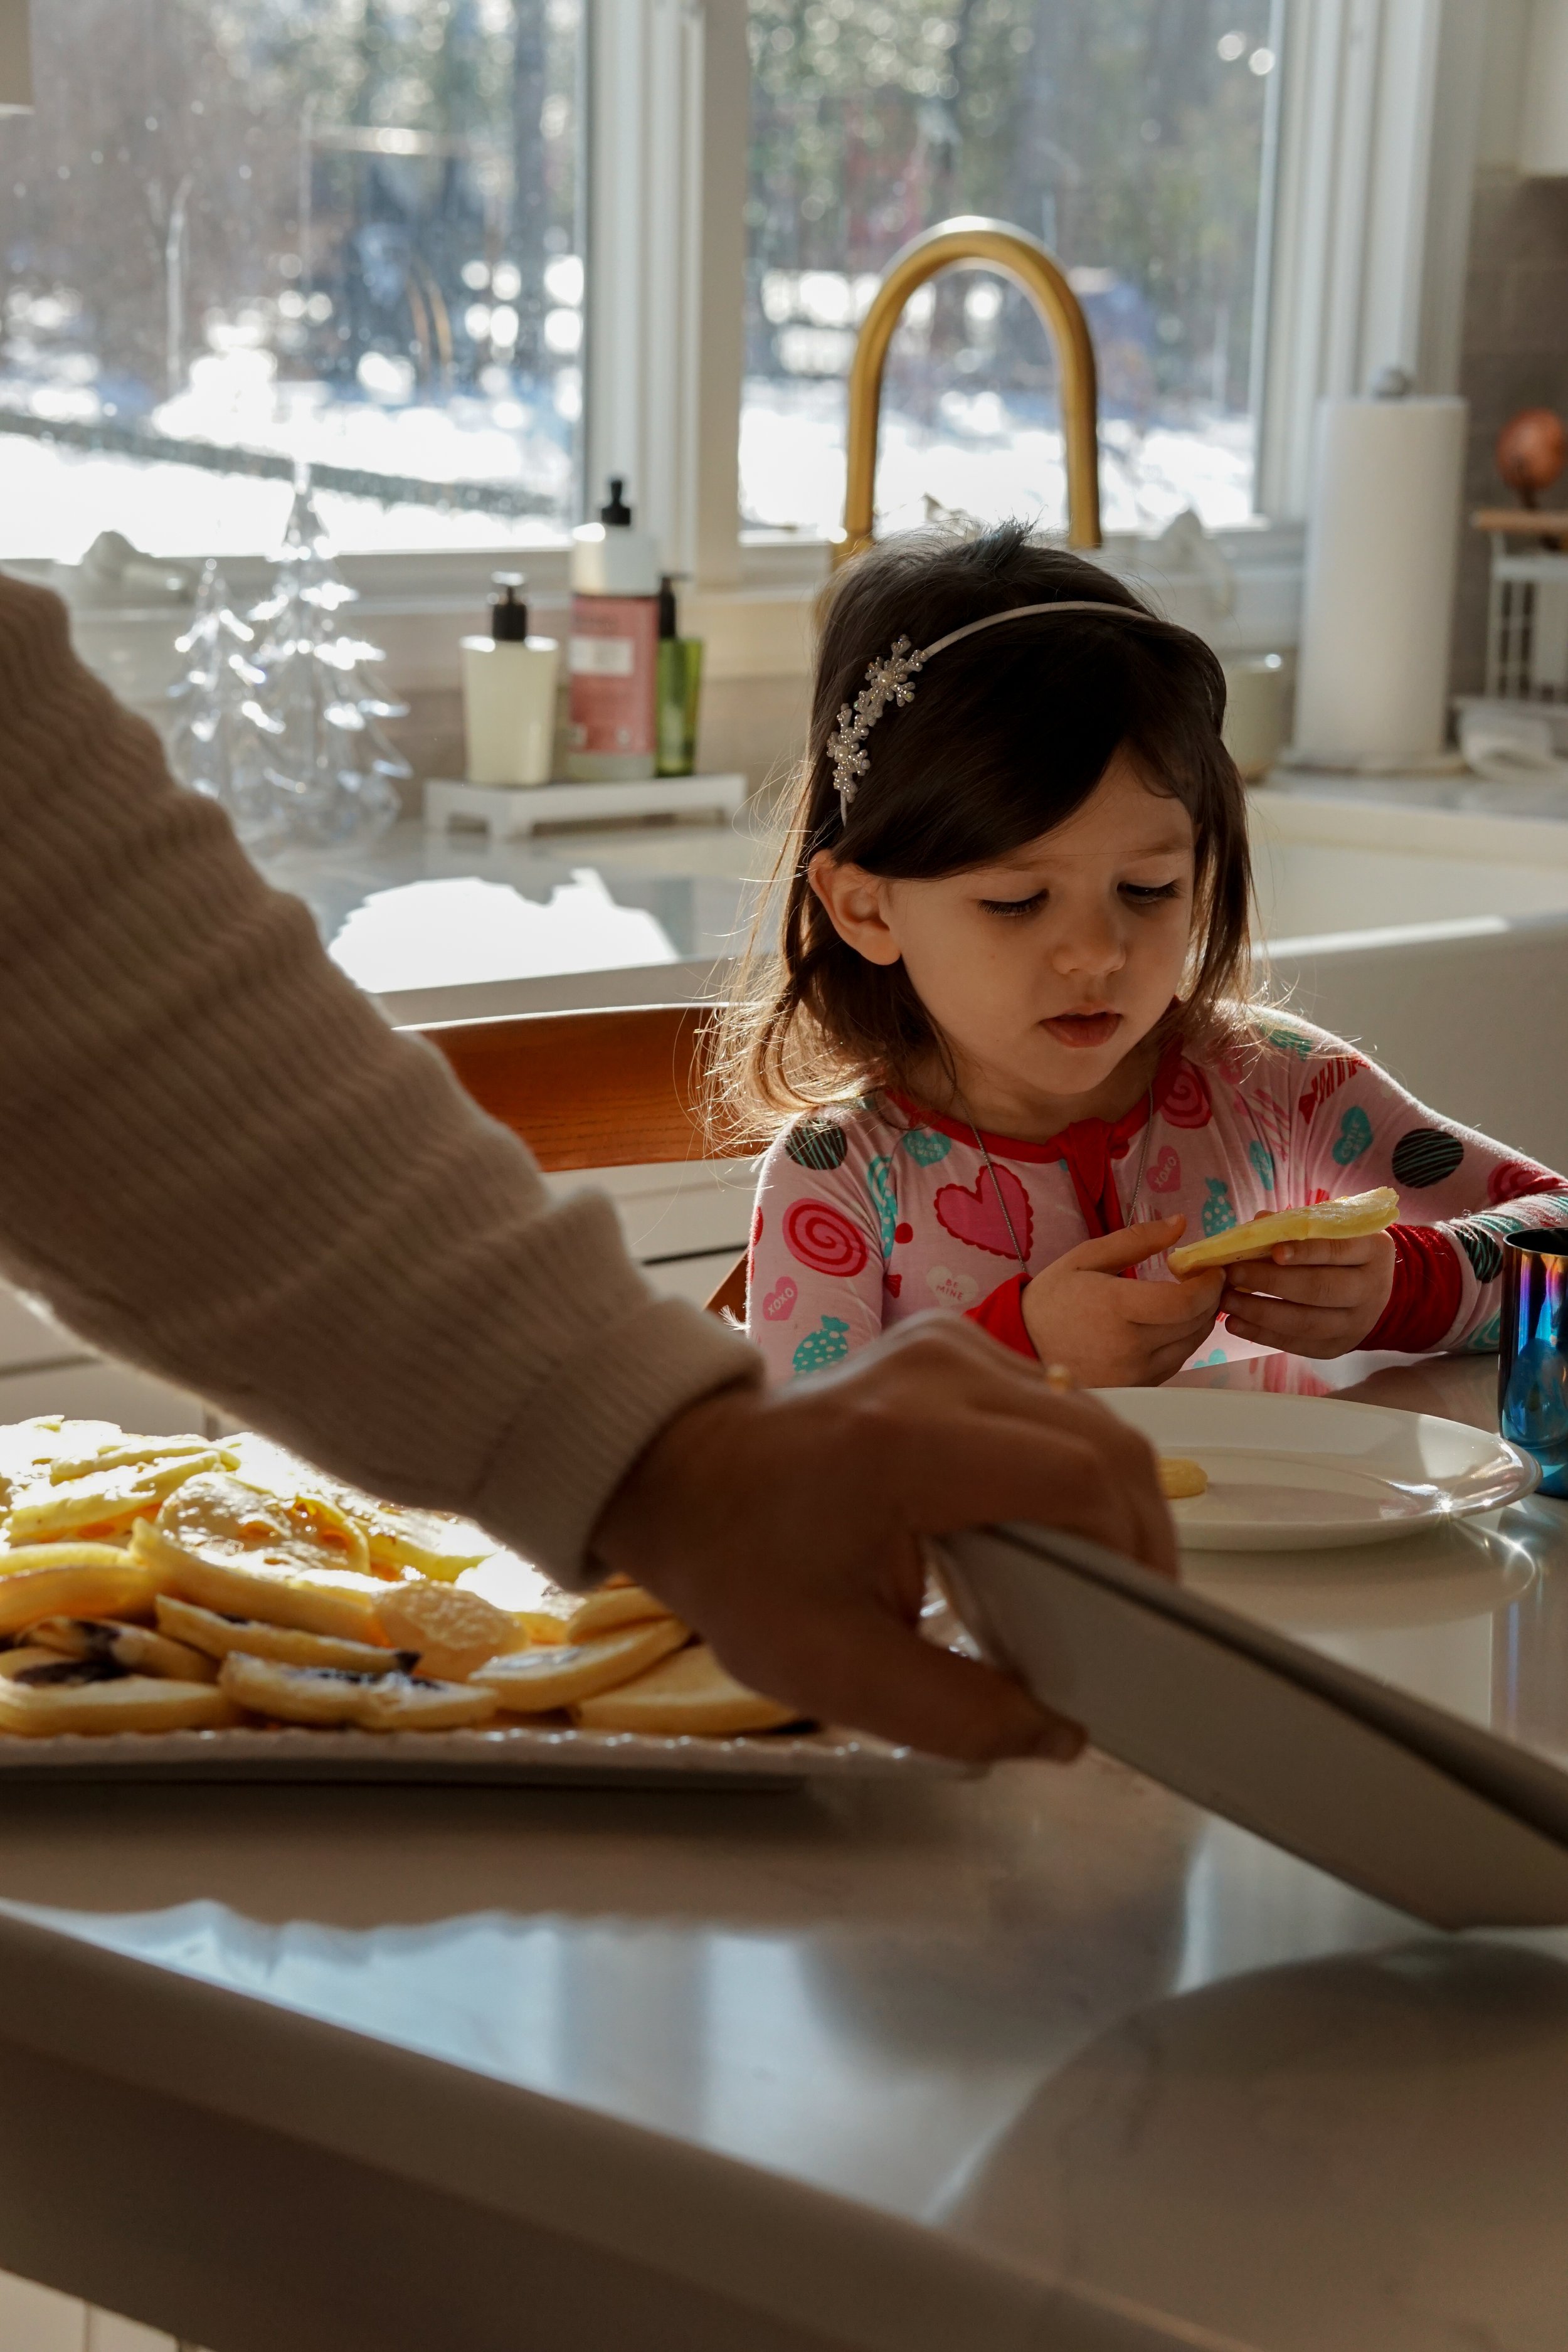
On the last day of my mother-in-law’s most recent visit, my family ramped up our last minute requests.
My mother-in-law, Maureen Christmas, is a professional floral designer based in Massachusetts with a long list of accolades and credentials. She owns a company called Floral Notes and travels the world to share her knowledge and expertise. When I first started Rue Noelle, I dreamed of partnering with her occasionally to bring her expertise to myself and you all, teaching us some basic tips & tricks to elevate our at-home flower arranging and creativity. We did our first collaboration over the holidays (a gorgeous chandelier greenery that you could adapt for any season!) and we’re back with another piece.
Back to Maureen’s most recent visit. You’d think I’d have the foresight to plan out an in-person floral collaboration. Of course, I did not, and we found ourselves on the last day of her visit, cramming in things we’d been thinking about. Maureen found herself doing crafts, baking desserts with Nellie, sewing repairs on a new princess dress… and then from me, a final and big ask.
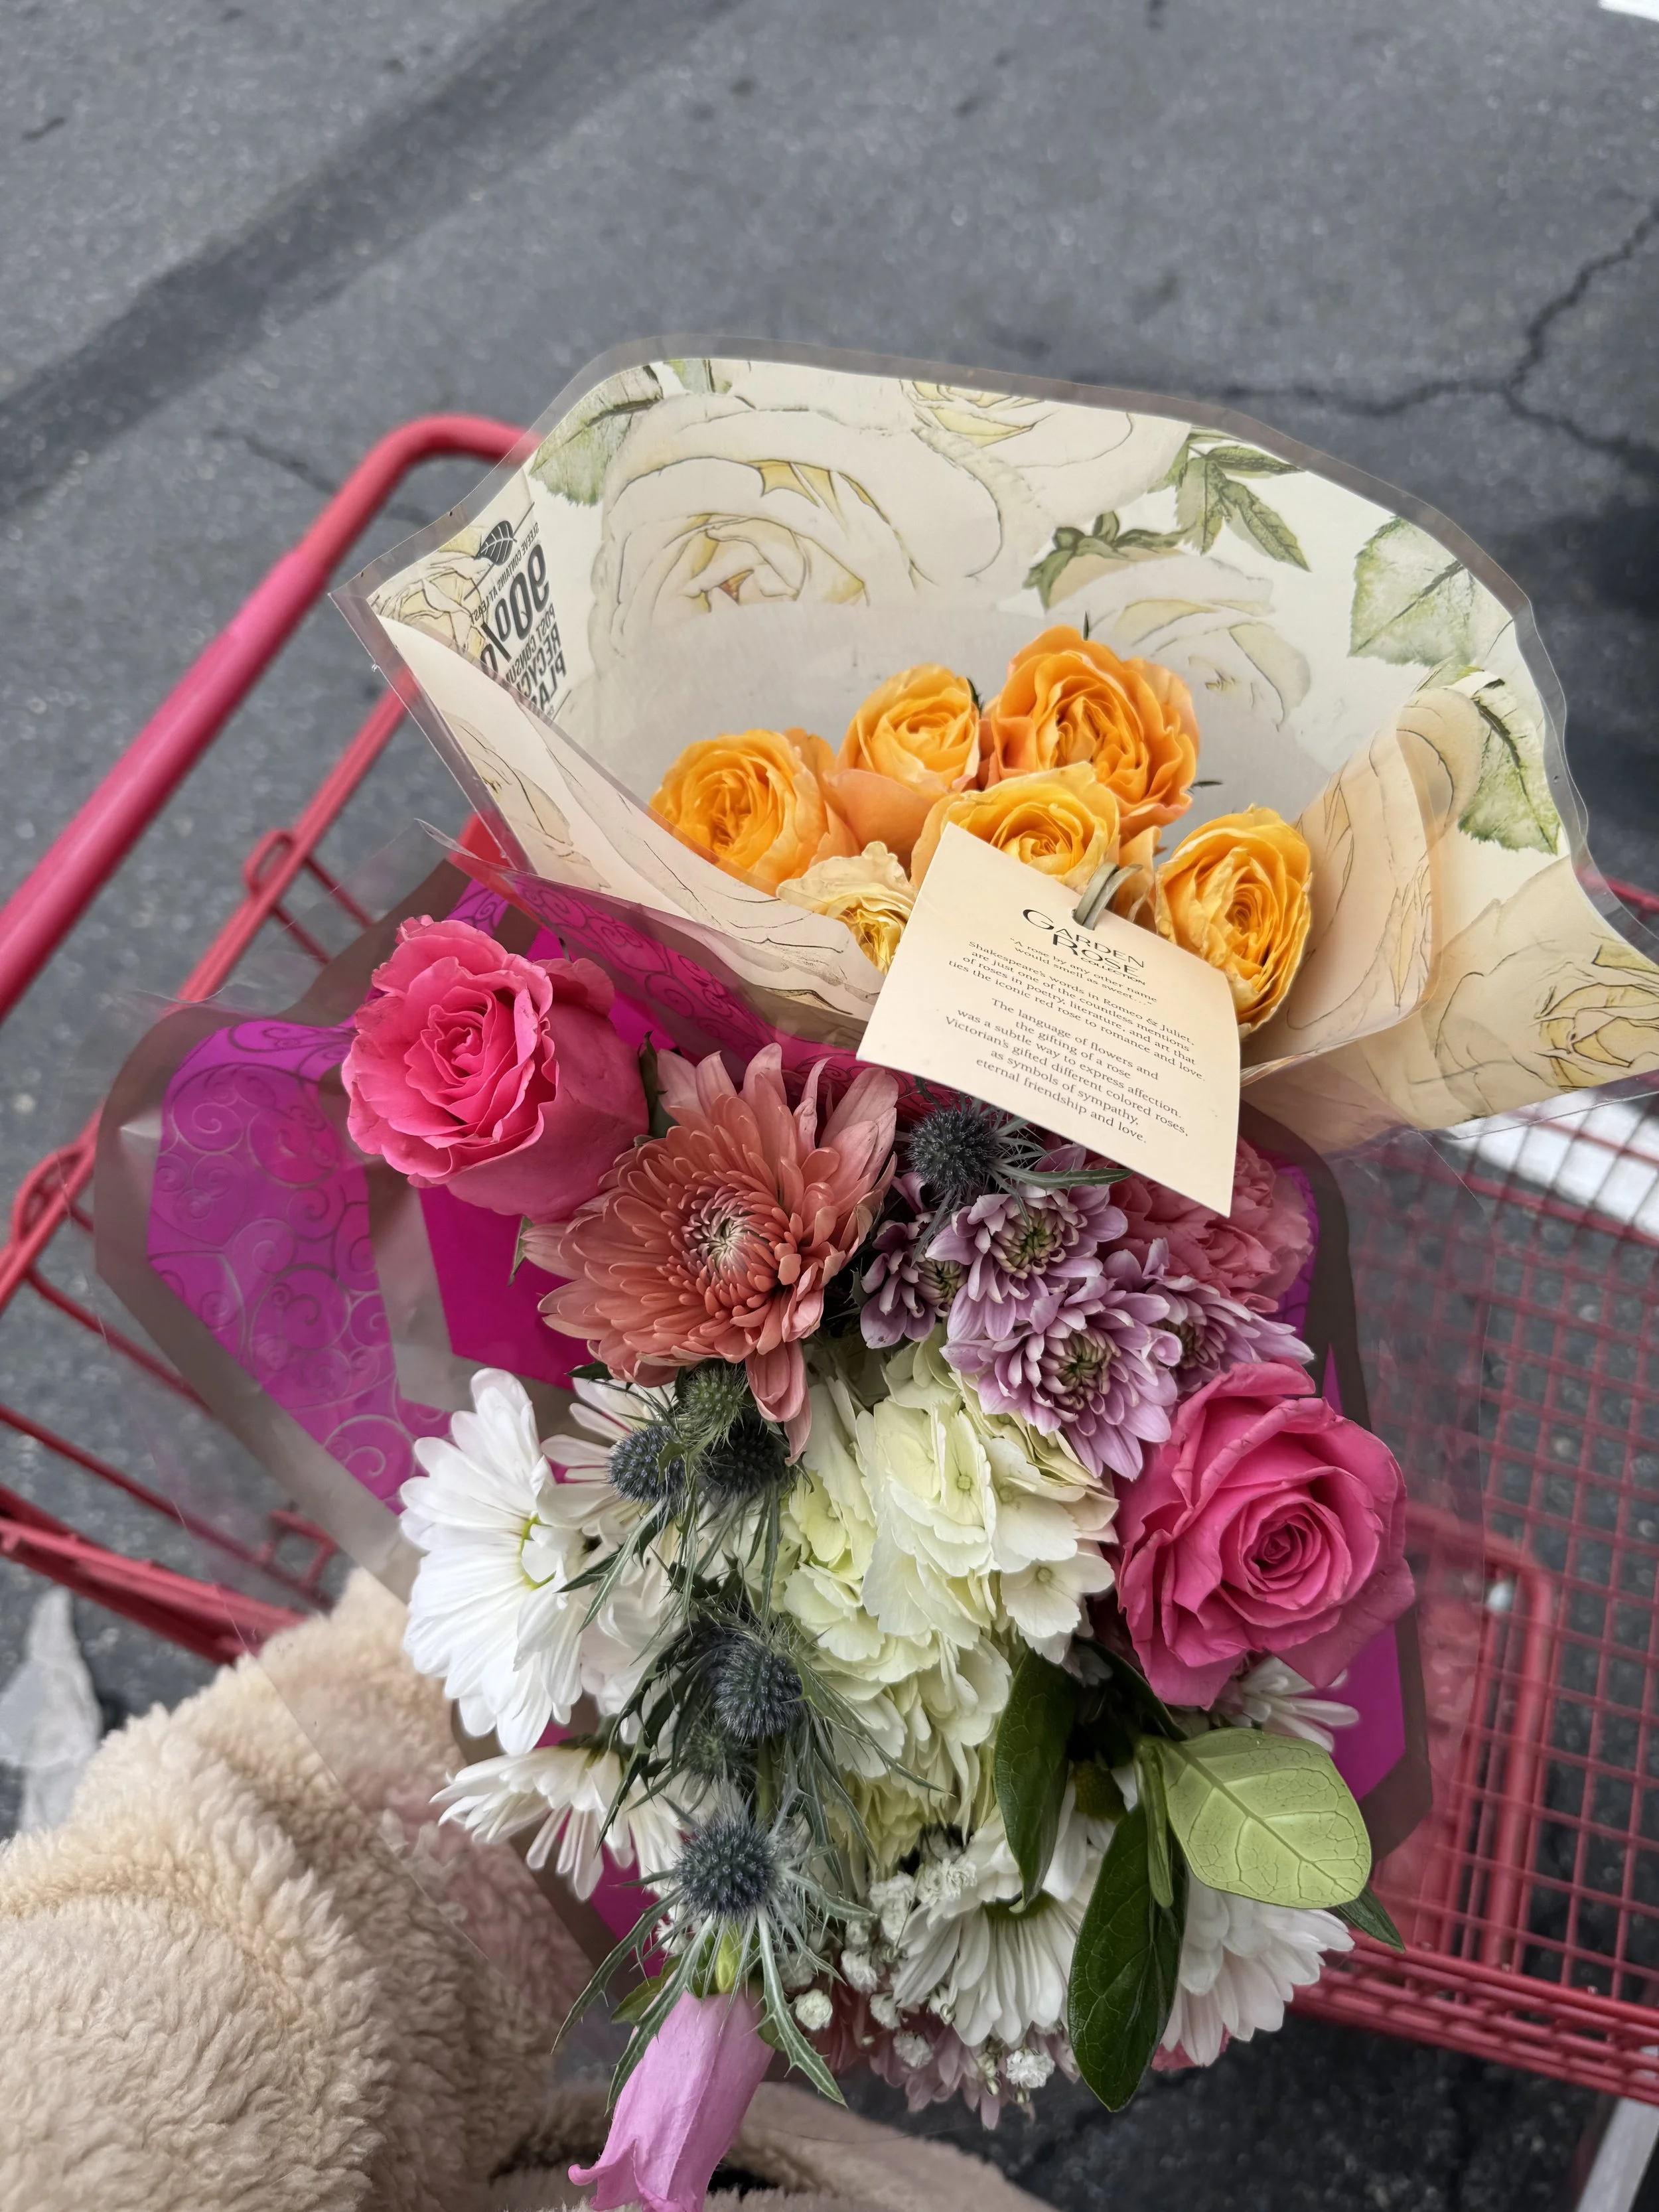
I’d escaped to Trader Joes that evening and inspiration hit me right as I walked in the doors. The flower section is the first thing you see. We love grabbing flowers from Trader Joes—they have fun options at reasonable prices. I picked two bouquets, one of those pre-made bouquets with lots of flowers as well as a bouquet of yellow roses—totalling somewhere between $15 - $20, to bring home for a last minute ask of Maureen.
My idea? How many times do we grab a grocery-store bouquet, but not quite know what to do with it other than trim the ends and stick them in a vase? Sure, they look pretty good as-is, but there must be a way to elevate these into a more artful arrangement. My vision was to have Maureen show me how a professional floral designer would transform a grocery store bouquet into a floral masterpiece at home.
Luckily, Maureen was more than up for it. The arrangement became a full family activity and I learned a lot. Below I’ll outline my observations of her process and the tips and tricks I picked up from this exercise. This could be timely heading into Easter weekend for some beautiful spring arrangements!
How to Transform a $15 Grocery Store Bouquet into a Floral Work of Art
Floral arrangement designed by: Maureen Christmas, AIFD, CFD, EMC, of Floral Notes
Observed, written and photographed by: Shannon Christmas of Noelle, L.L.C.
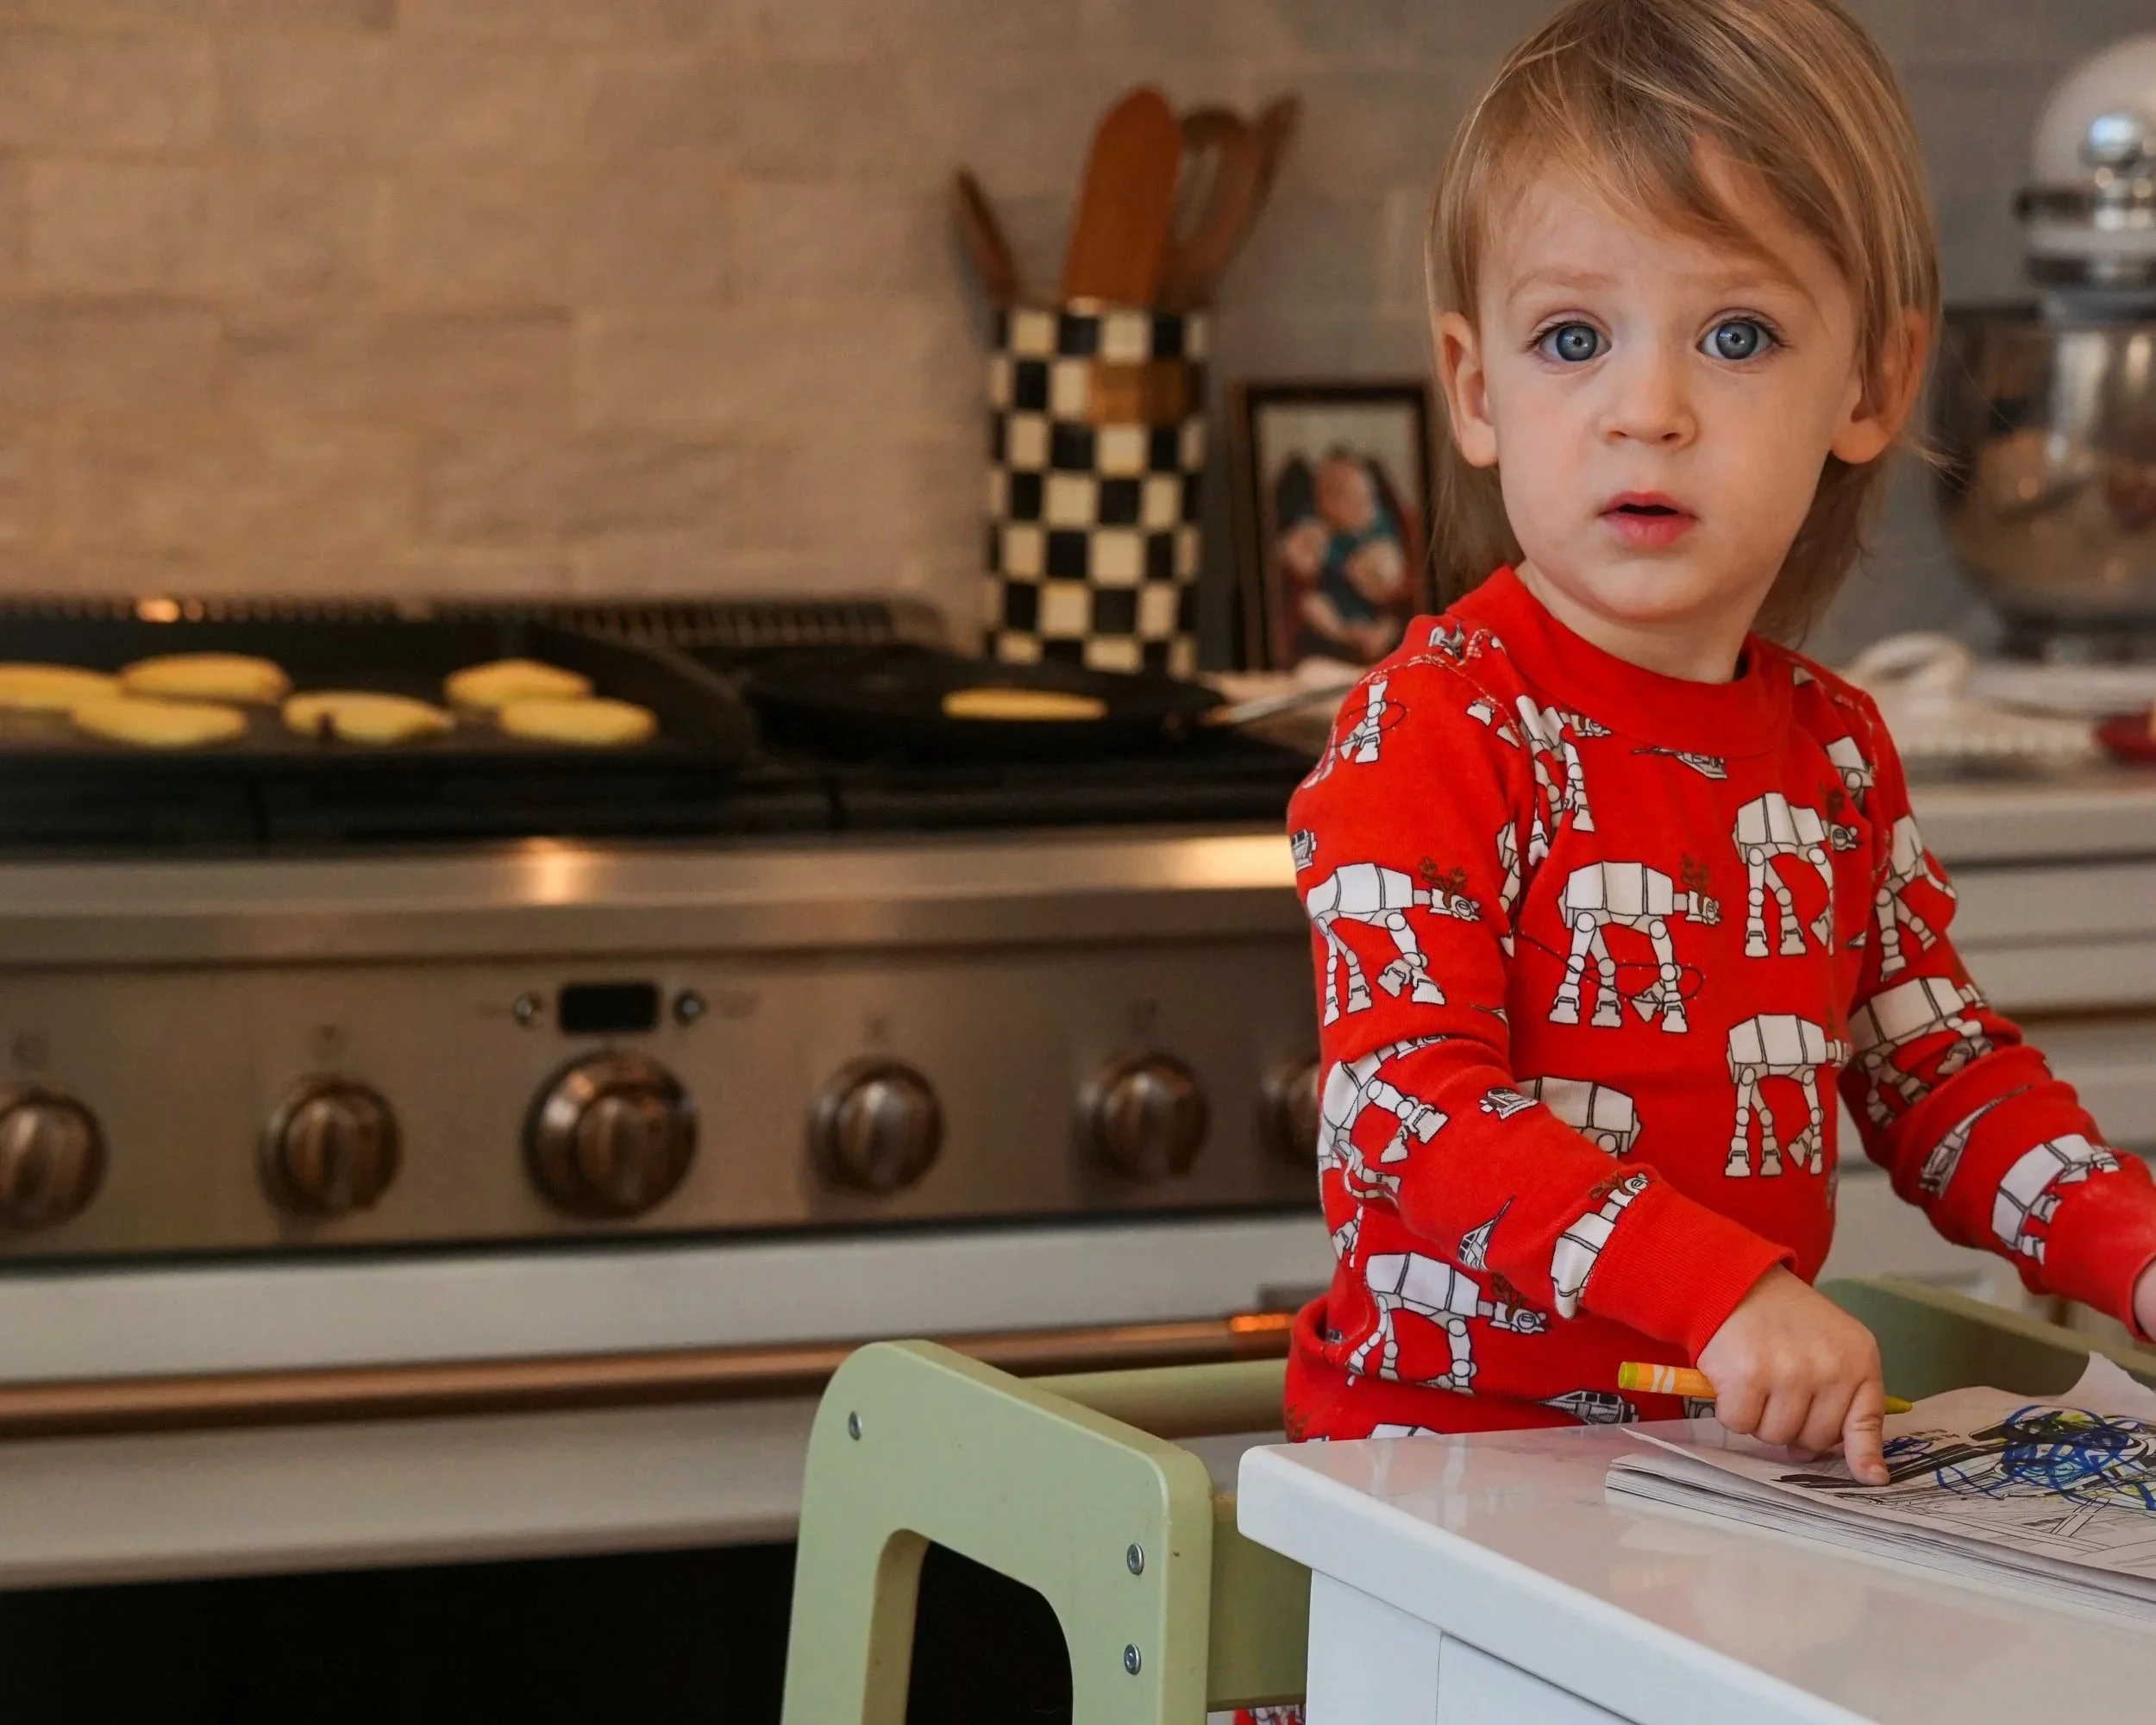
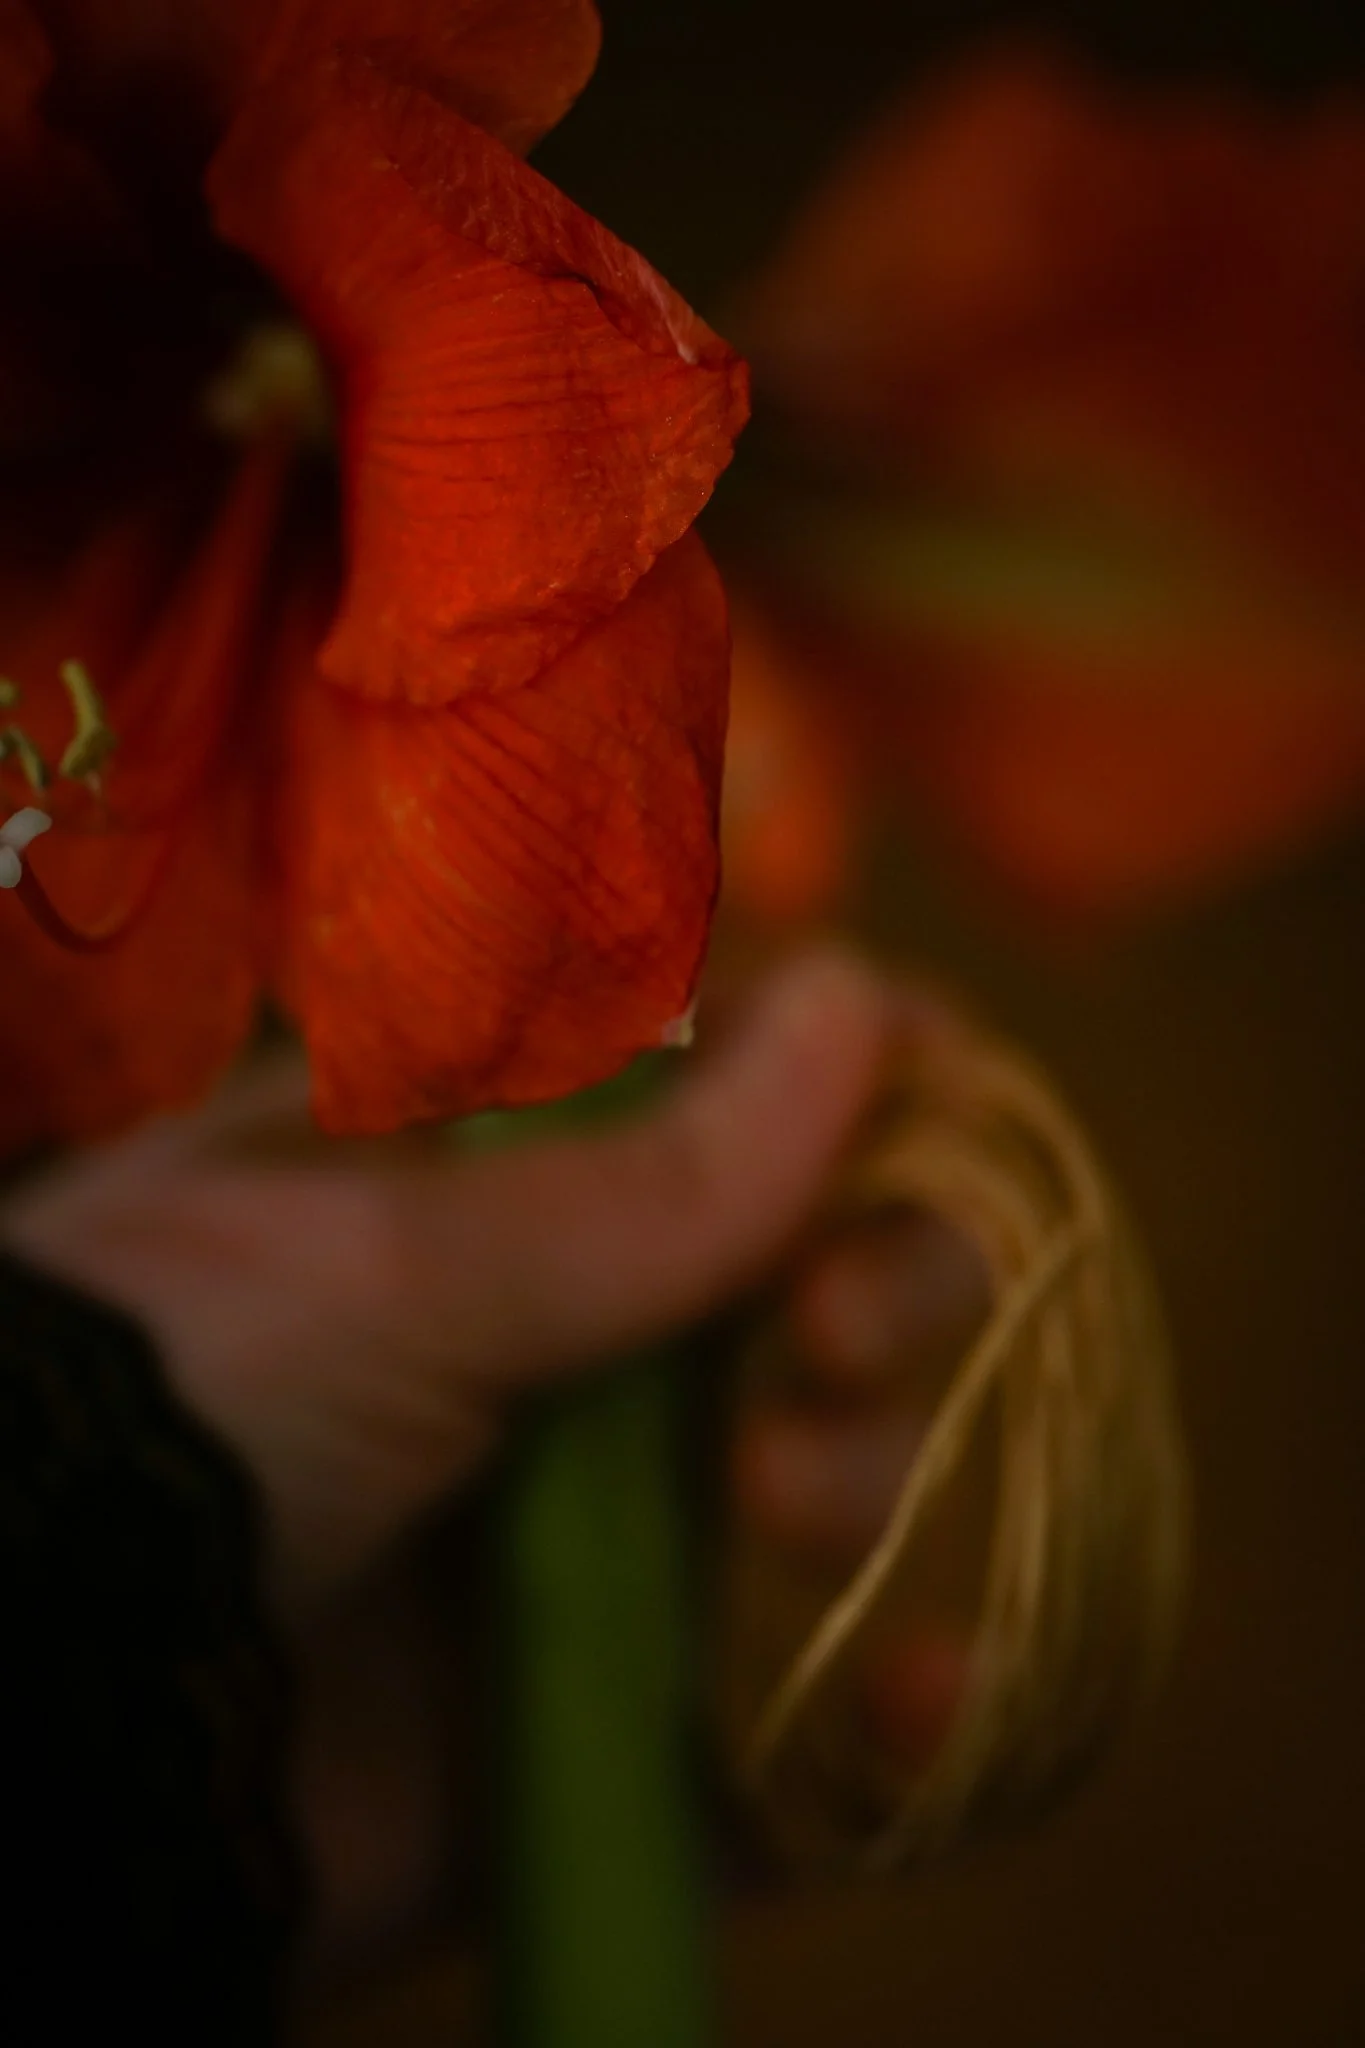
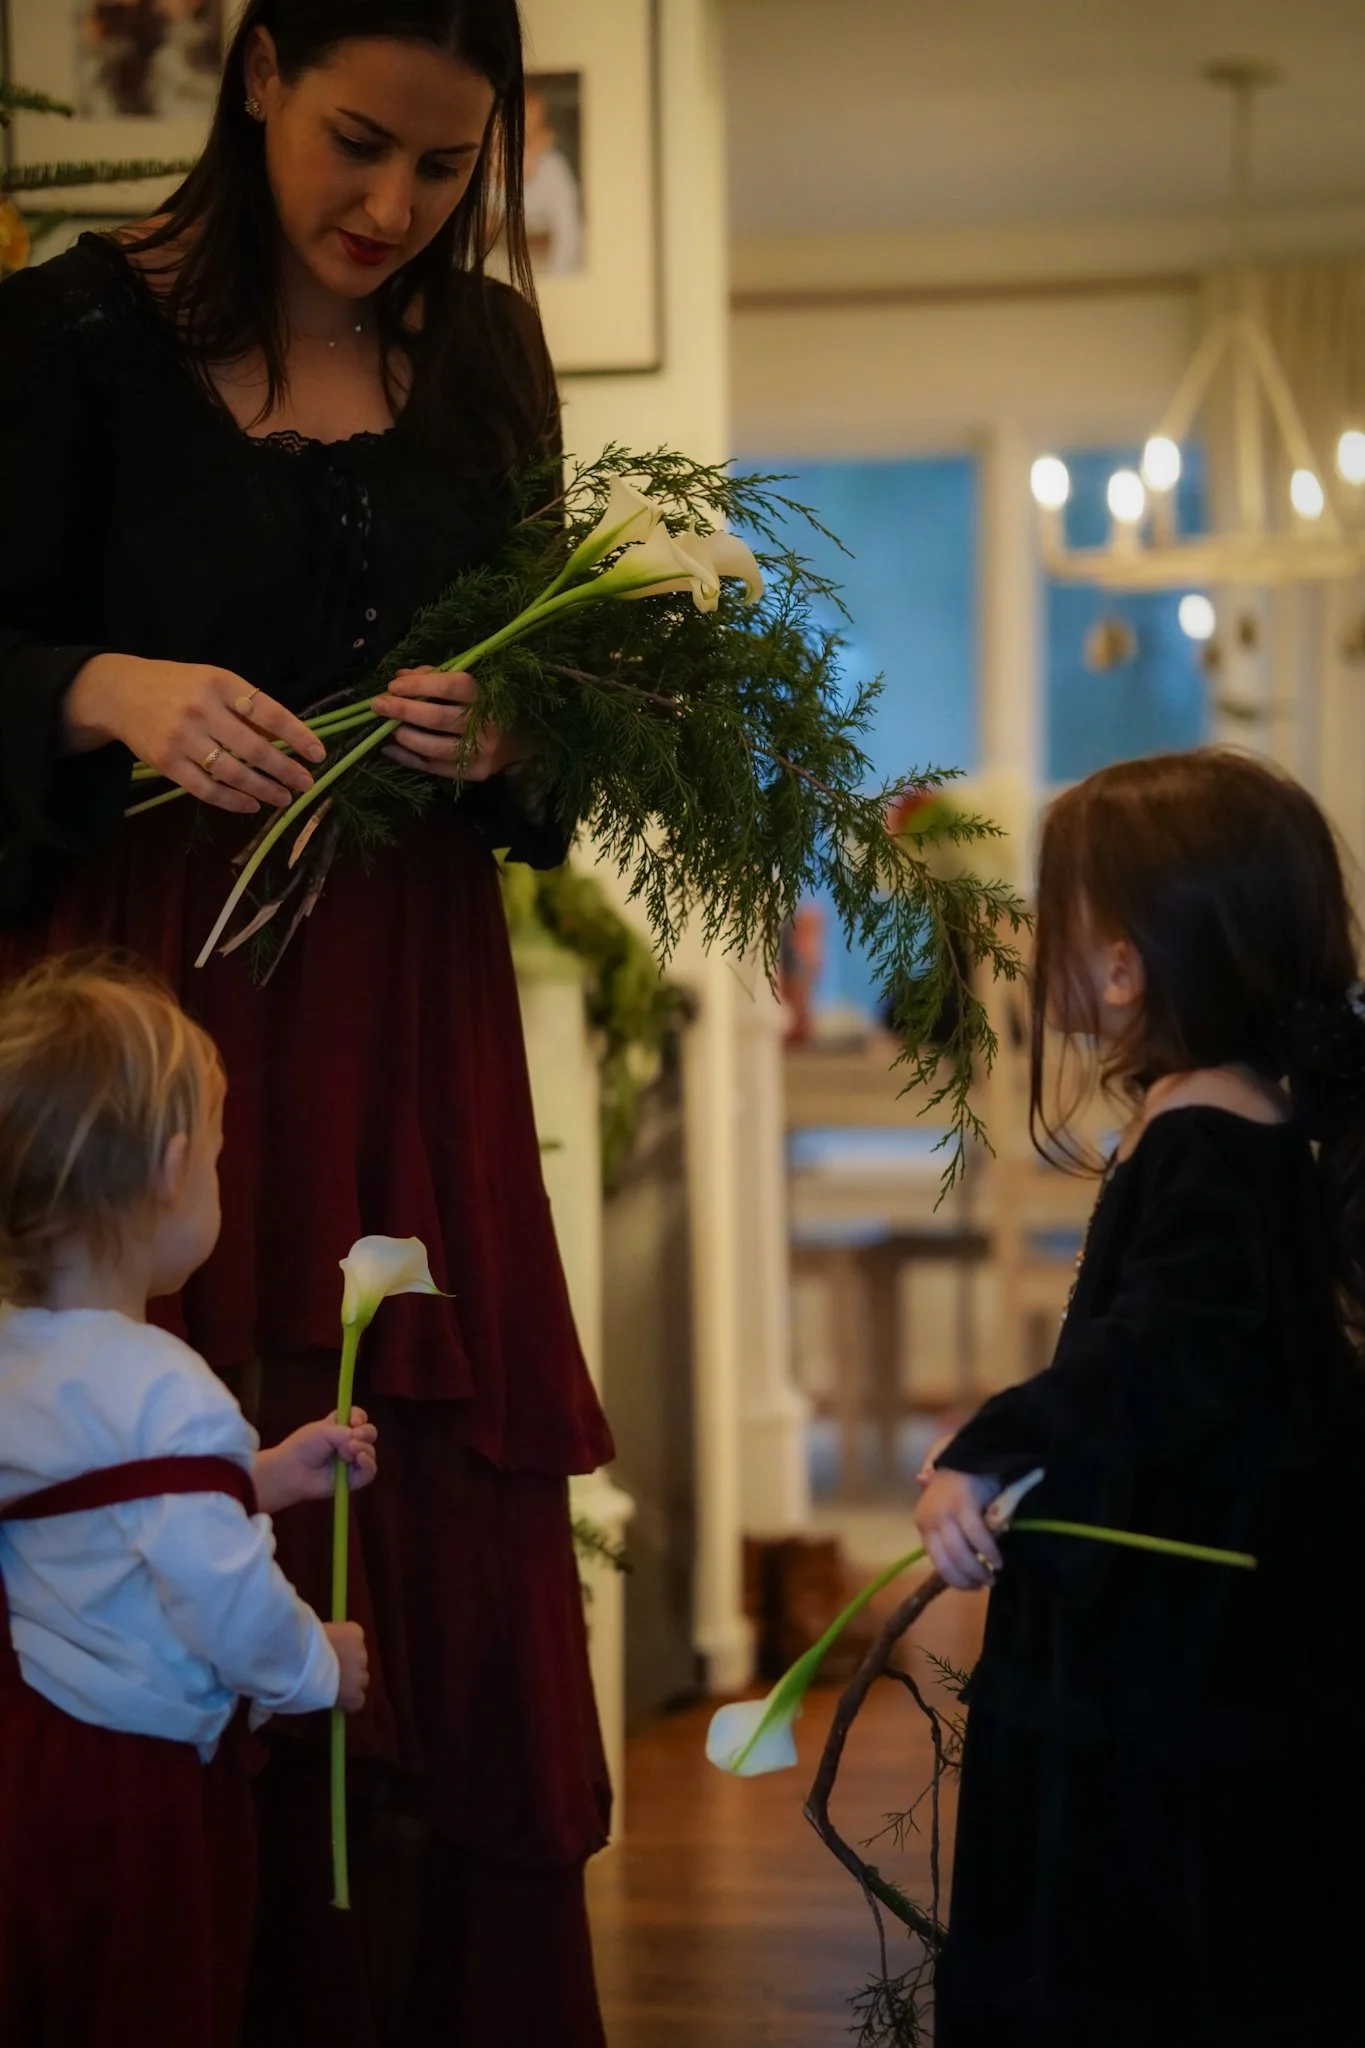
On a chilly mid-February day, I got home from Trader Joe’s and plopped a pre-built flower bouquet and a bouquet of yellow roses on the counter in front of my mother-in-law. “Maureen… could you transform this into something beautiful?” I asked. All she would have access to was our limited supply of floral tools, our backyard, and these bouquets (which in total I think were somewhere between $15 - $20). Maureen was more than up to it.
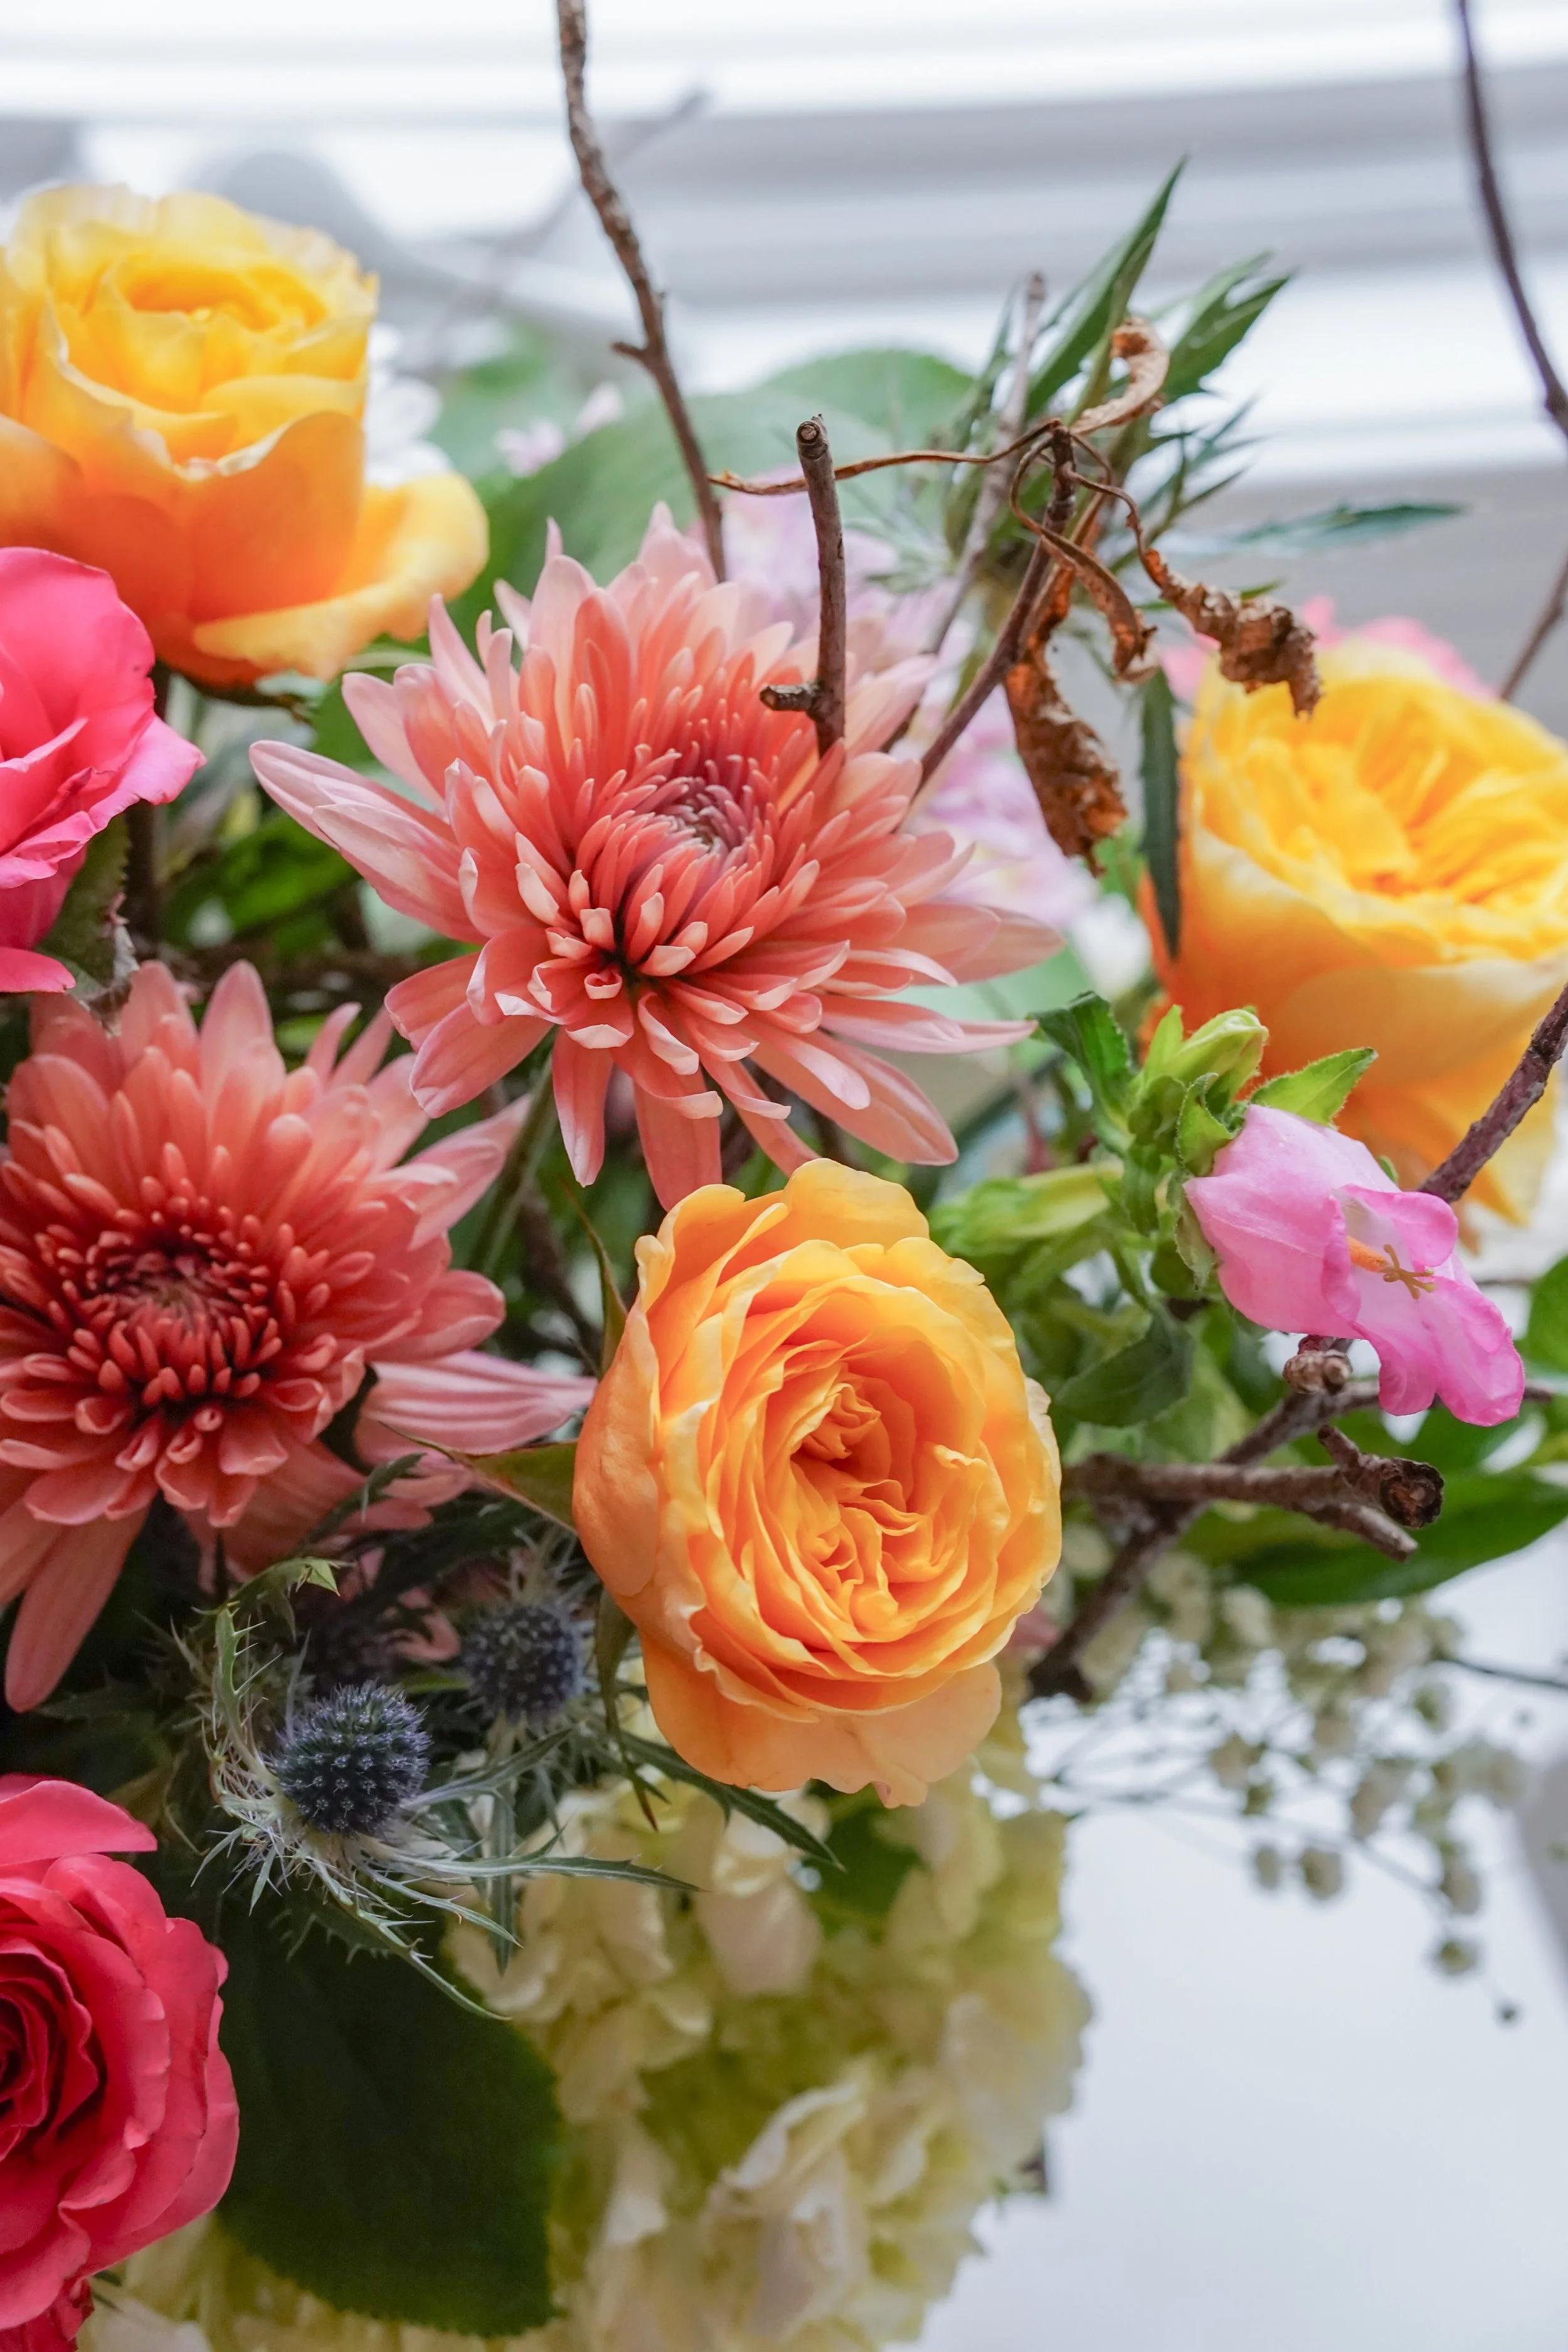
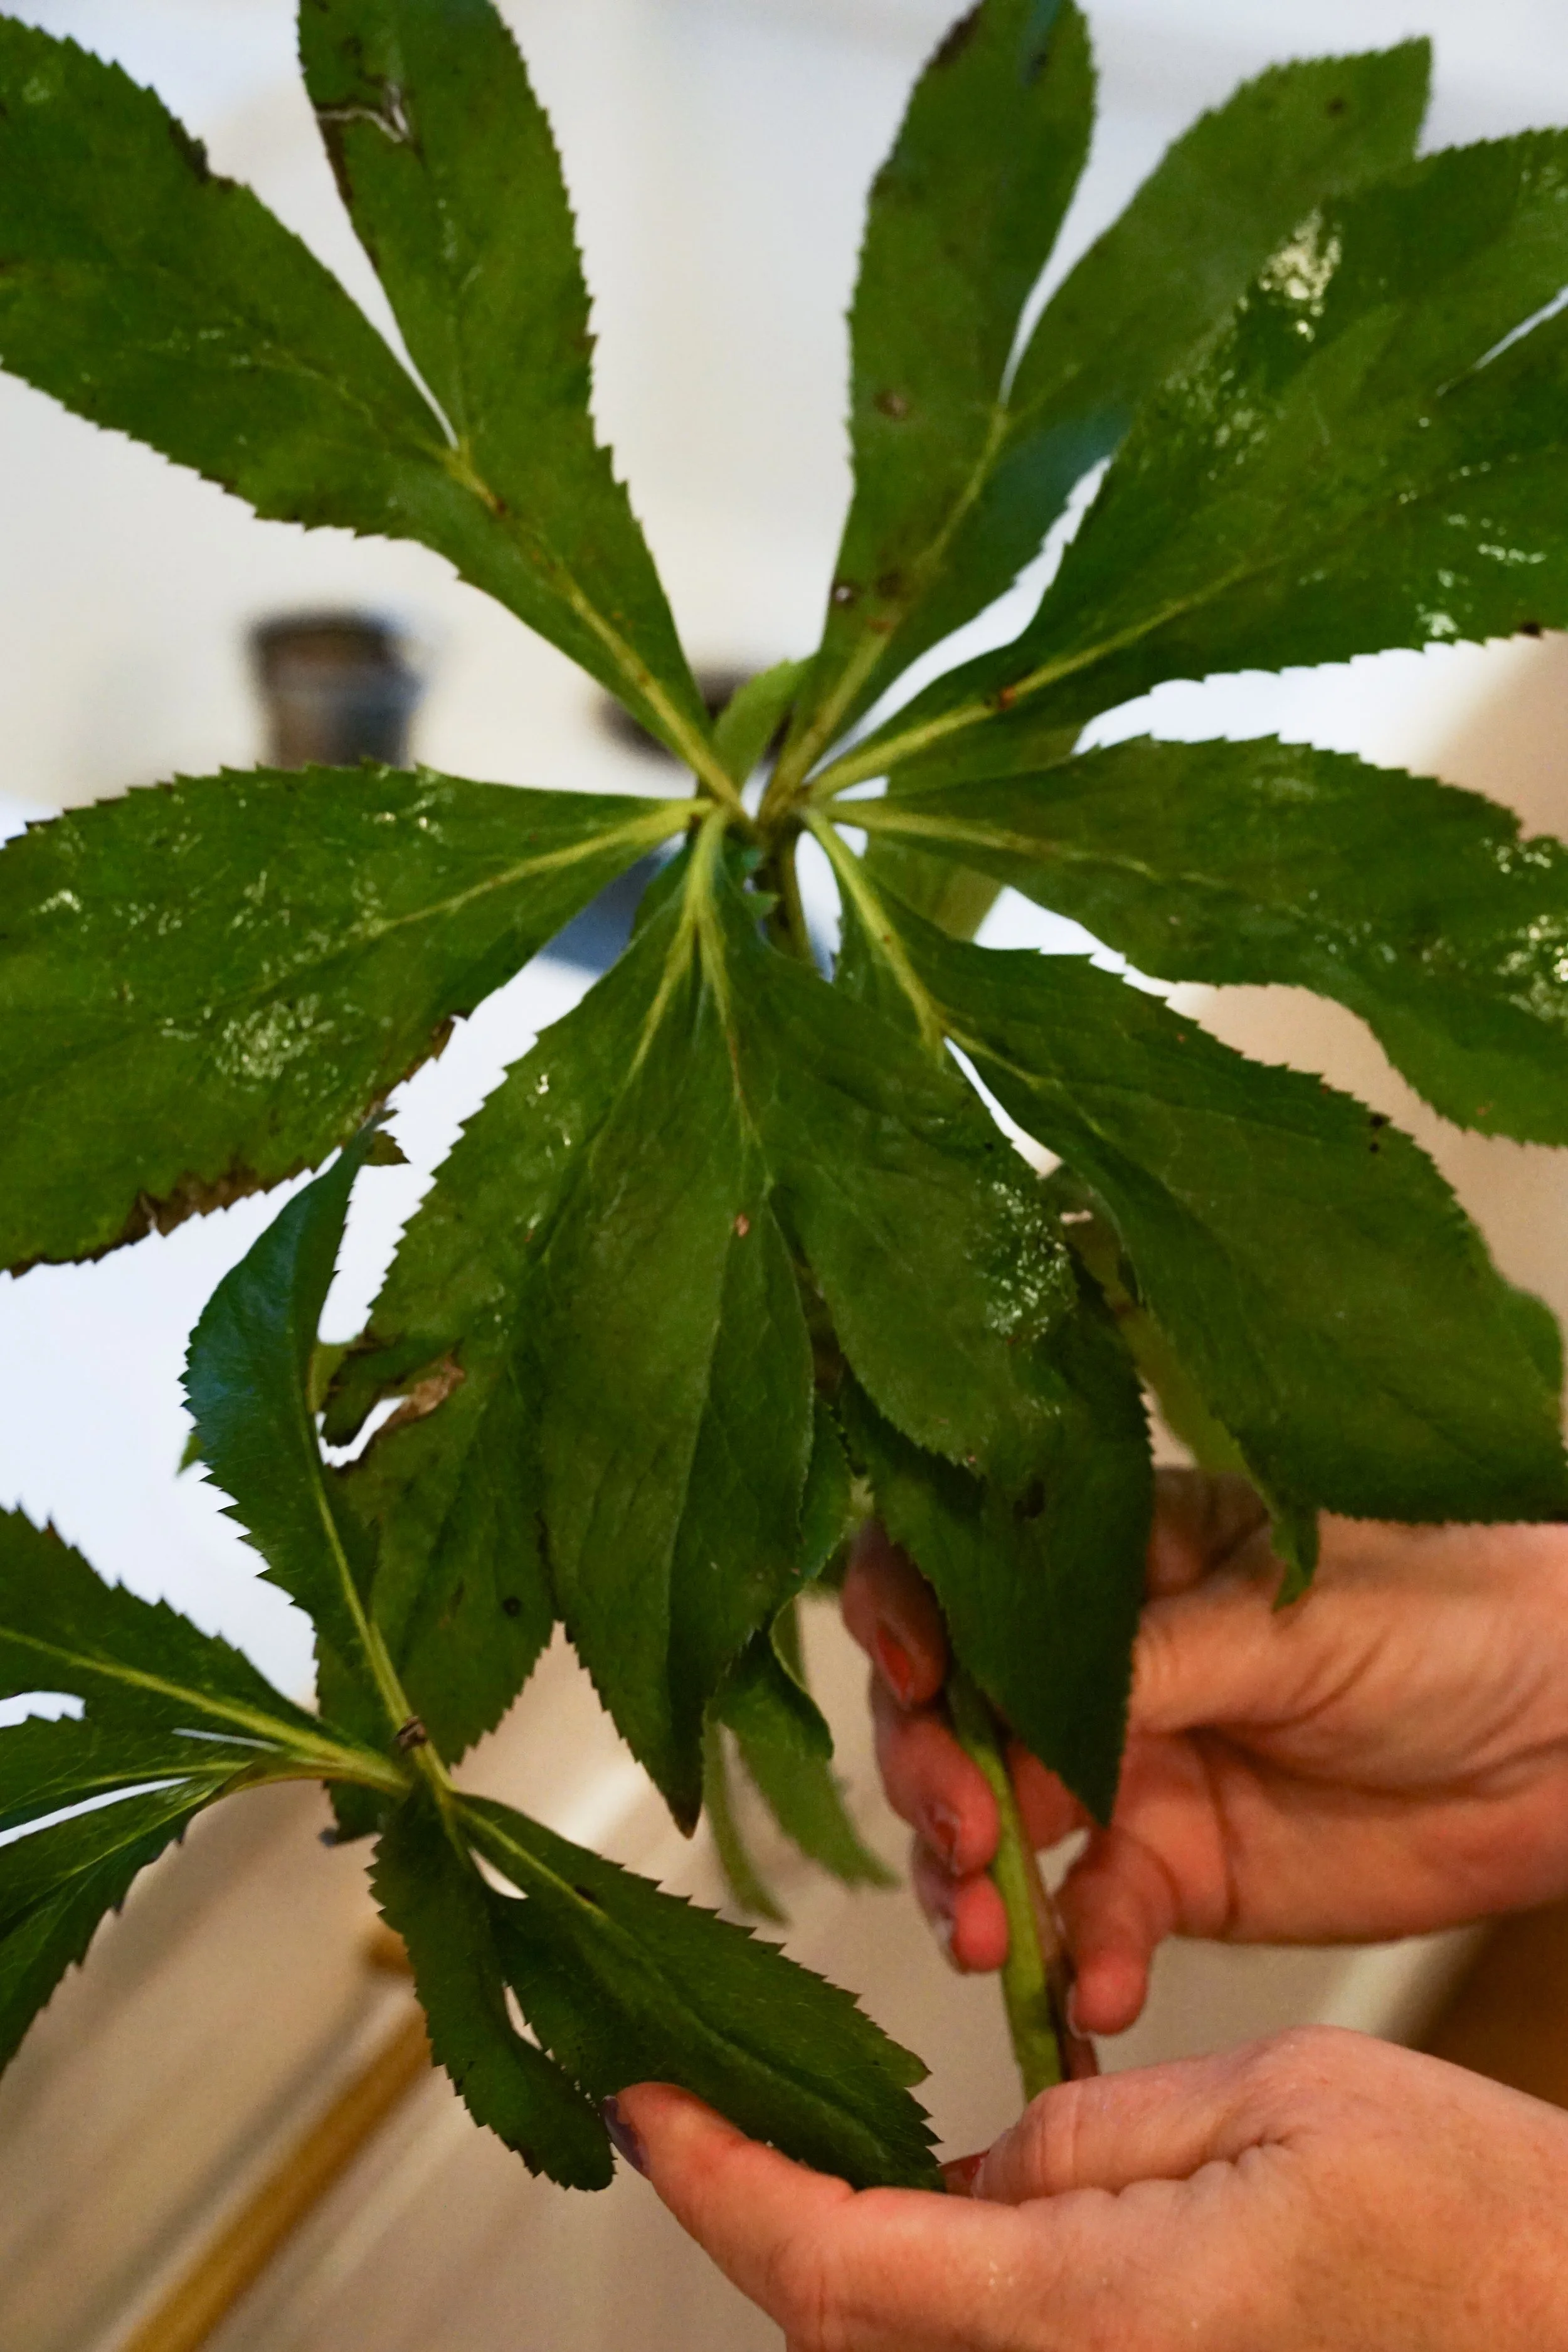
The first thing she did, before getting the bouquets into water right away, was get her shoes on and march outside. The kids and I watched as she strolled around the backyard, examining greens and picking things up off of the ground. She came back inside with a collection of sticks in various shapes and lengths, and hellebore greens—most showing the signs of the seasons, with a mixture of green and browning parts.
Major Observation # 1: Embrace the Seasons
When we bring flowers inside, we are reflecting the outdoors. Maureen’s first point was that it’s okay if not every piece going into an arrangement is perfect, in fact, imperfection adds to the arrangement. You’re reflecting what you’re seeing outside, bringing true nature inside. I absolutely love this tip. This simple shift in perspective can shape the way you see the greenery and nature in your own backyard, and how you can incorporate it into arrangements. Plus, the obvious life lessons in finding beauty and meaning in imperfection.
The next thing Maureen did was search our hall cabinet for a suitable vase. We happened to have one that is filled with slots, allowing for easier arranging. You can use any vessel, though, and use other tools to add structure.
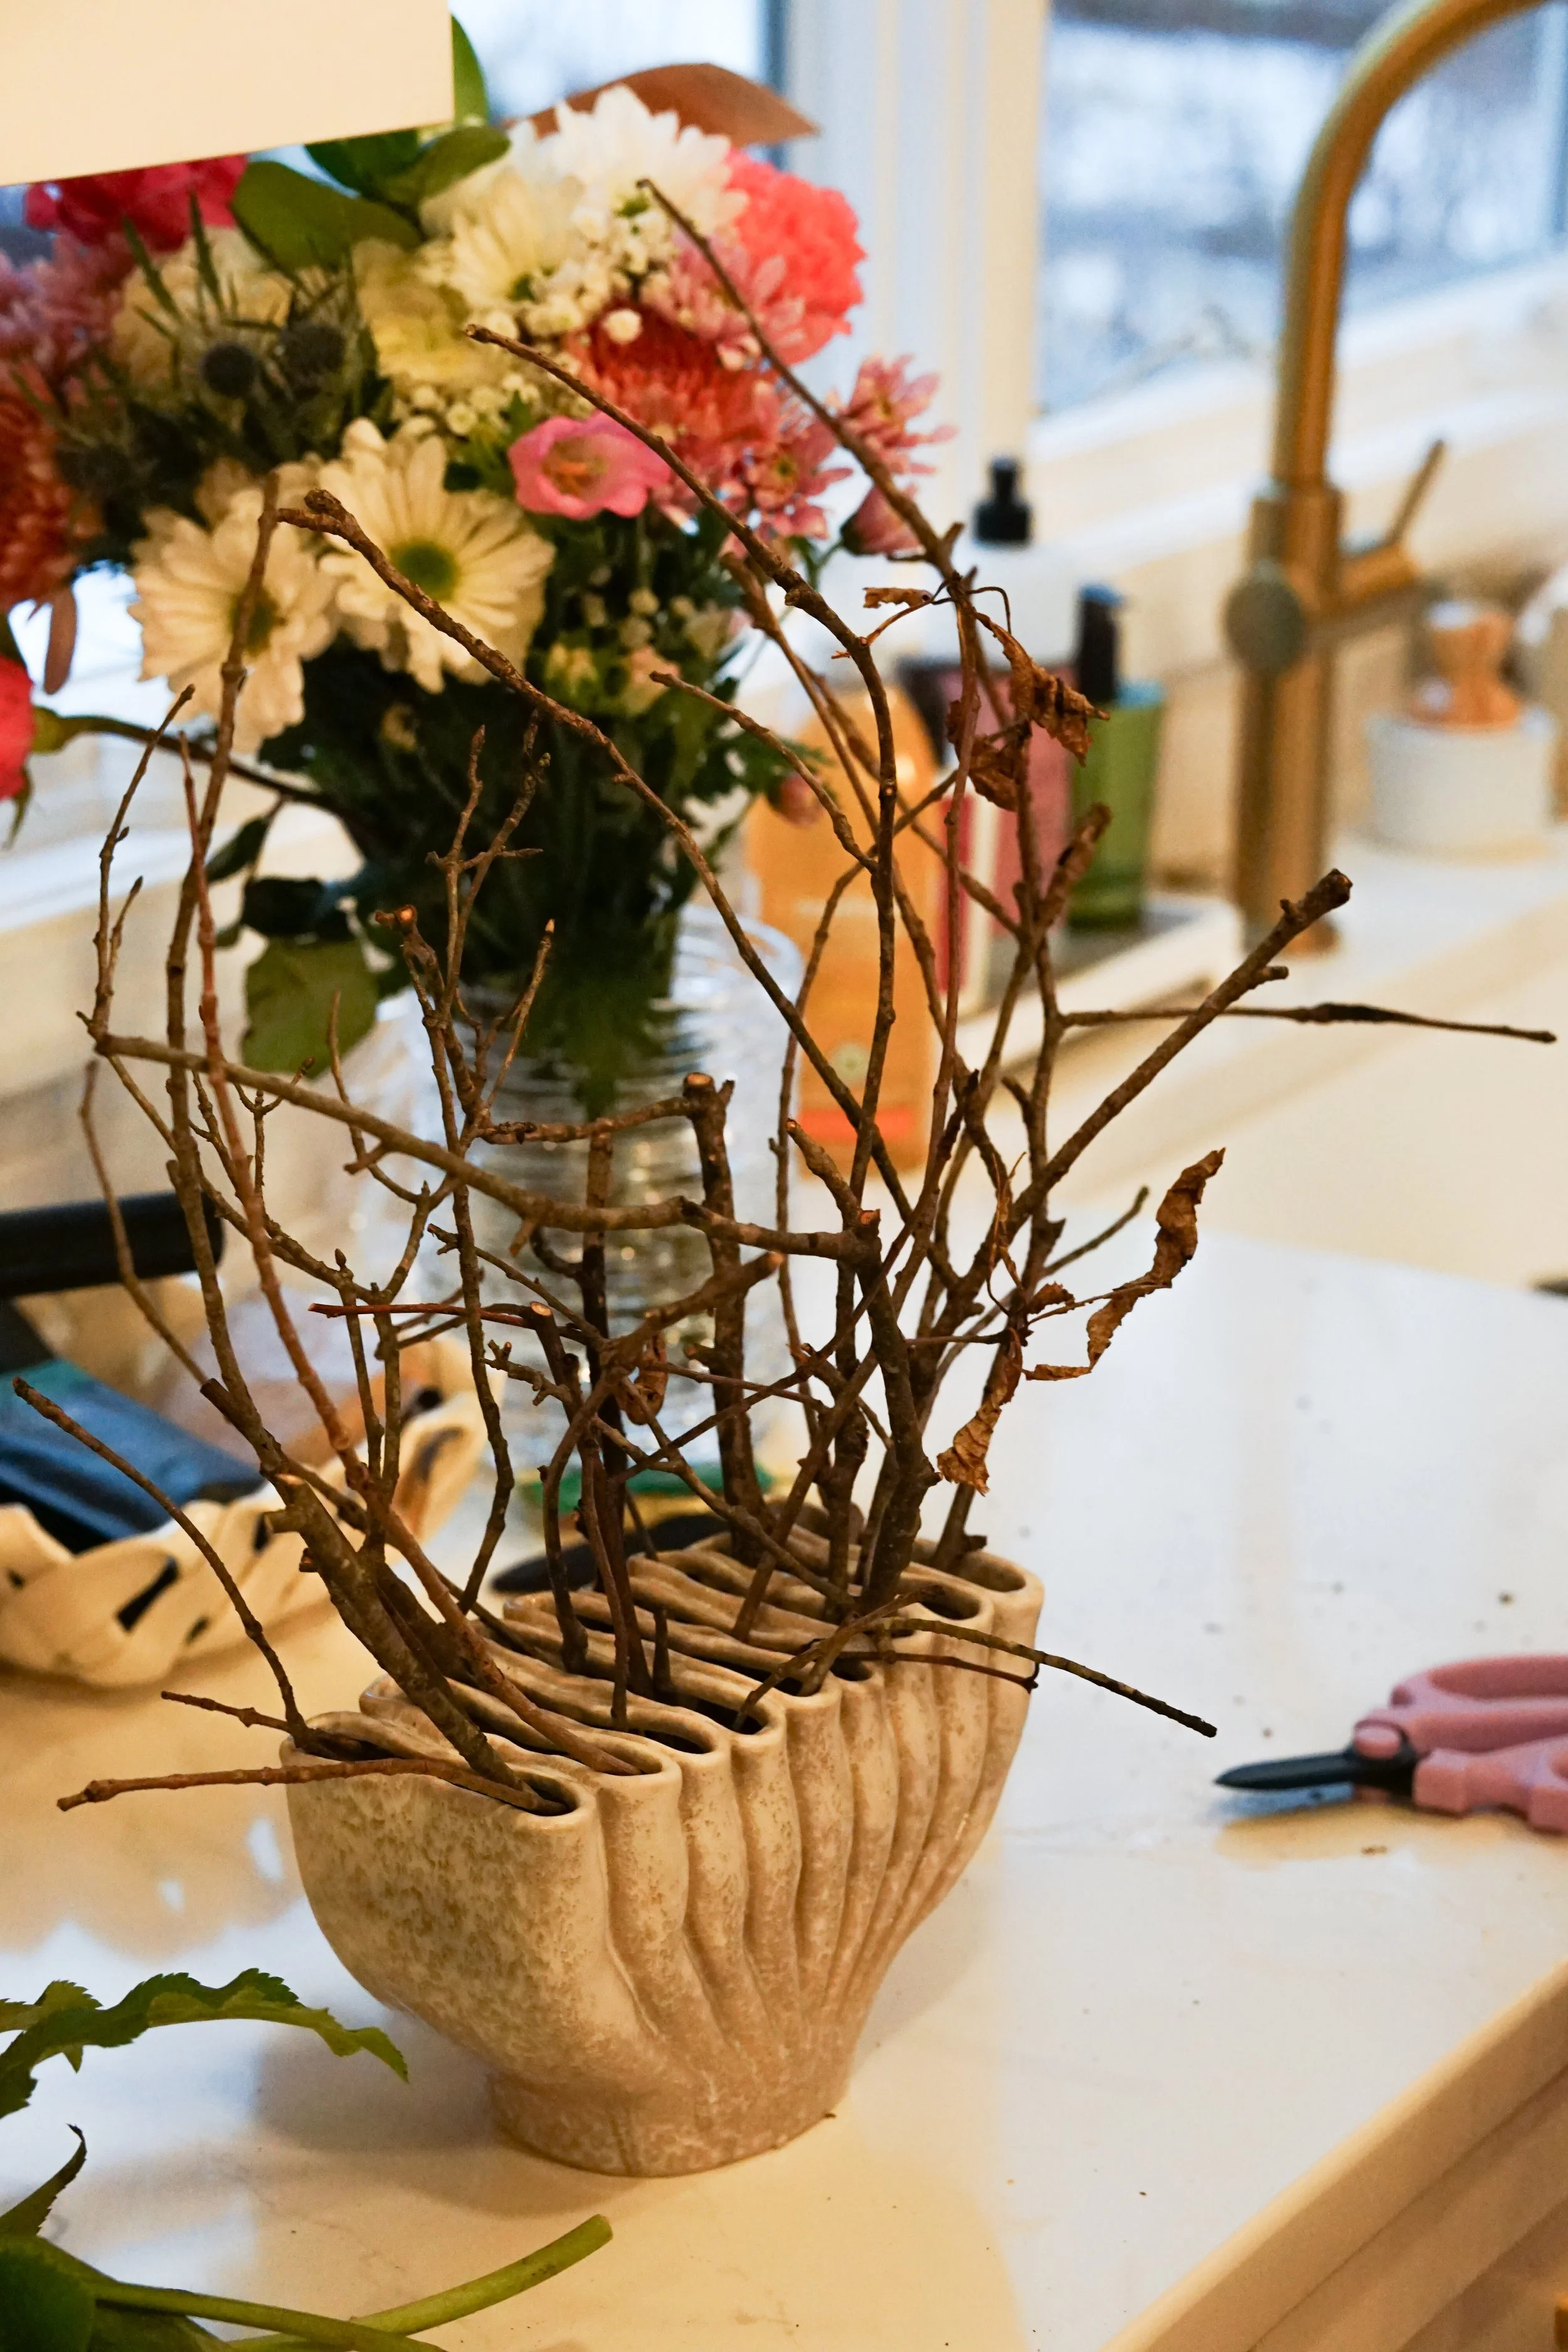
Major Observation # 2: Create a Structure
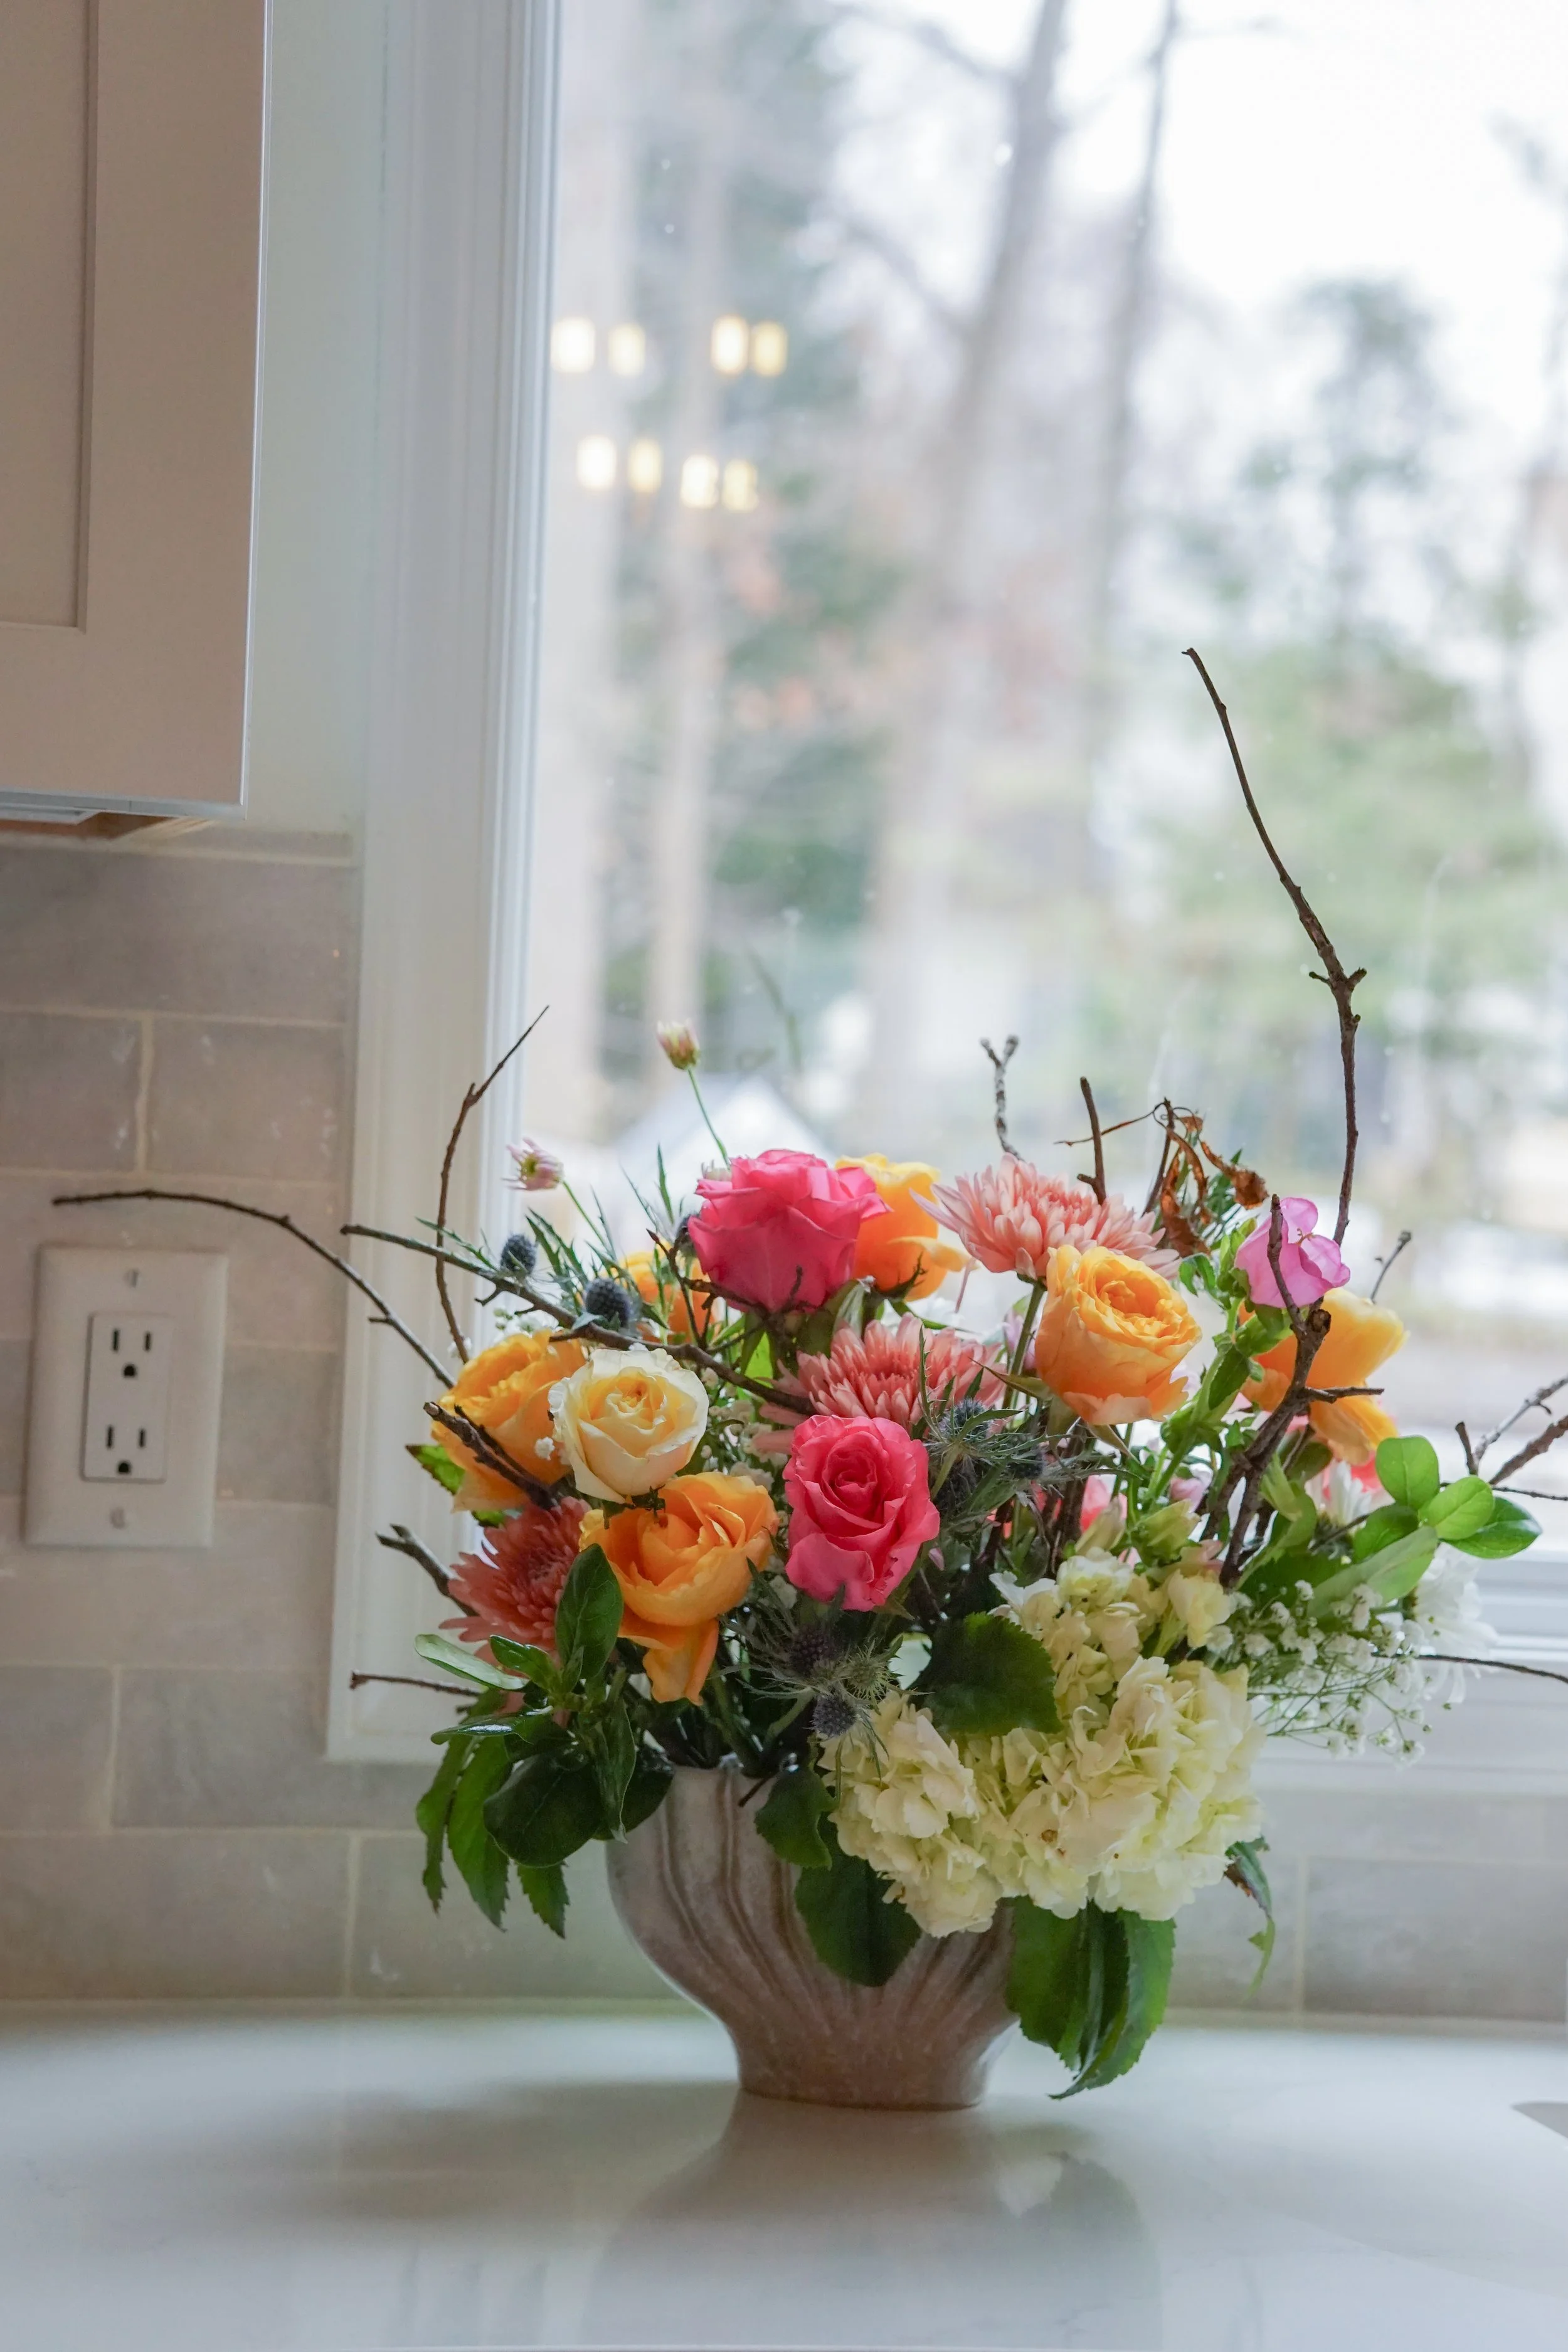
Creating a structural base for your arrangement is key. You’re giving your flowers and greens a place to rest, a mechanism for you to more easily execute a beautiful design. With this arrangement, Maureen achieved her structure in two ways: 1 - the built-in slots in the vase, and 2: the sticks she brought in from outside. While I half chased my kids around and half observed, she placed the sticks throughout the vase, intertwining them to create an interesting shape with plenty of resting space for flowers to-come.
Other tools you can use to add structure:
Flower Frogs: these tools come in many shapes and sizes and sit at the bottom of a vase. They have protruding spikes that pierce the bottom of stems, allowing them to stand up in your vase. The tool is a little scary when you have tiny children—we keep ours in a very high-up cabinet—but it’s super useful when we pull it out.
Wire cages (we have a plastic one too): another item to put into your vase, allowing you to place flowers a little more intentionally without leaning.
You might have seen or heard of floral foam. Maureen is great about eco-friendly options so this isn’t the top of the list—it’s single-use and non-biodegradable (it breaks down into microplastics, ick)—but certainly works if you have nothing else.
After creating her structural base, the fun begins! Both of my toddlers climbed into their towers to help Maureen with flower placement. This was so much fun to watch. Maureen talked me through what she was doing and a lot of technical concepts and practices came my way. Here’s what I took away:
Flower Arranging Observations
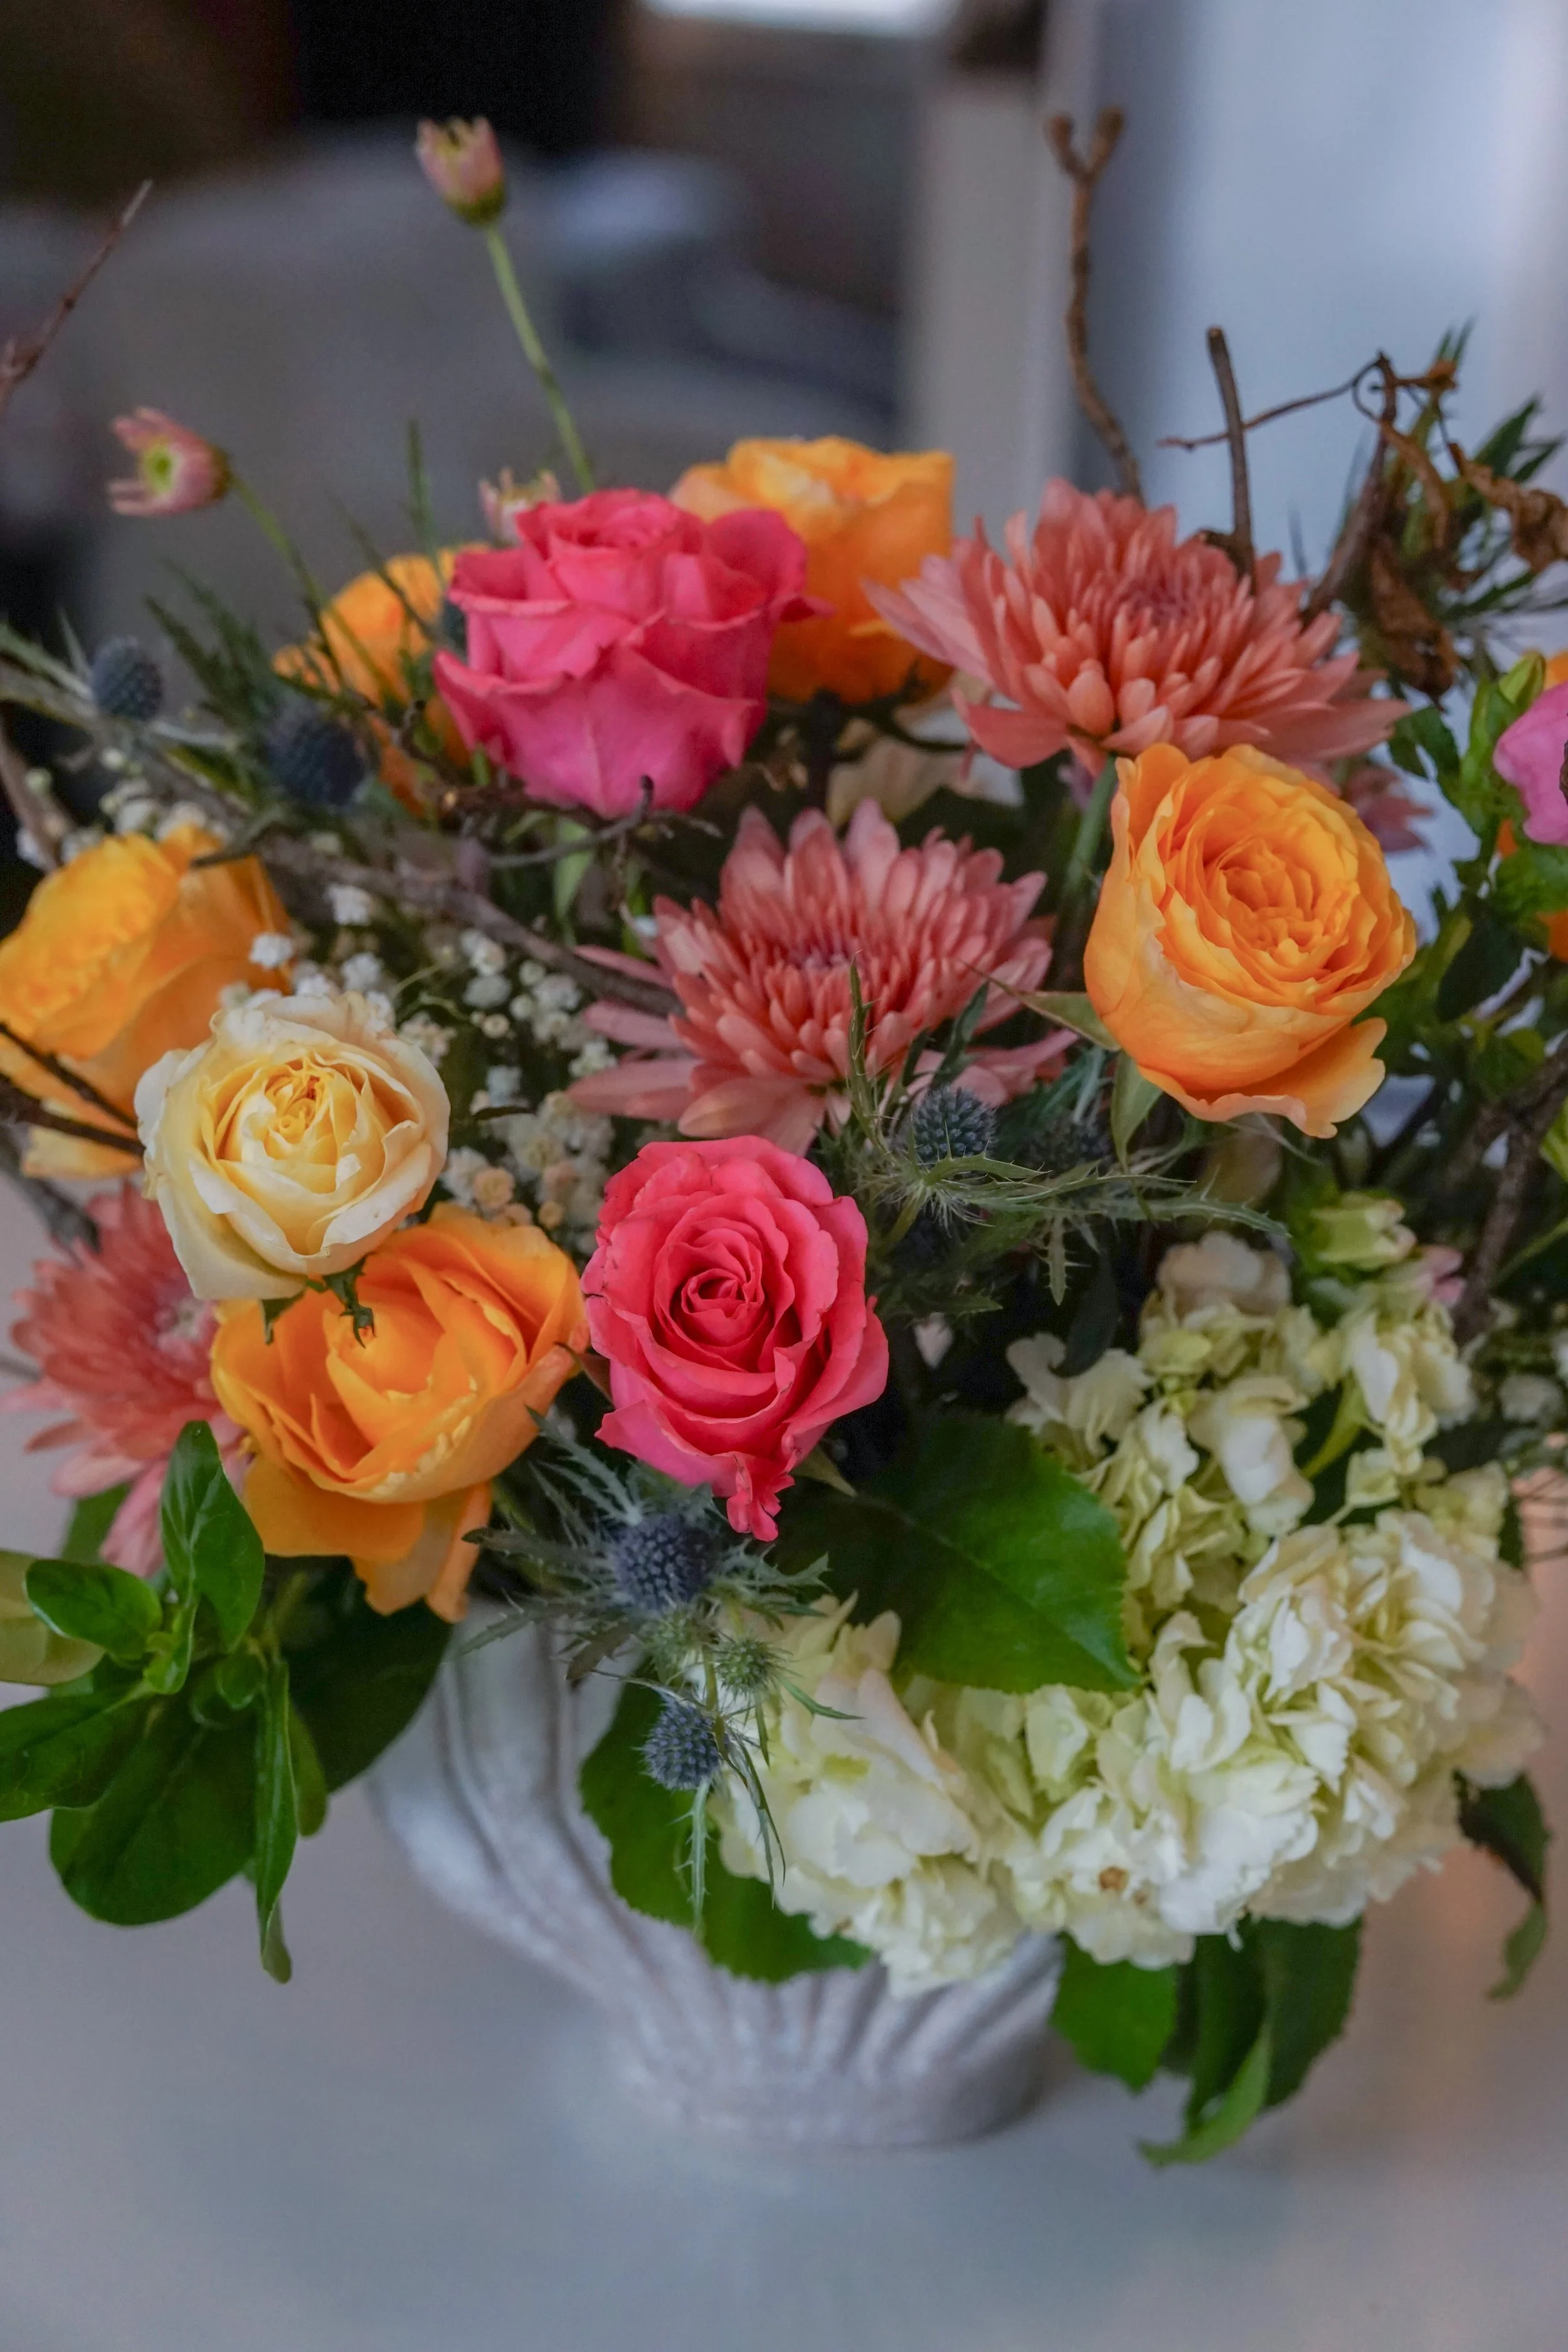
Think about your colors! Maureen was very glad I had bought the yellow roses. Without these, the arrangement might have been a little bland. I remember hearing a tip from florist Sarah Raven last year to use when picking colors: “you want a bride, bridesmaids, and wedding crasher.” This basically means, you want to have some similar colors that complement each other, but also something that contrasts and brings everything to life. The yellow roses did this for us.
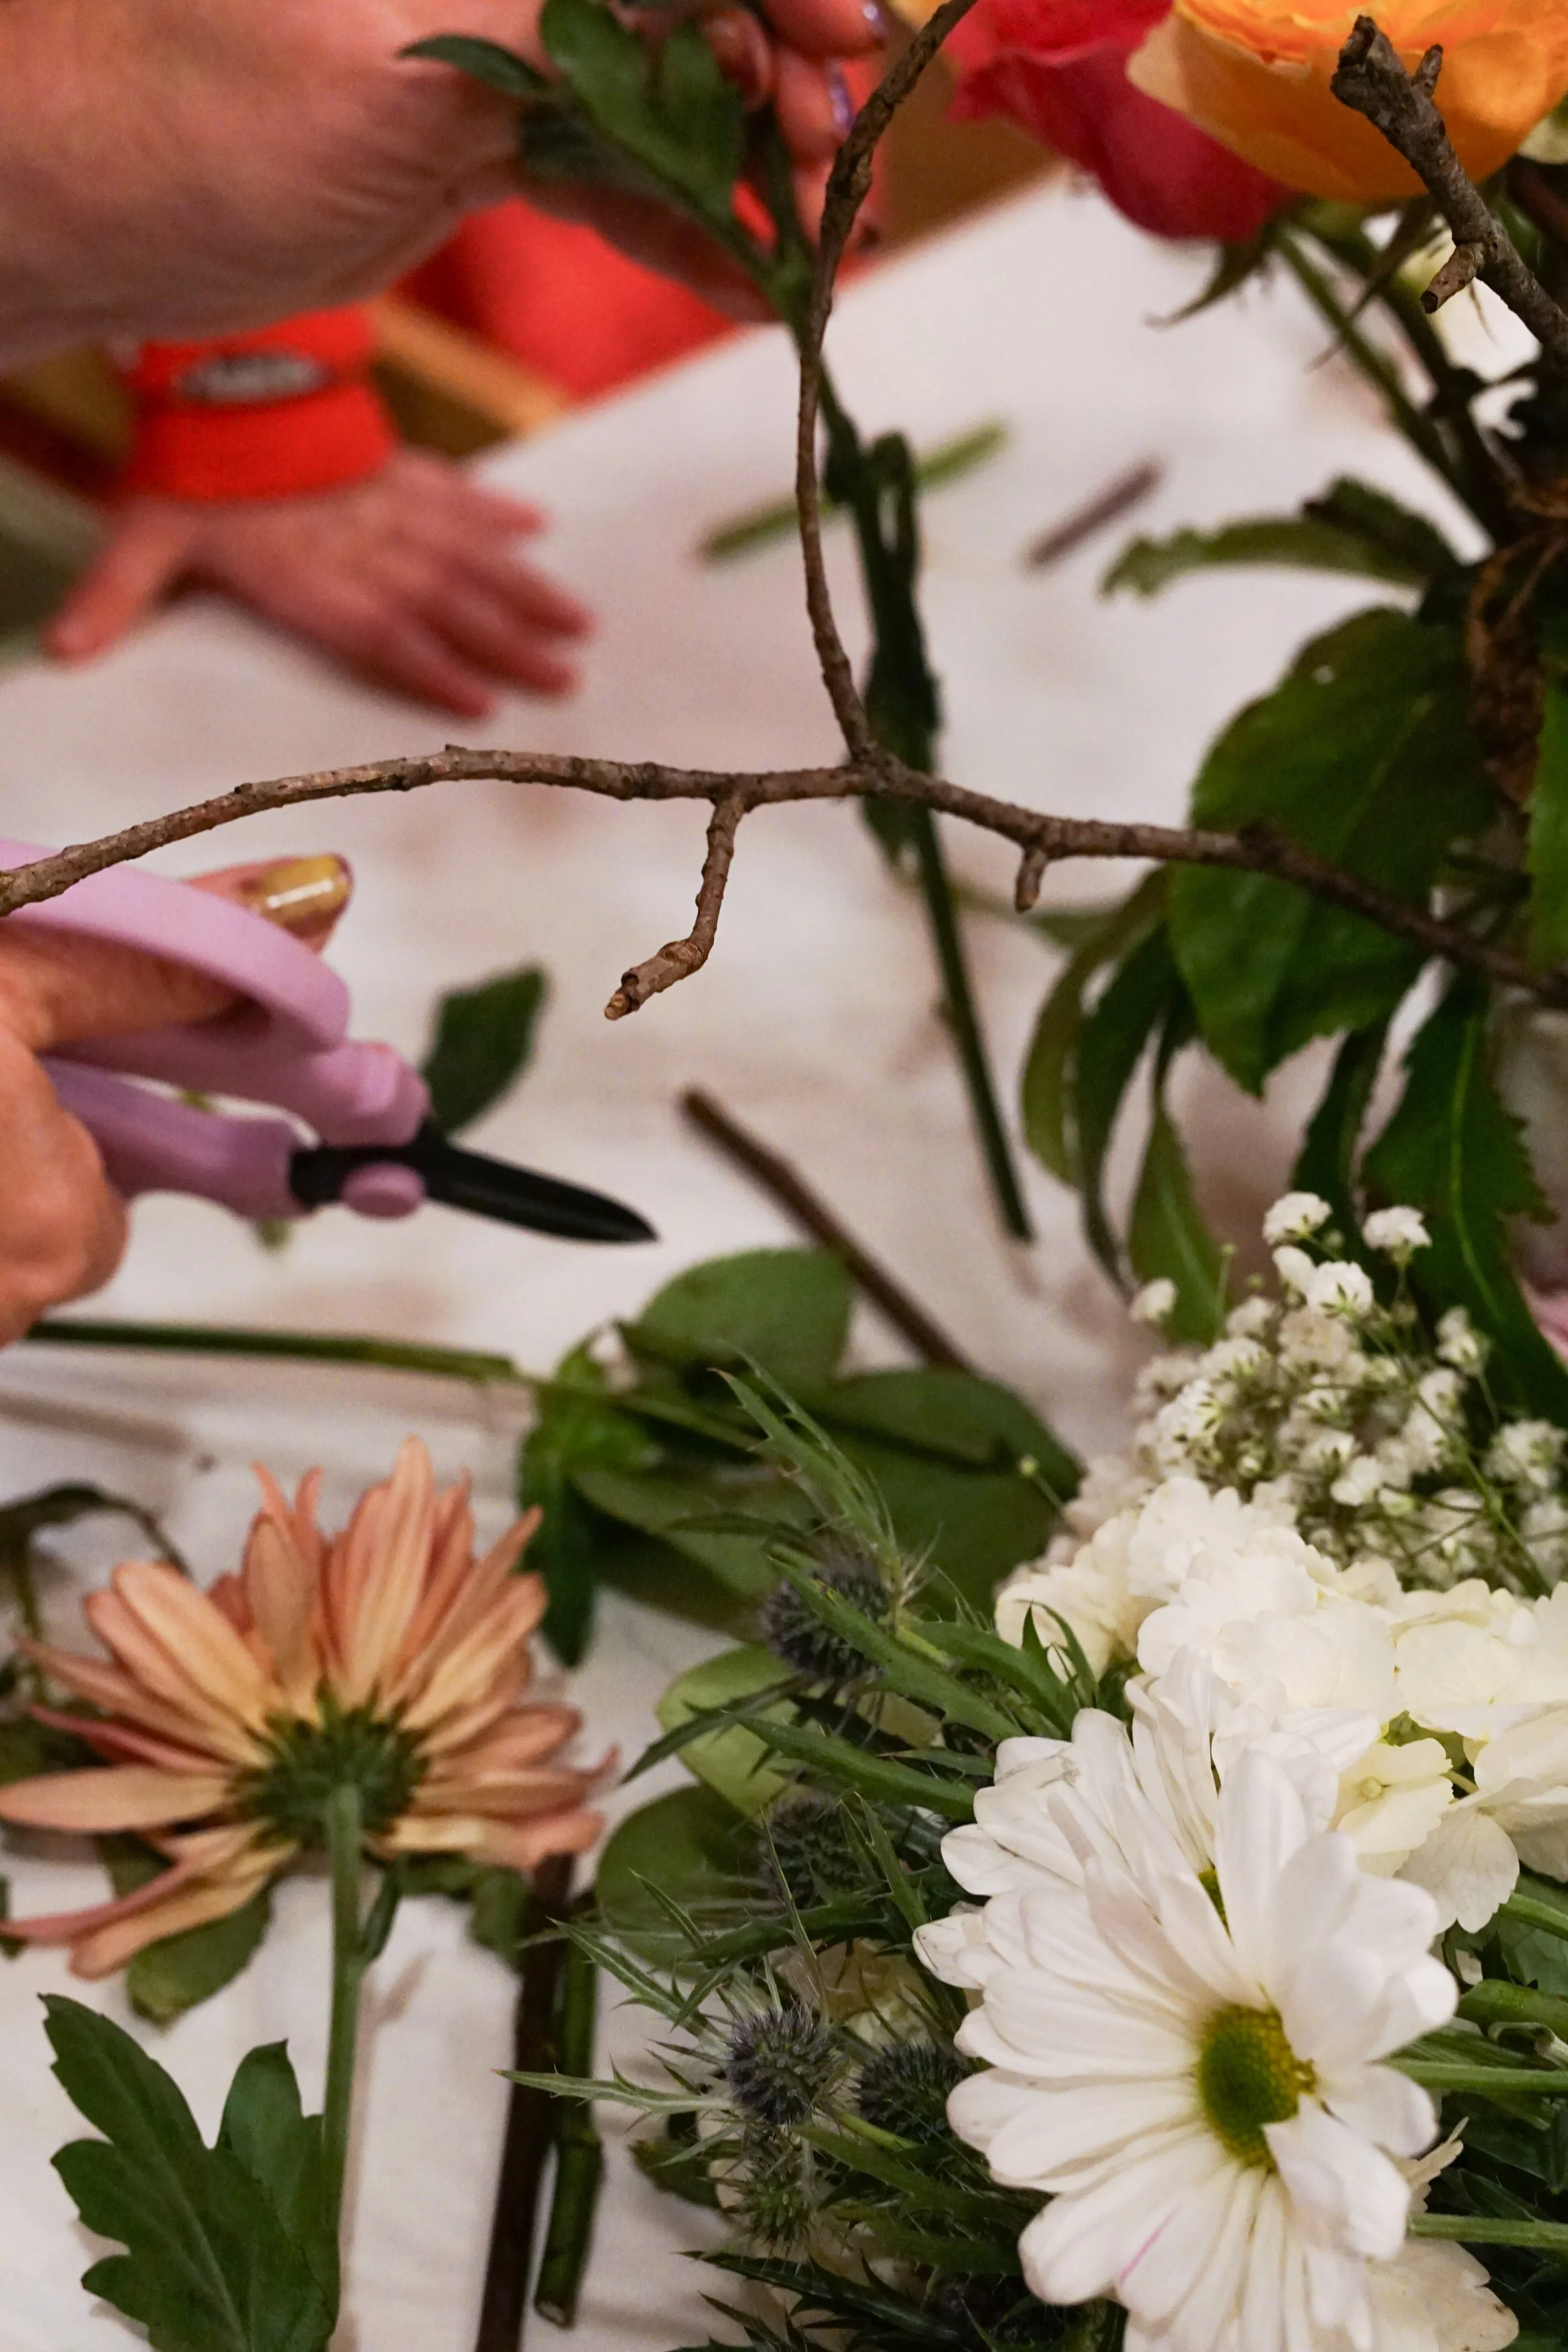
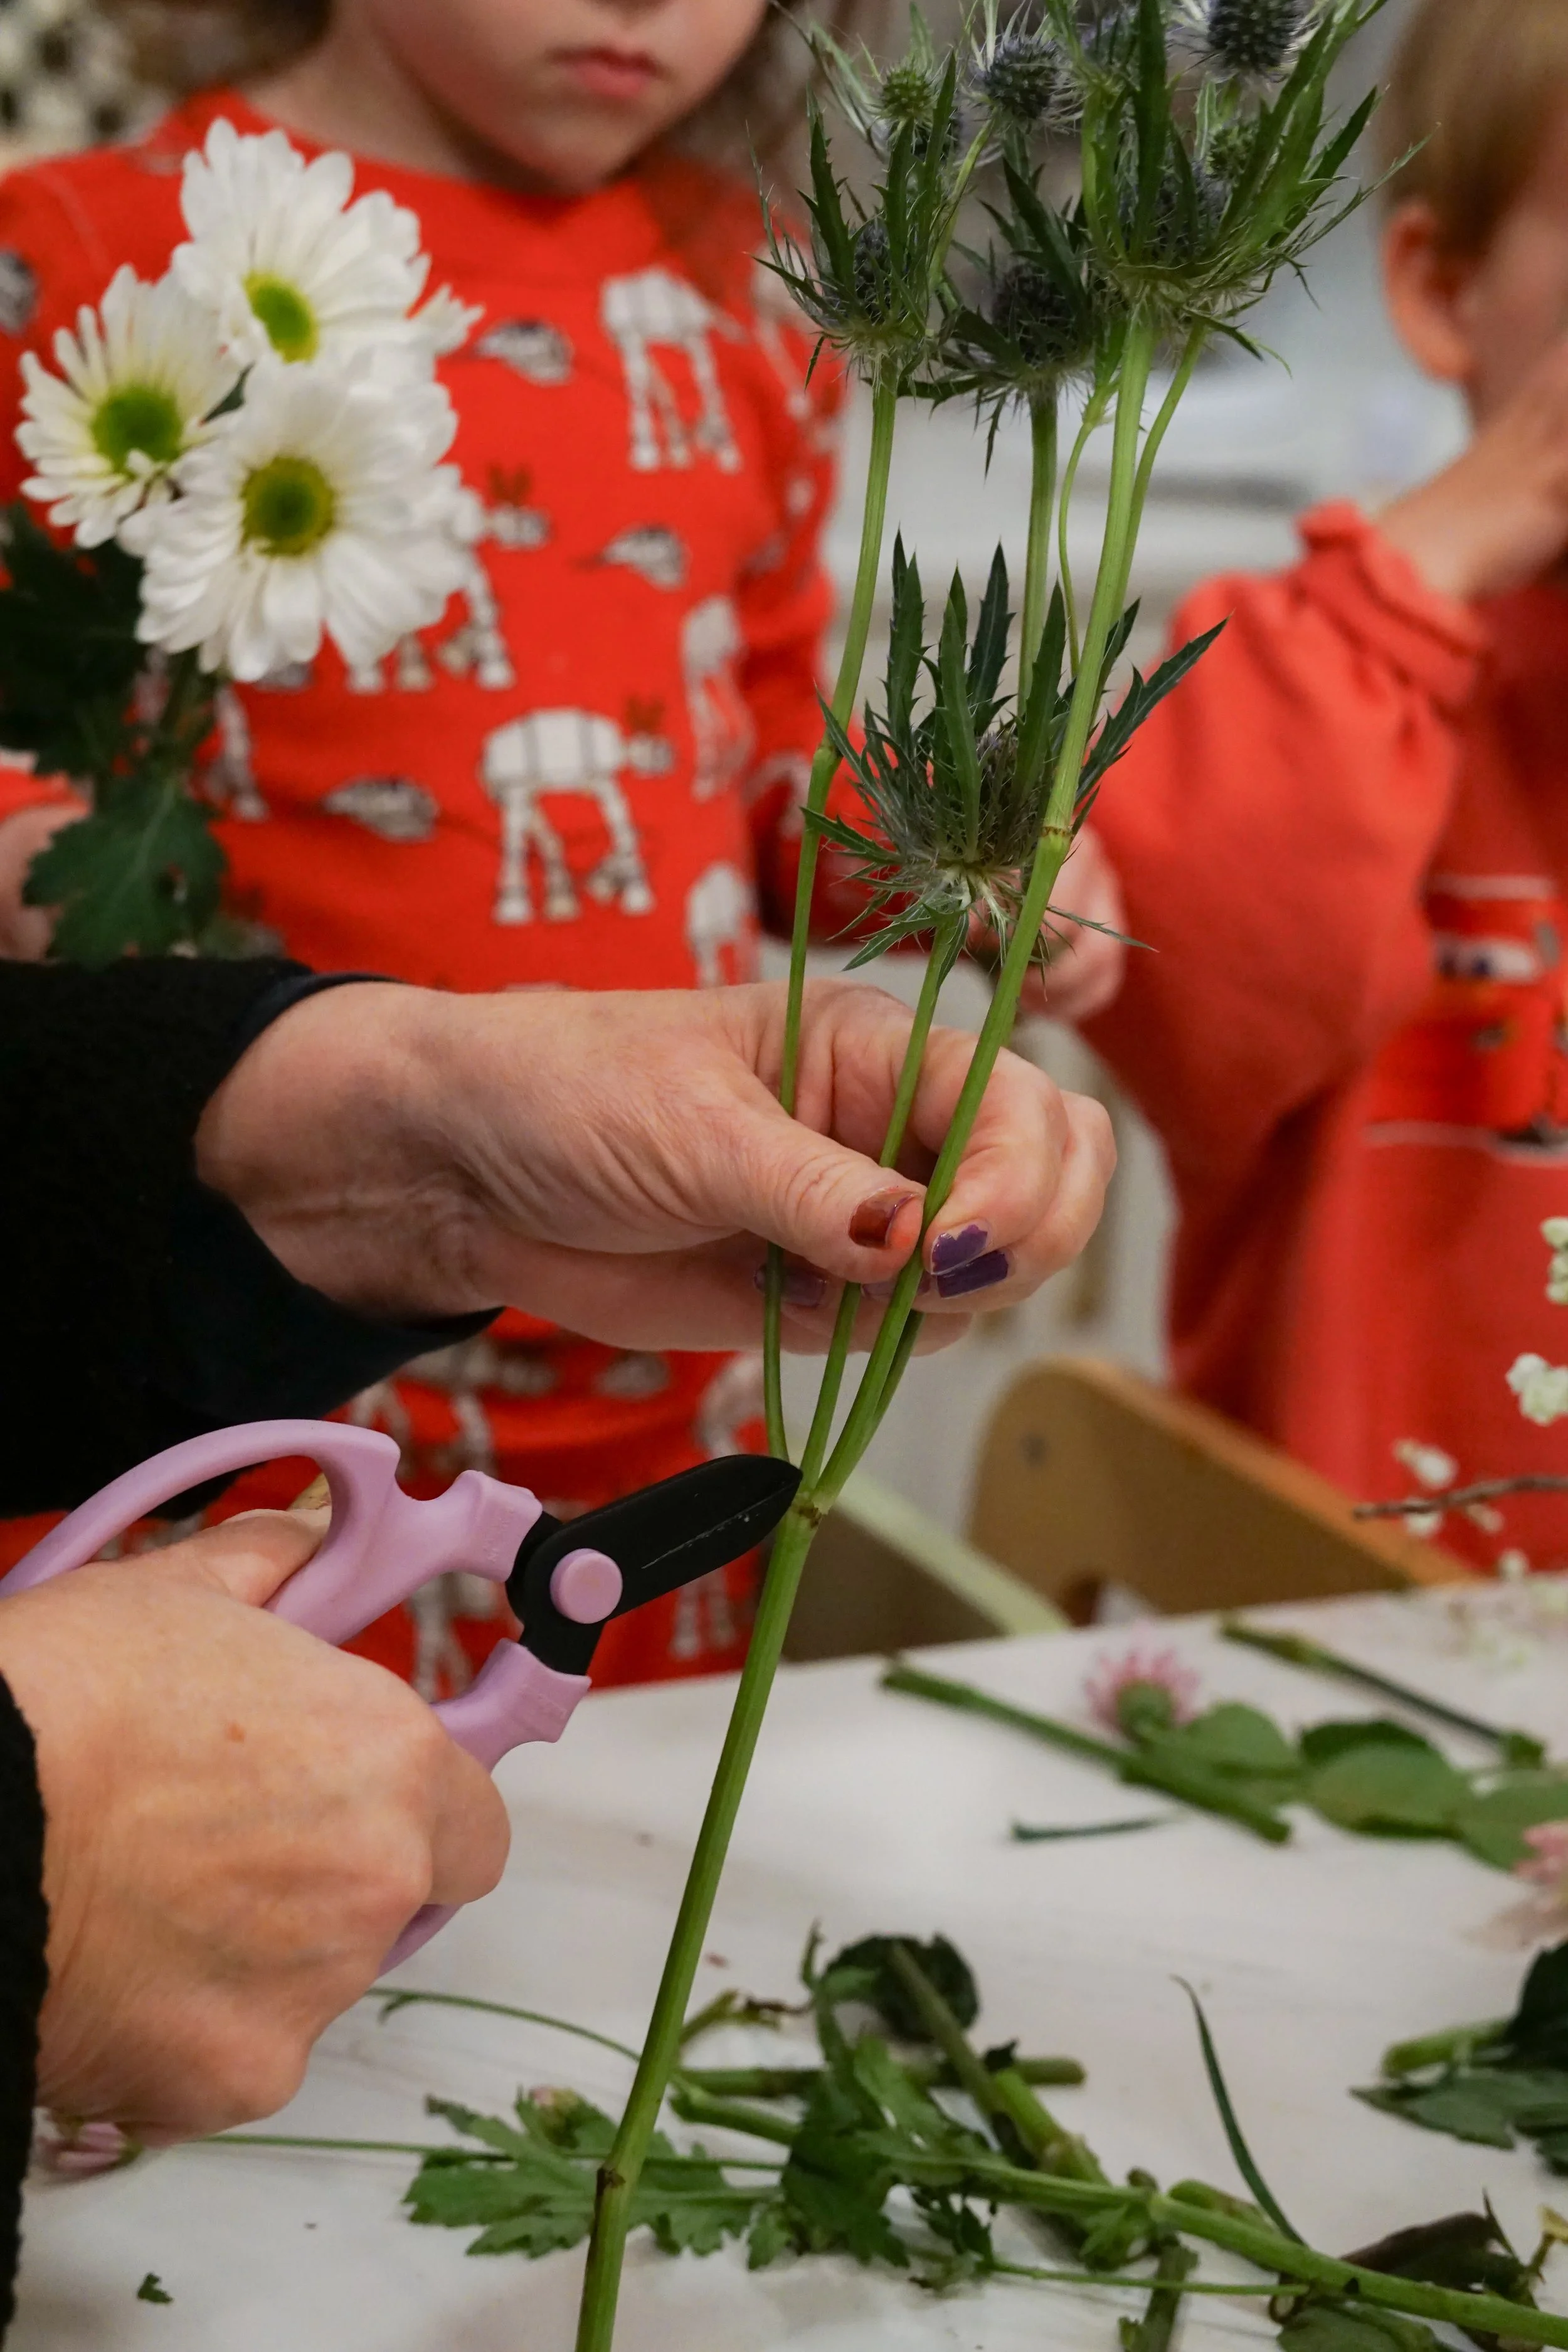
Trim flower stems at an angle as you go, and maintain some greenery. I remember sometimes stripping flower stems of all of their leaves before adding to a vase. Not necessary! You can remove some, but leave some too. Maureen recommends removing any leaves from stems that would end up underwater, or that look untidy. Leave a couple of leaves near the top of the stem—they’ll act as little pumps, bringing water up the stem.
Maureen would trim each flower as she added it to the arrangement, so that she could eyeball where she wanted it and trim the appropriate amount off. Make sure to trim the stems at an angle, too, to prevent the stem from falling flat on the bottom of the vase, unable to take in as much water. Think about kids drink cups whose straws are angled so that they can get that last little bit of water.
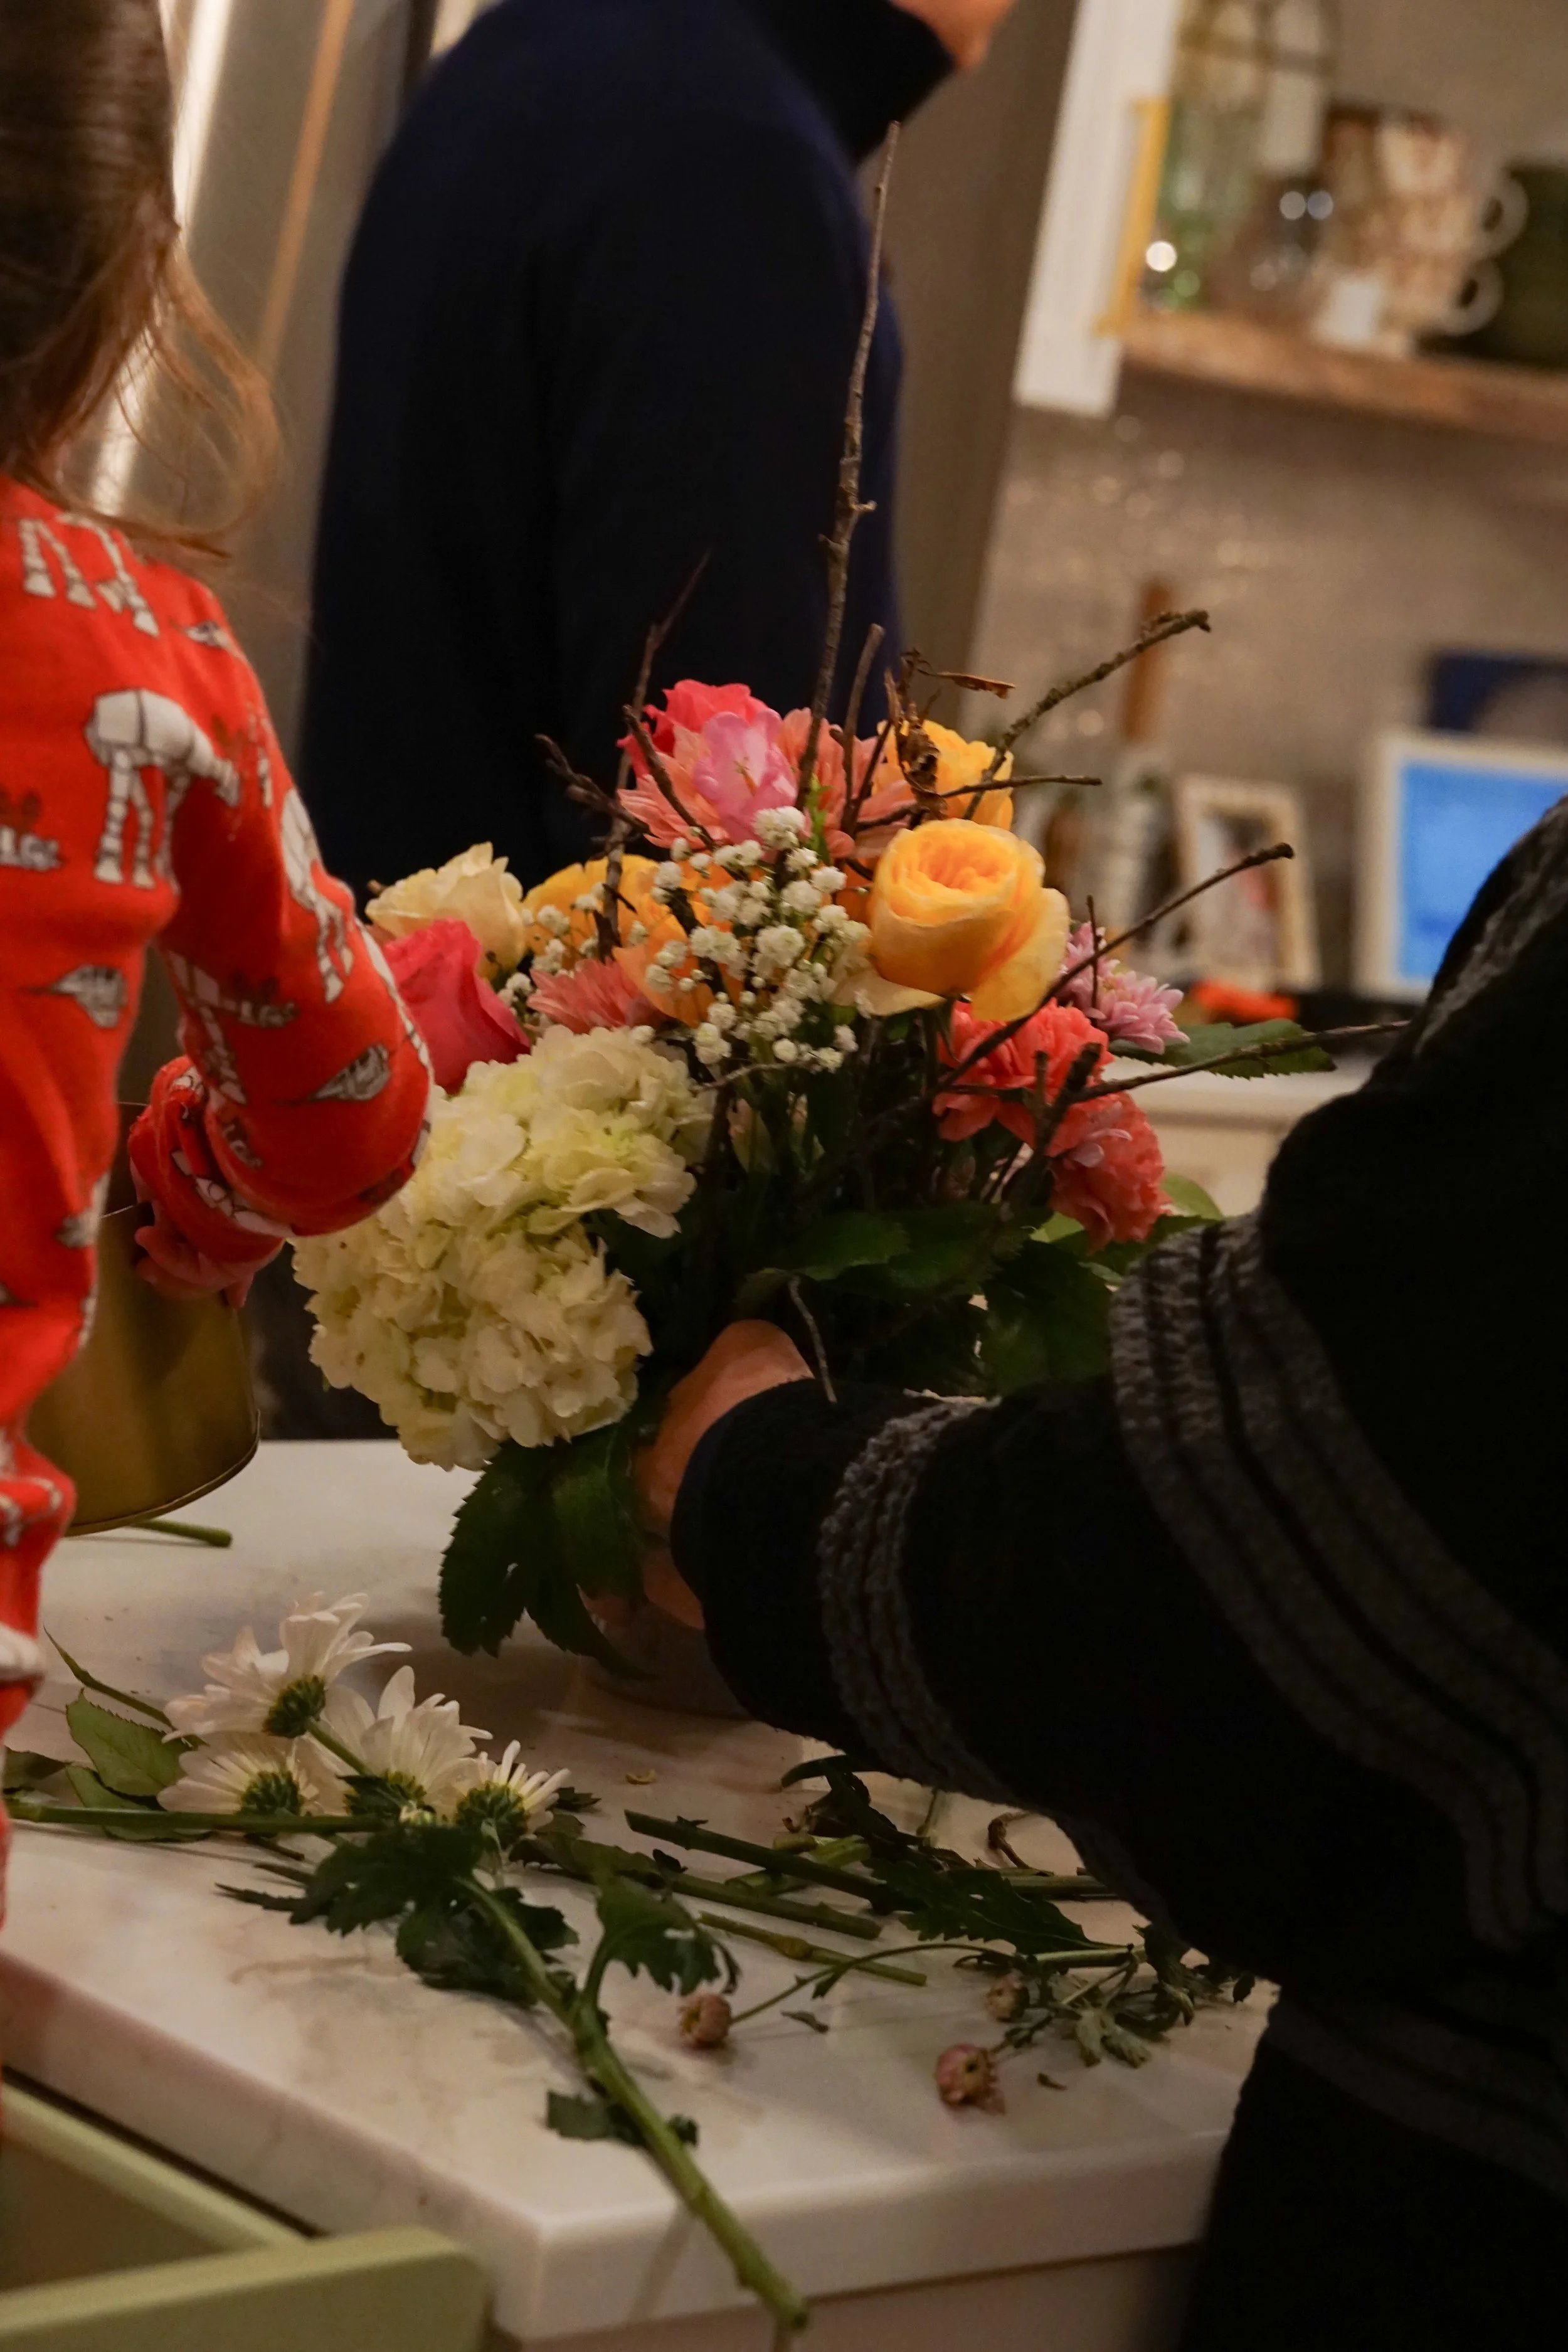
“Arrange in 3s” - create triangles. This tip has paid me major dividends already and is a great place to start. Pick 3 of the same flower and start placing them. Can you draw a triangle between the three? The triangles can be different shapes and sizes, close together or far apart, but avoid equilateral triangles (equal length sides).
Aim to have flowers of the same type on different eye planes. This is a continuation from the triangles tip. If you can draw a triangle between 3 flowers, and each is on a different horizontal and vertical plane, you’ve done great and created something interesting for the eye.
“Put the money in the front”. Think about where your arrangement will live. Put most of the florals into the side of the design that will be most viewed. If the arrangement will be seen at multiple angles, make sure the back still looks nice; maybe add more foliage to the back side so that it’s still a complete design for those moments you’ll see it from another angle.

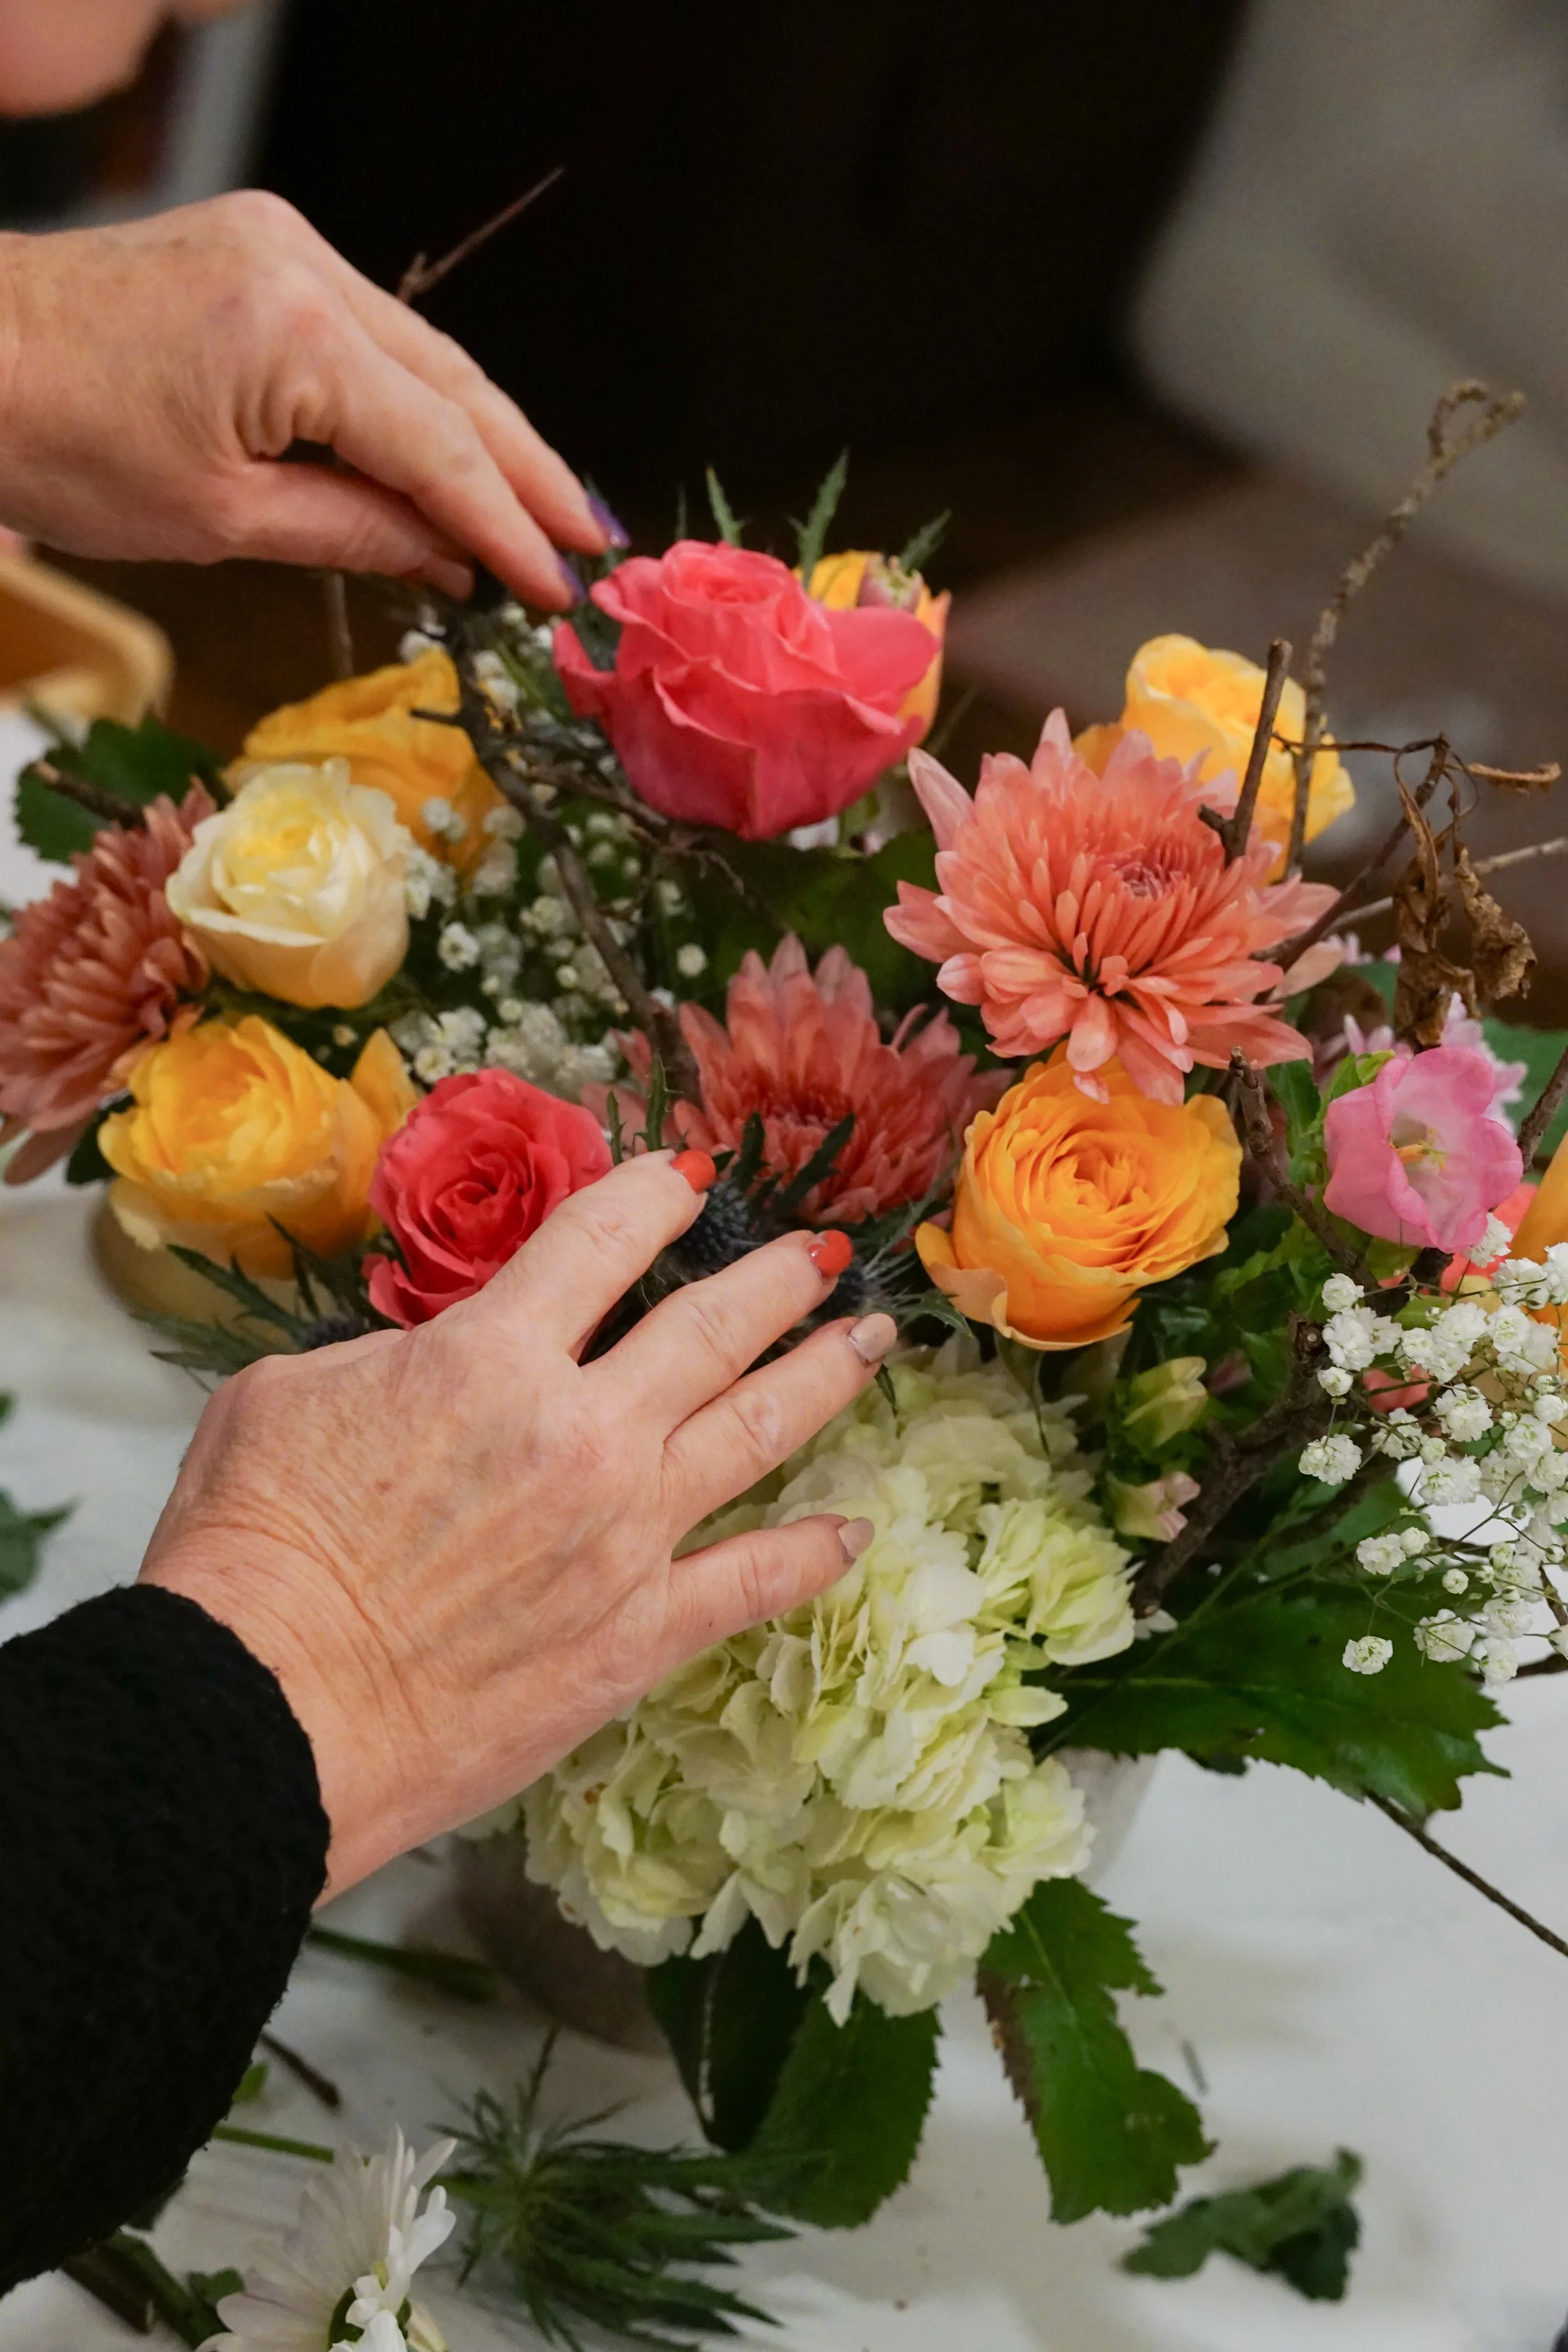
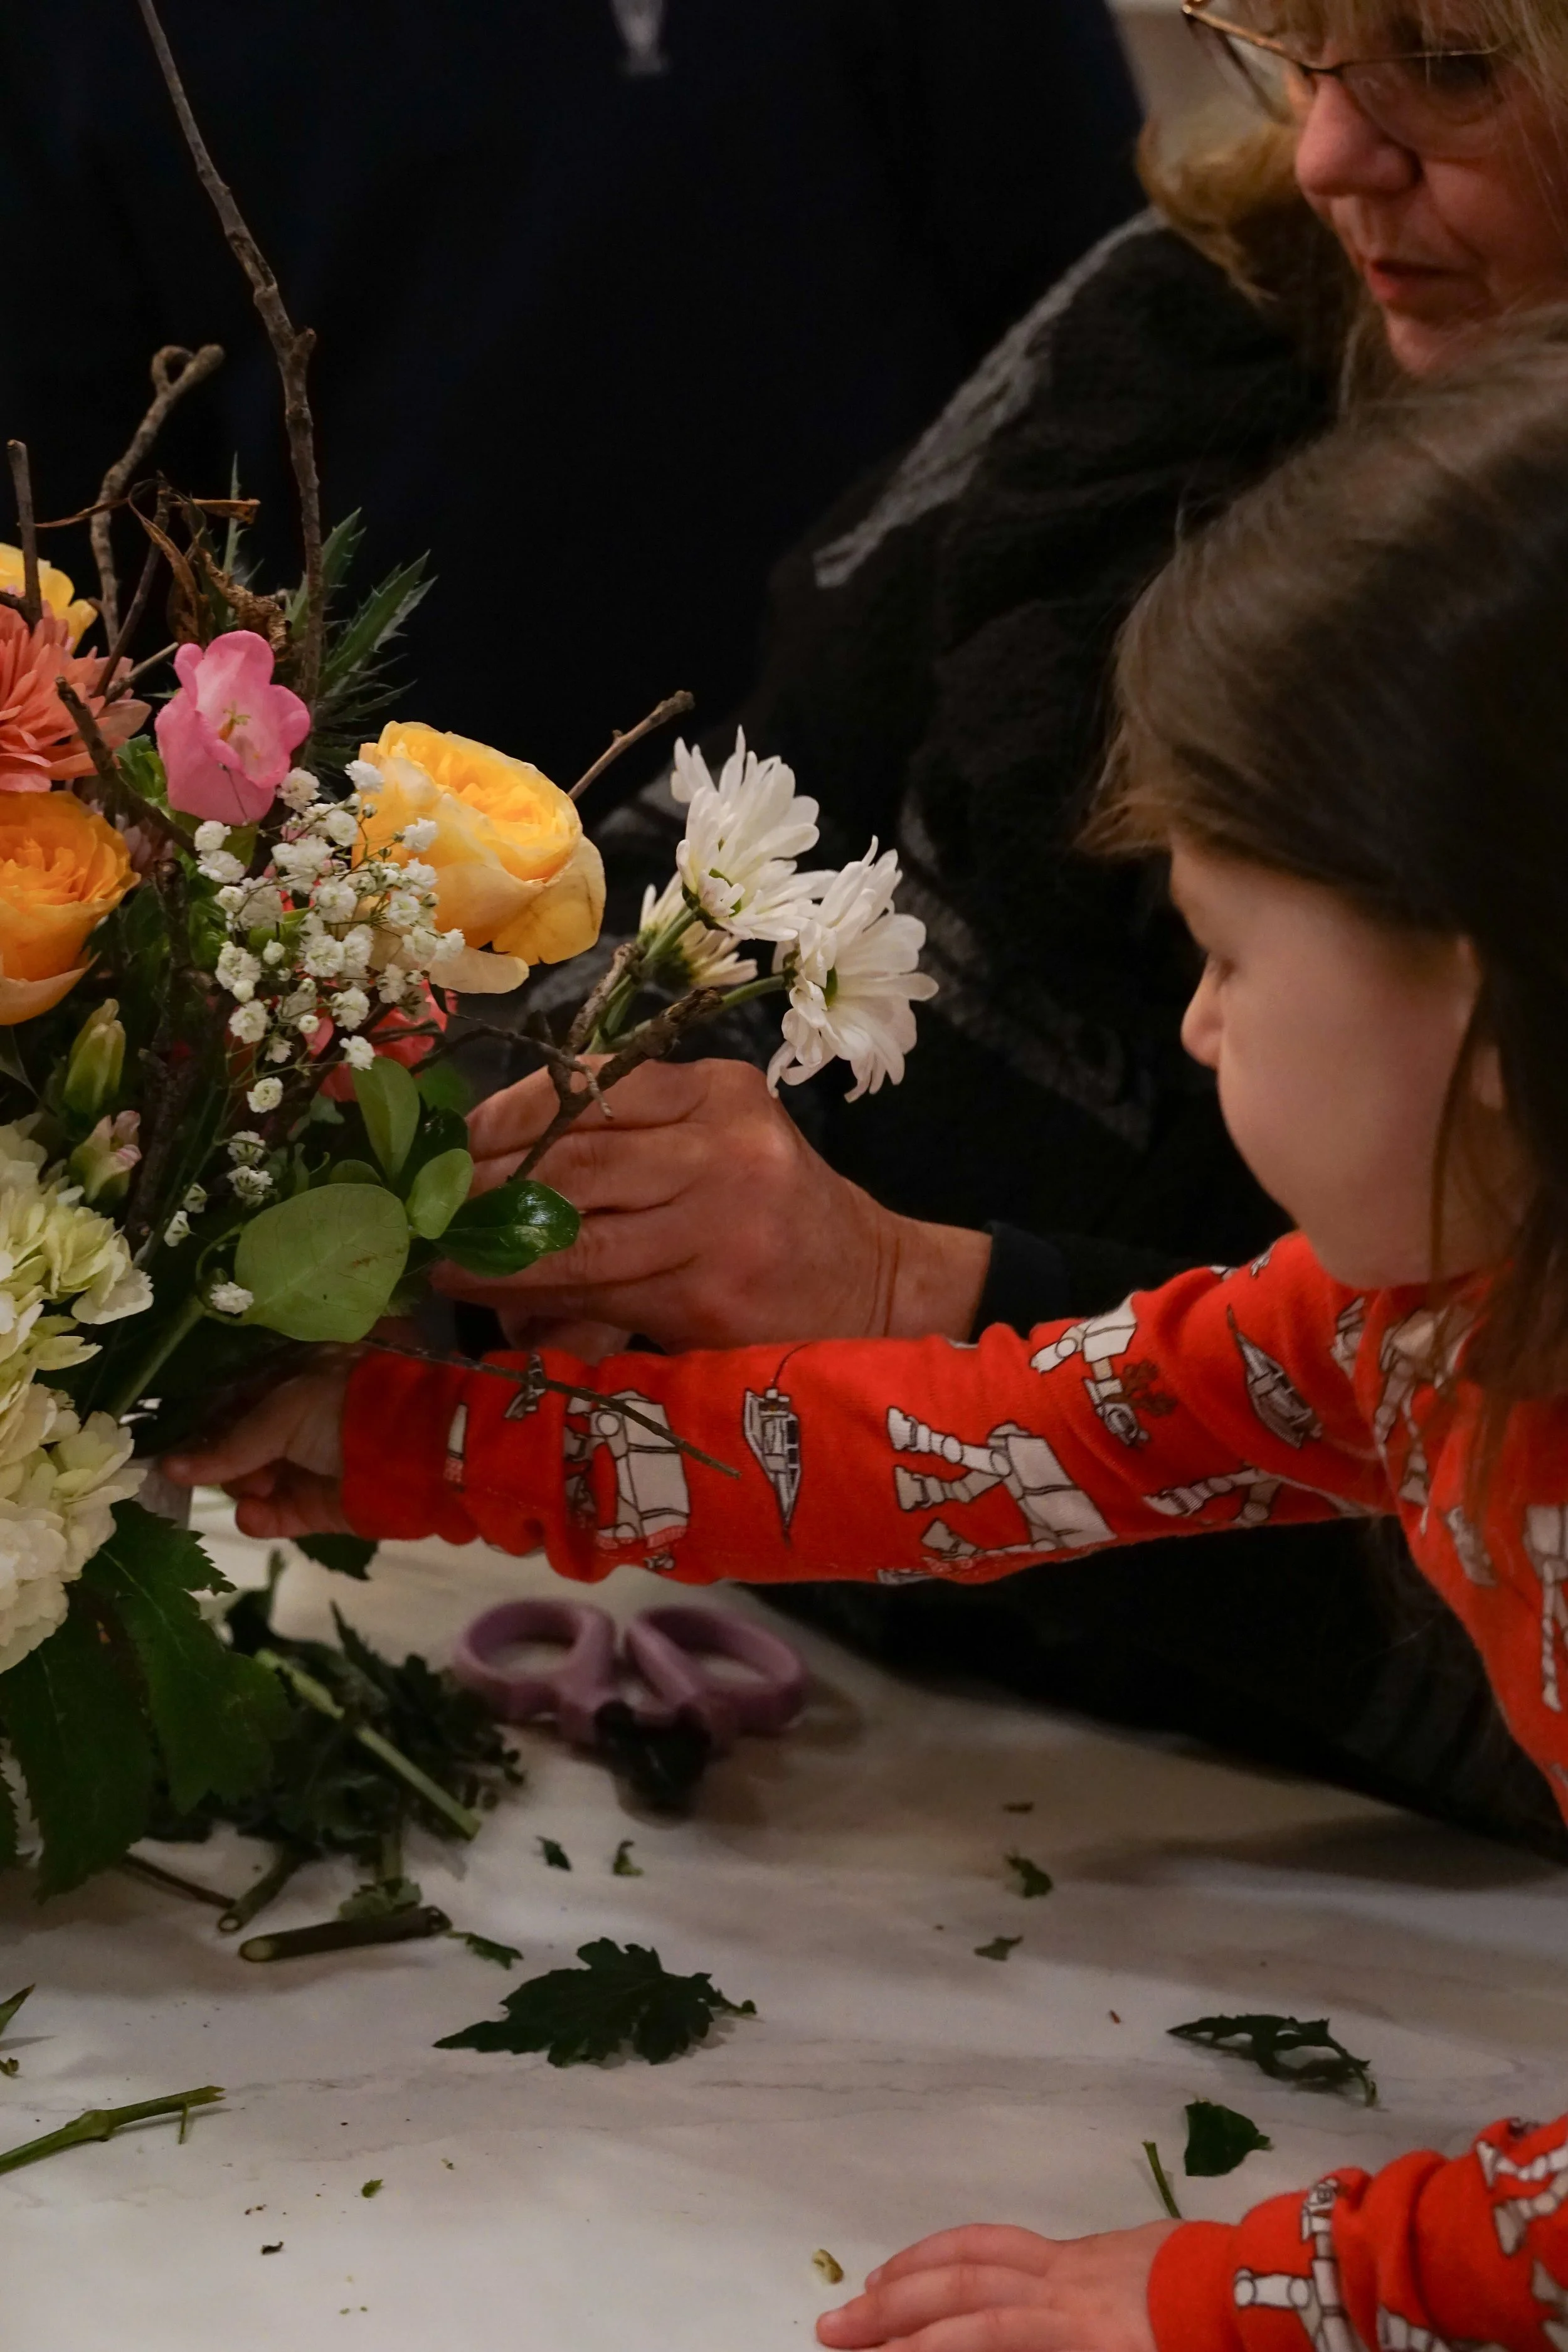
Obviously, Maureen’s extensive knowledge and experience take over. She knows what she’s doing, how to place things, and what looks good. She placed the hellebore greens from our backyard near the bottom of the arrangement.
The above tips can help those of us who aren’t professionals practice and start to build something new. We can take our time, try something, rearrange it, try something else. Adjust the arrangement as you go, stepping back to see where there might be a gap or to shift something around.
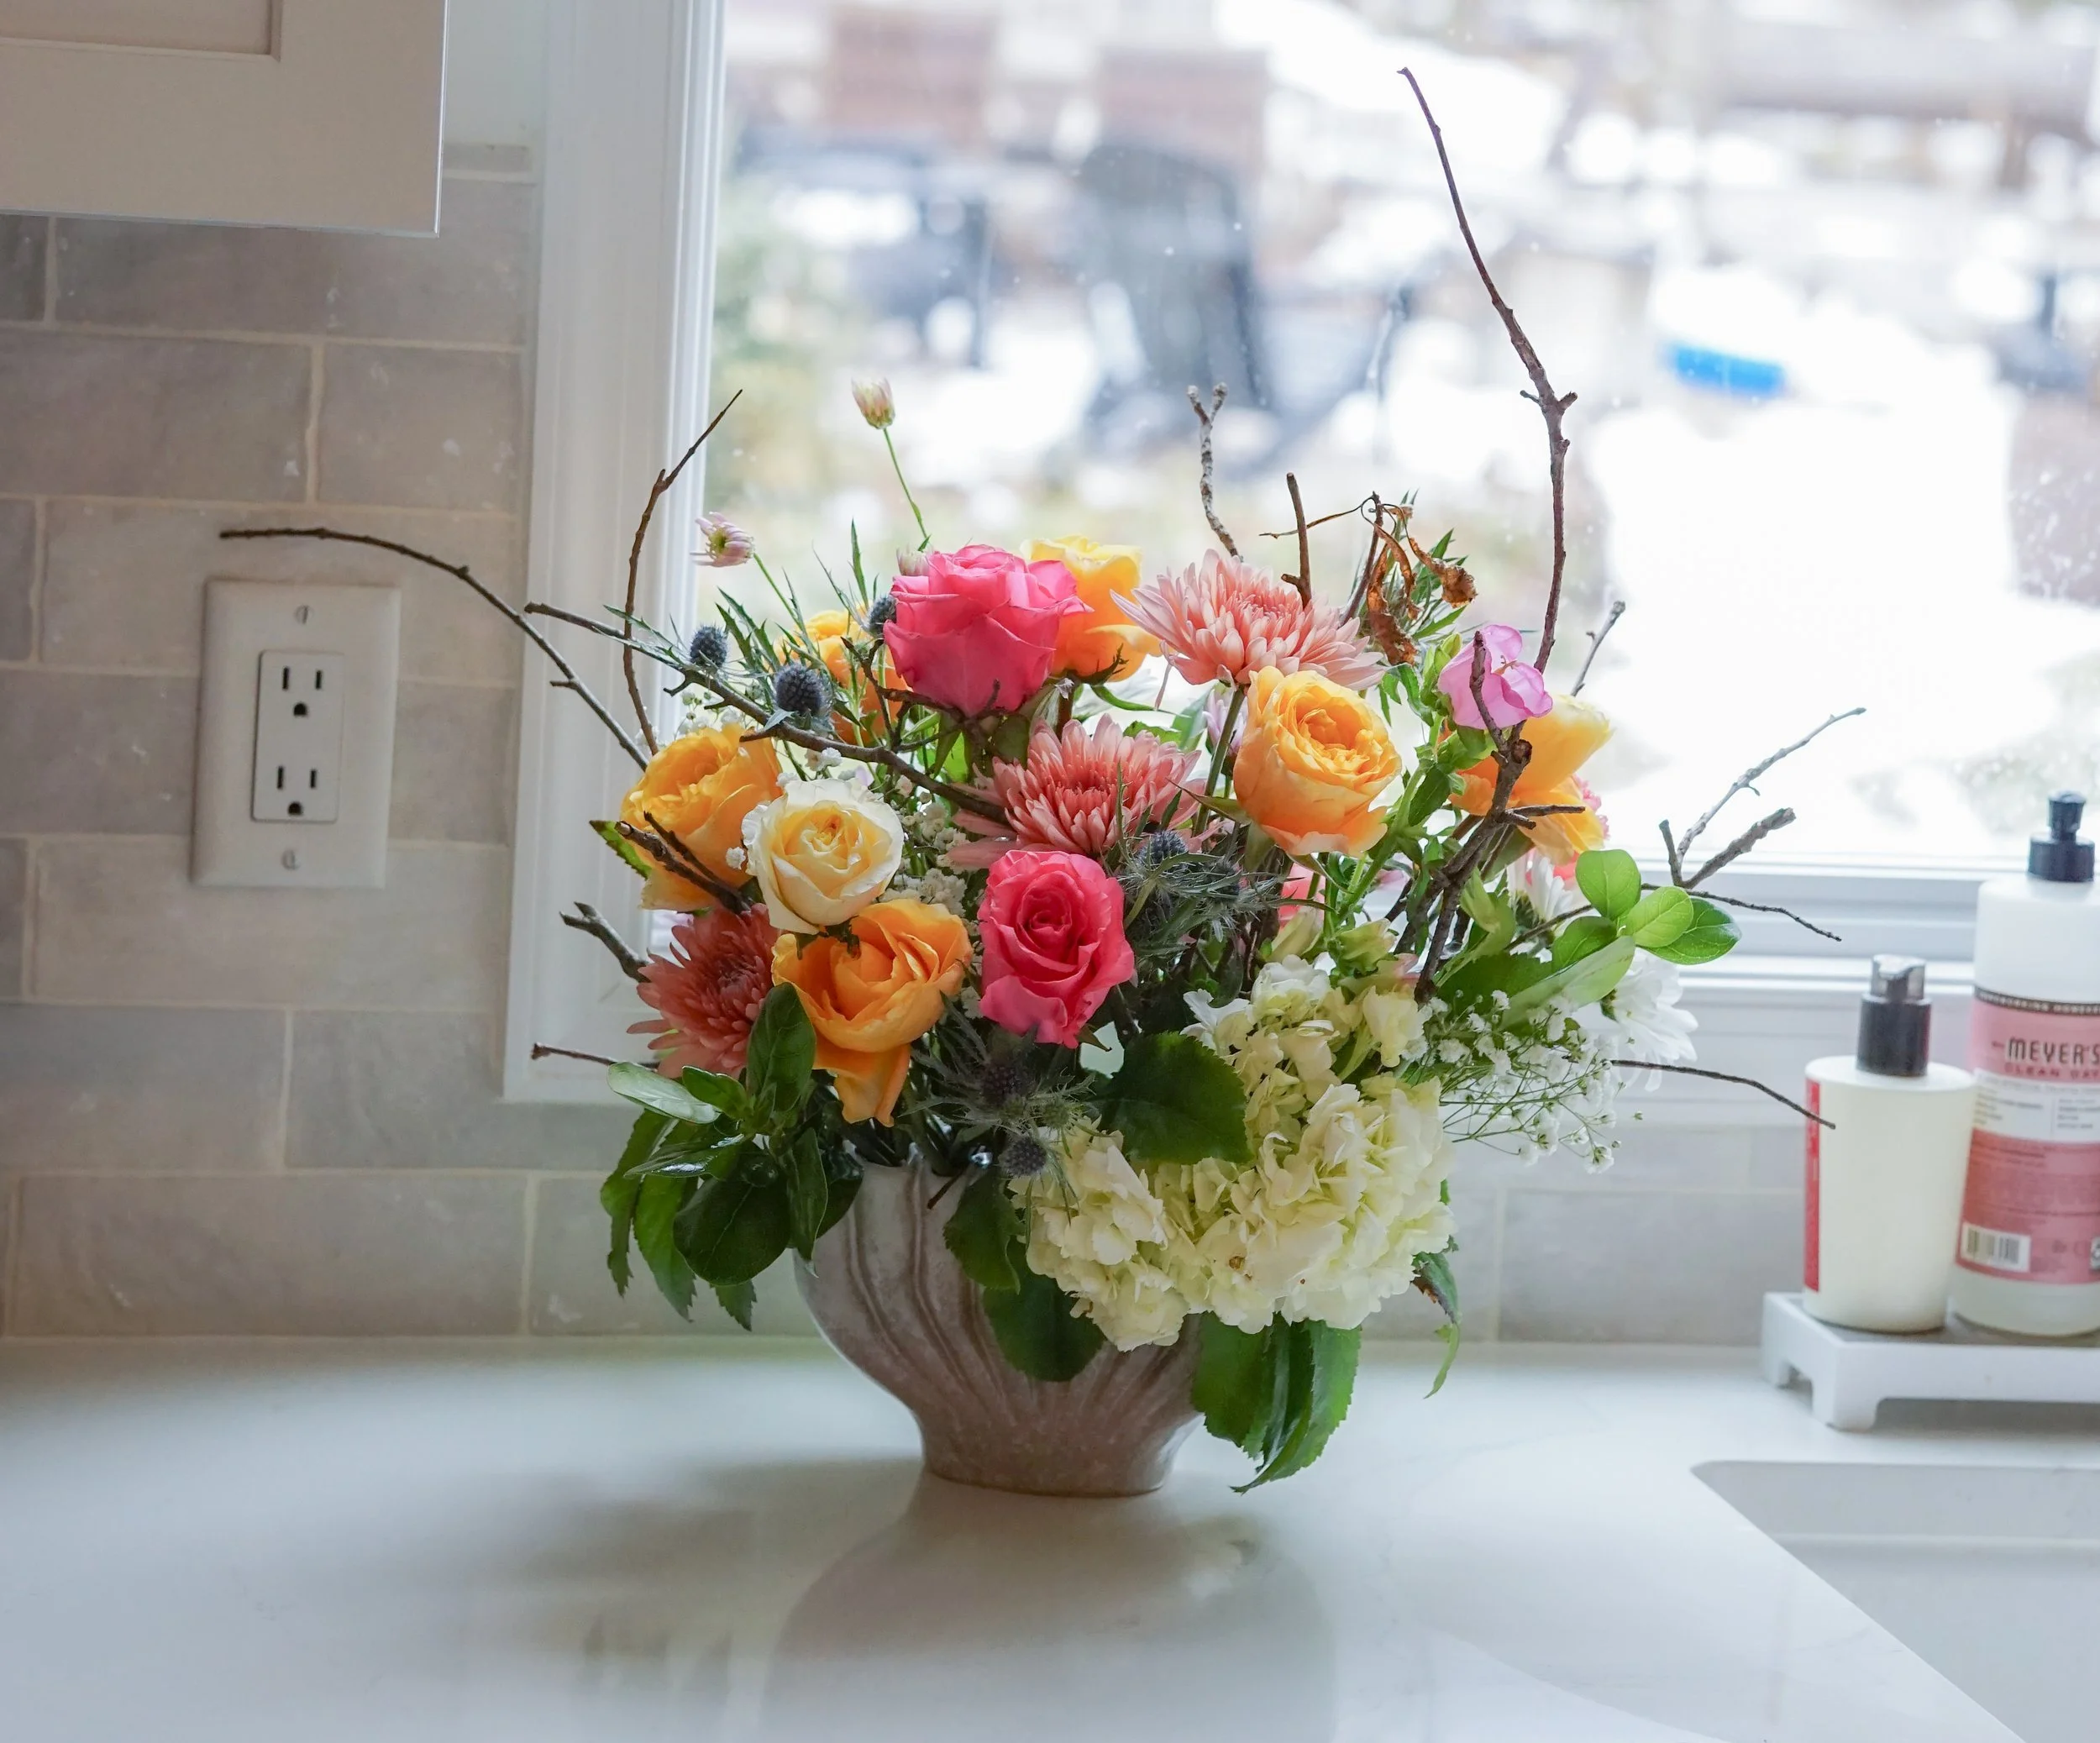
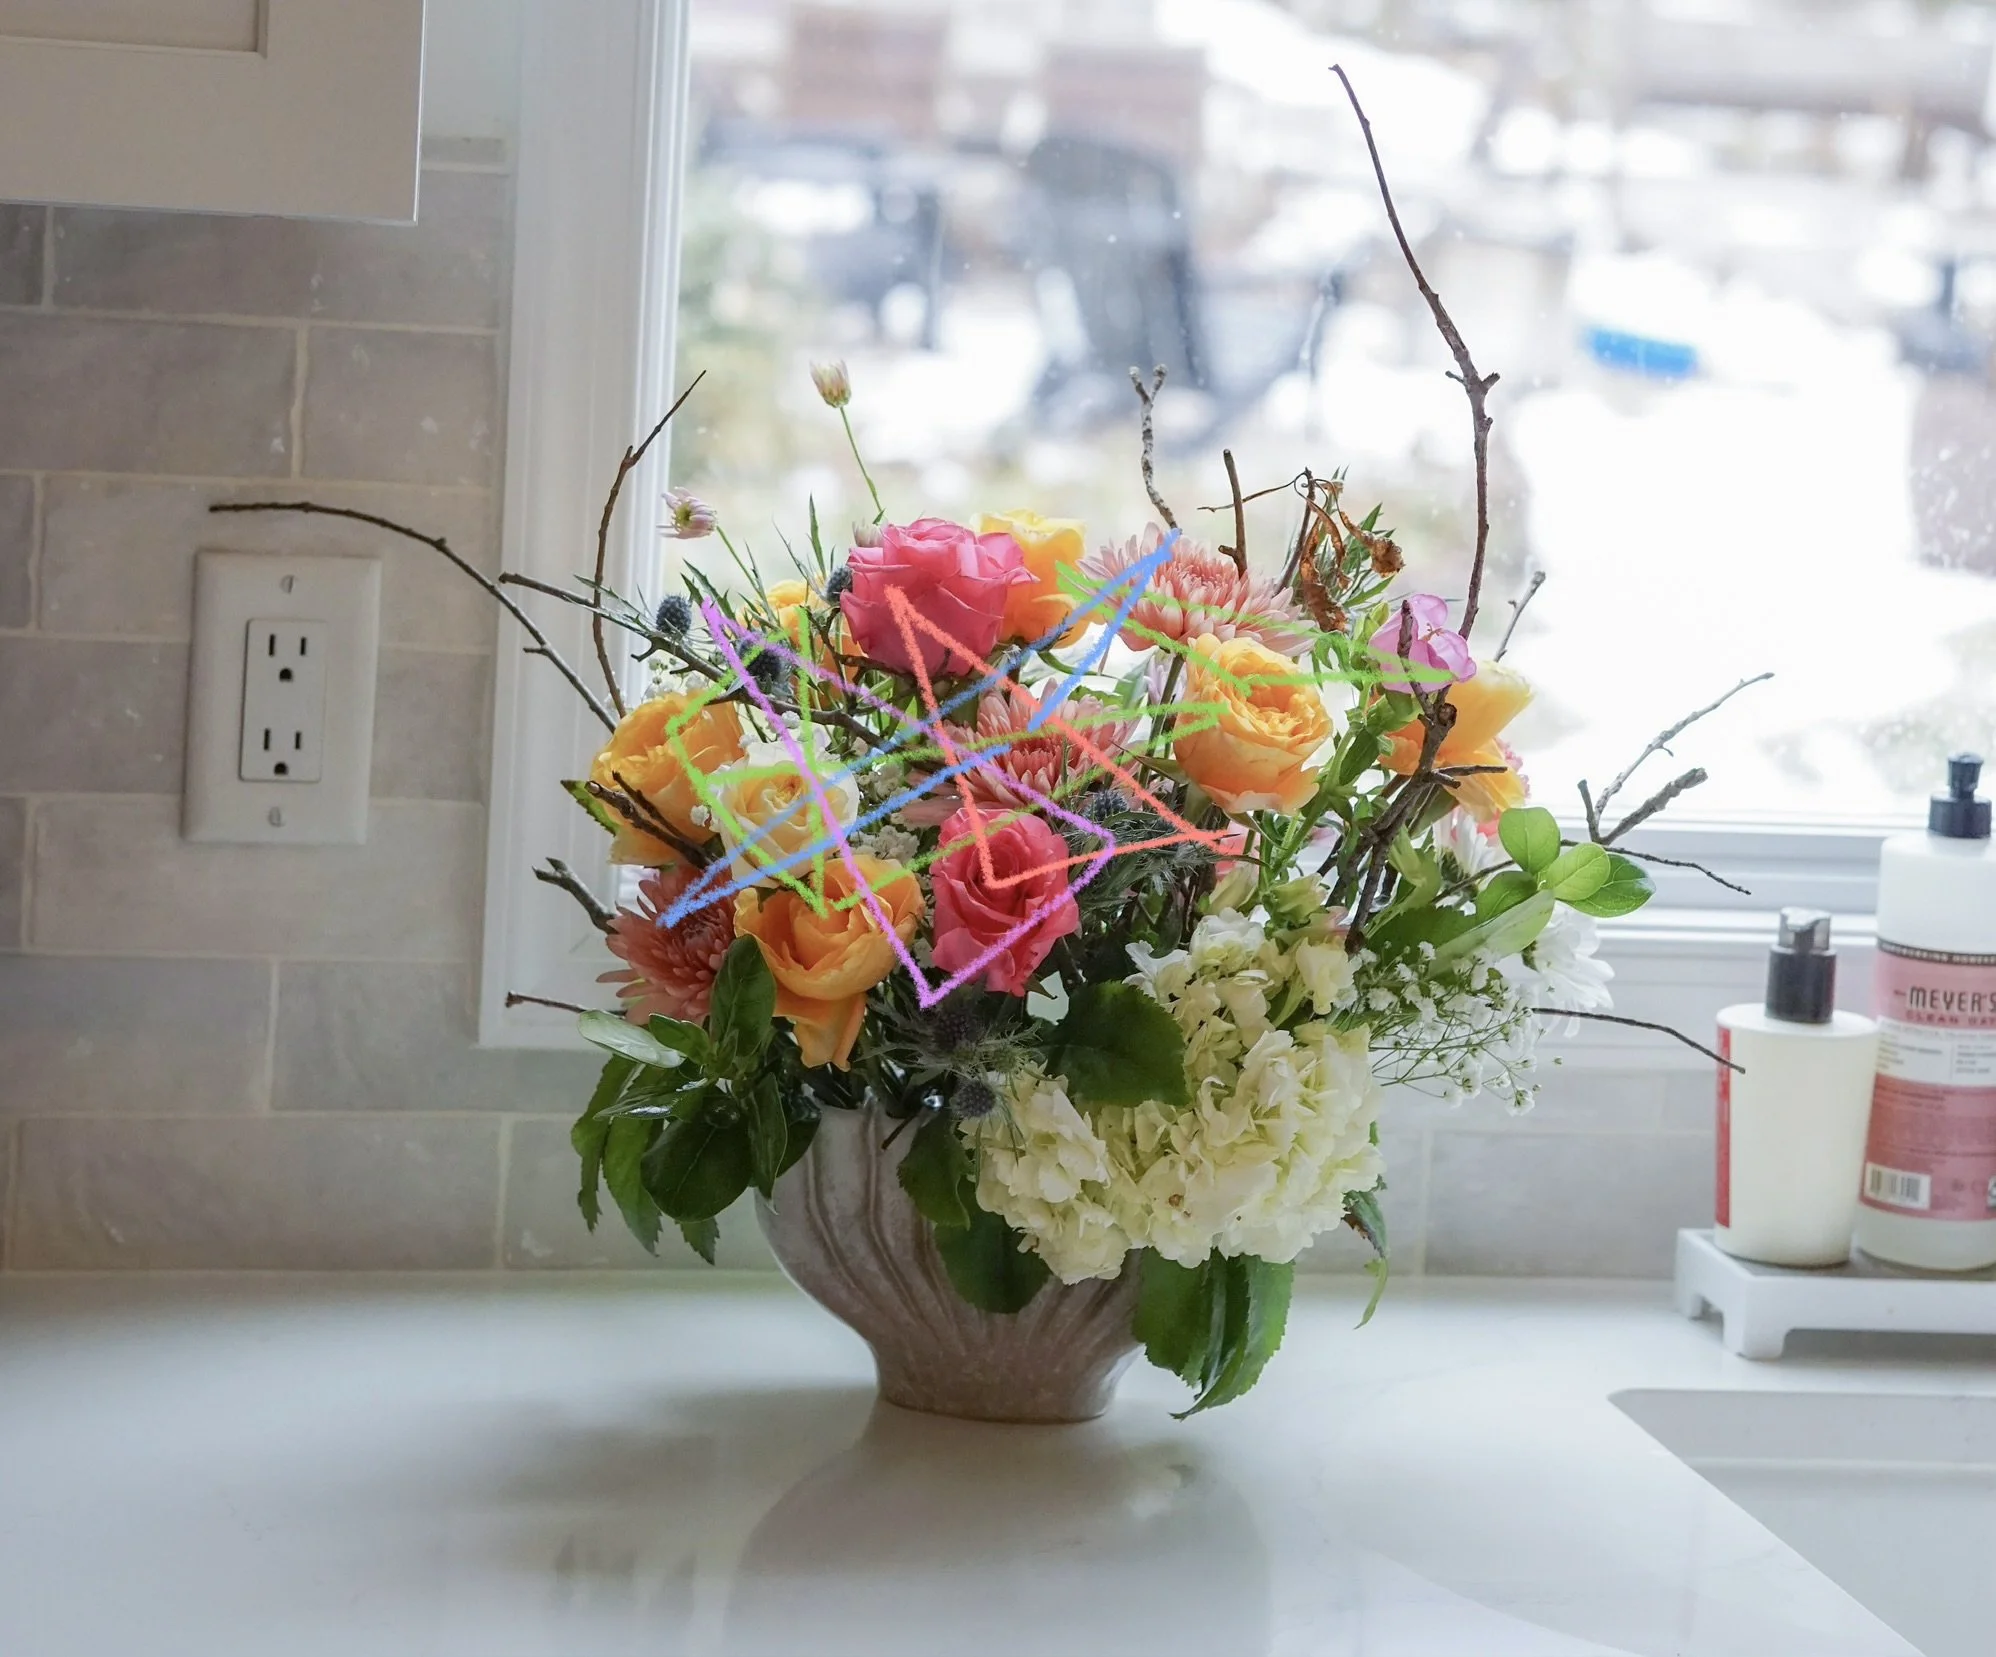
Notice the placement of flower types on different horizontal and vertical planes, as well as the various triangle shapes we are able to see
After you’re done — there’s maintenance. Maureen is also a fan of Trader Joes, but as a professional florist, she gets flowers for her arrangements directly from flower markets. Market flowers are likely to last longer due to a number of factors. But our grocery-store bouquet arrangements still have a good life ahead, especially with good maintenance!
Maintaining Your Arrangement
Water, and think about conditioning! Yay, a new flower term! I learned from Maureen that different flower varieties like different amounts of water—the conditioning of the flower. So, don’t just fill your vase to the tippity top with water. You don’t want the water line to drop below any stems, because the flowers will obviously wilt much faster, but you also don’t need a full vase. As you get to know your flowers, you’ll learn more intiutively what they need. Some flowers might only need a couple of inches of water, but some need more. Google can help those of us non-flower professionals while we’re learning. For an arrangement with multiple flower types, add enough water to meet the thirstiest stems’ needs; in this arrangement, the hydrangea needed the most water so Maureen added enough water to meet that flower’s needs.
You can also spritz water on certain blooms to keep them perky, for example, hydrangeas.
When greens and blooms do start to droop, pull them and adjust your arrangement. Maureen instructed me to spritz the hydrangea in this arrangement when she was gone to see if it might perk up, but if not, to remove it immediately. You can then shift things around to cover any gaps, bearing in mind the arranging tips from above.
I hope you picked up a few useful tips. Thank you of course to Maureen for being the brains and teacher behind this experiment. We are so grateful to learn from you and bring a little more beauty into our homes!

Introducing… Reprints
Introducing… Reprints. A new category of art available on Rue Noelle.
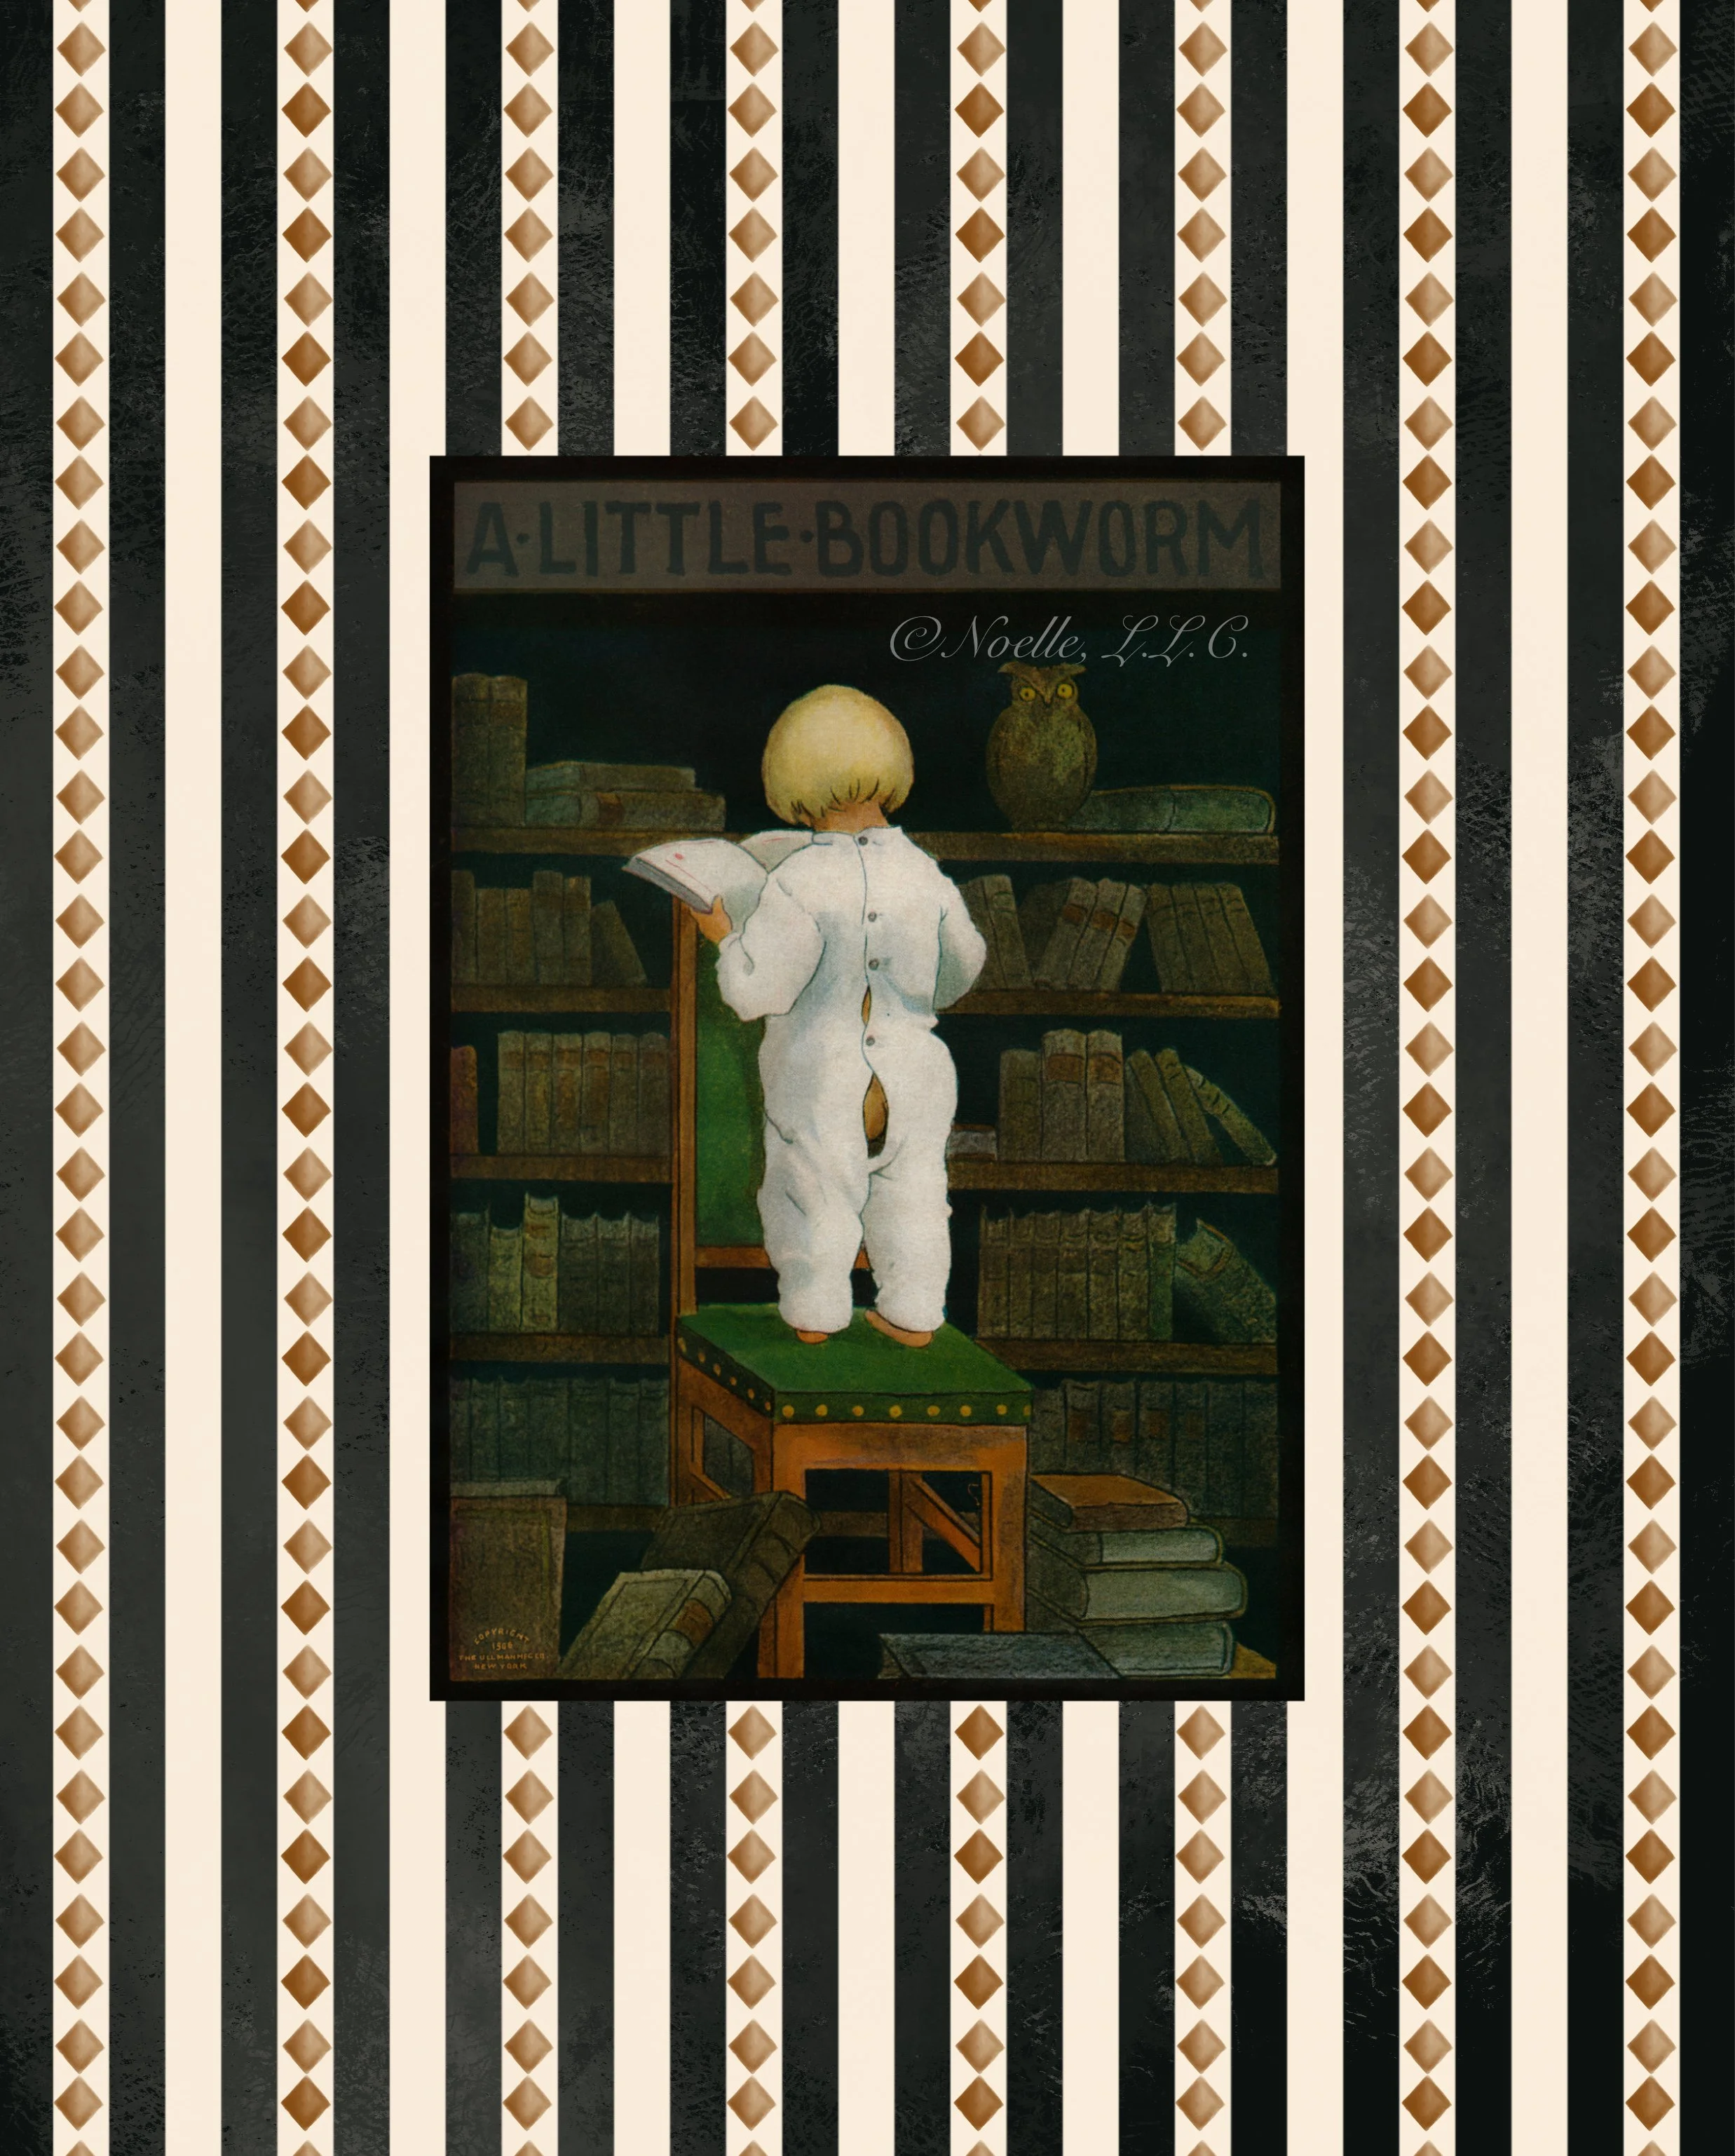
A new section of Rue Noelle’s shop. I’m so excited about these. And it all starts with my first reprint, A Little Bookworm.
This new category of art brings together multiple passions of mine into one unique product. How, you ask? I’ll tell you the story.
I love antique shops. There can be a lot of junk, but sometimes you stumble upon that one thing that gives you a moment of joy and speaks to you. While this sounds like regular shopping too (I’m looking at you, Target, but love ya!), with antique shops, you get to imagine the places this item has lived, the stories it has been a part of, who made it, and when.
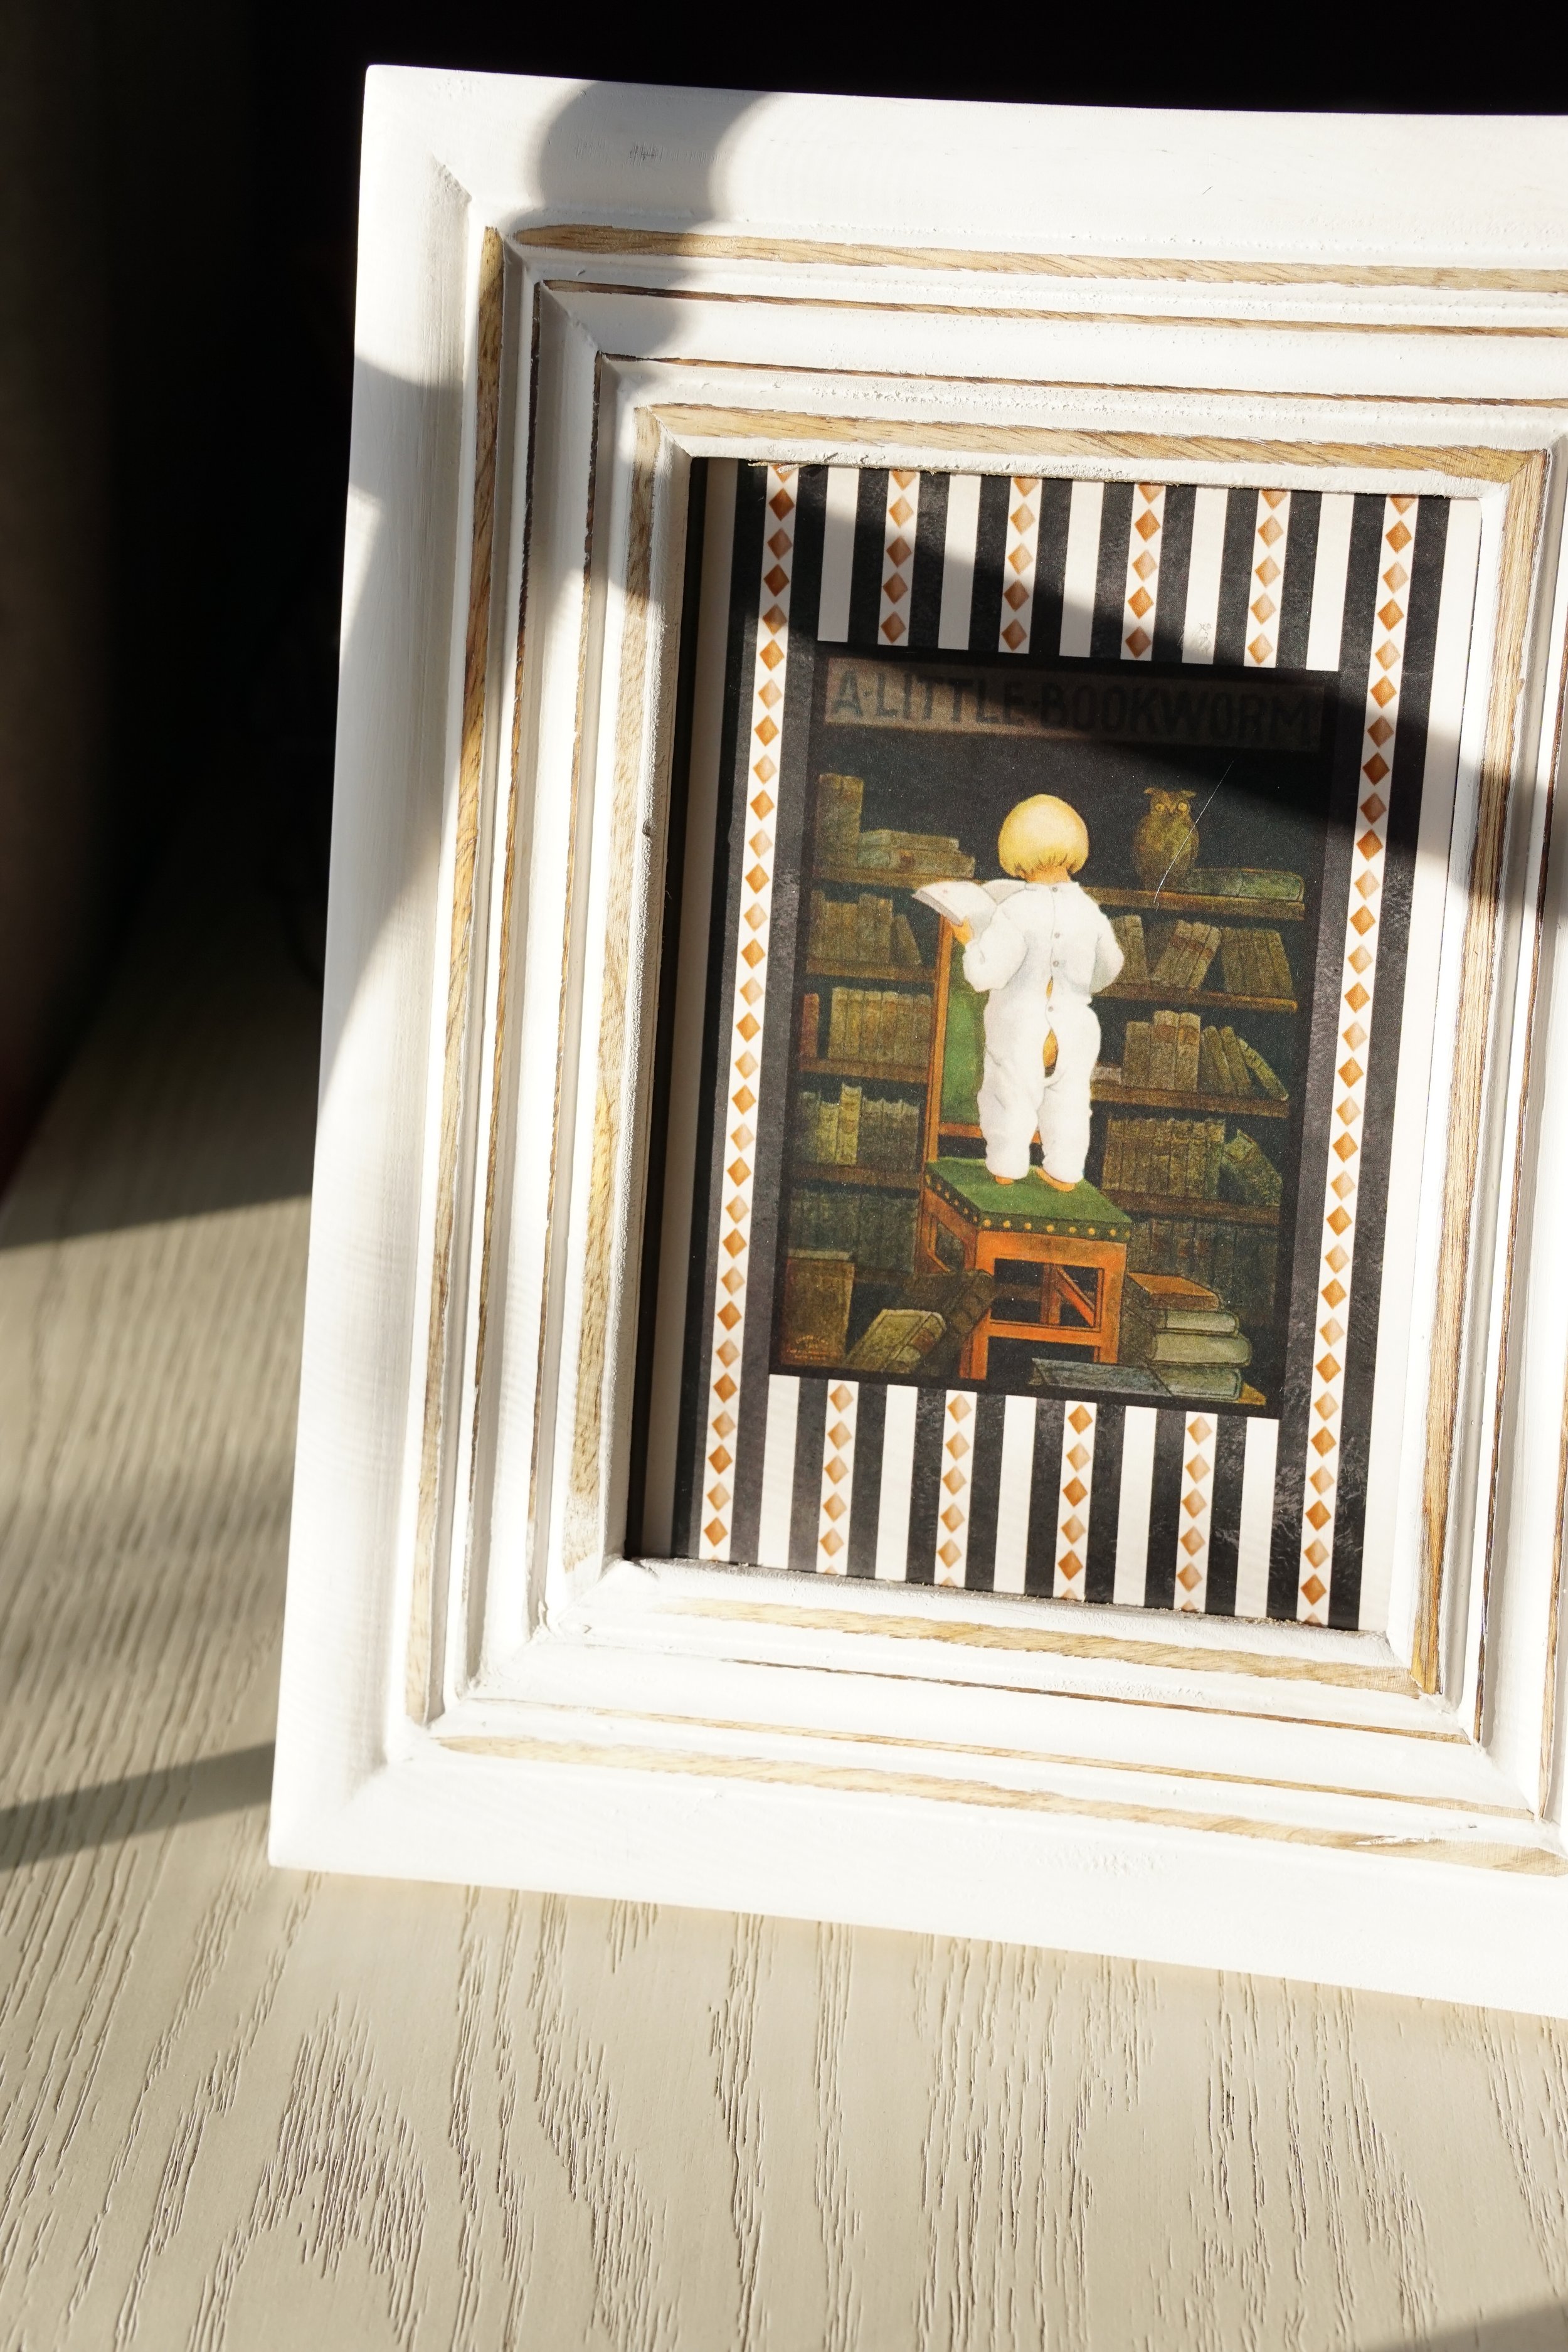
A few years ago I picked up a framed antique print called A Little Bookworm. The print was tattered, damaged, and the frame full of dents, but the print spoke to me right away. I knew it was destined to be a part of our home.
Maybe it was the darkness mixed with childhood innocence, maybe the owl, maybe the cheeky little bum peeking through the child’s onesie, maybe just the fact that it’s someone reading; likely, it’s all of these factors, plus the fact that the kid reminds me of my son Gus. Actually, a few of the reprints I’m working on remind me of Gus.
I re-framed the print and it has lived on our playroom wall. My kids love it, giggling of course at that cheeky little bum. There is something so charming about the scene.
After I started Rue Noelle and began making lists and lists of different types of art to work on outside of custom prints, a new category of art dawned on me: Reprints.
In the U.S., generally speaking, works of art published before 1929 are in the “public domain”. This is why, for example, you can legally buy copies of prints by masters of art (think Van Gogh, Rembrandt, Cassatt, Picasso) pretty much anywhere.
So… what does this have to do with Rue Noelle?
I had another one of those useful “aha!” moments: I can restore antique (pre-1929) art, design and draw a background around it, and print it. Voila: a reprint!
Antiques + photography + restoration + designing + art…. so many things I love all wrapped up into one product.
While I have several in the works, I am very eager to get my very first one on my site: A Little Bookworm.
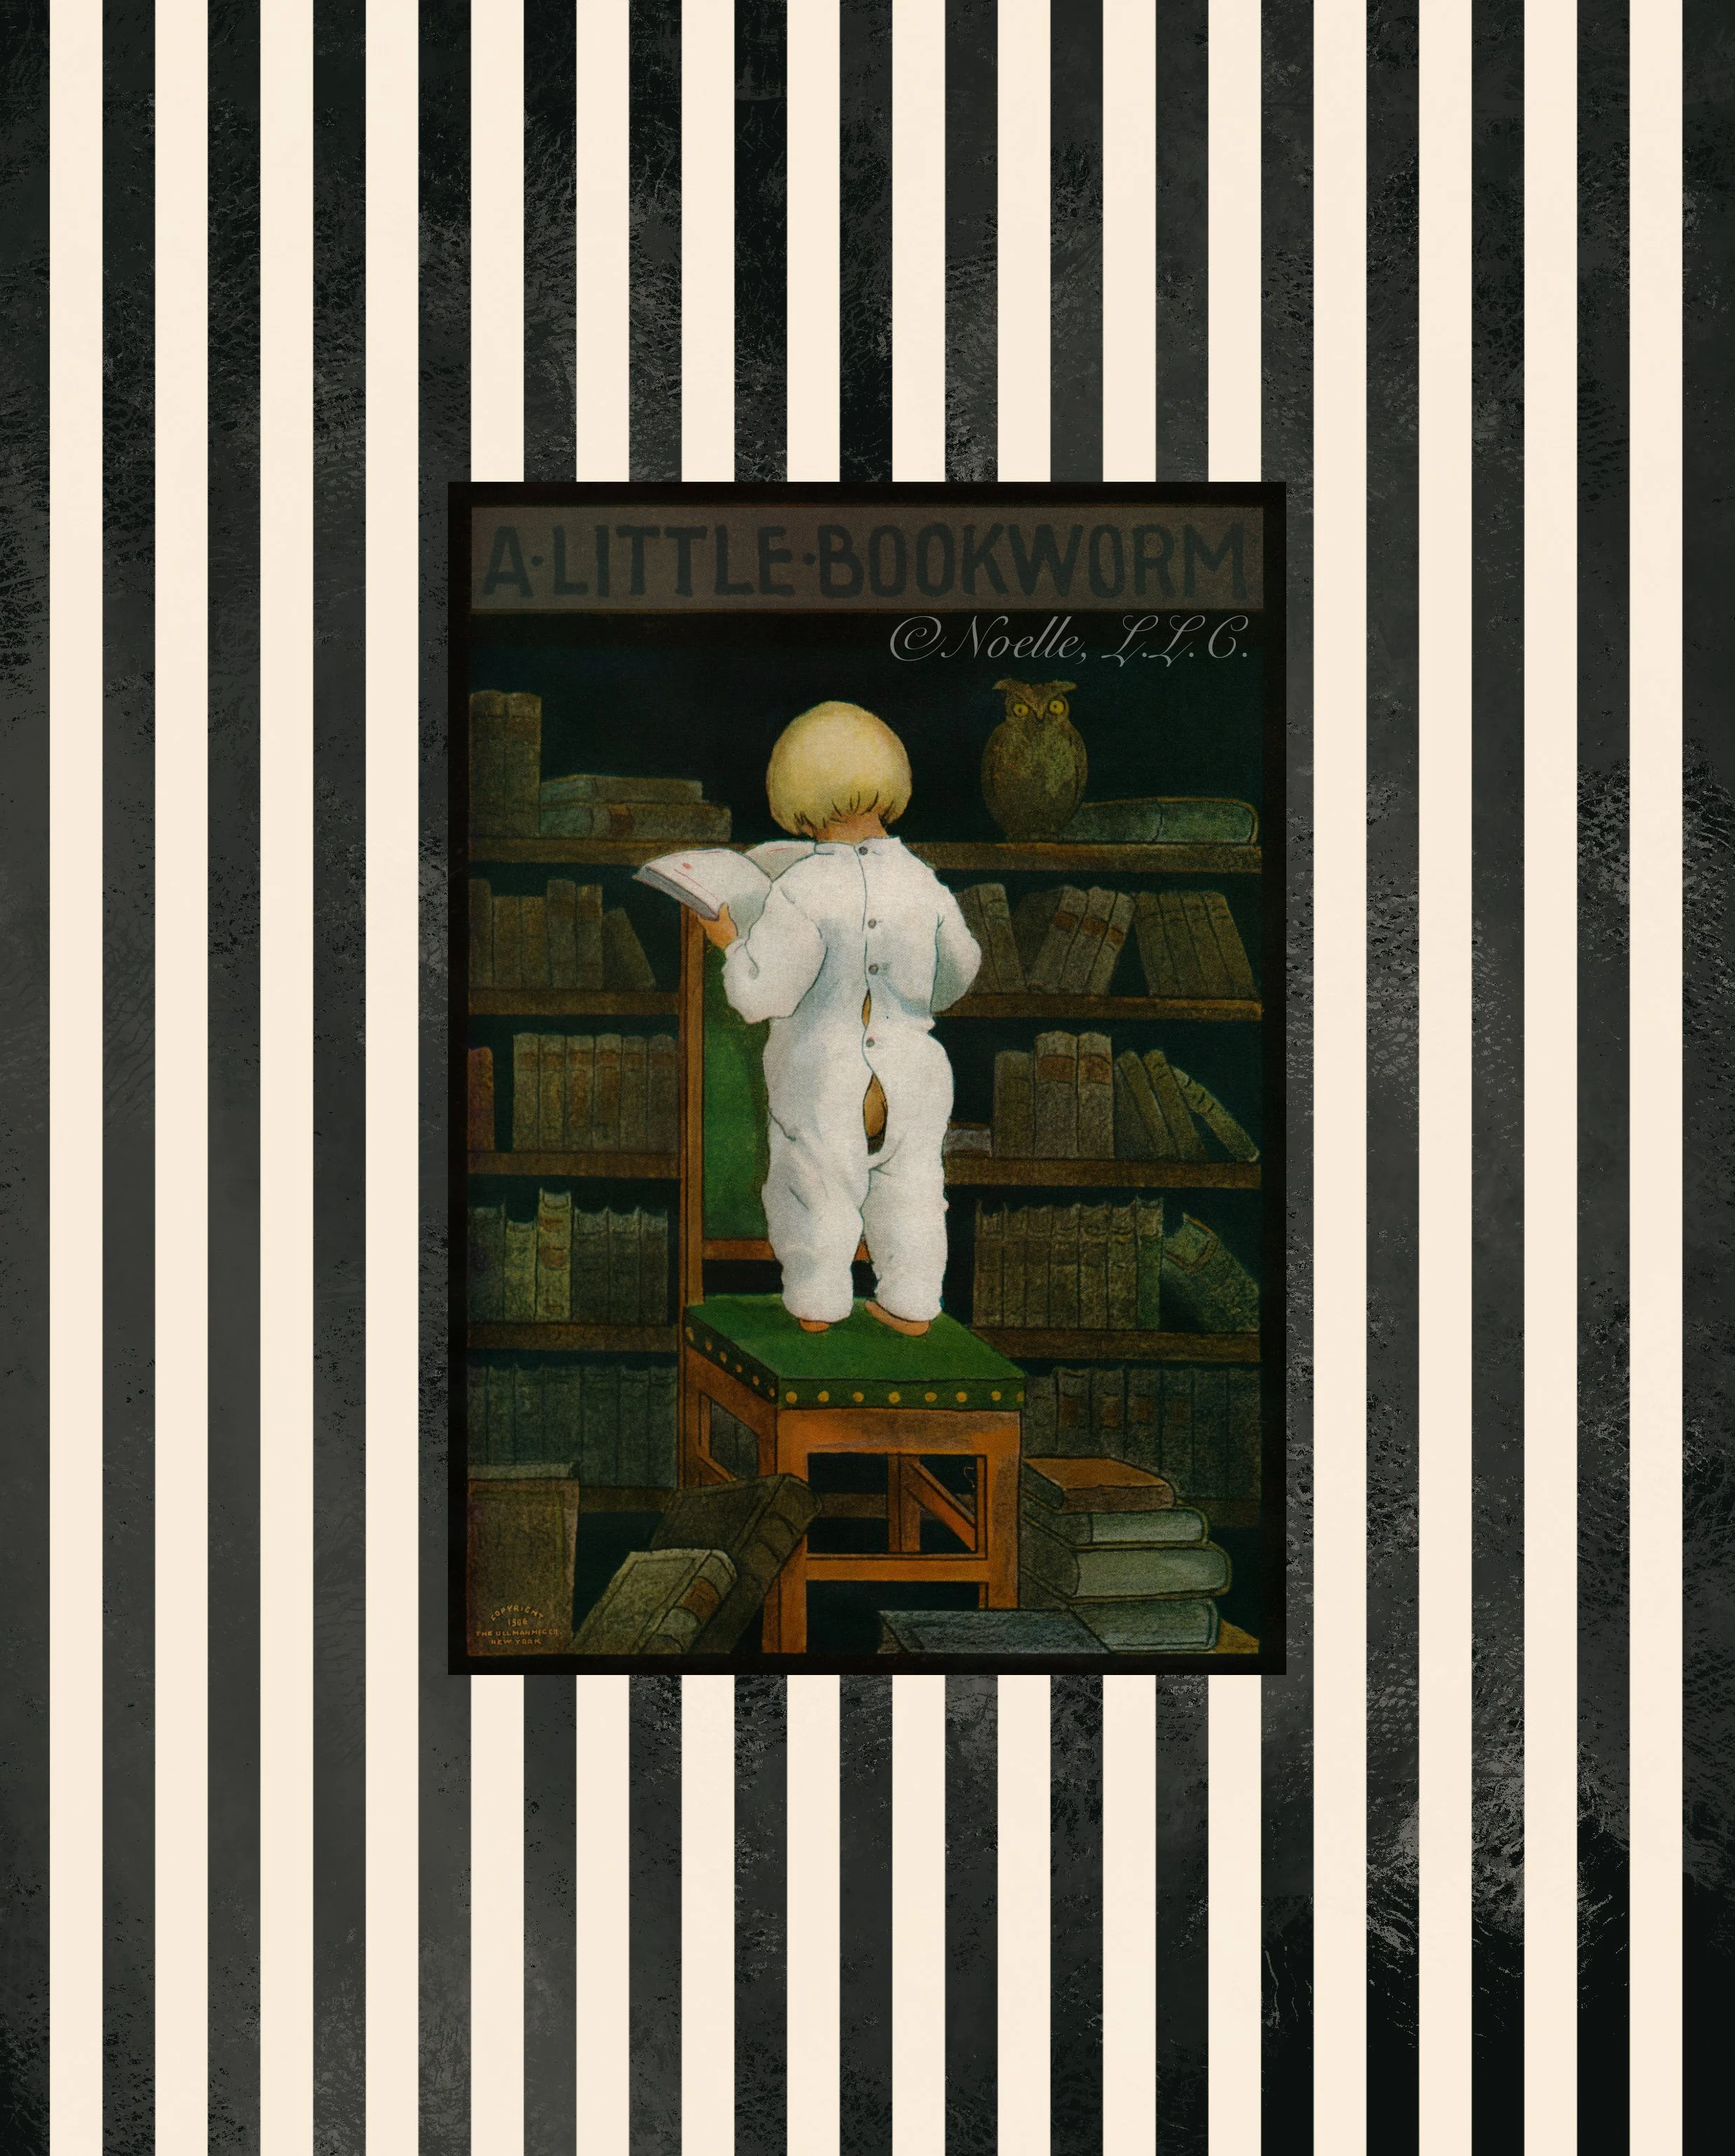
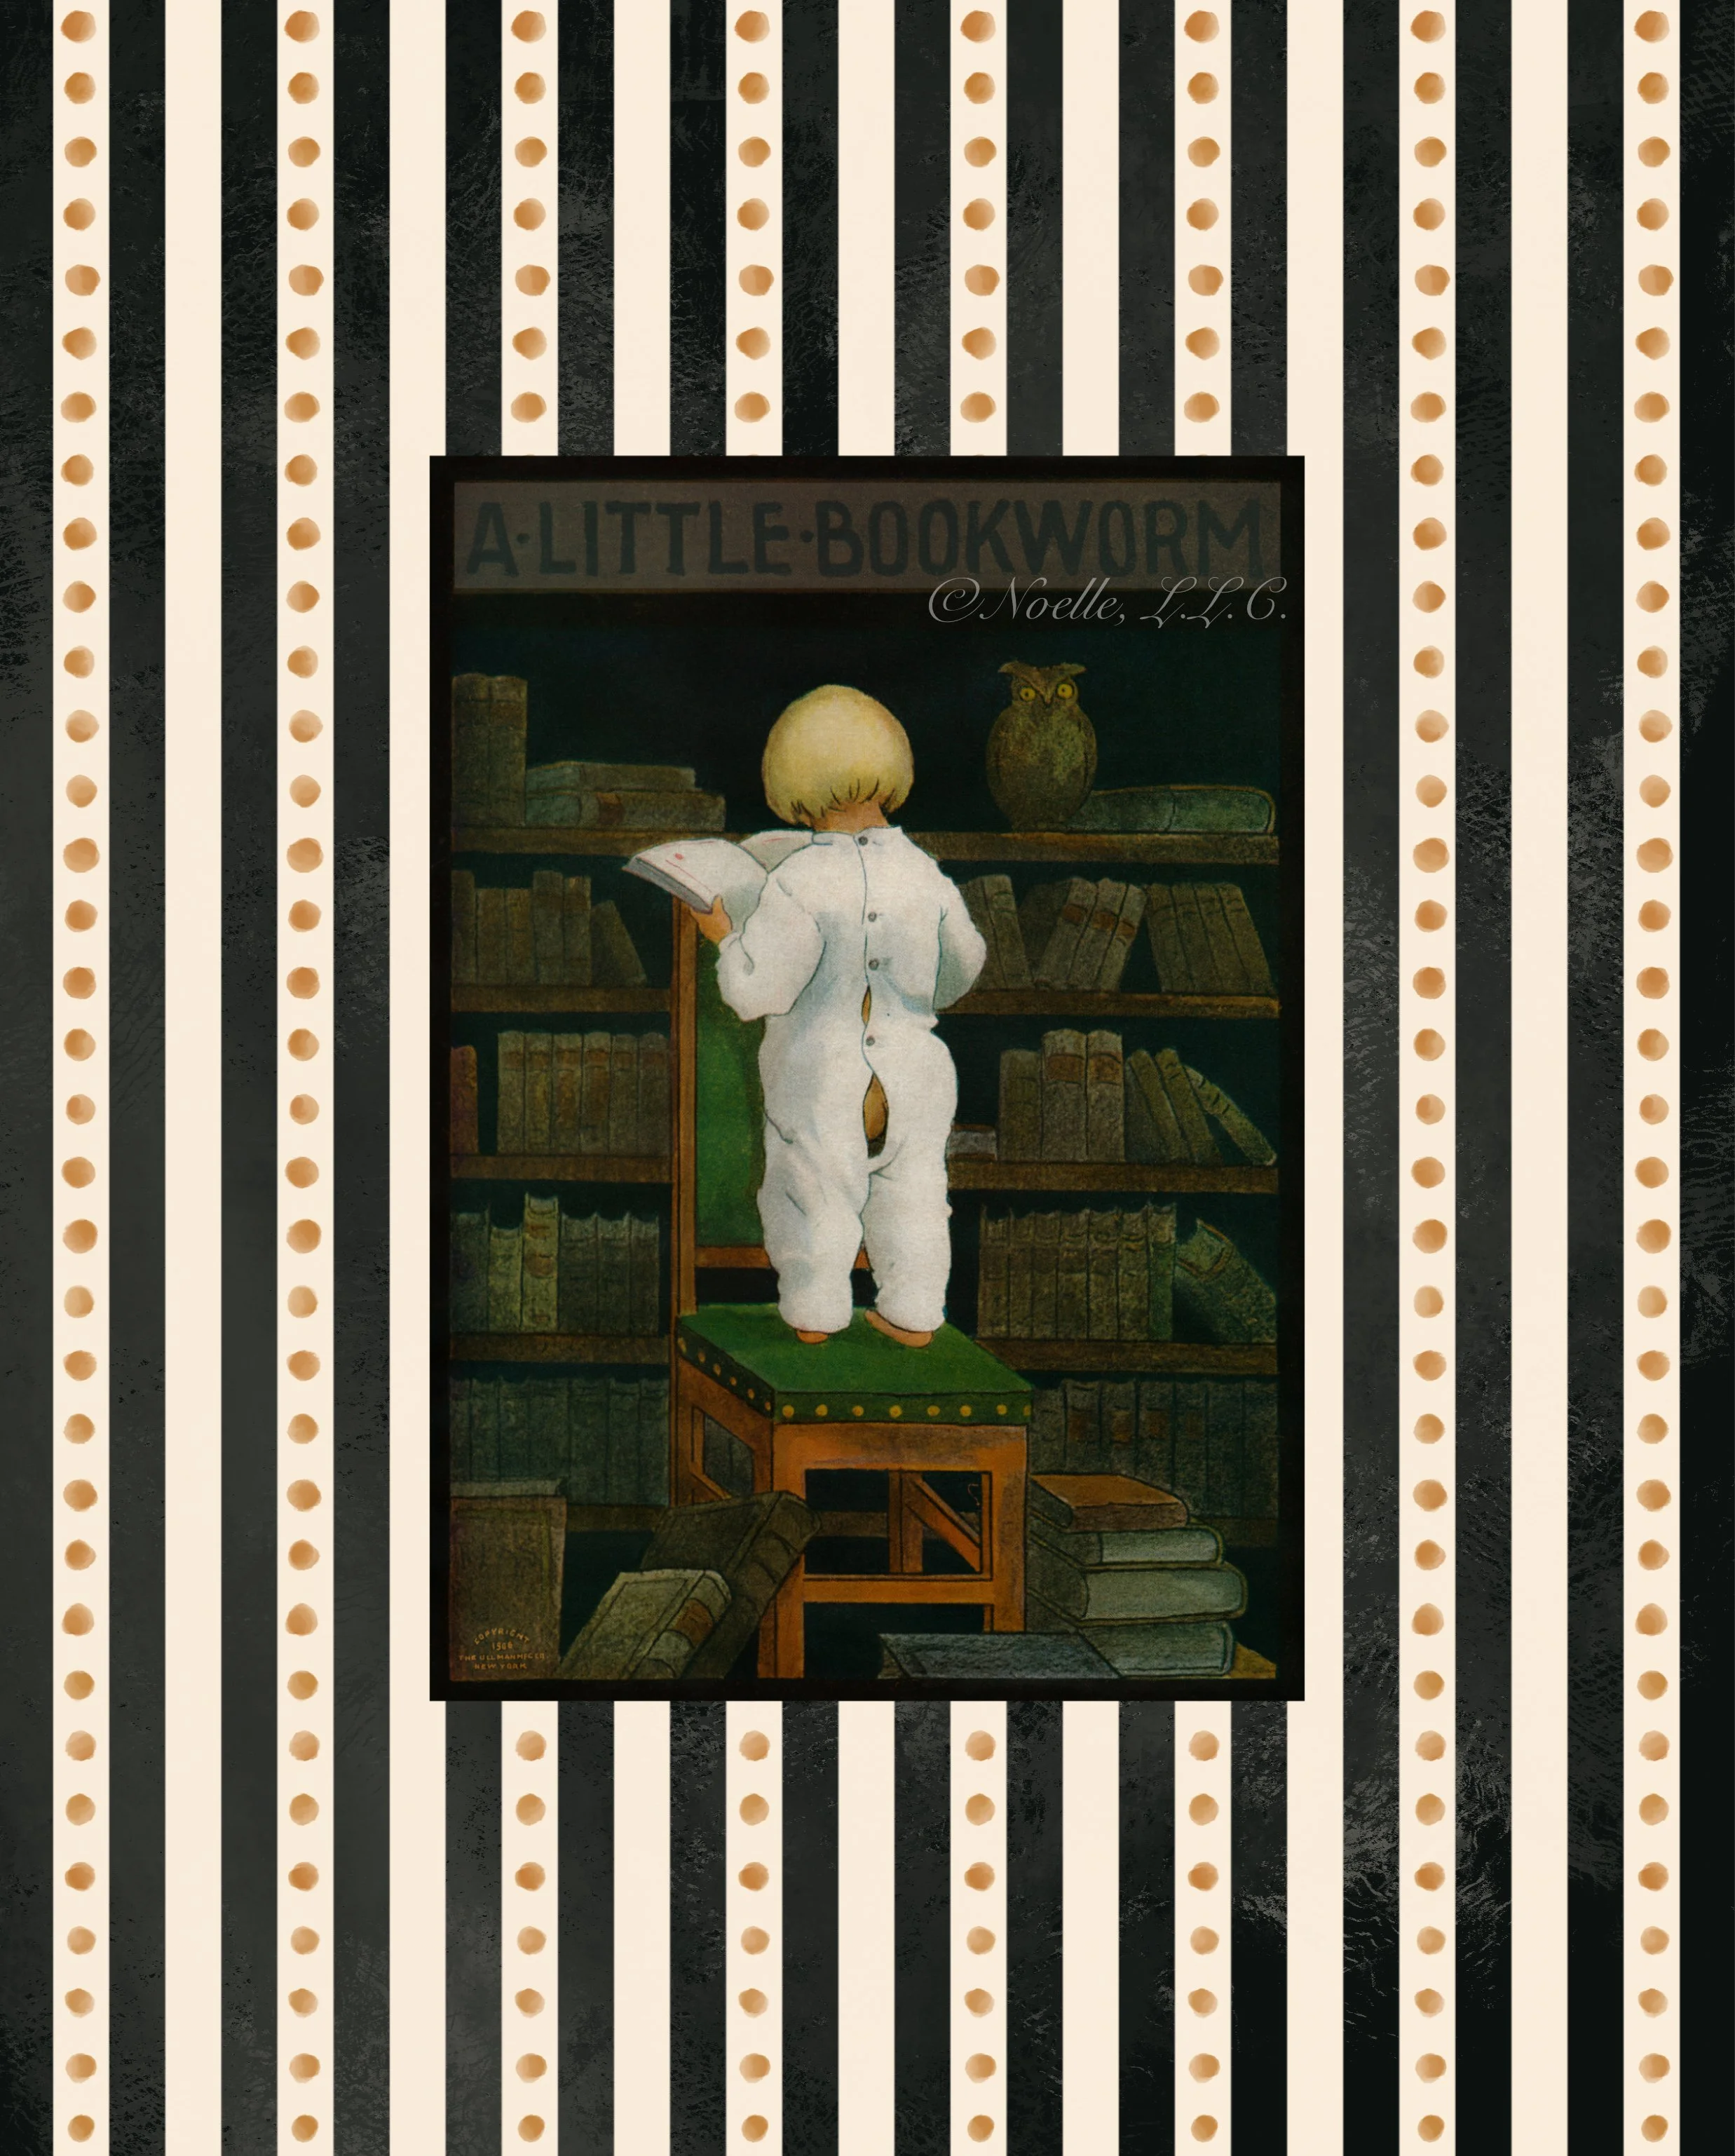

A Little Bookworm: a charming, cheeky little scene. A child stands on a chair engrossed in a book, almost glowing in their bright onesie (don’t miss the little bum peeking out!) set against a dark library filled with books and a watchful owl. This print is based on an antique lithograph from 1906 sourced by Rue Noelle.
Perfect for a library, reading nook, playroom, or nursery—this print tells a story, and is ready to join your home!
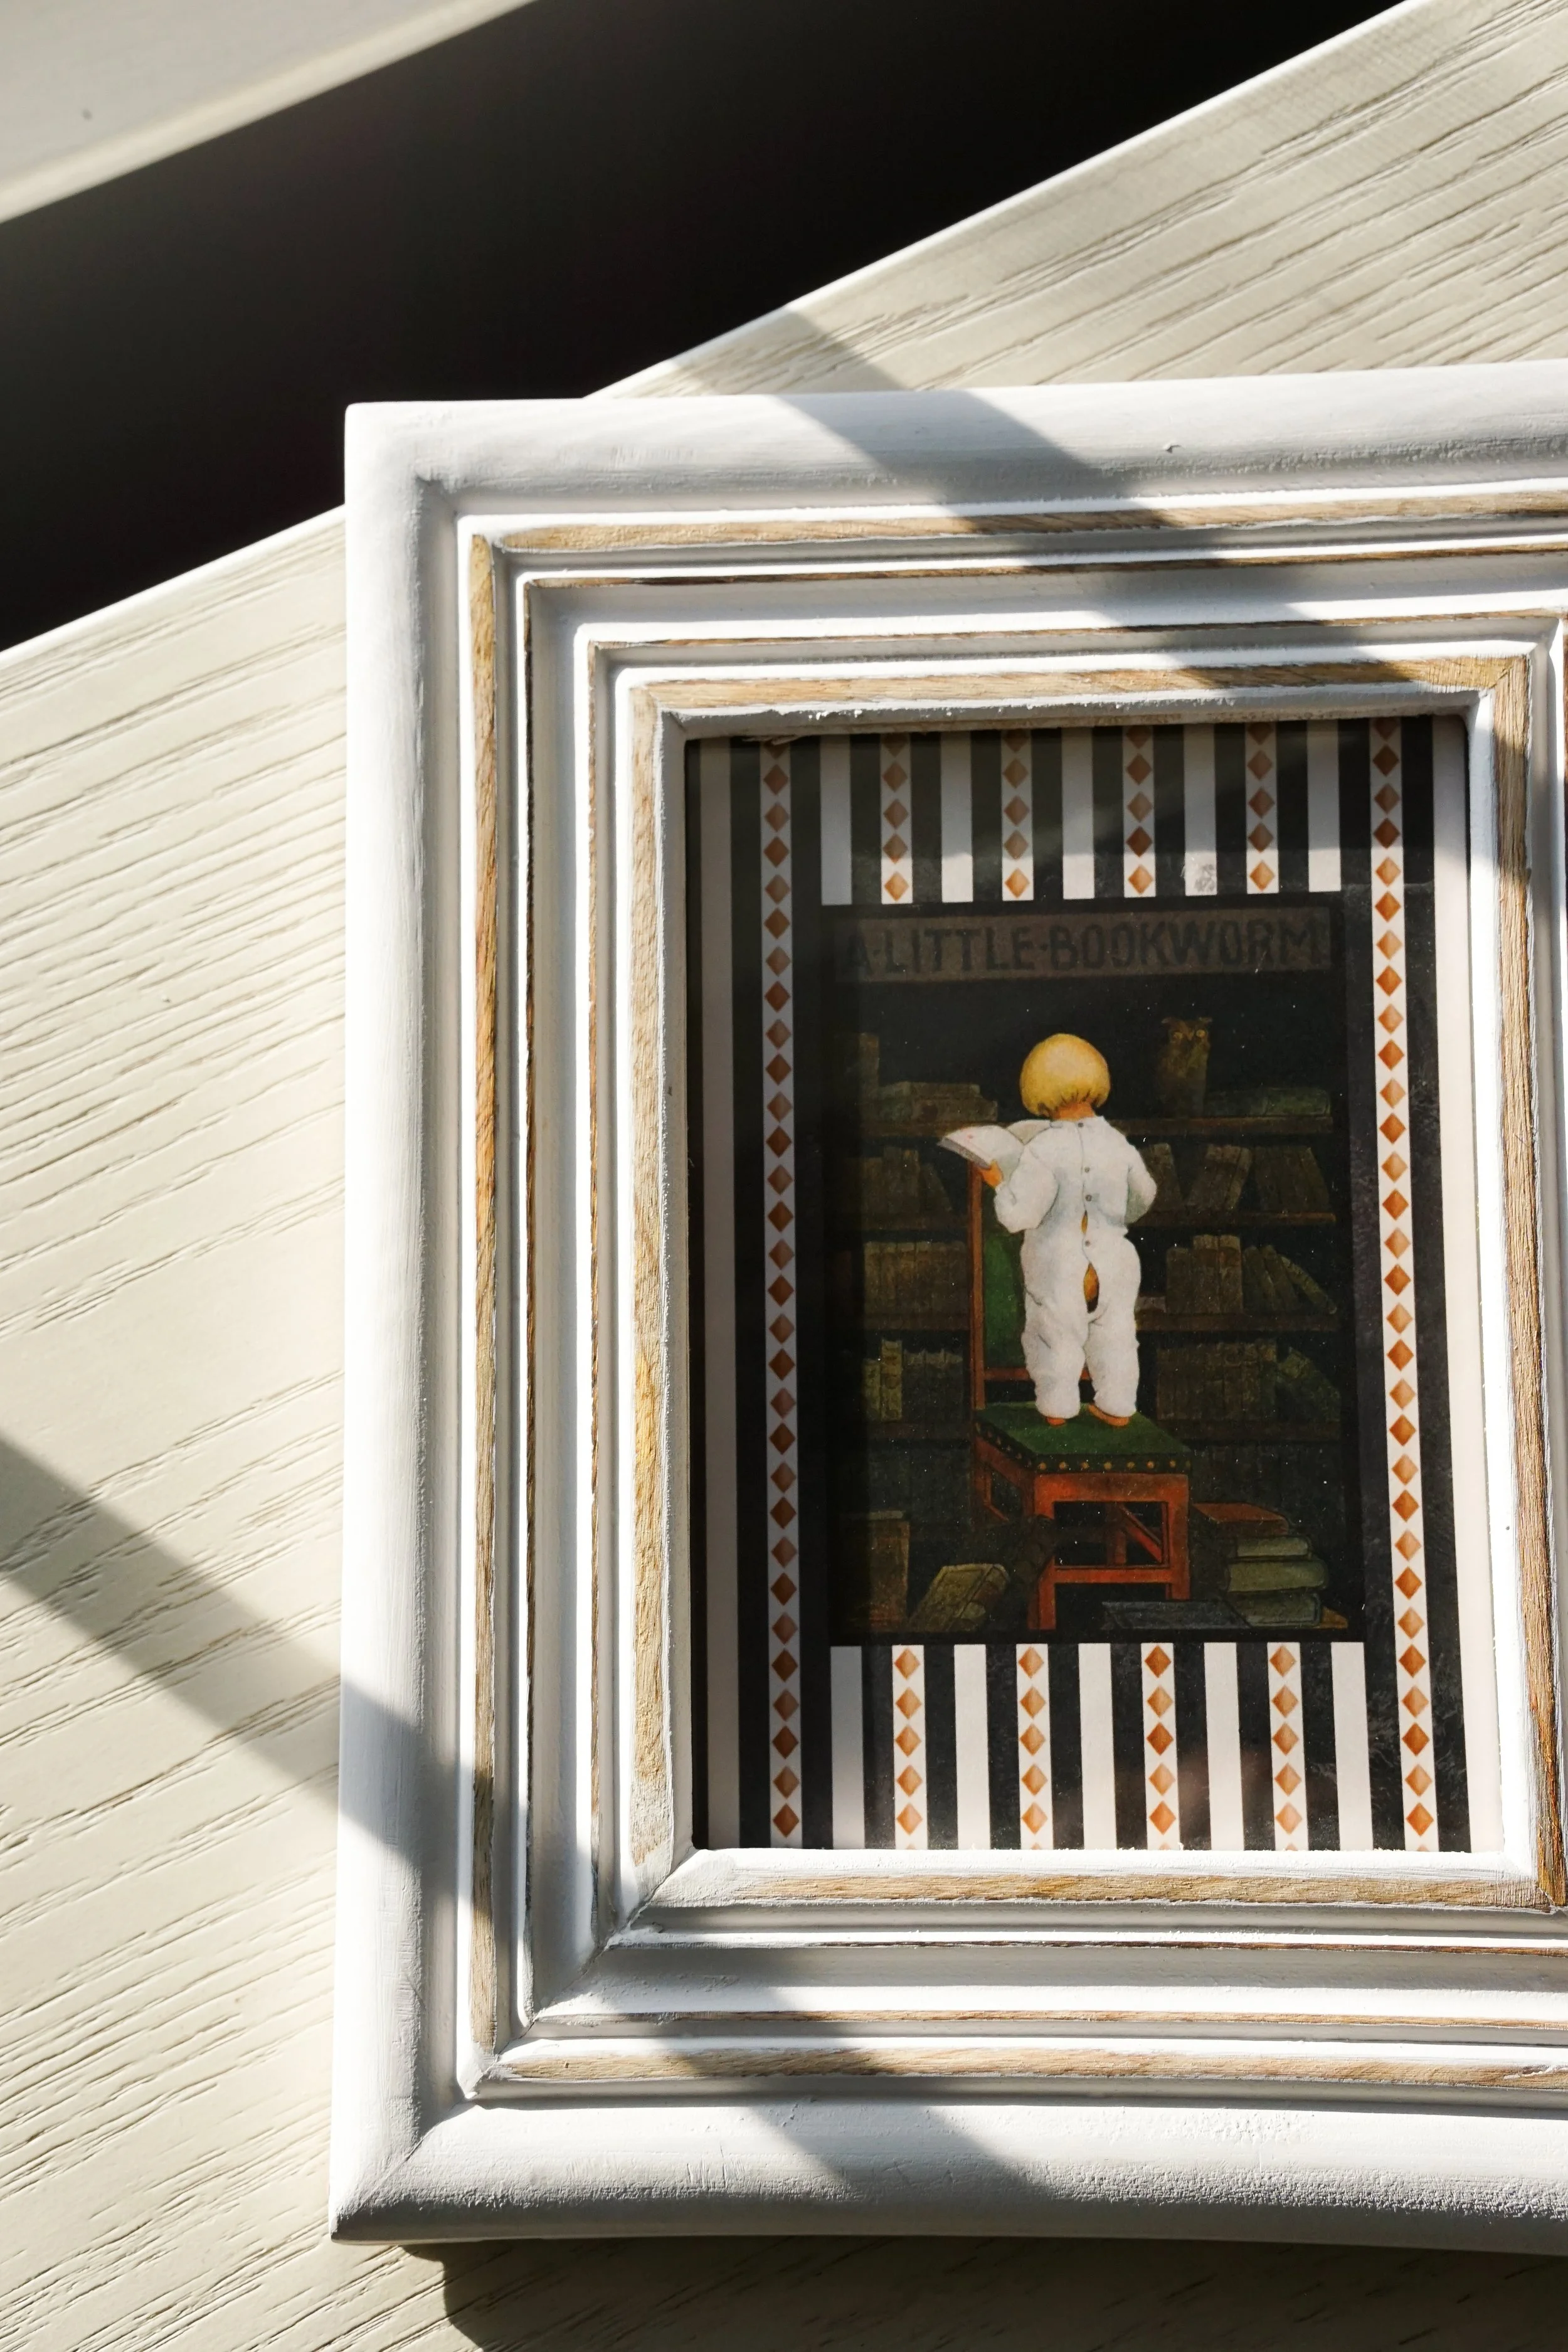
The striped border and watercolor elements are hand drawn by Shannon, designed to complement and enhance A Little Bookworm. The original print was carefully and professionally restored and reproduced, preserving original details and colors.
Choose between textured black and white stripes only, or versions with watercolor elements (dots or diamonds). All prints come on a beautiful fine art watercolor paper that uses archival quality inks, adding to the charm and texture.
This product is for the print only. An framed option is coming soon!
Here’s what I know about the print itself:
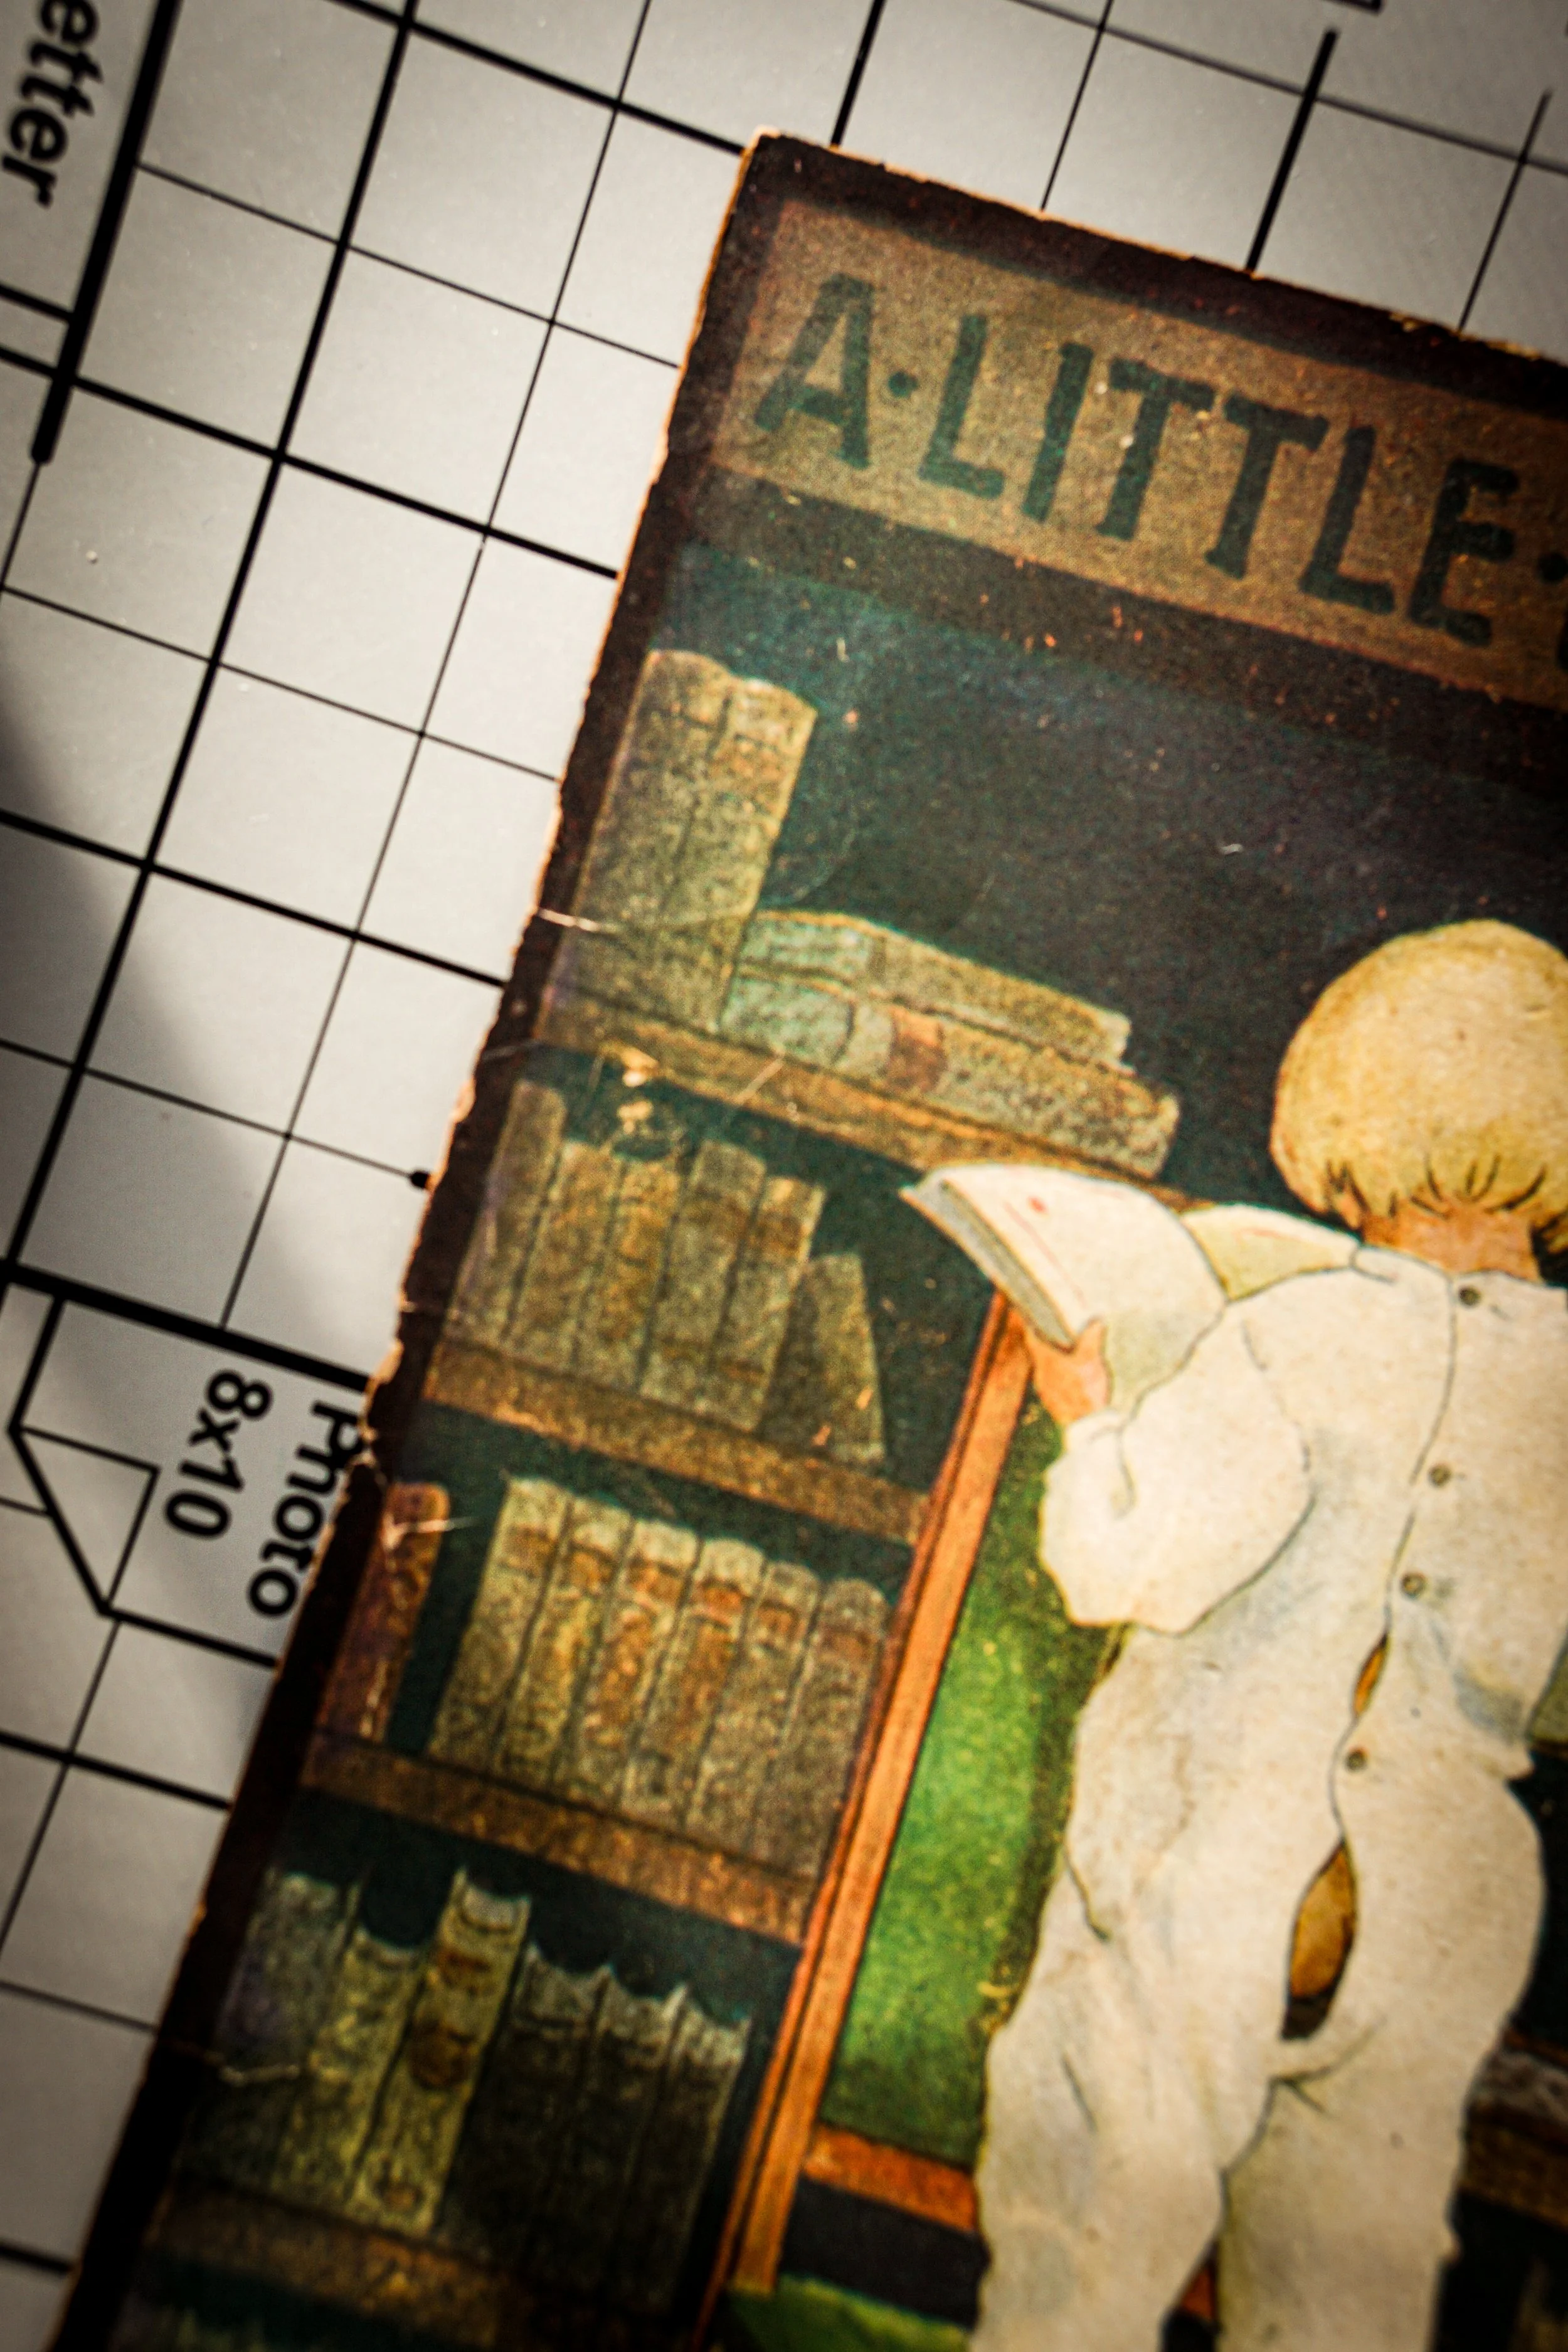
A Little Bookworm was produced in 1906 by the Ullman Manufacturing Group. There’s a little stamp with the name in date in the bottom left corner of the print. From the late 1800s through the early 1900s, the Ullman Manufacturing Group produced prints, postcards, puzzles, and more. The artist of this particular print was most likely Katherine Greenaway.
I took this print to a local print shop in Annapolis that specializes in restorations. Typically, I am able to photograph and restore prints on my own, but for this very first one I wanted a specialist to carefully repair and restore. After they did the restoration, I designed and drew a border to surround the print. A few actually—different design options.
You can choose your design and print size when purchasing. My goal is to also upload framed versions for purchase.


I hope that this print will speak to people out there the way it spoke to me. For me, it’s dark and moody but also full of innocence and cheekiness. It’s perfect for a library or reading nook, playroom or nursery. A great gift for someone who loves to read and maybe even has a little one of their own on the way. Maybe it’ll remind you of one of your kids. Maybe it will charm you the way it charmed me.
Stay tuned for more reprints across an array of subjects. These are a lot of fun; I hope they spread a little joy and bring something unique to a spot in your home!
xo,
Shannon


Our very favorite pancake recipe
A warm little recipe to feed the soul on this frigid February morning.
If you’re living somewhere that has been experiencing these frigid temperatures and icy conditions, I hope you’re cozied up under a blanket while reading this.
I truly love winter but even I am finding it difficult to be outside for long in these conditions. Our backyard is essentially an ice rink. This entertains the kids and I for a little while: shuffle-skating around the most frozen patches, sliding down smooth ice mountains, collecting fallen pine needles and sticks to make Nellie’s favorite nature soup.
But when the temperatures drop to the single digits, the wind howls so loudly that you can hear it, and it feels like the kids’ noses just stopped running from their last round of colds, we agree it might not be the best time to venture outside. There are perks to being cooped up right now, though.
The glistening landscape. Jutting mountains of dirty ice scraps by side of the road aside, the frozen snow sparkles in the light and we’ve had beautiful alpenglow in the evenings. We were mesmerized by the full moon over our frozen backyard a few nights ago.
Unique sights like my dogs skidding across our ice rink backyard while they chase each other, or my husband skating up and down our street. When this weather first started a couple of weeks ago and we had that second night where everything froze, Tommy grabbed his hockey skates and took to the streets. On his birthday no less. This was a sight we won’t soon forget.
Cozying up inside. With over a week of cancelled school and a little cold that would have kept my 4 year old home anyways, we have had the most incredibly cozy days being together. Lots of snuggling, mornings reading stacks of books piled high, endless games of chase around the house, wearing pajamas all day, forts, bingo, hot chocolate, and diving into our cold-weather-impulse-purchase, a love sac. It is truly a beautiful thing in our house to have no agenda, not rushing around anywhere; we love slowing down and sinking in. And cooking food—lots of good food.
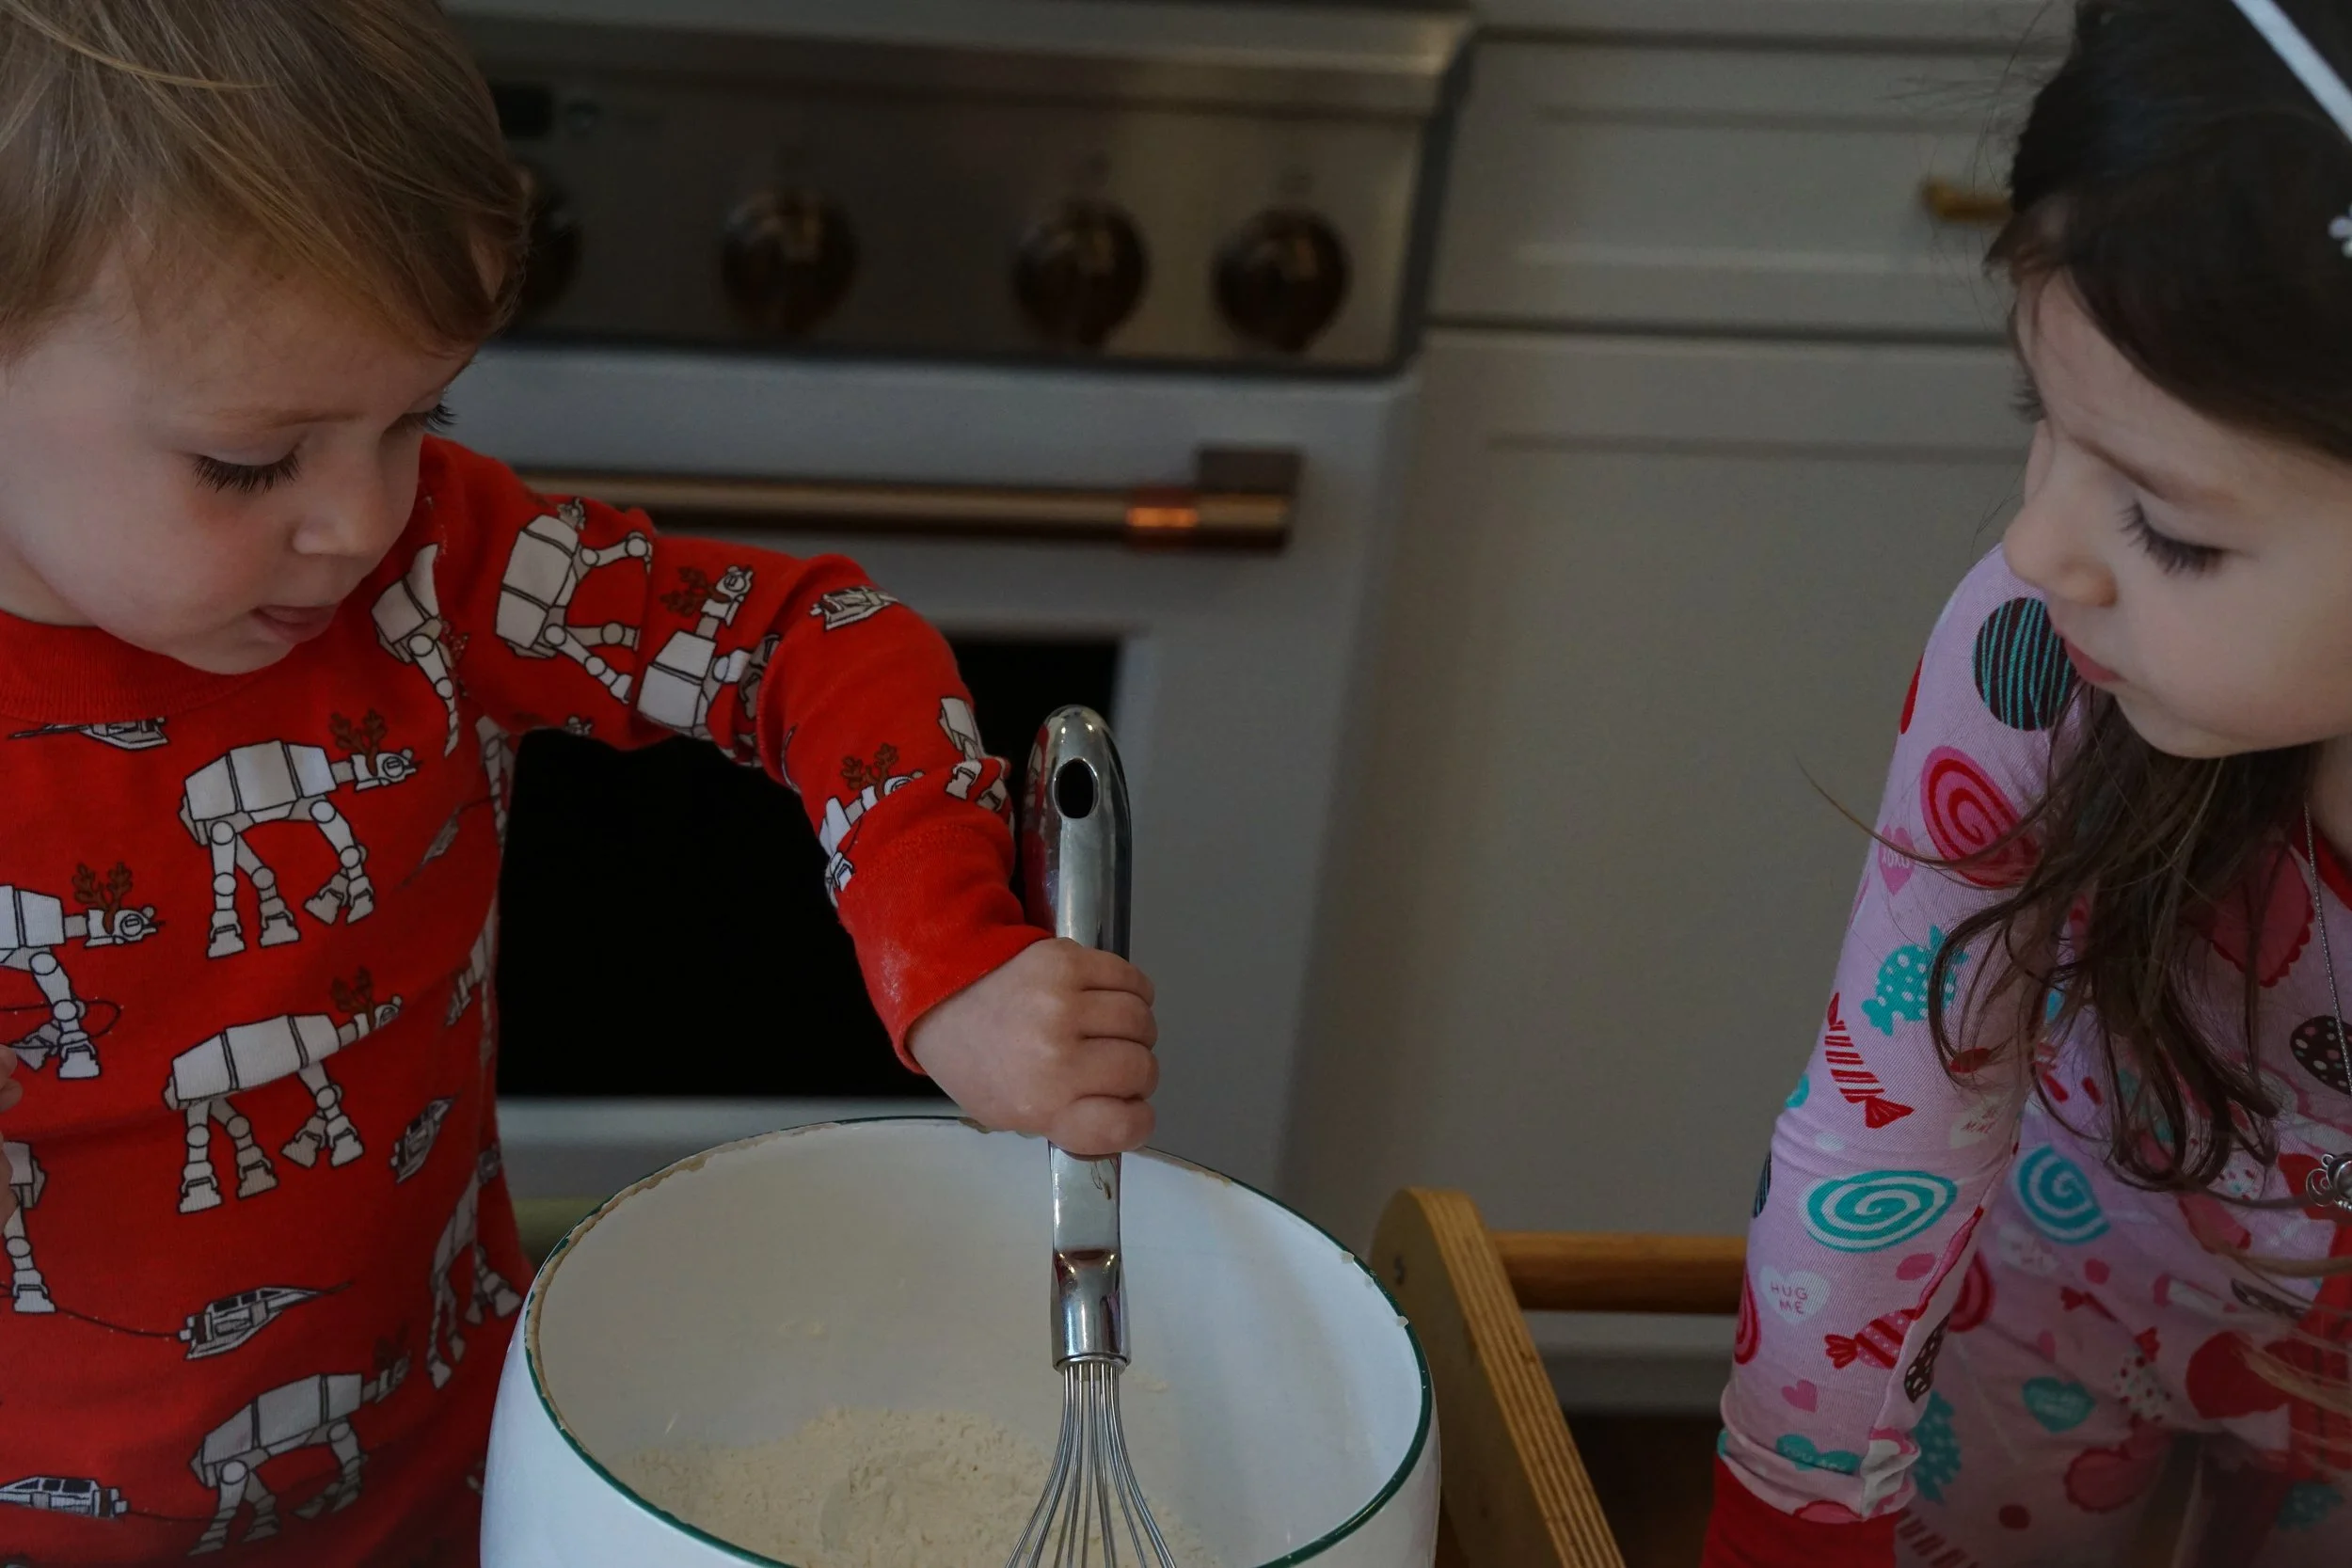
In the spirit of good food, I’ve been wanting to post our favorite pancake recipe for awhile. I can’t say “best pancake recipe” because while it’s the best pancake recipe for us… I could never make the claim that it will be everyone else’s, too.
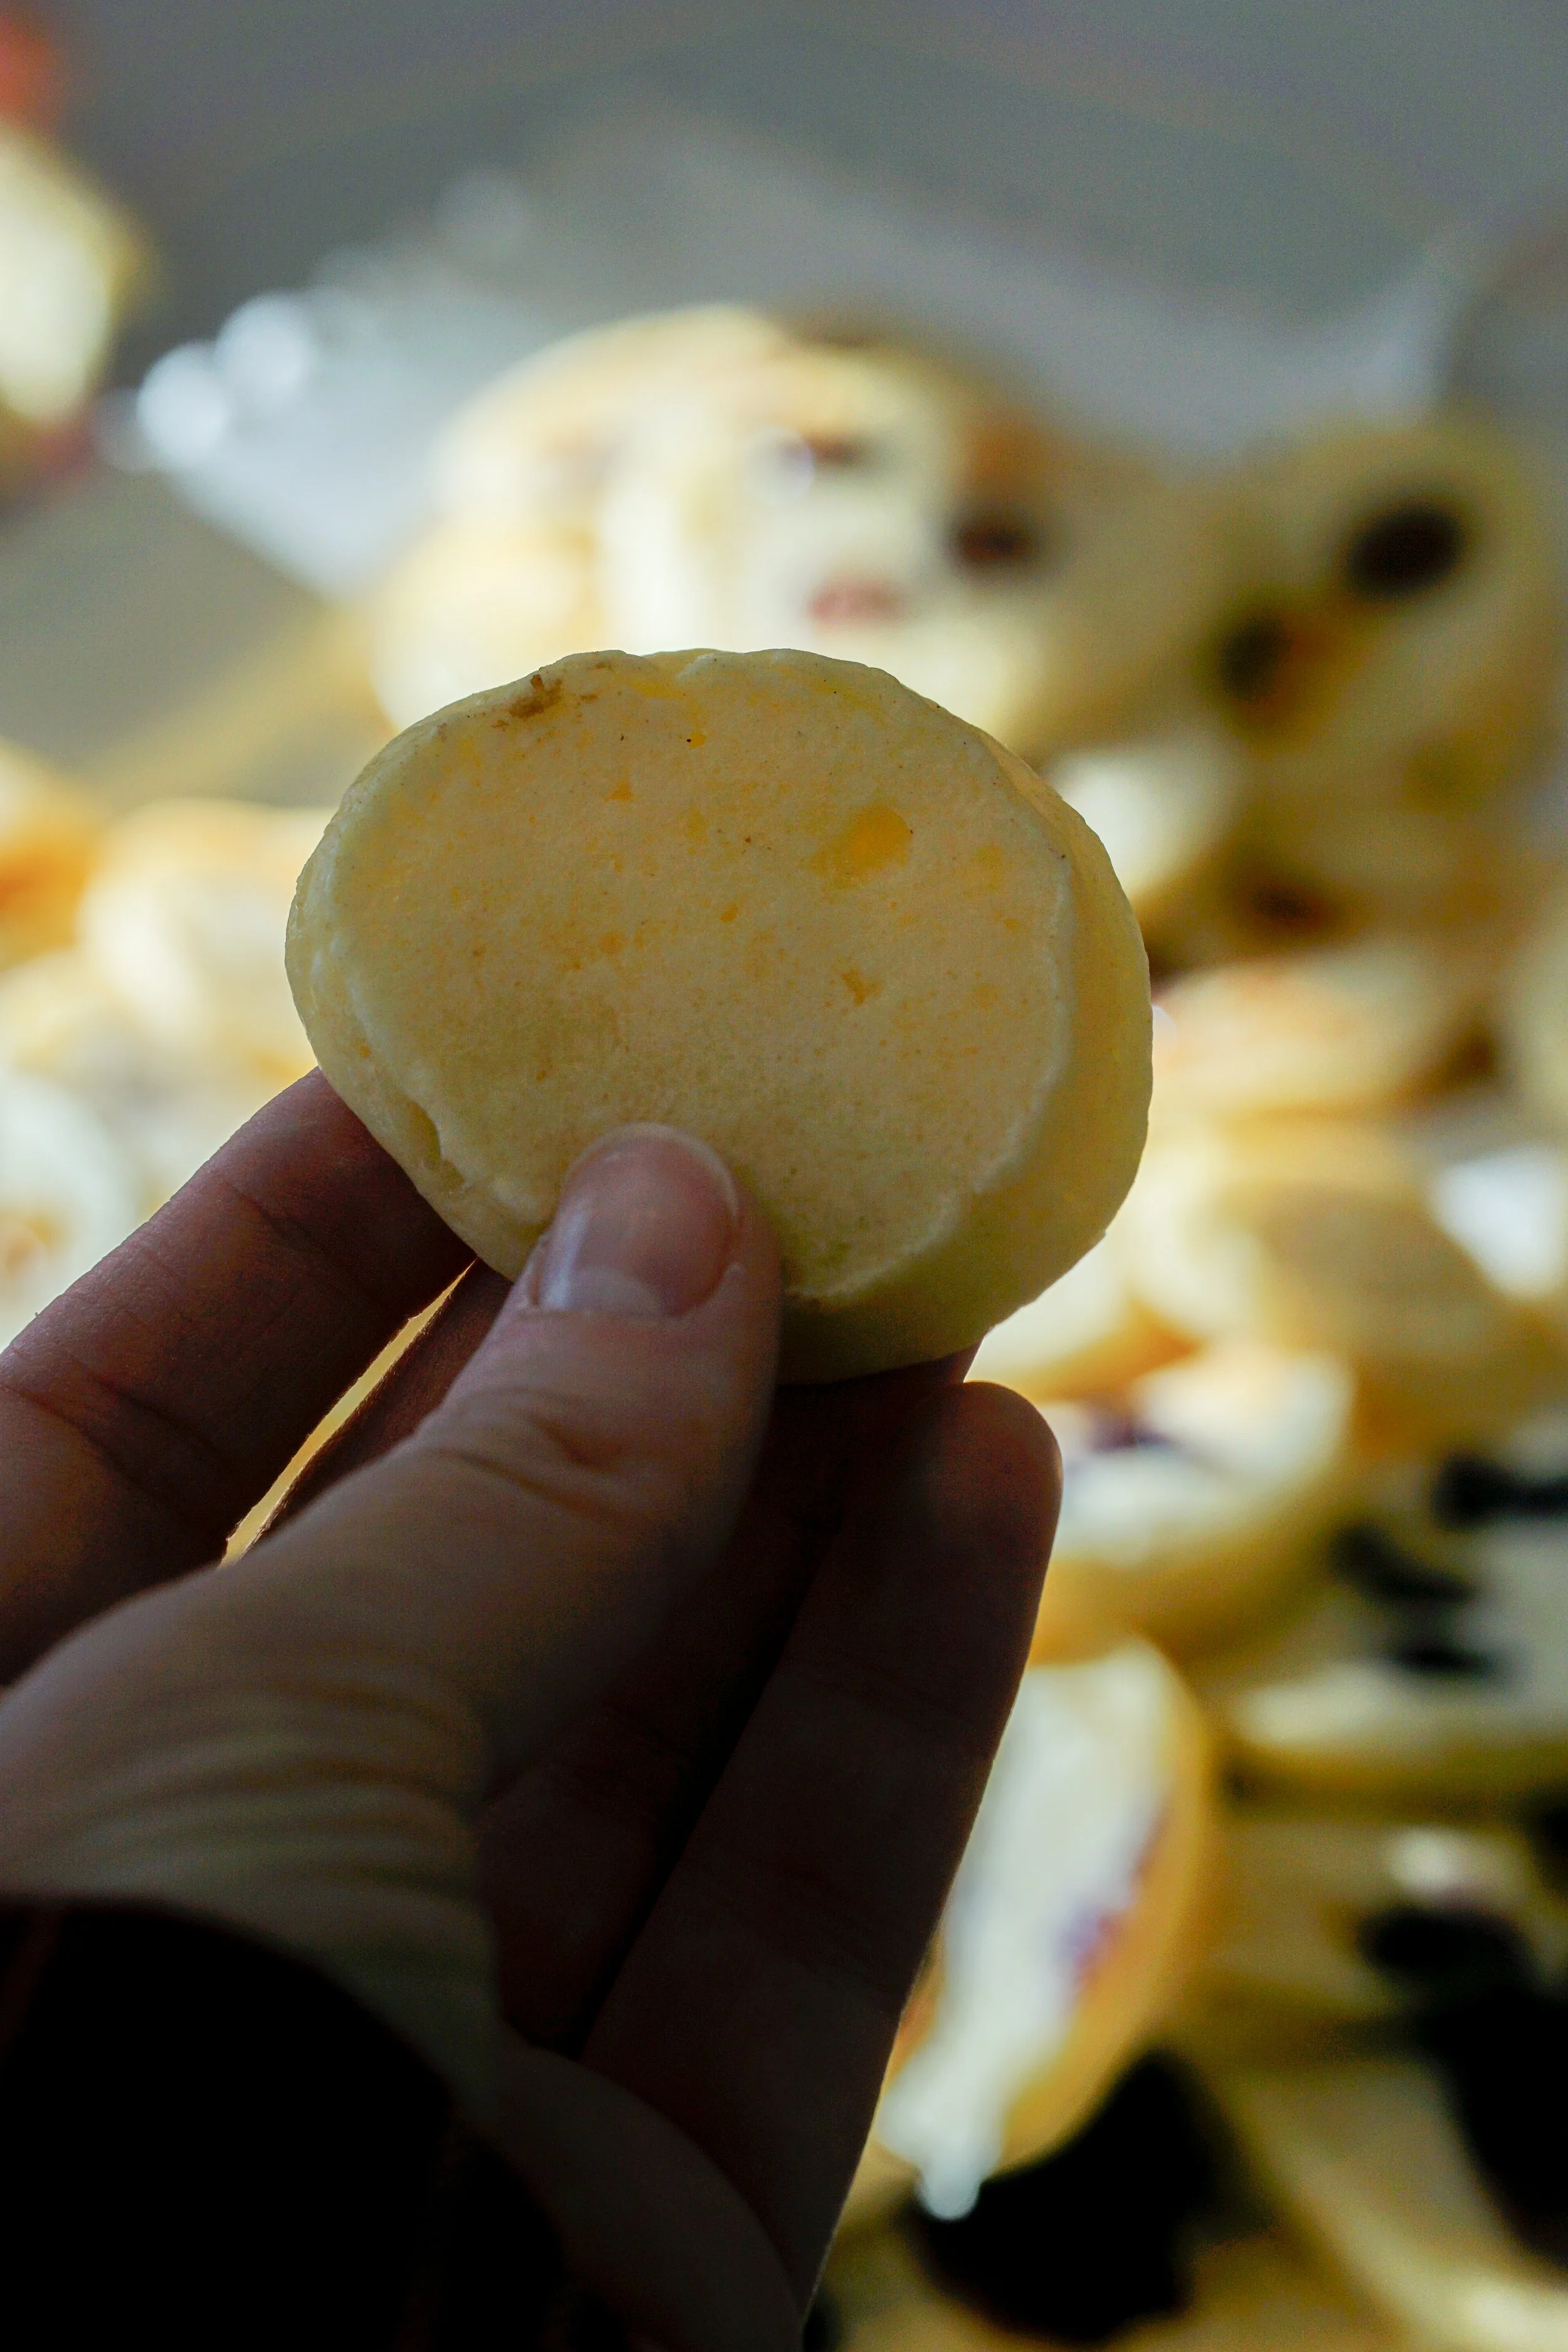
I have strong memories of making pancakes with my late grandmother, Mimi. I can remember being in her kitchen, standing on a chair next to the stove, watching the pancakes like a hawk ready to flip them with her right by my side. Mimi had a particular pancake style: small, thin, pale, and delicious (silver dollar pancakes, I think some people call them?), and I inherited a love of this style.
While I never remembered her exact recipe*, I always remembered the look and taste. For my whole life, I’ve loved making “Mimi Pancakes”. We make them a little bit bigger than she used to. Tommy likes any kind of pancake, so sometimes we fluff them up a bit with more baking powder or turn up the heat to brown the pancakes a bit more just for fun (the kids call this “Dada Style”). “Mimi Pancakes”, however, are our very favorite and the recipe we’ve made is so simple and absolutely delicious.
Mimi is not physically standing next to me 2-3 times a week when we make this recipe, cooking pancakes and teaching her great granddaughter Nellie how to keep an eye out for the telltale bubbles telling us it’s time to flip. But she’s there. The people we’ve loved and lost live on through us in whichever way we allow and accept, and through the stories we tell and pass on, no matter how small.
xo,
Shannon
*Before writing this post I asked my 3 aunts if they remembered Mimi’s recipe. They remember her using Bisquick mix, lots of butter, and some vanilla. Anything works :)
Our very favorite pancake recipe
Recipe makes 20-30 pancakes depending on size


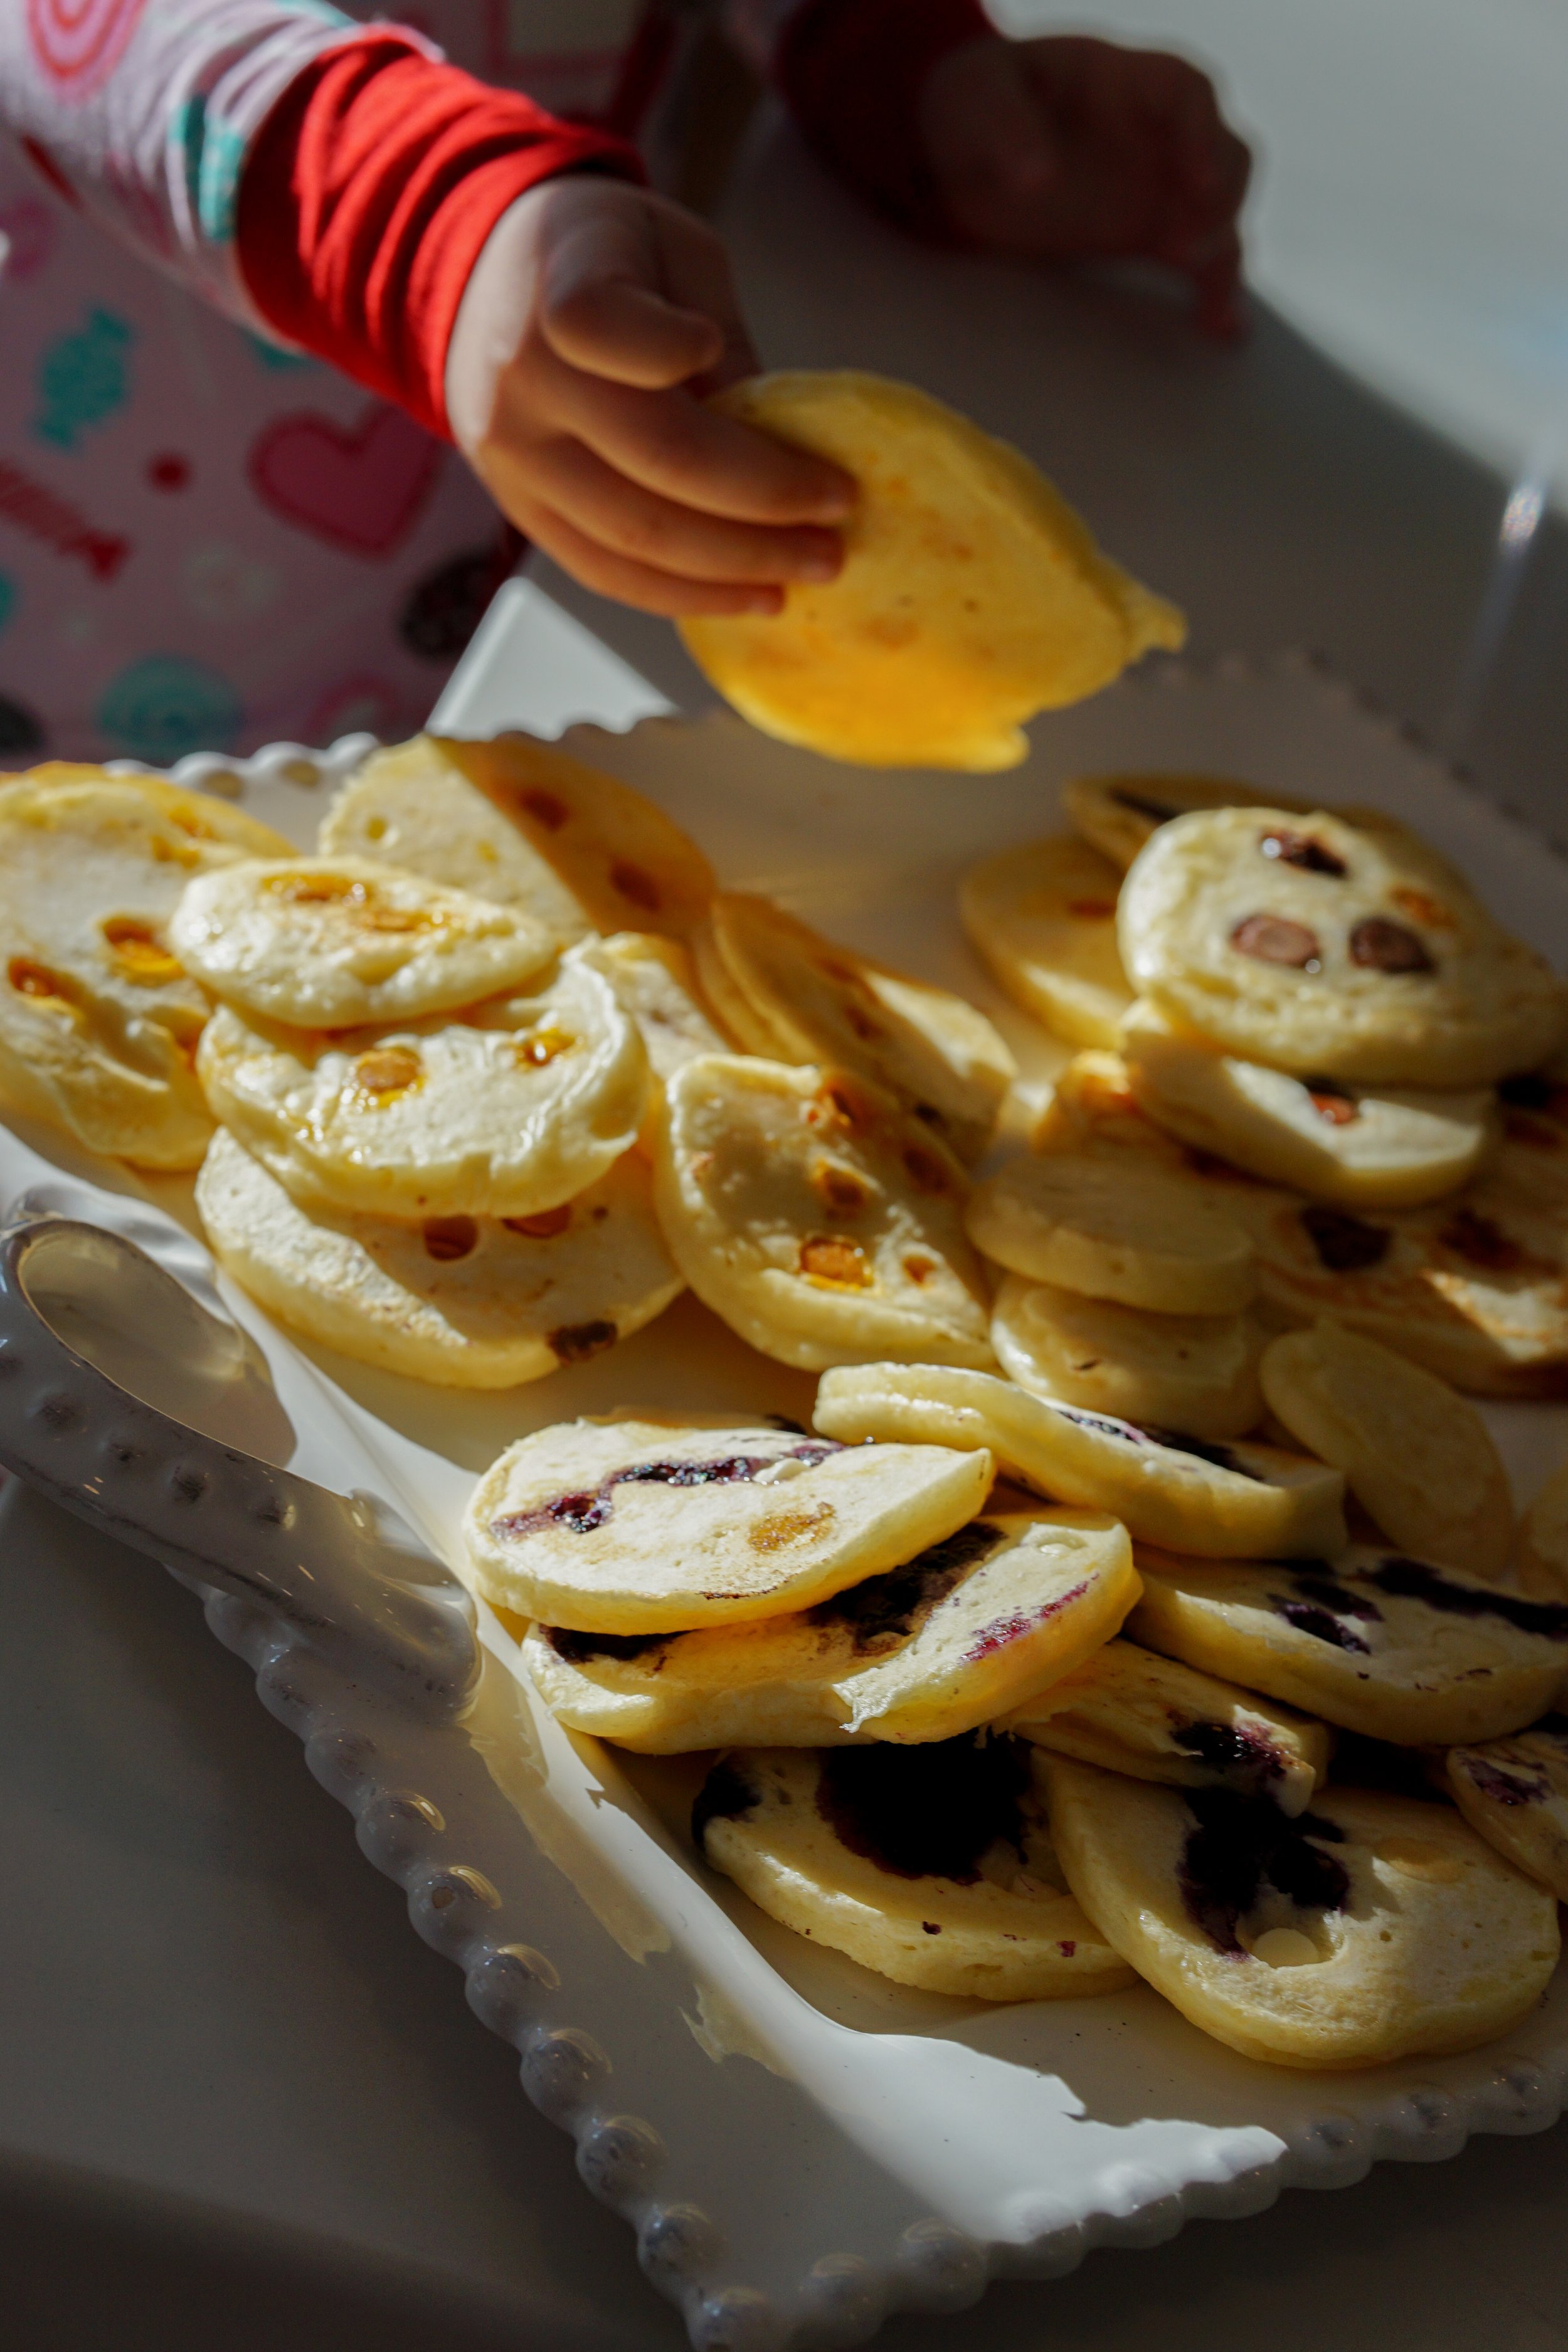

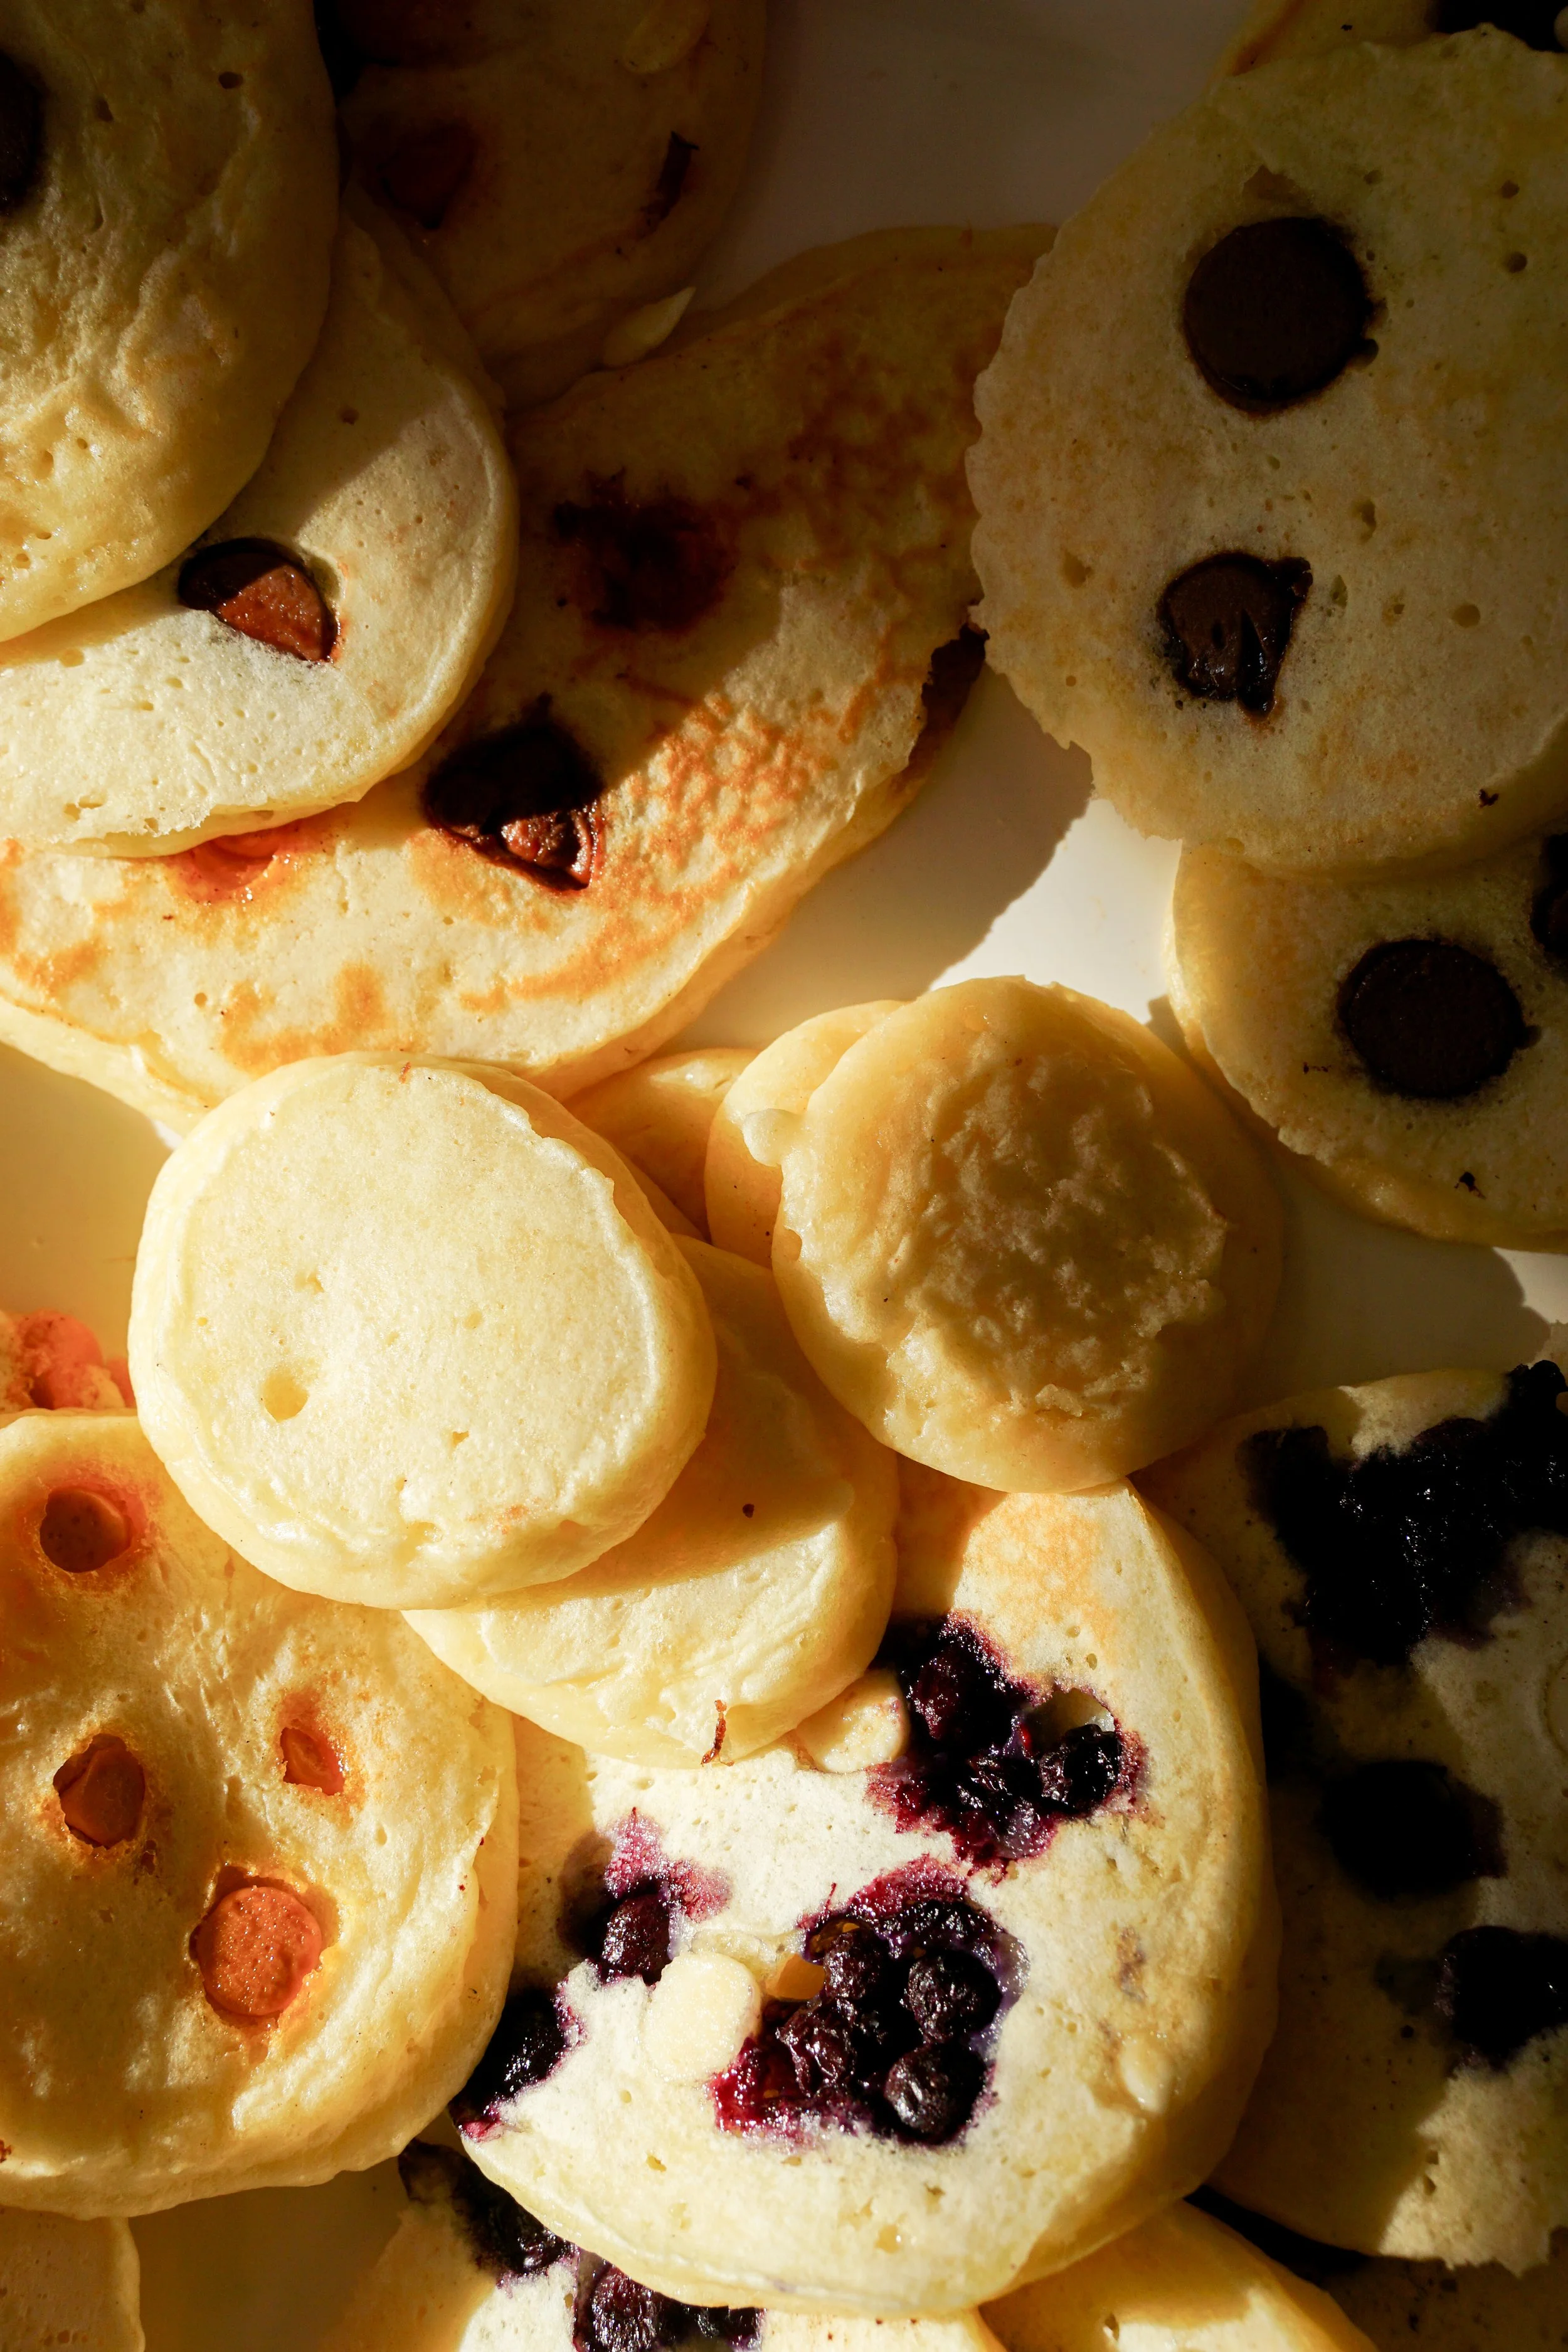
Pancakes are one of those staple food items that almost everyone loves and almost everyone has an opinion on. There’s not one way to make a pancake. They can be big, small, thick, thin. Made from scratch or using boxed mix. Dark or light coloring. Chocolate chips, blueberries, plain, or if you’re my kids—butterscotch chips. There are endless ways to make pancakes and everyone has their own preferences.
We spent a long time perfecting this extremely simple recipe, and once we perfected it we haven’t changed it. The pancakes in our recipe are light, thin, melt in your mouth, and delicious. If you like fluffier pancakes, add more baking soda or reduce the milk a bit. If you like them even more thin, add more milk. Often I’ll make about half of the batter and then thin out the remaining batter with another splash of milk.
I hope this recipe brings a little golden joy to your mornings.
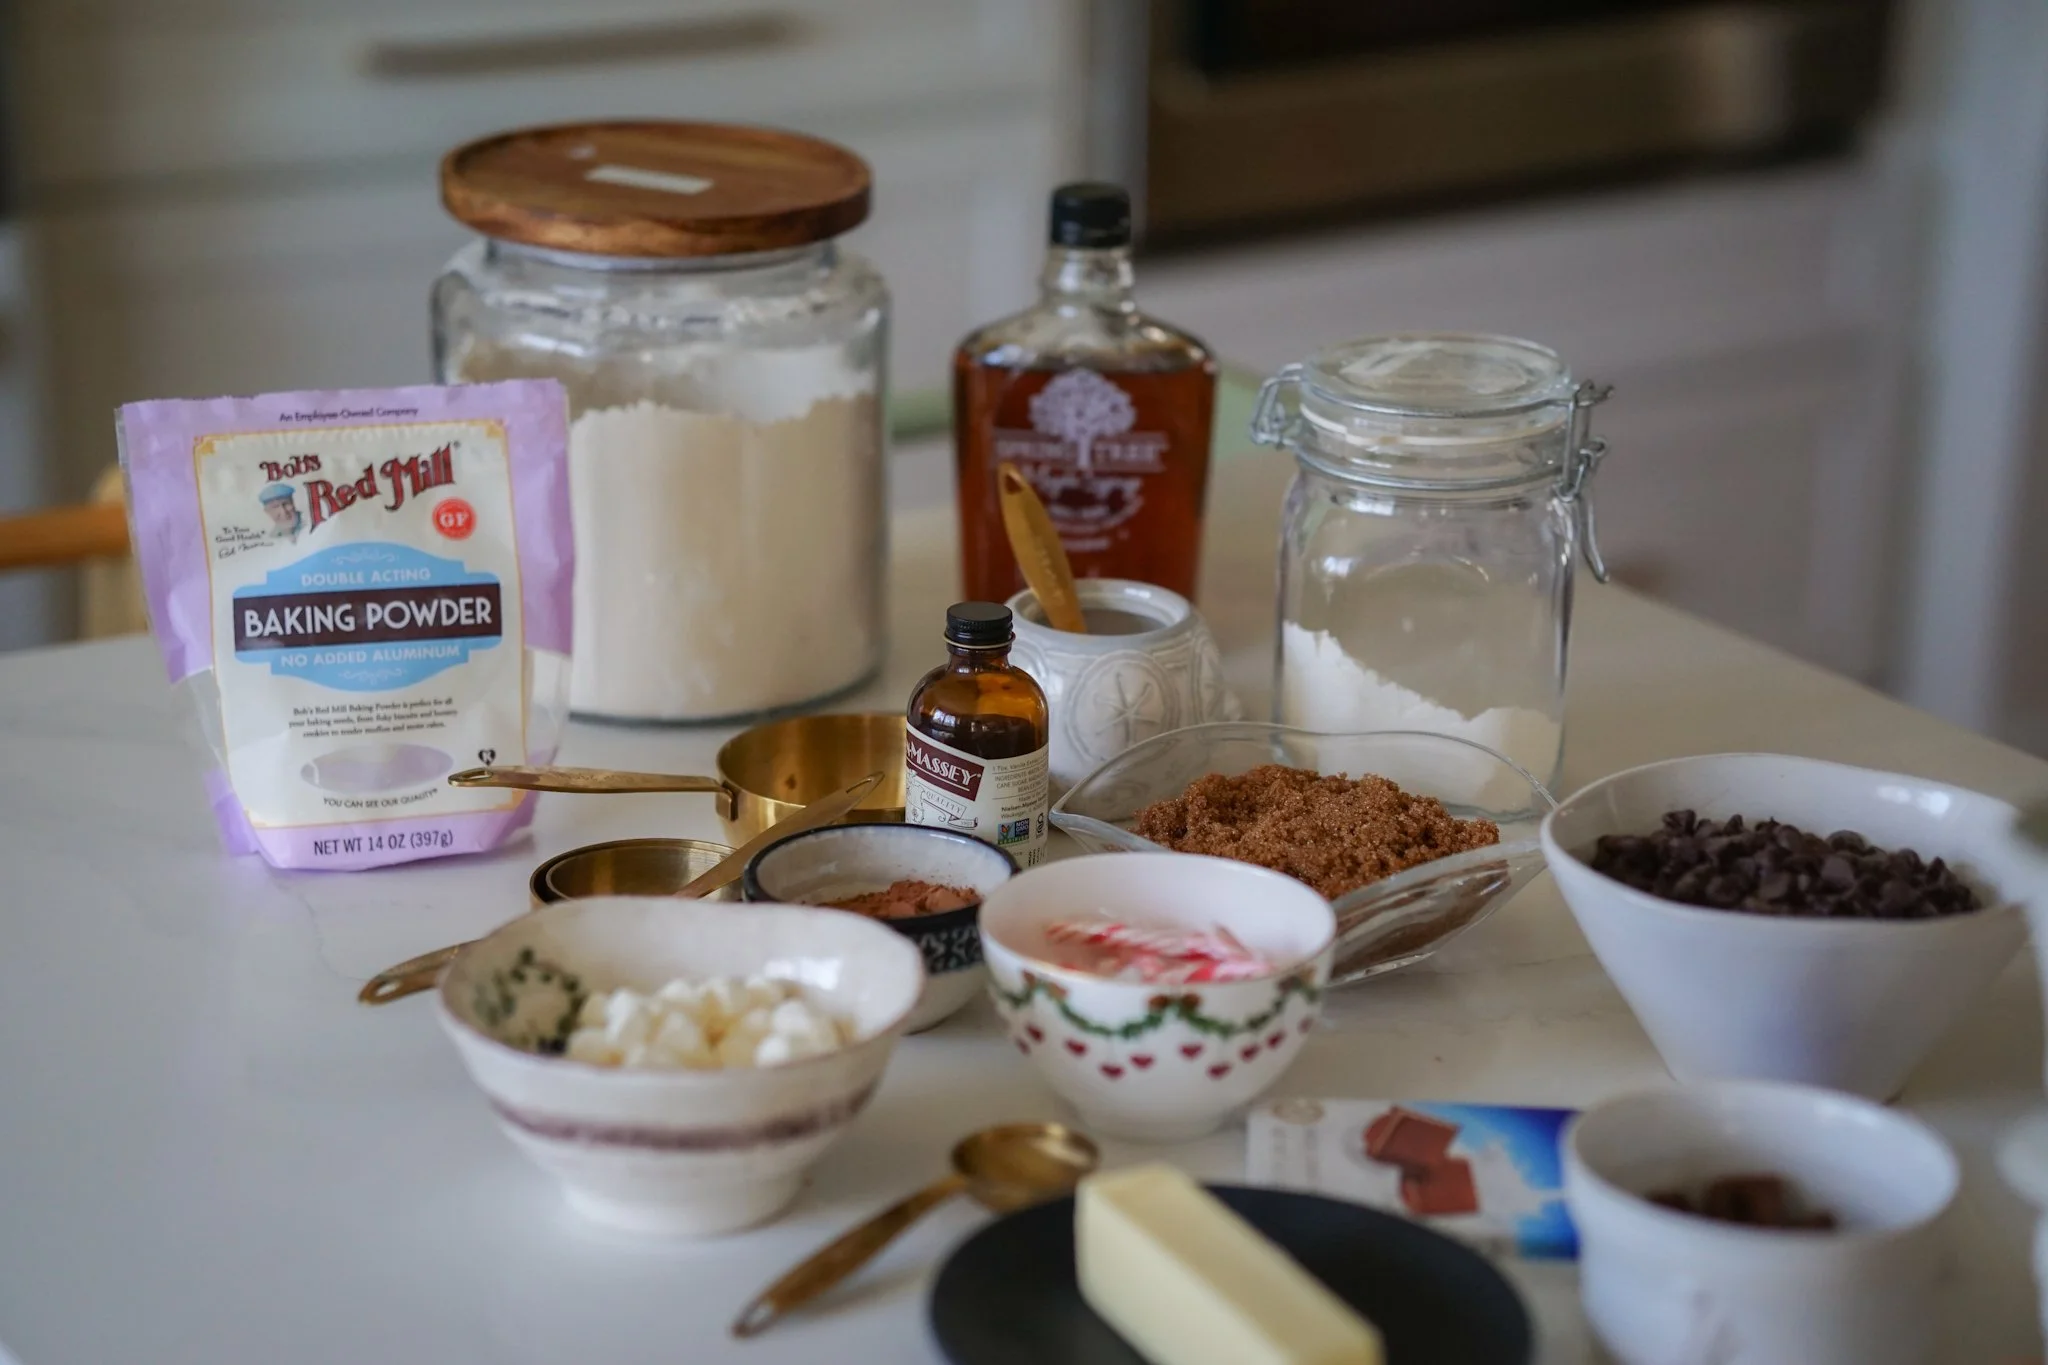
Ingredients
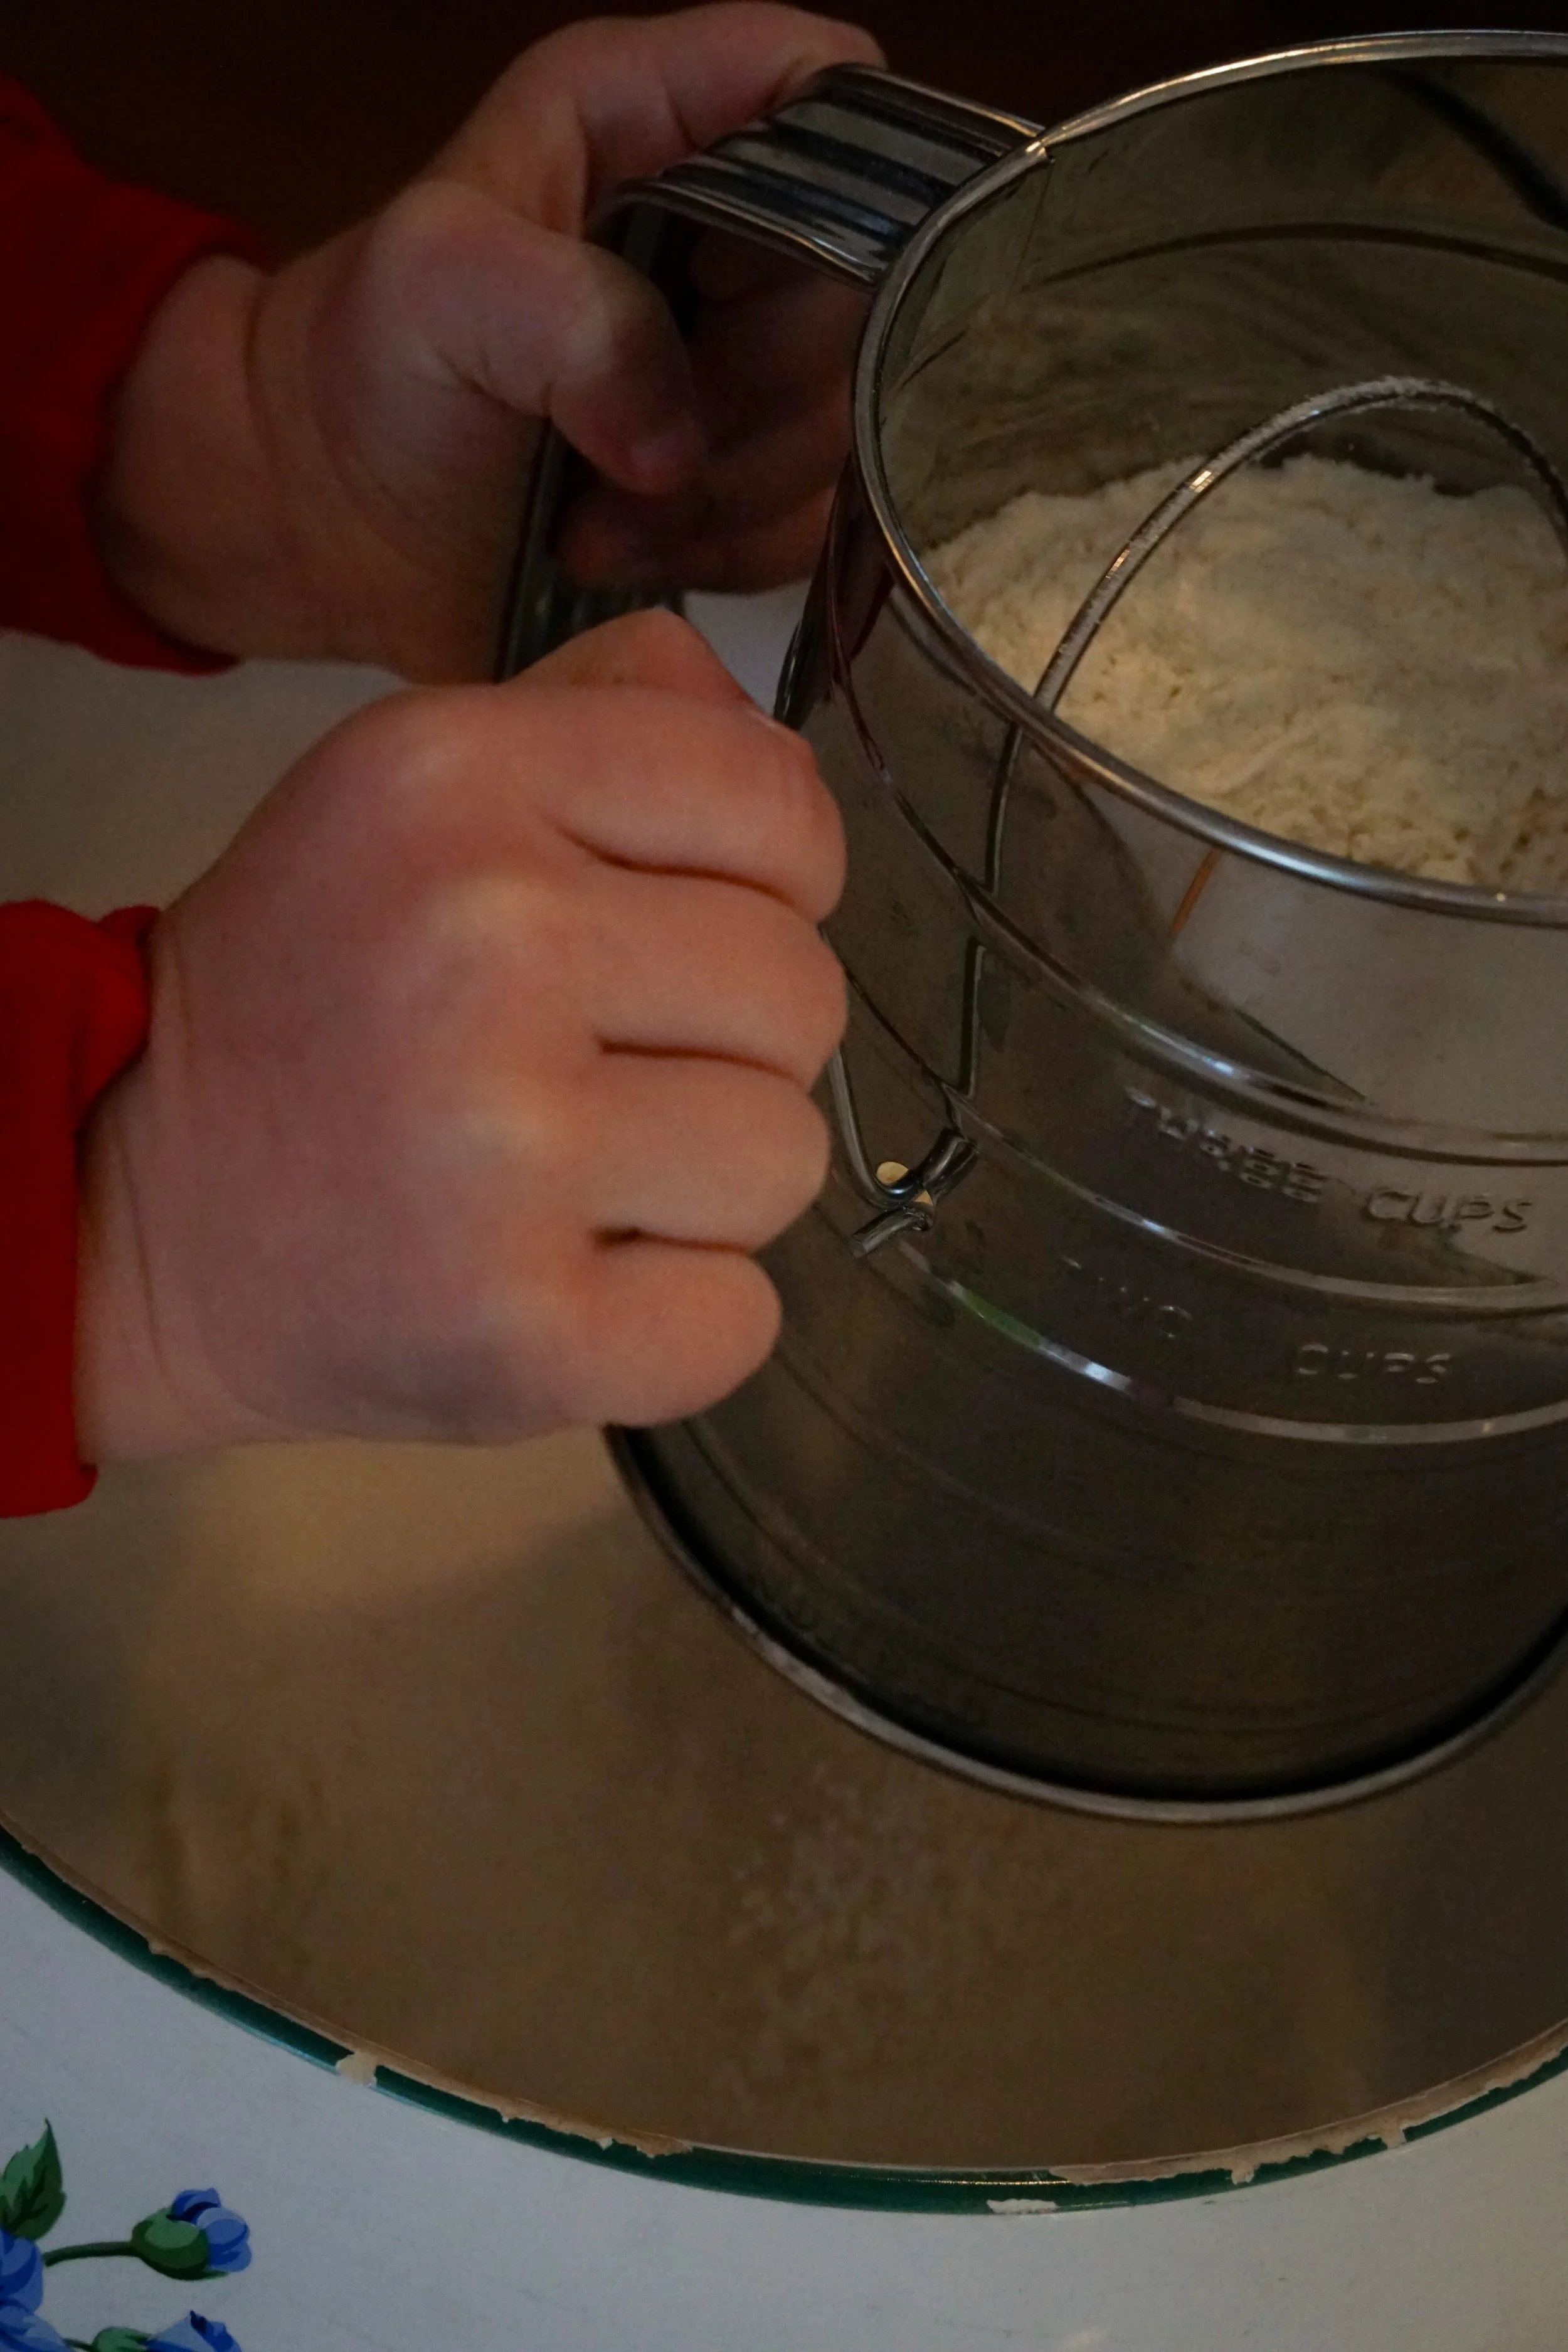
1.5 cups flour, sifted
2.5-3 teaspoons baking powder
2 tablespoons granulated sugar
1/4 teaspoon sea salt
1.5 cups milk
3 tablespoons melted butter
1 teaspoon vanilla
1 egg
Additional butter to cook the pancakes
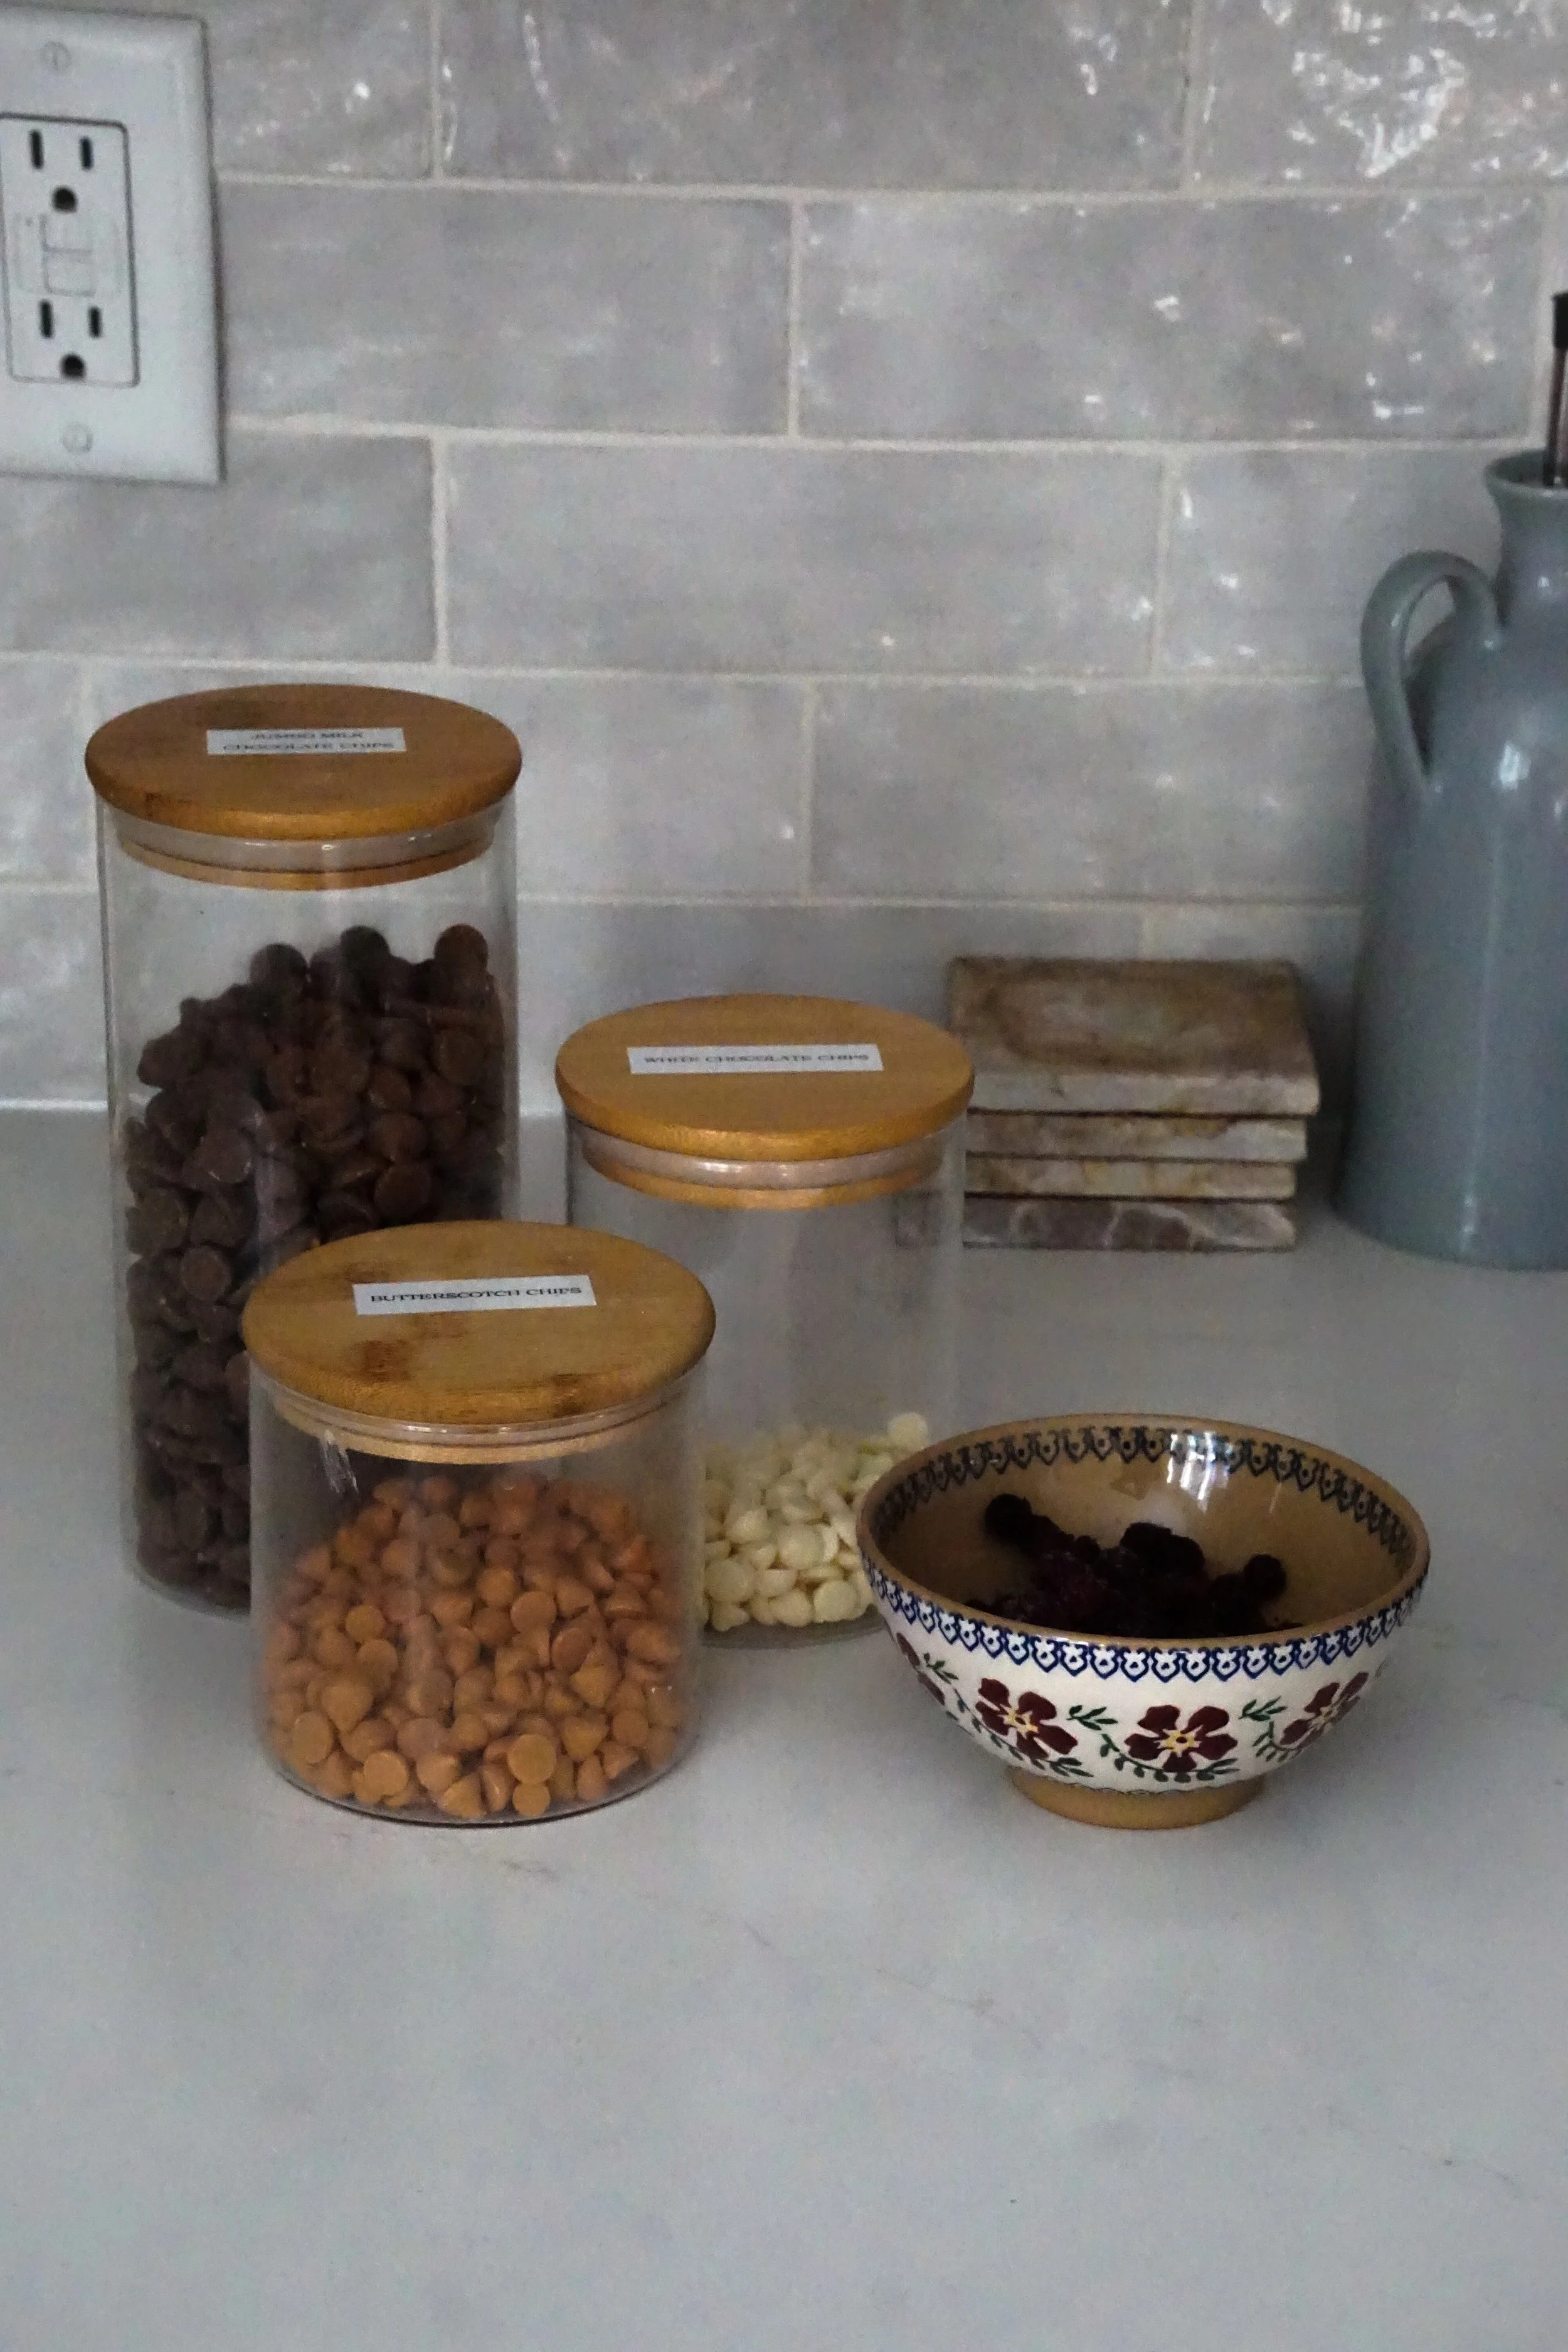
Optional Add-Ins: chocolate chips, blueberries + white chocolate chips, butterscotch chips, flax seed, chia seed, whatever you like!
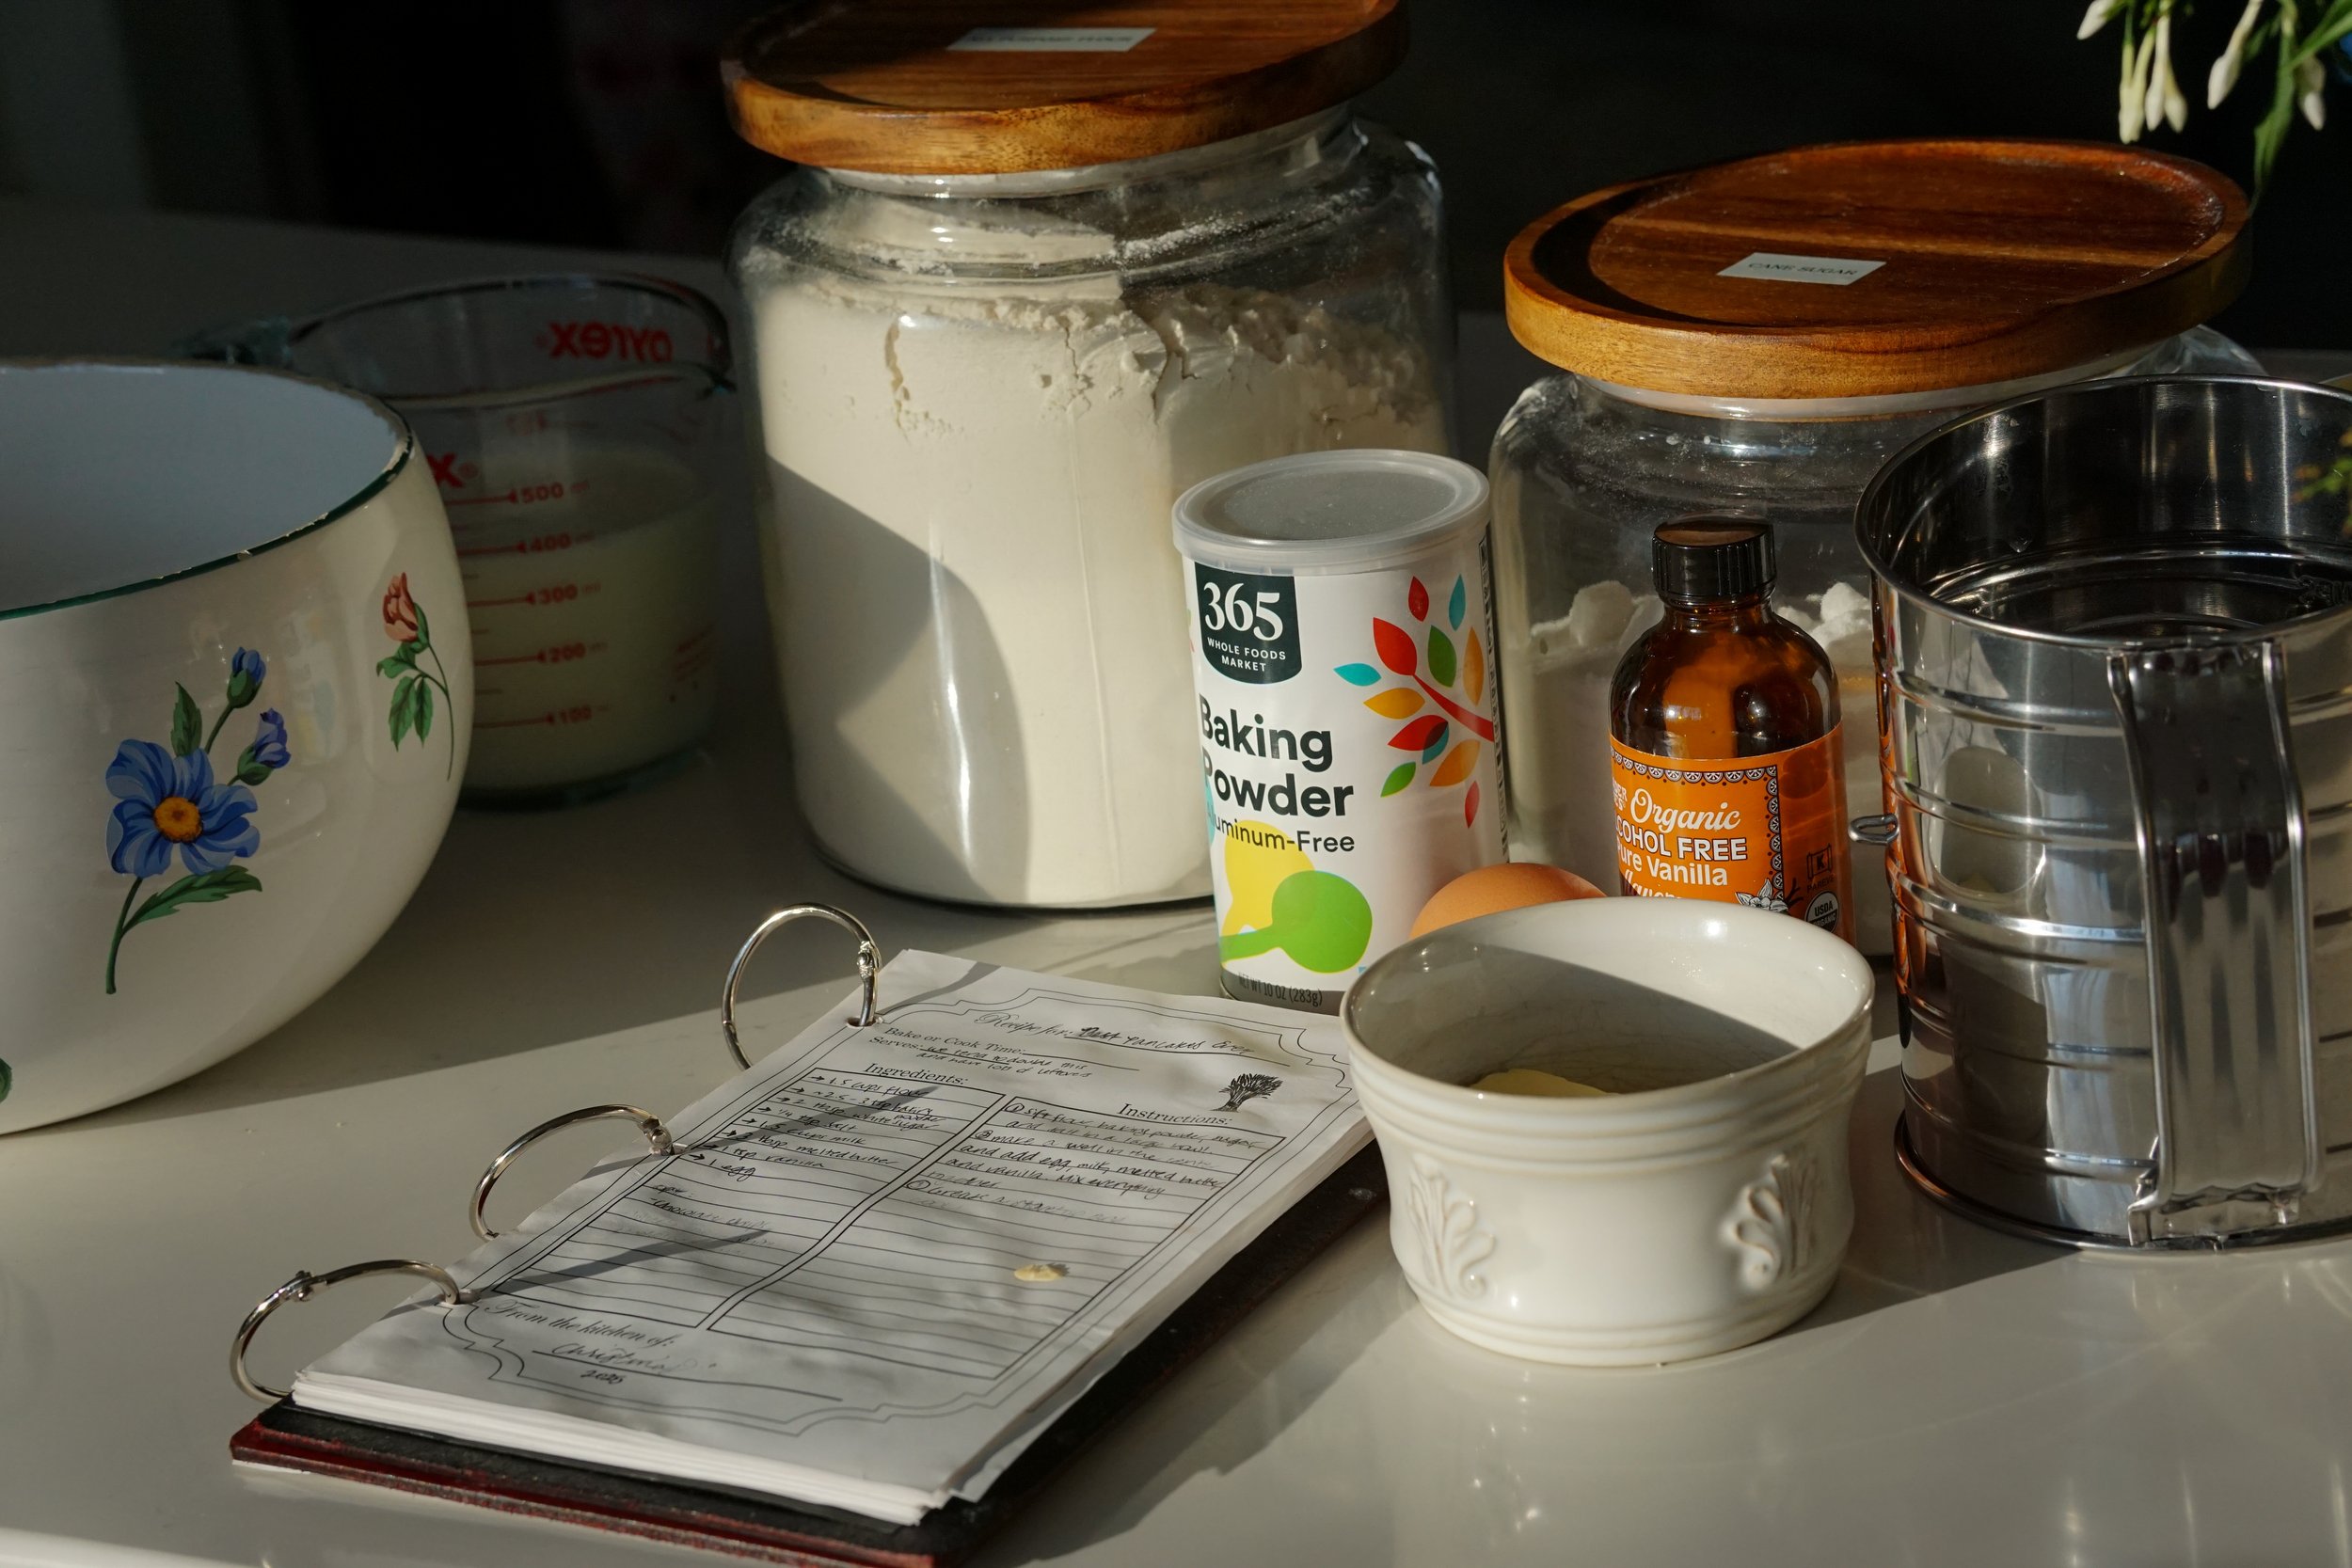
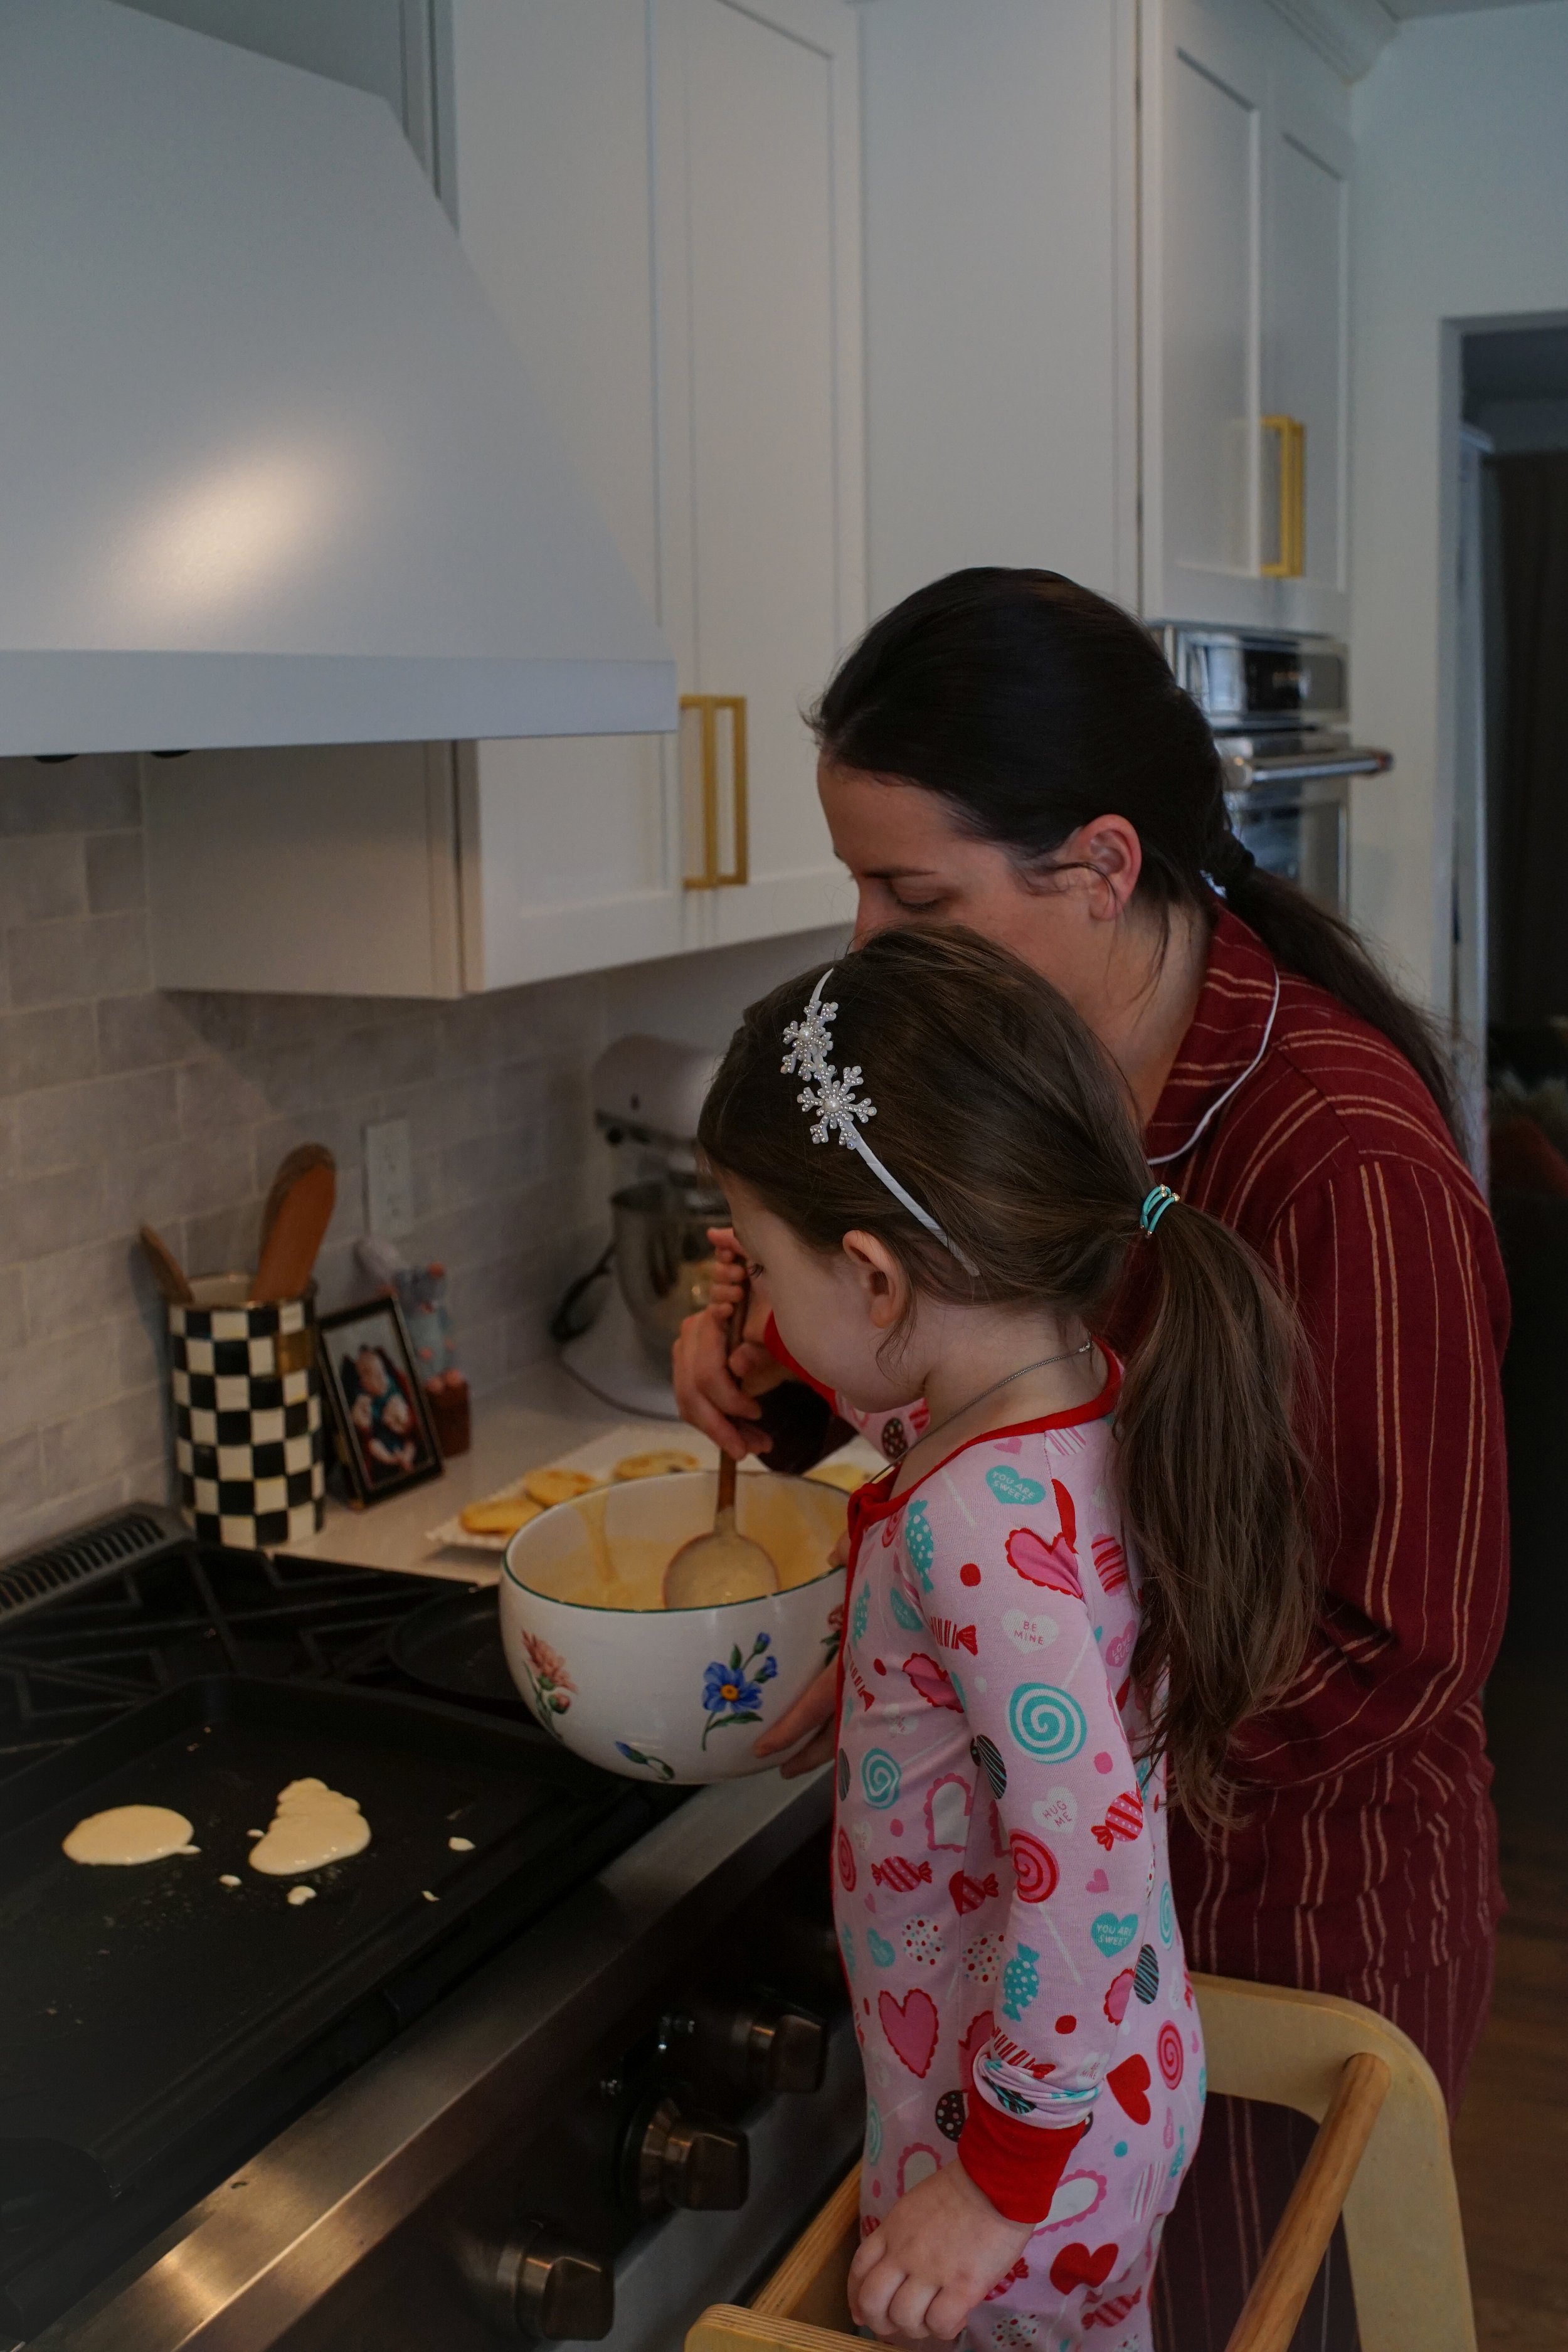
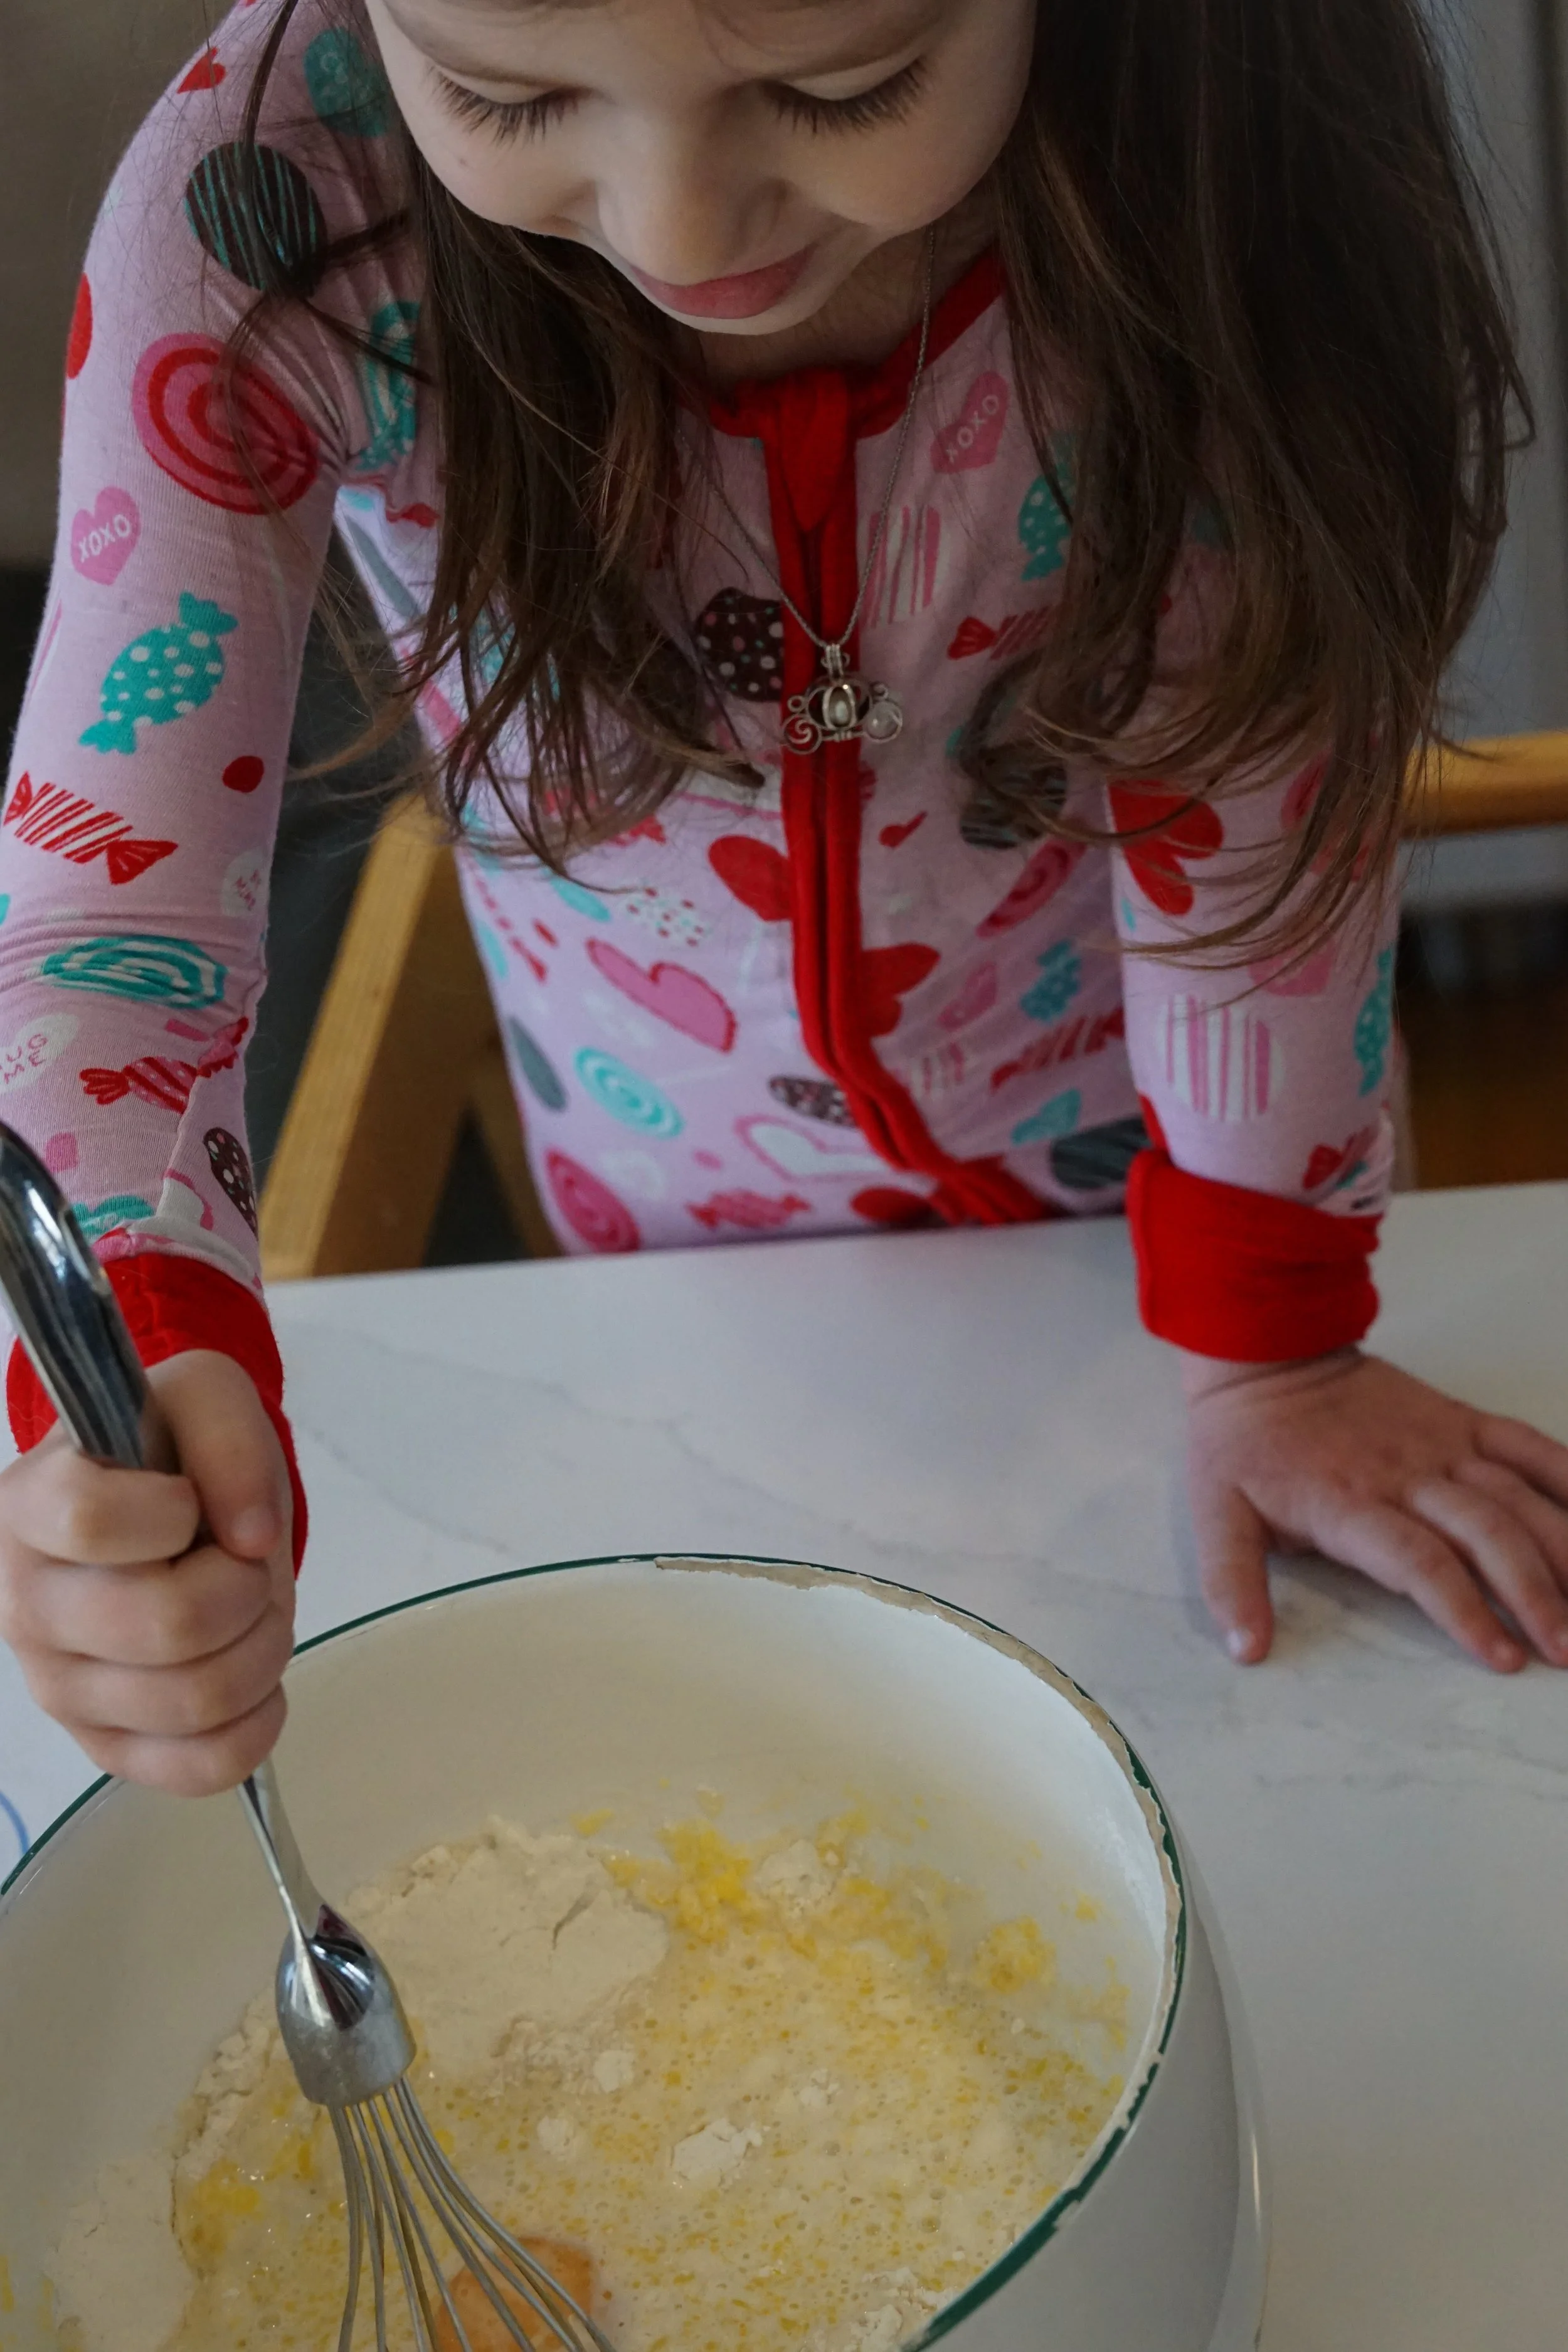
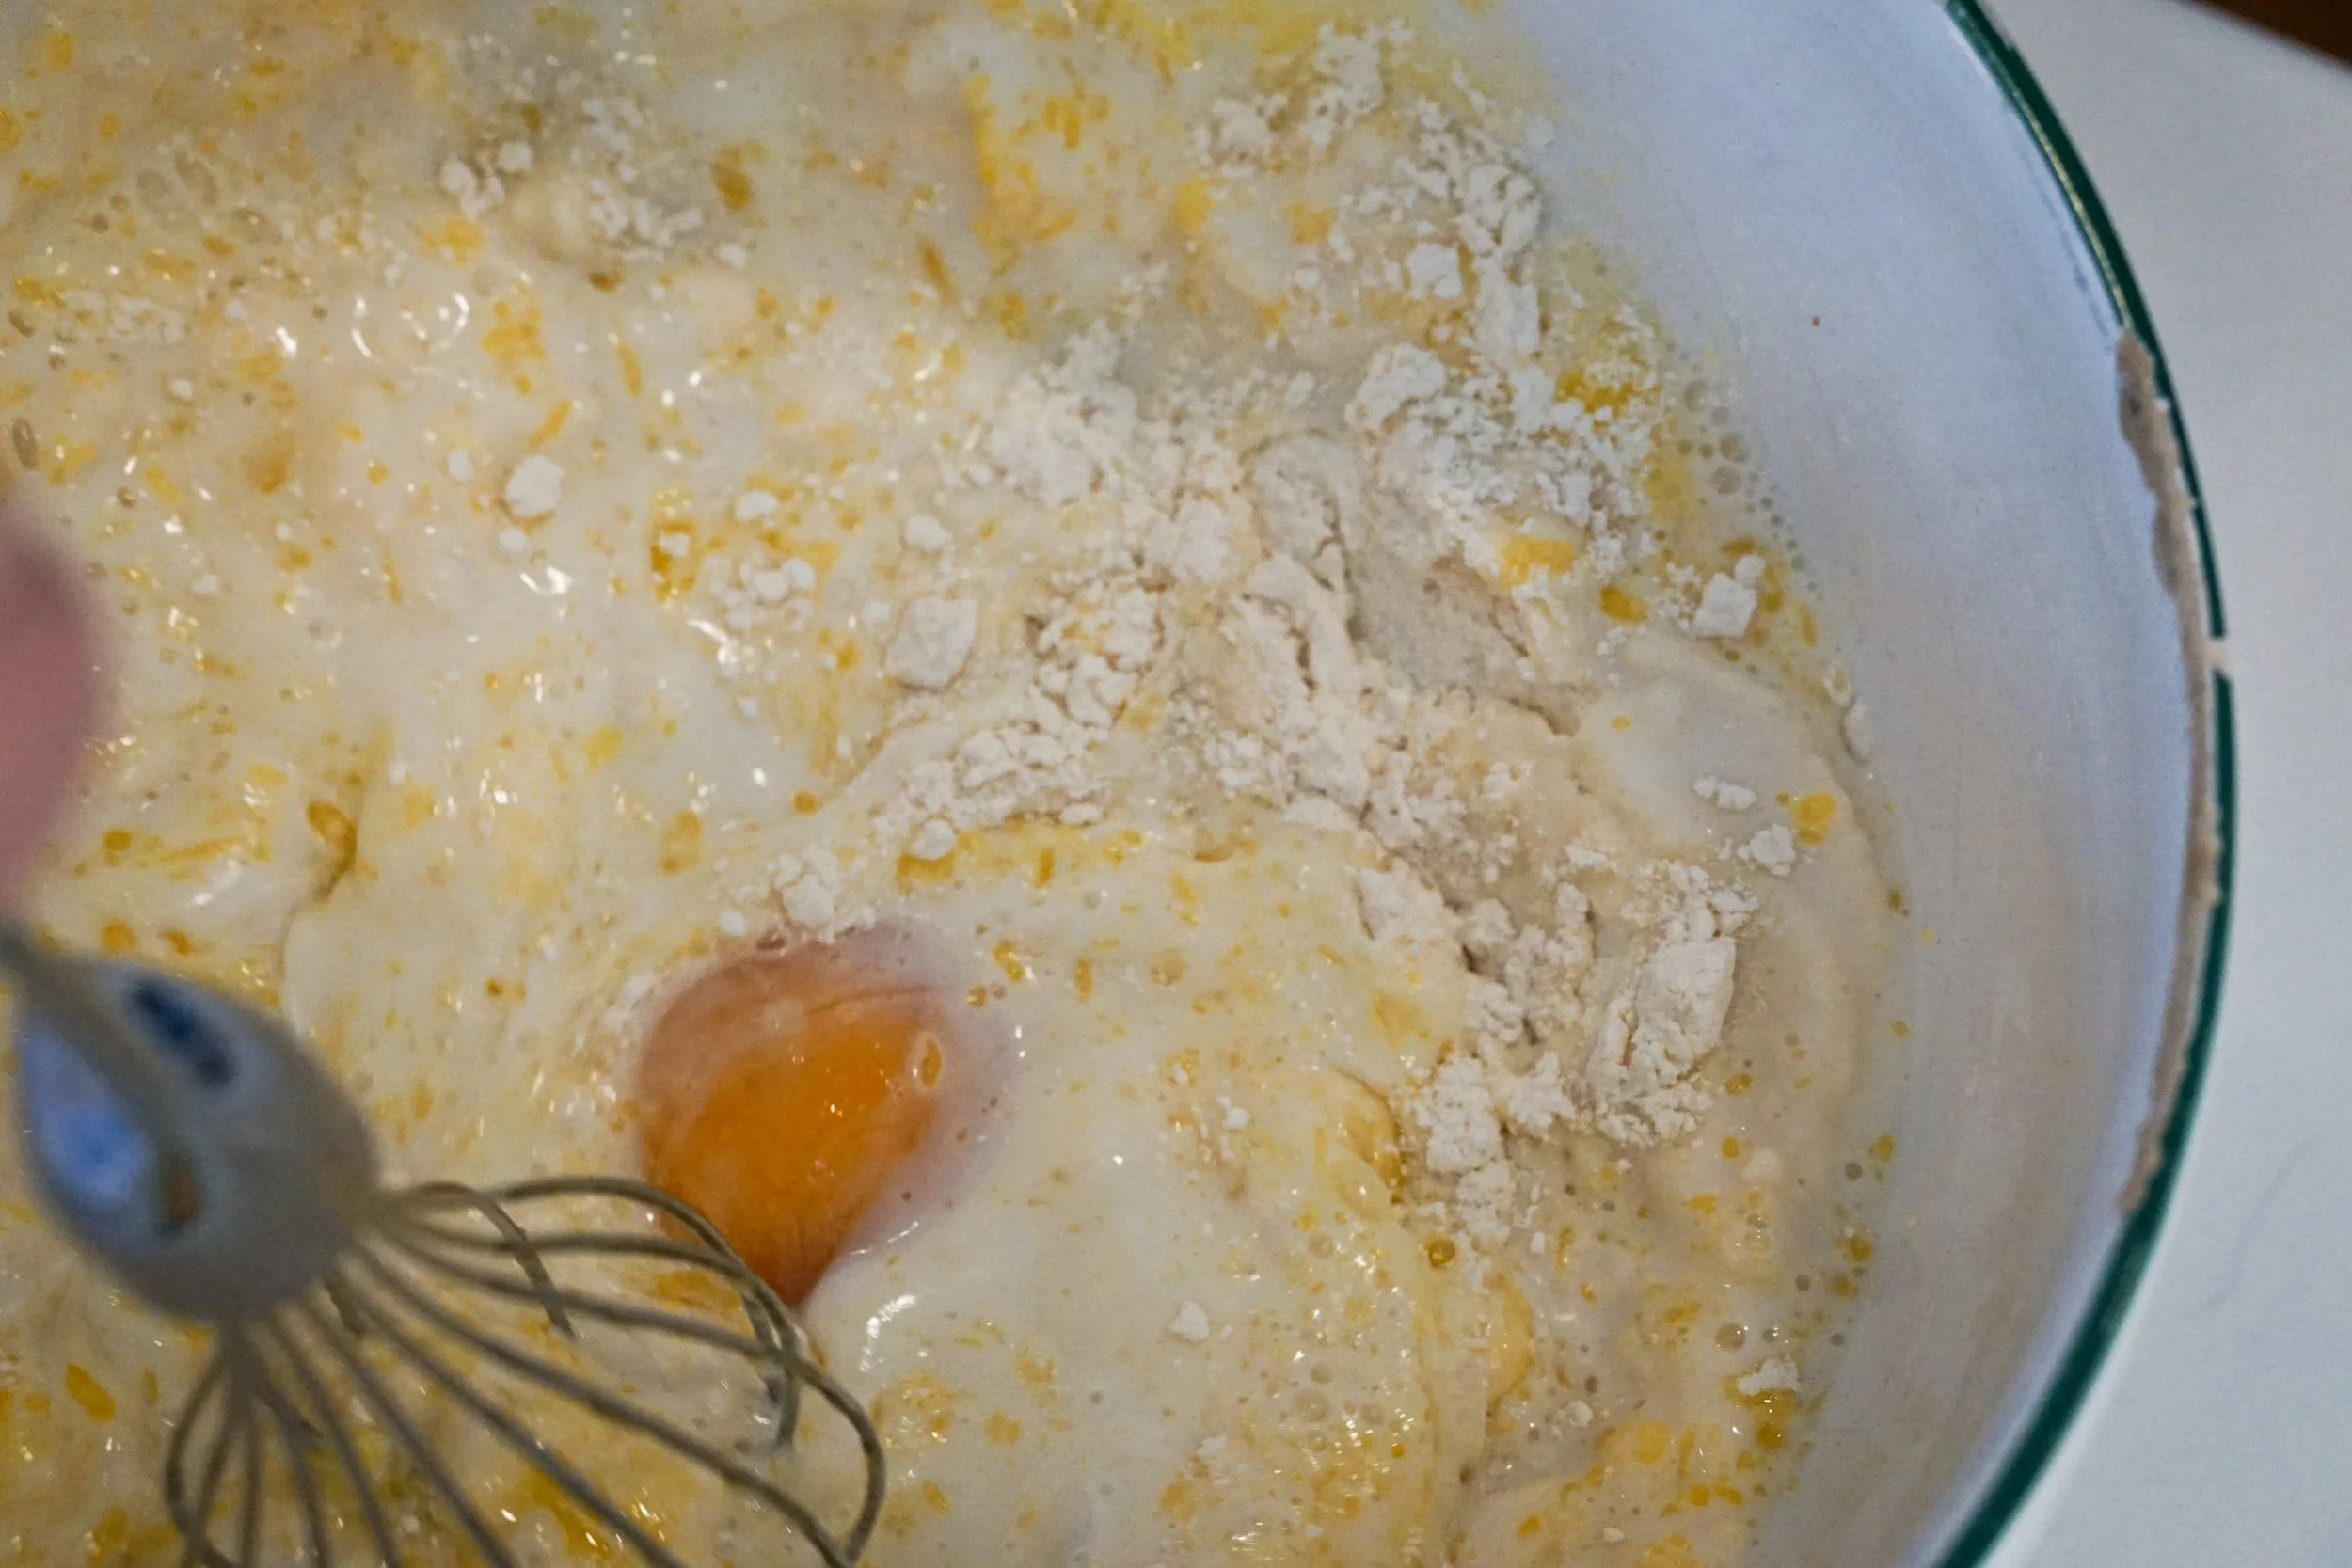
1. In a large bowl, whisk together the flour, baking powder, sugar, and salt. We started sifting the flour as we added it in and feel like it makes the pancakes even more smooth.
2. Make a little well in the center and add your milk, melted butter, vanilla, and egg. Whisk until smooth.
Note on the melted butter: if you melt this ahead of time and it’s nice and cool when it’s time to add, great. If you’re melting it for this step, add a little dollop of milk to the melted butter before mixing it in to cool it down. This should help prevent the warm butter from solidifying into little clumps as it hits the cool milk.
3. Evaluate the consistency of your batter. Add another splash of milk to thin it out if you’d like, or more flour to thicken. You’ll figure out what you like.
Optional: let your batter rest for at least 10 minutes. We usually do at least 5 minutes while we prep the stove and clean dishes, and with hungry kids we don’t always have time to wait at least 10 minutes. The pancakes are just as good in our opinion. Letting the batter rest will give the ingredients time to meld together and do their job even better. This will especially help if you’re looking for fluffier pancakes.

4. Heat a griddle or other smooth-surfaced pan on your stove. We like to do medium/low heat to avoid browning the pancakes. “Low and slow”. Melt a little butter to grease your griddle and/or pan.
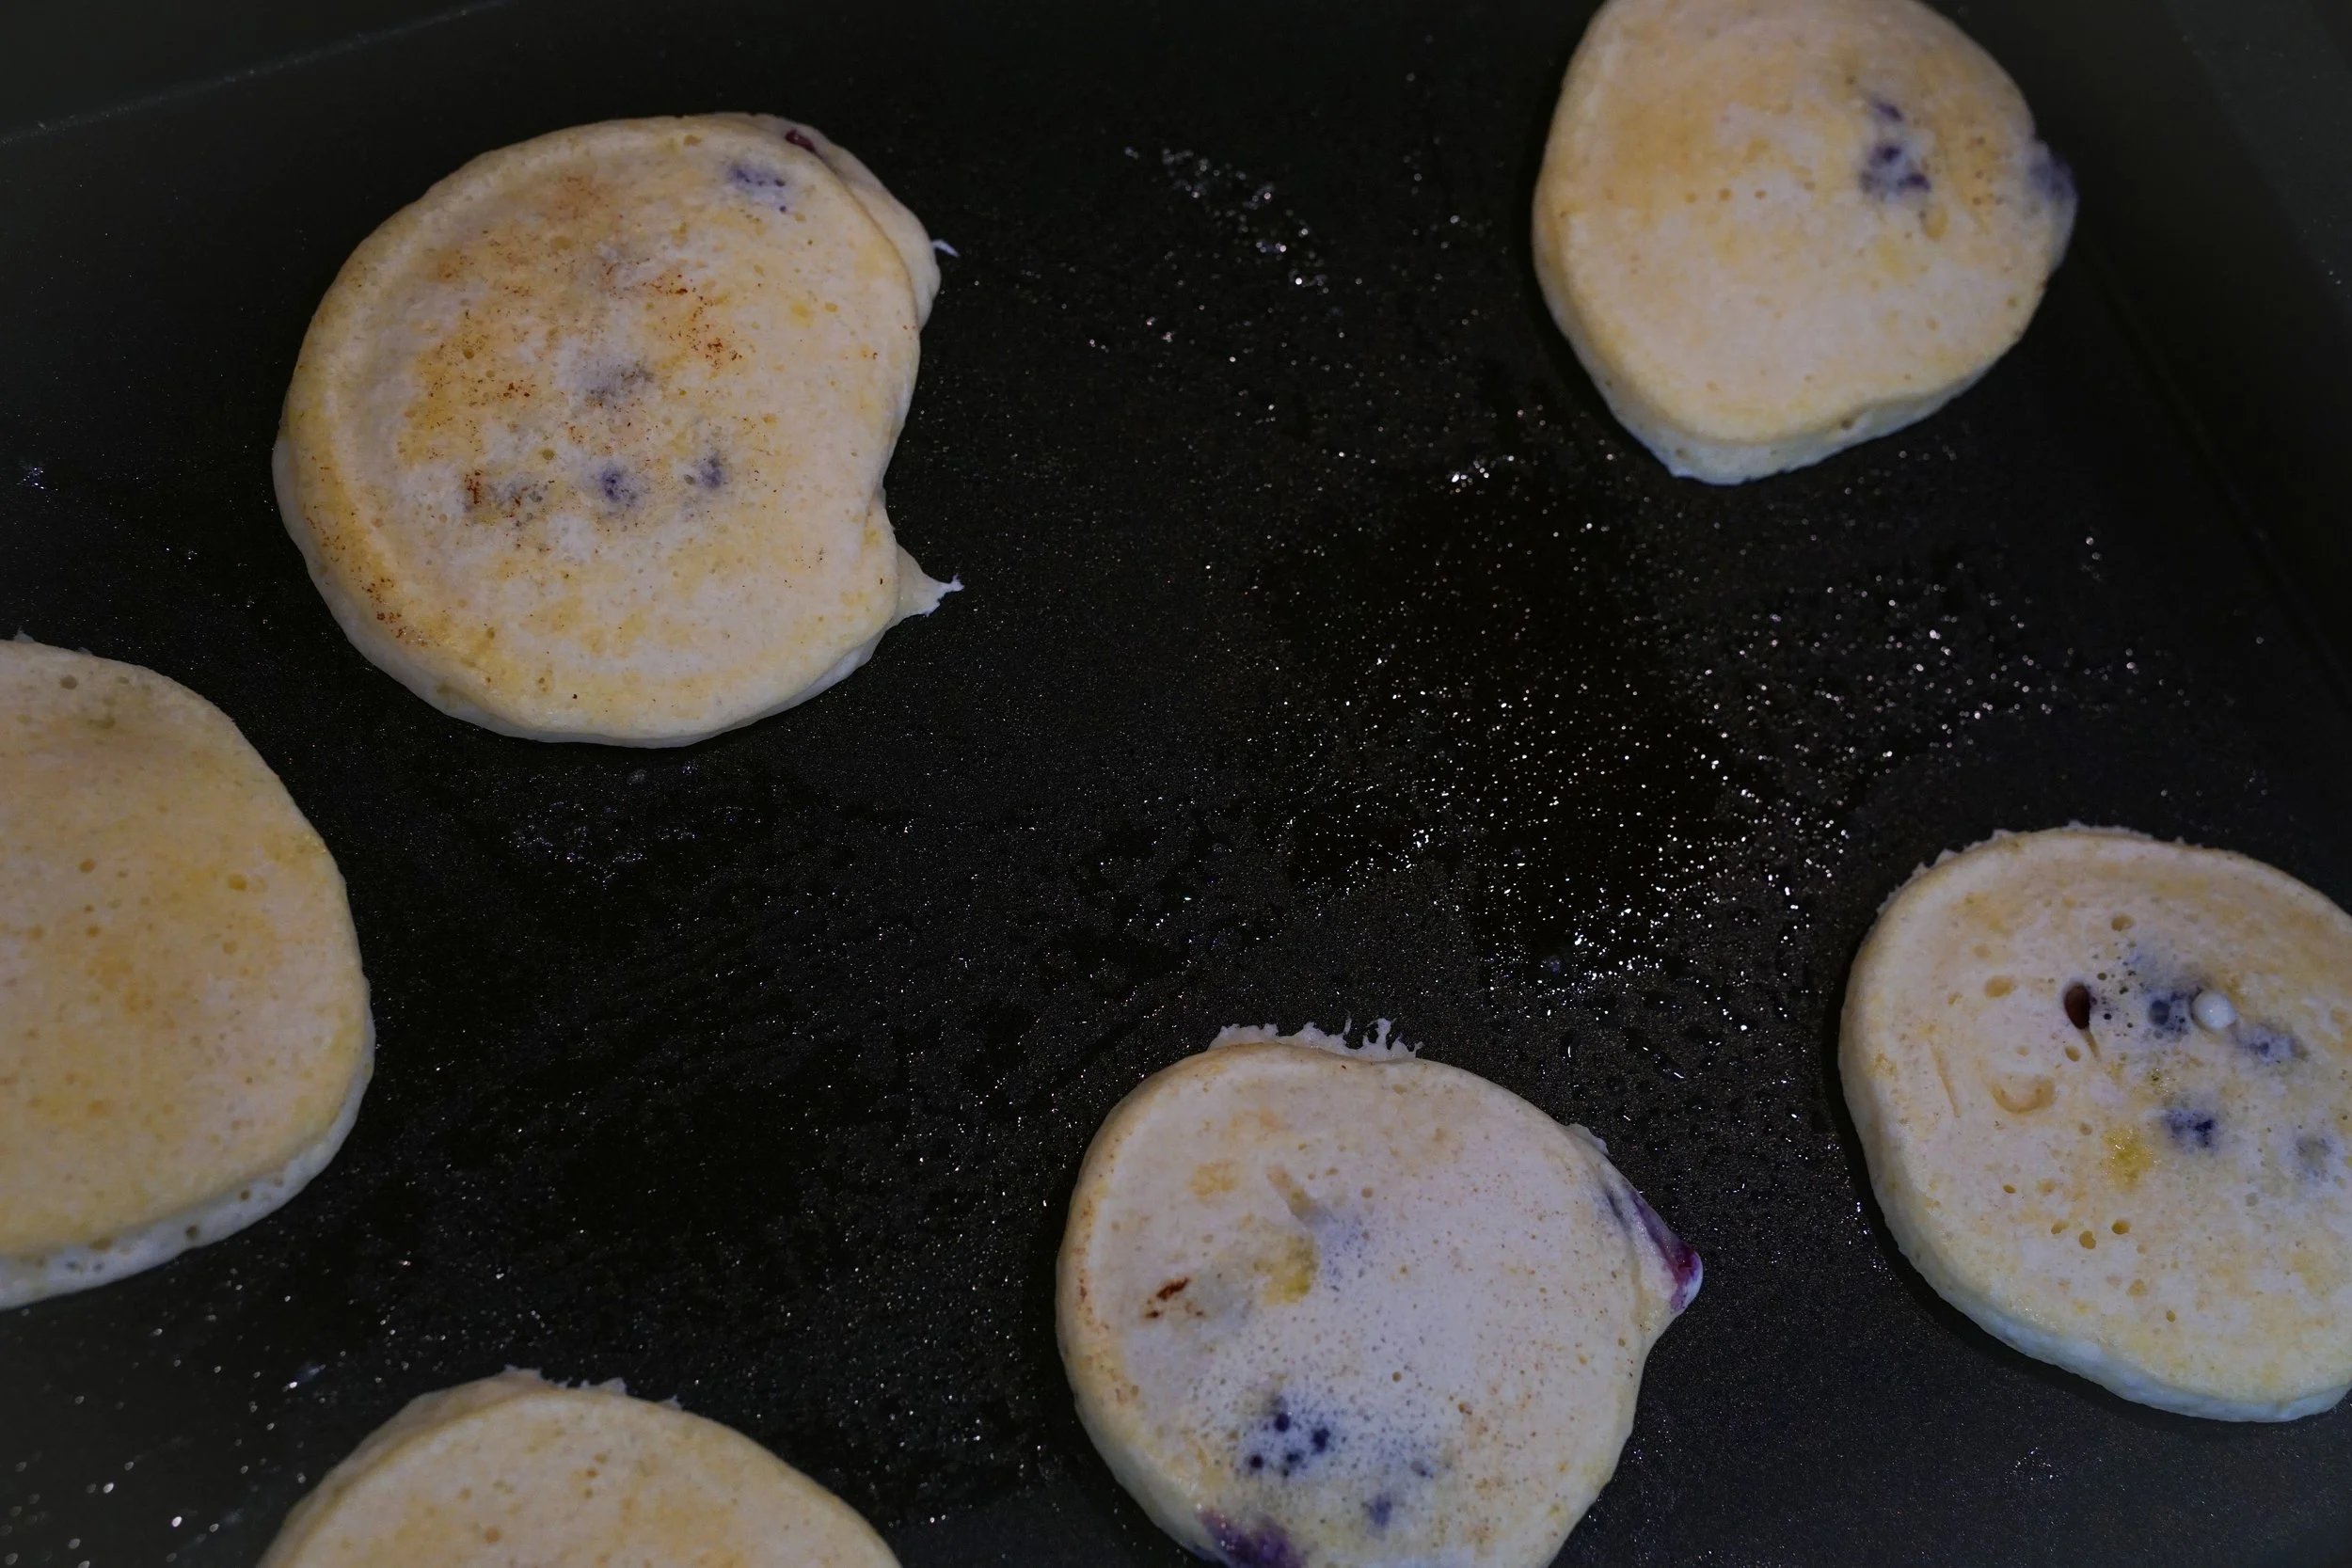
5. Spoon pancake mixture to your desired size. We usually do about a quarter cup size, max. Add your toppings now if you’re using them.
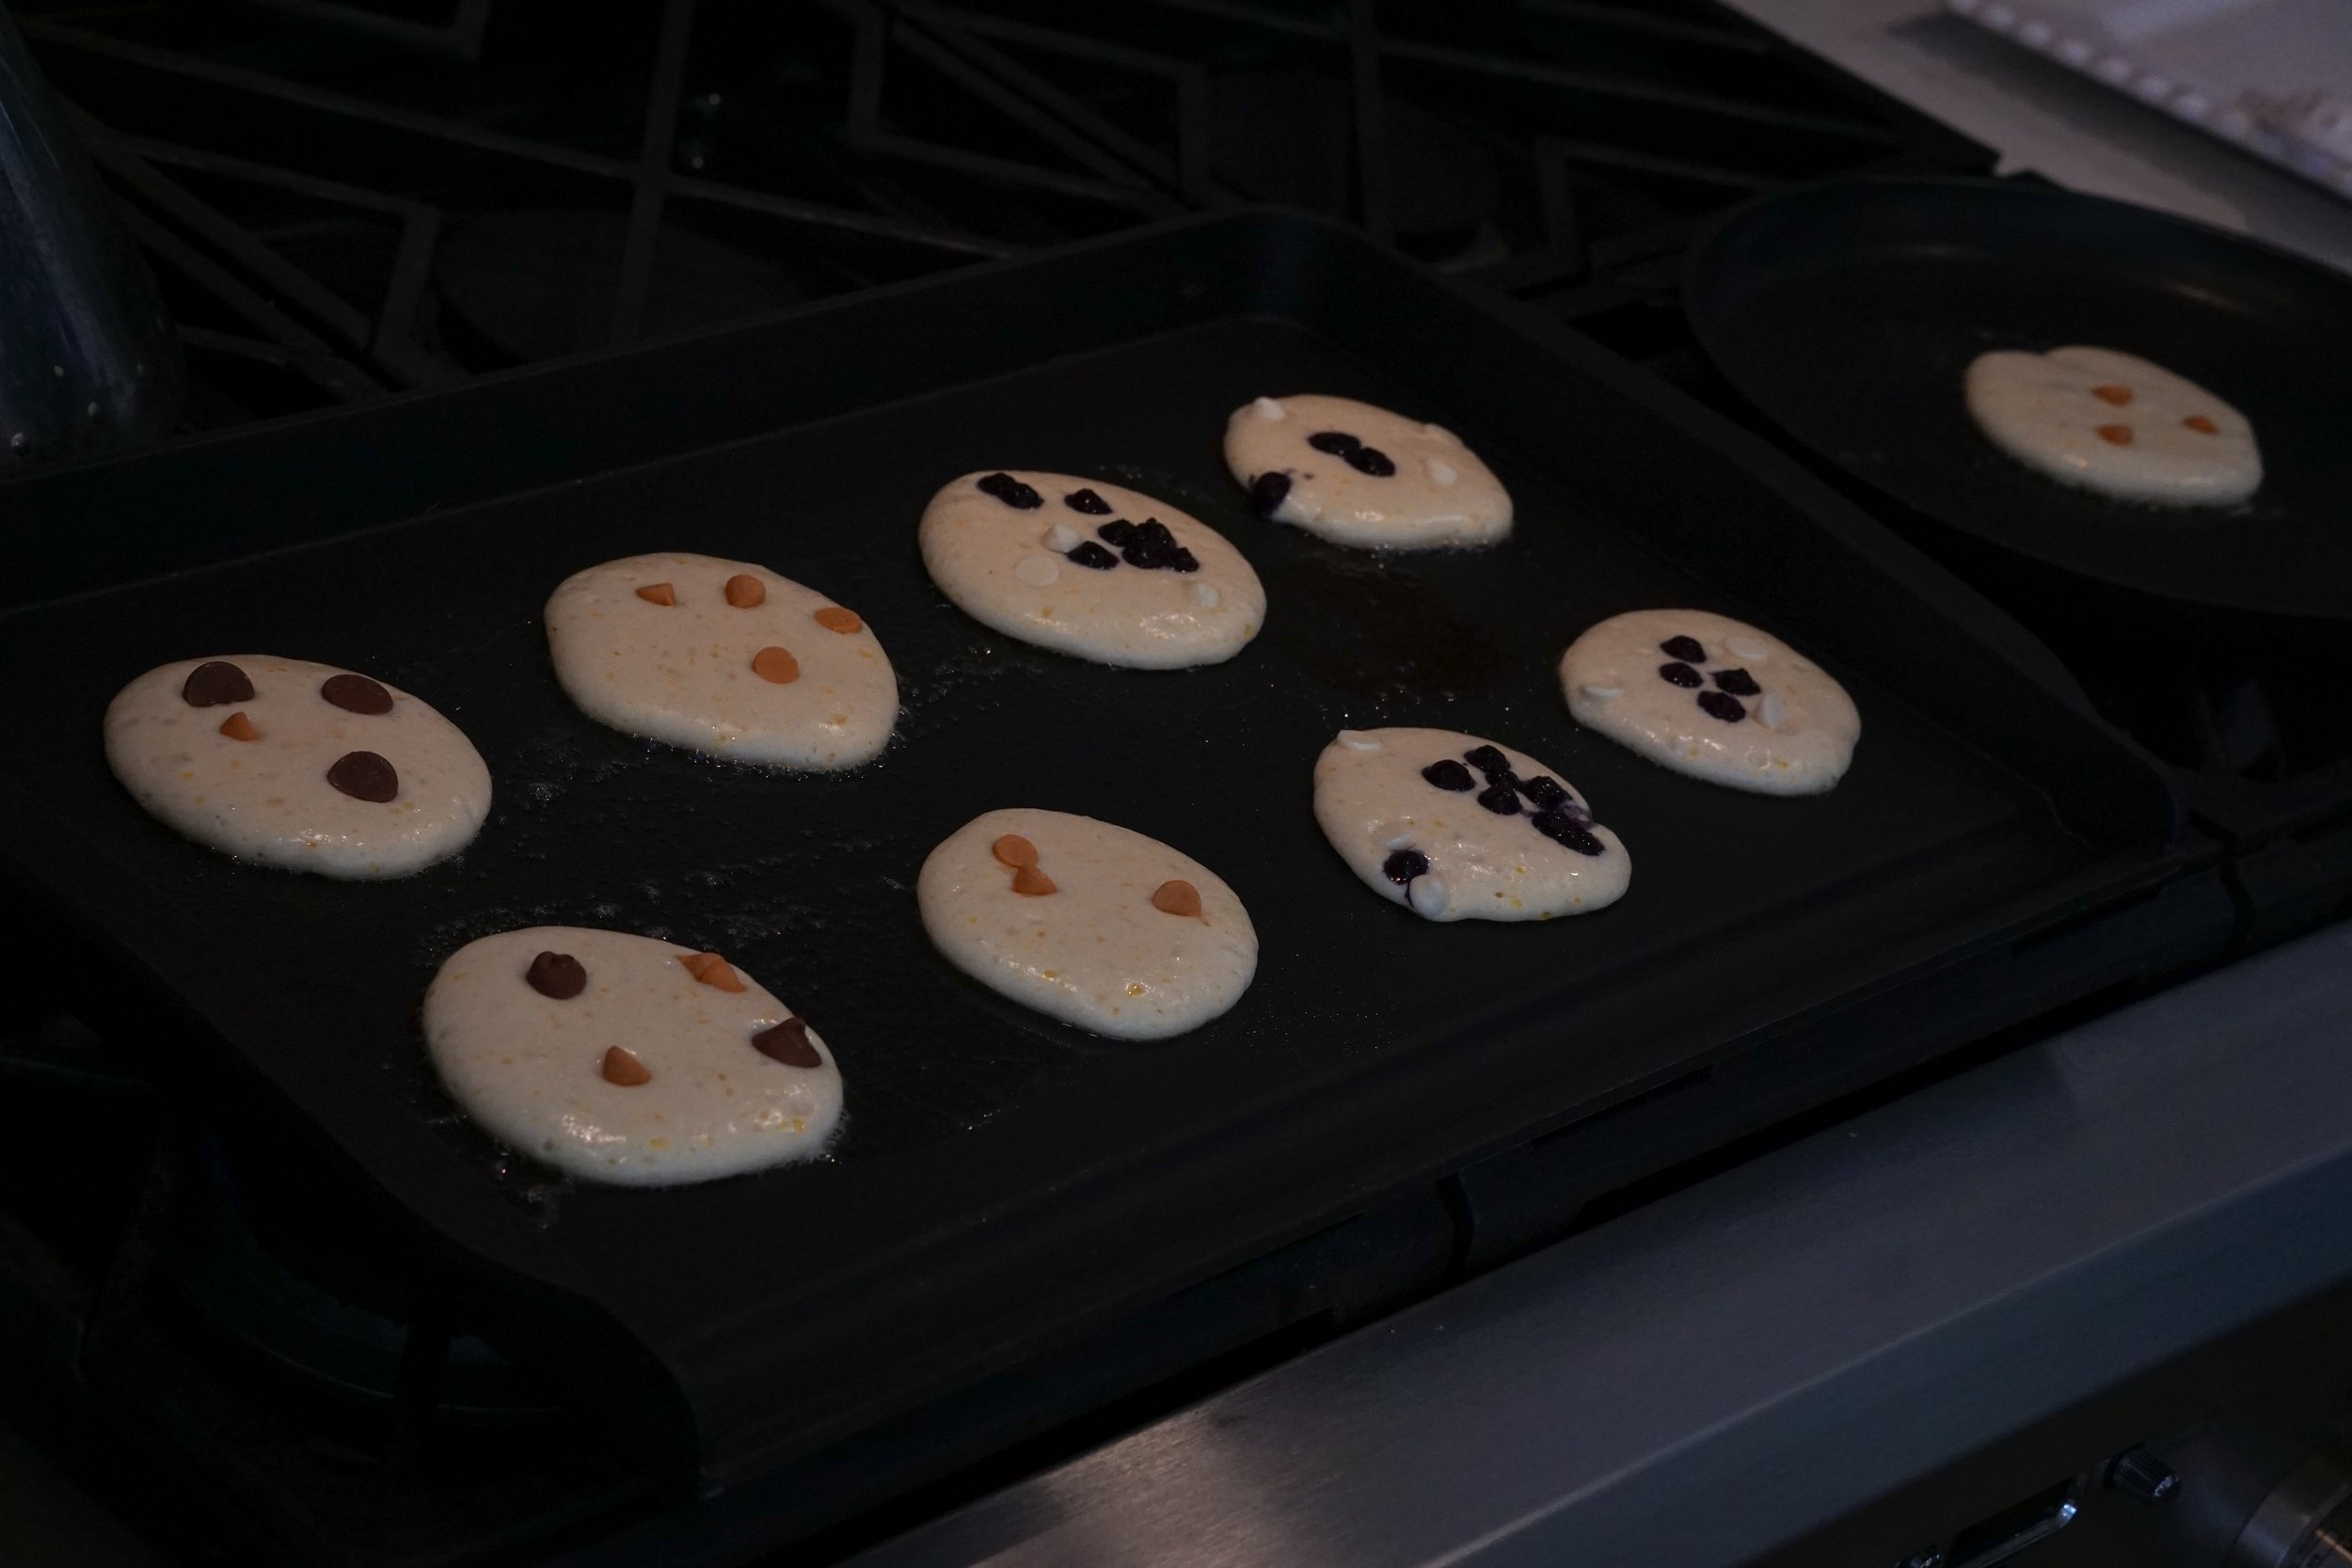
6. Cook the pancakes and keep watch for small bubbles starting to come up through the surface, and for the edges to look a little dry. It’s time to flip them!
7. Cook on the other side for another minute or two. All pancakes will come out just a little different, so don’t worry about perfection. Cook for a little longer or increase the heat if you want golden brown pancakes. You’ll get a feel for what you like.

Sit down, make a tower of pancakes and enjoy.


The end of the world and dreams of love
Yesterday I woke up from a dream about the end of the world. I say dream because although the concept of the world ending is nightmarish, the way everything unfolded was in a dreamlike, almost alternate reality state. And luckily, the world did not in fact end before I woke up.
In this dream, the end of the world was upon us. I was a part of a group of scientists*. We were all well aware that the end was near and we were tasked with finding and executing last ditch efforts to save everyone. There were scientific things we were doing and studying at some point but I couldn’t tell you what they were.
There was no sense of urgency or panic. There was an overwhelming acceptance and sense of peace. What was coming was coming, we were beyond scientific solutions and we knew it. Instead of falling into disarray, everyone was rising up. Time seemed to move more slowly, particles of earth sparkled in the air, we dropped what didn’t matter and reached for those we loved.
Up above in the skies there was a wild convergence of science and spirituality. There were very inevitable scientific reasons that our world should be ending, but there was also a spiritual presence only now revealing itself—blanketed around earth like some sort of shimmering protective layer. This presence—a spirit or multiple spirits—had been holding and watching humanity through good times and bad and through all kinds of phenomena, since the very beginning. Now here at the end of the world, it revealed itself to everyone in one last show of protection, giving everyone strength and peace to face what was coming.
The spiritual presence and scientific happenings commingled in the skies creating an aura of darkness and light, both scary and beautiful. Beneath it all we slowed down and held our loved ones close. We tossed tennis balls to our dogs. We read books to our kids and danced under the mysterious sky. We treasured each passing second knowing that it was one of our last.
Now and then we’d glance at the sky, wondering when it was going to happen. The seconds ticked on, the moments with our loved ones stretched, each more beautiful than the last.
Above I could hear the sky spirit saying with such tenderness, “look. Just look at them. We need to hold on. Look how beautiful they are, look how beautiful they can be.”
“It’s their time,” the looming darkness seemed to be saying.
“It’s not their time, yet. I’ve held onto them for so long. Look at them now. Look what they can do.”
We continued to dance underneath the skies and pour love into one another, our only momentary regret being that we wished we had done this sooner. It was love that was saving us, even if just for a short time.
When I woke up from this dream it took me a full 15 minutes to transition out of it. As always, some fragments of the dream immediately began to fall away especially as I tried to hone in on certain parts of it.
I should note that for my entire life I have had crazy, vivid dreams. Not every single night and not always like this one, but often! I used to keep dream journals with pictures because my dreams were that wild and needed to live somewhere. Writing this dream down today feels like my old dream journaling.
I fell asleep on the night of January 30th and at some point entered this end of world dream, and there are several things happening in my life and the word that I can tie into my dream. Sometimes my dreams are extremely random, and sometimes they just make sense.
I am currently reading “The Secret of Secrets” by Dan Brown, which as those who have read Dan Brown know, he likes to cover the convergence of science and mythology/spirituality. This particular book also covers brain activity & consciousness, so I’m thinking I have also been unconsciously absorbing the plot of my husband’s book…
“Project Hail Mary” by Andy Weir. I have had this one on my reading list for so long and my husband is a new avid reader—he’s been devouring this book at night! Like the title implies, the book is about a “hail mary” attempt to save earth from extinction.
Important note: as a lifelong lover of books, reading at night side by side with my husband who is a new lover of books is the best.
Frozen. Just Frozen. My kids are obsessed and the movie’s lovely messaging about love conquering fear and how fear can’t be trusted, fear is the true enemy but love will heal—that obviously showed up in my dream.
THE WORLD RIGHT NOW. I can’t even begin to describe how this one feels. The world is a very scary place right now, and getting scarier. The things that have happened, are happening, and the way they have been unfolding with ease and no consequences is extremely unsettling. The duality of going through your everyday life, especially raising little kids right now who are so full of pure innocence that you just want to protect and nurture your safe, kind and beautiful bubble—against knowing what is happening in the world can be very hard to hold. I find it so bizarre to have casual conversations with fellow school moms whose names I can’t even remember, where we chat about how scary things are and wonder what the world we are raising our kids into is going to look like—and then end the conversation with something like “well anyways… bye! See you at pickup.” Life goes on.
Our family bubble is the absolute most treasured thing to me. We are learning that it’s okay to feel so unbelievably happy and peaceful in our bubble, but also sometimes feel distraught on the outside about the world around us. Hopeful, too, we do have hope—but it’s also important and okay to say that things that are happening are not normal and not okay. We teach our kids about morals, human decency and kindness, and we as adults need to live these morals and use our voices when we see something that isn’t right.
Lastly and maybe the final thing that pushed me into an end-of-world dream, Catherine O’Hara. News of her passing came on January 30th. What a tremendous loss of an absolute icon. Tommy and I decided to watch episode 1 of Schitt’s Creek that night. It turned out that the last line of episode 1 was Catherine’s character saying “let’s all pray we don’t wake up” after her family said goodnight, so of course we couldn’t end on that and watched episode 2. I also watched a clip of her being asked what the role she’d like to be most remembered for and her answer was something like “the role of mother to my kids.” She gets it. I think the mysterious sky-spirit-protector-of-humanity from my dream would approve. Rest in peace, Catherine.
Speaking of this mysterious sky-spirit-protector-of-humanity, I think I know what it might be now. People talk about Mother Earth, but maybe this was the Mother of Earth. Like we wrap our children in our love and protection, this spirit did the same for humanity. Guiding and loving and nurturing, ever-present even when we can’t see her. The other day I got to rock my 2 year old Gus to sleep. There’s nothing like the feeling of your child in your arms, fully trusting and melting into you, especially when they’re 2 and it doesn’t happen as frequently. While I rocked Gus, I could literally feel my heart surrounding him. It was like my aura as his mother was coming out of me and wrapping itself around him. With my eyes closed I could see this motherly, magical glow closing in around him and in that moment I knew my love and protection would always be with him. I could feel it in my bones.
Maybe, like everyone realized in my dream, and like Elsa realized after Anna’s sacrifice (like I said… the Frozen obsession in this house is very real): in the face of turmoil, we need more love. We need to remember what’s important, who we are, and that love is a true human form of magic that transcends time and space.
That’s a lot for a Sunday morning, welcome to my brain. Sending love your way.
xo,
Shannon
*Sidebar: despite a brief but intense phase of my life during high school where I wanted to be a surgeon, I am not a scientist. I would literally check out videos from the library that had operating room footage of all kinds of surgeries, which I would watch at home taking notes. This dream of being a surgeon pretty much evaporated on day 1 of AP Bio. AP Bio and I did not get along very well.
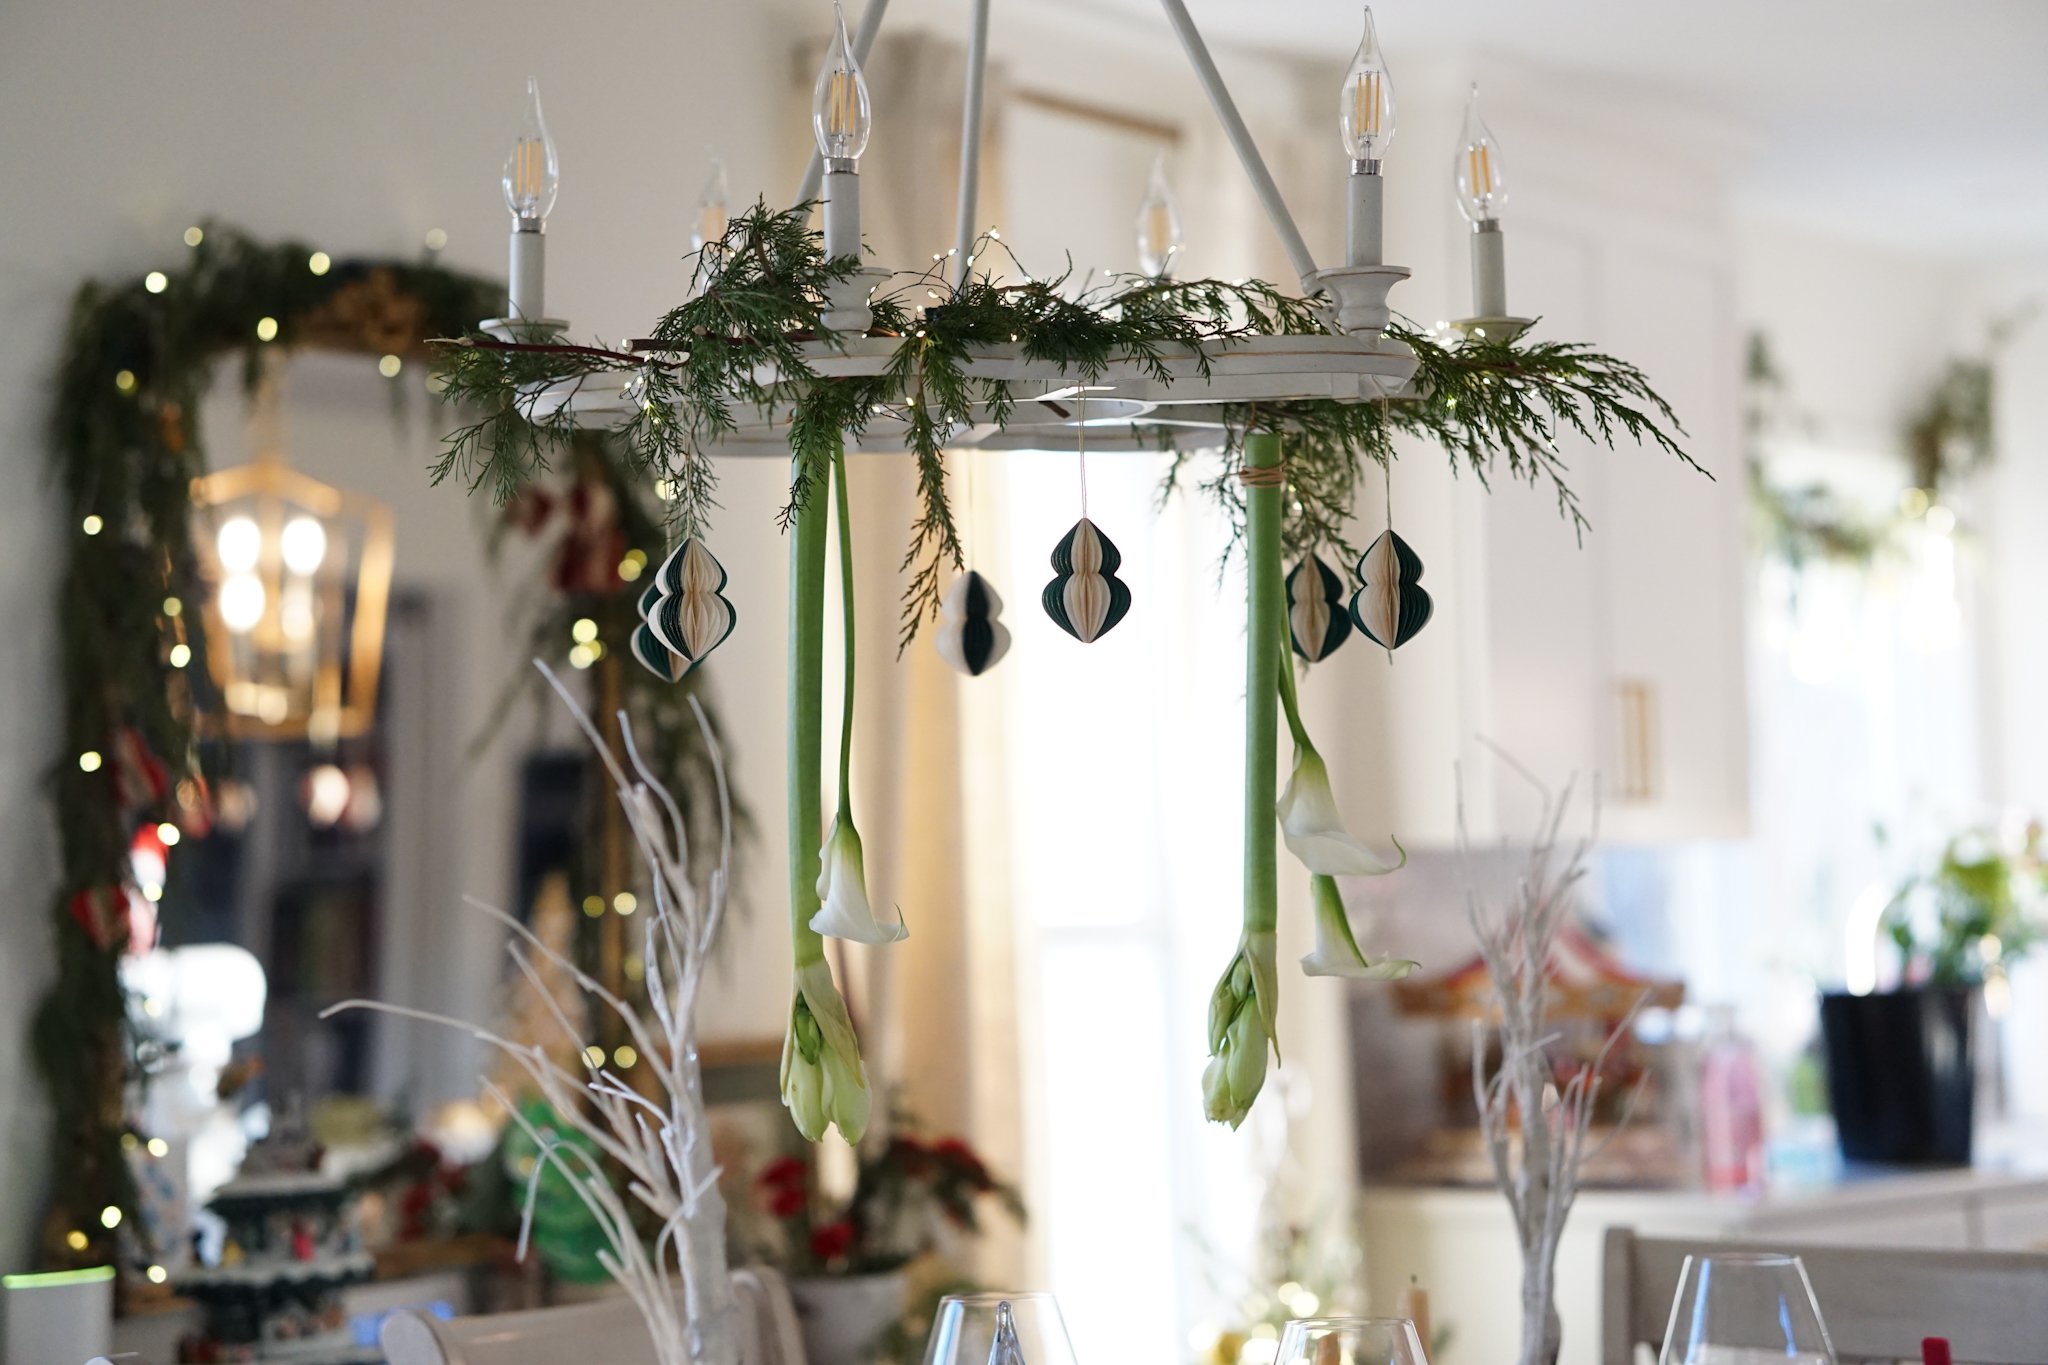
A truly magical chandelier floral arrangement
Full of greenery, cascading flowers, and twinkling lights—this statement floral centerpiece will take your breath away.
When I started Rue Noelle last month, my brain was overflowing with ideas. It has been fun to let them slowly marinate and evolve. One of the first and most tangible, exciting ideas that Tommy and I had was to collaborate with his mom, my mother-in-law, Maureen Christmas. Maureen is a floral designer based in Massachusetts—her company is called Floral Notes—and her work is stunning. She creates true works of art, follow the link and see for yourself!
Maureen has done flowers for the Dalai Lama. Her work has graced museums like the Boston Museum of Fine Art. She did the flowers for our wedding and countless others. She participates in and judges flower shows. She travels the world both to learn and teach techniques. She has a long list of accolades and certifications. Tommy and I once “modeled” flowers for her during a floral conference in Boston. Though we were aware of how talented Maureen is, it was beyond impressive to see the huge crowd she was instructing—pen and paper in audience members’ hands furiously taking notes—as we walked across the stage literally wearing her floral designs.
I love having flowers and greens around the house and take great pleasure in putting together my own little arrangements, well aware that I have no idea what I’m doing but am very happy putting together something that brings me joy. Whenever Maureen would travel to see us, I remember gazing at my suddenly feeble looking arrangements and thinking, well… this is going to get ripped to shreds. Having someone who is a true subject matter expert look at your work changes your own lens preemptively. This is true in both work and at home.
However, Maureen taught us what it looks like to not just be a true expert but a true artist. Instead of coming to our home and looking at flowers we’d put together with a critical eye, changing them or telling us what we’d done wrong, she encouraged us. I remember asking her for feedback and she’d say something like, “no, this is great. It’s all about what you love.”
That’s what true artistry should be about, I’ve realized. We’ve all experienced someone giving us unsolicited criticism over some aspect of our lives. How you parent, how you feed your kids, how you spend your time, how you spend your money, how you decorate your house, anything. Sometimes that unsolicited critic is in our own mind. But a true artist encourages. They understand the magic of creating and the beauty in finding what speaks to your soul, translating that into an art form, and how powerful it is when you are the one making those discoveries. So rather than impose their idea of how something should look, they encourage you, empower you, and inspire you.
So for that, Maureen, I thank you.
Despite all of that—I know what a wealth of knowledge experts and artists hold. Their minds are like treasure troves, years of experience lived and knowledge gathered. Being an extremely curious person and a dreamer, aware of this in-depth floral knowledge my mother-in-law has, and knowing that I was on the cusp of starting my own little company, an idea came to me to see if Maureen would be up for gifting us with some of her knowledge. She was!
The goal for this series partnering with Maureen is to help myself and anyone interested increase their floral knowledge and abilities. Maureen has so many tips and tricks, and as with many skills learned in life, some things that seem impossible to achieve from the outside can actually be achieved when you break them down into simple steps. Personally, I’d love to increase the tools I have on hand at home for simple but more elevated arrangements, understand how to incorporate things I have in my home or can find in my backyard, and create some beautiful arrangements. I hope that some of you out there are excited about this, too!
I feel so lucky that Maureen is sharing her knowledge. For this first piece, Maureen and I went back and forth with ideas and she came up with this magical piece. She walked us through step by step, gave an overview of tools to use (most can be substituted with things you likely already have!), and sent plenty of photos and videos to help guide us, as well as live tips on FaceTime. In the post below, I’ve included photos of us creating our arrangements in our home as well as the photos she used too, since she created this for her own Christmas table.
I had intended to get this on the blog sooner but time slips away faster than you think in mid-to-late December so here we are on Christmas eve, my favorite day of the year. A fire is crackling, I’ve got a plate of Christmas cookies and mug of hot tea, and my soul is content. I hope yours is too and for those who celebrate, Merry Christmas Eve.
xo,
Shannon
A Magical Holiday Floral Centerpiece for your Chandelier
Floral arrangement designed by: Maureen Christmas, AIFD, CFD, EMC, of Floral Notes
Written and photographed by: Shannon Christmas (no acronyms), of Noelle, L.L.C.
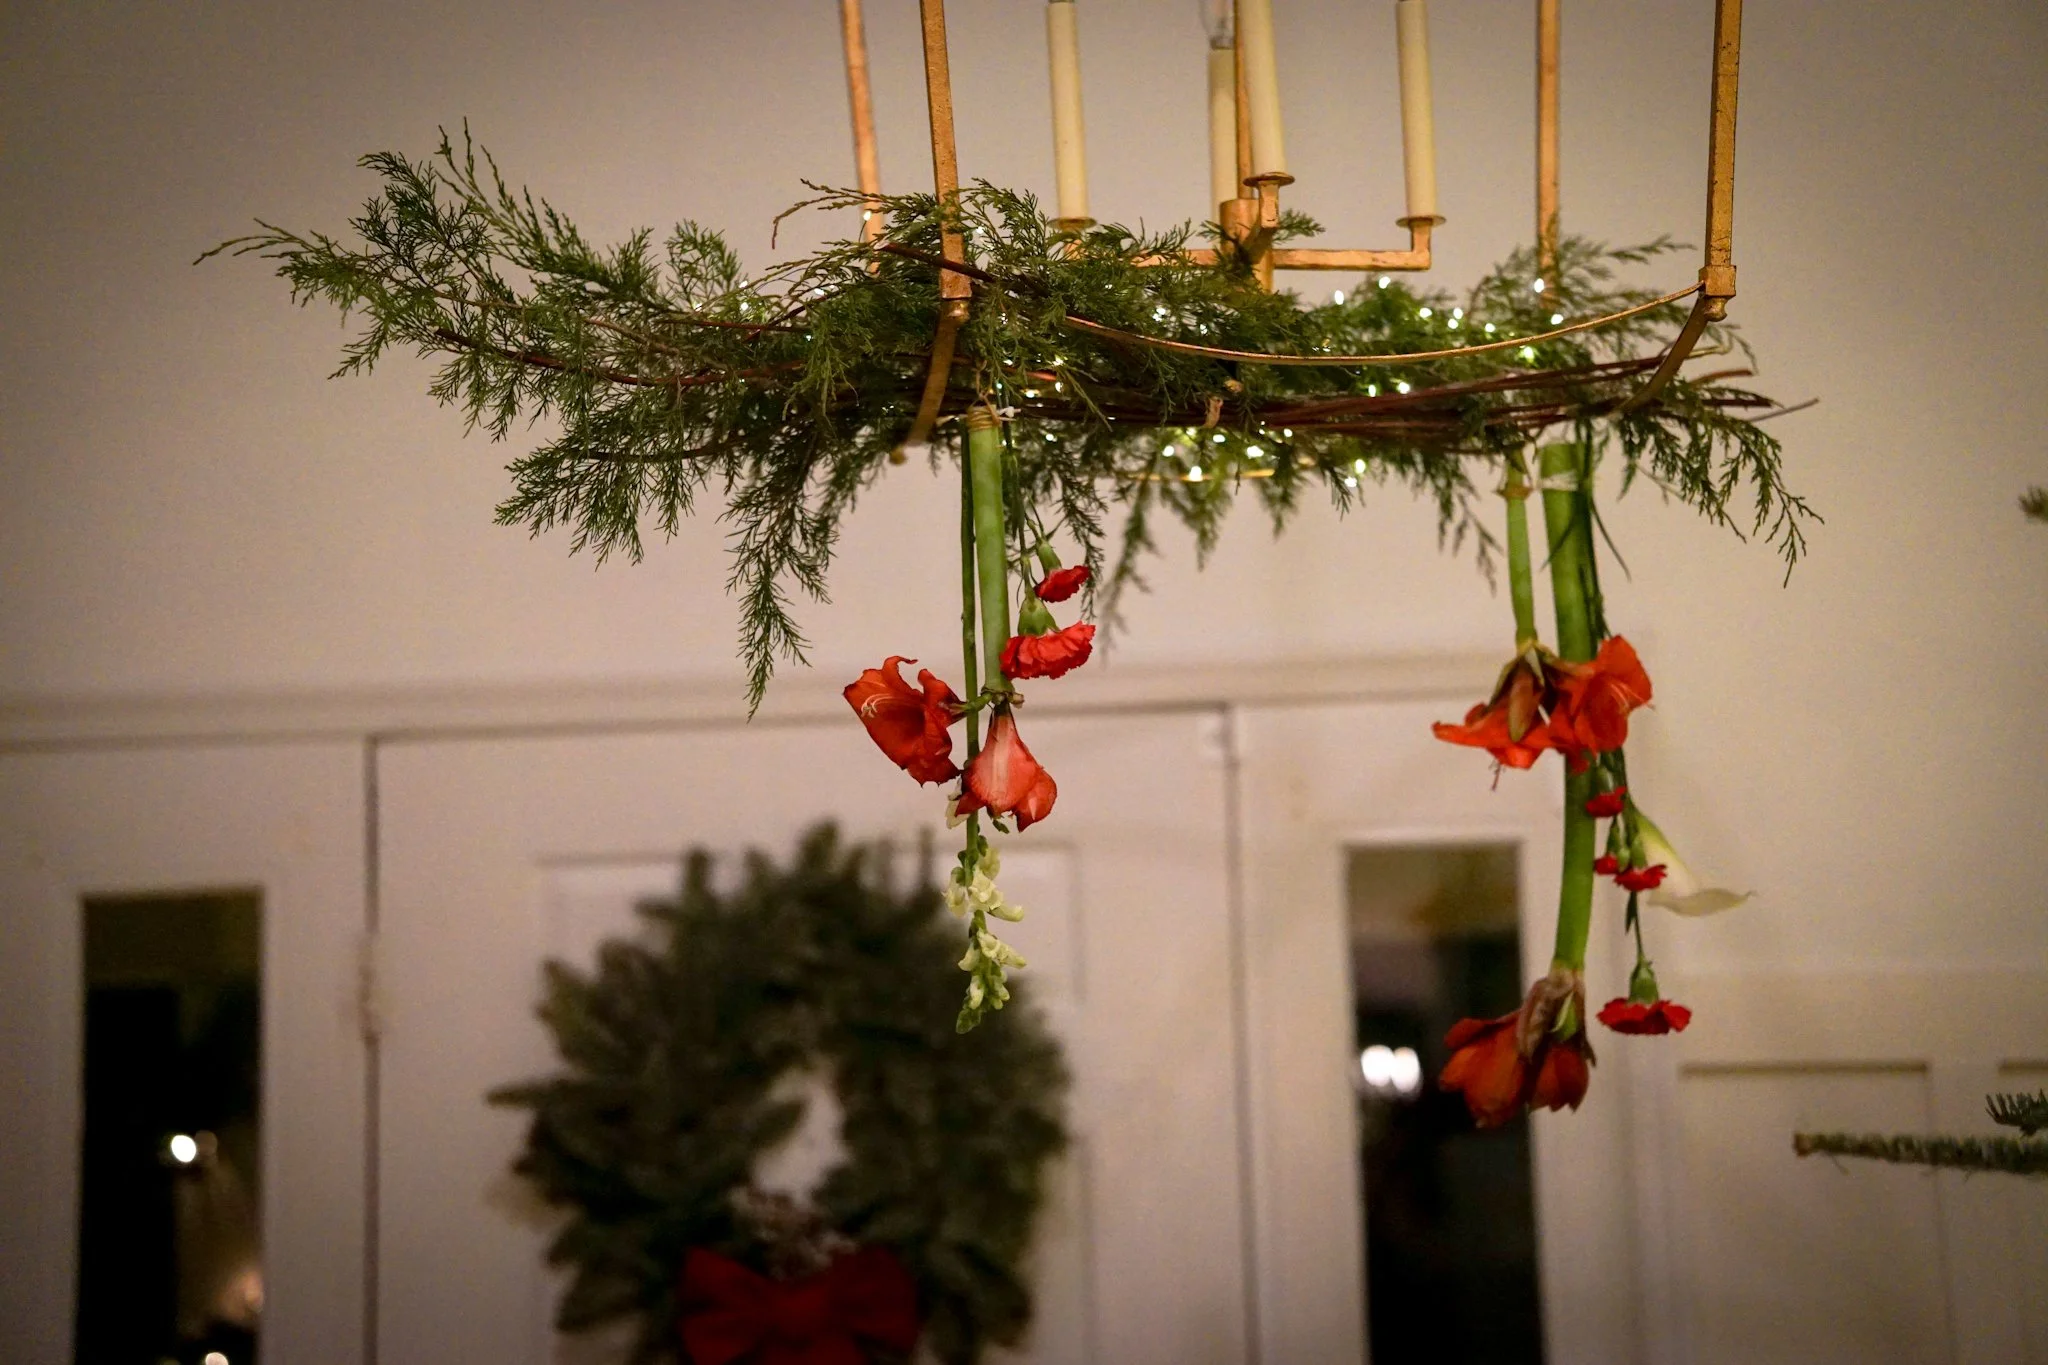
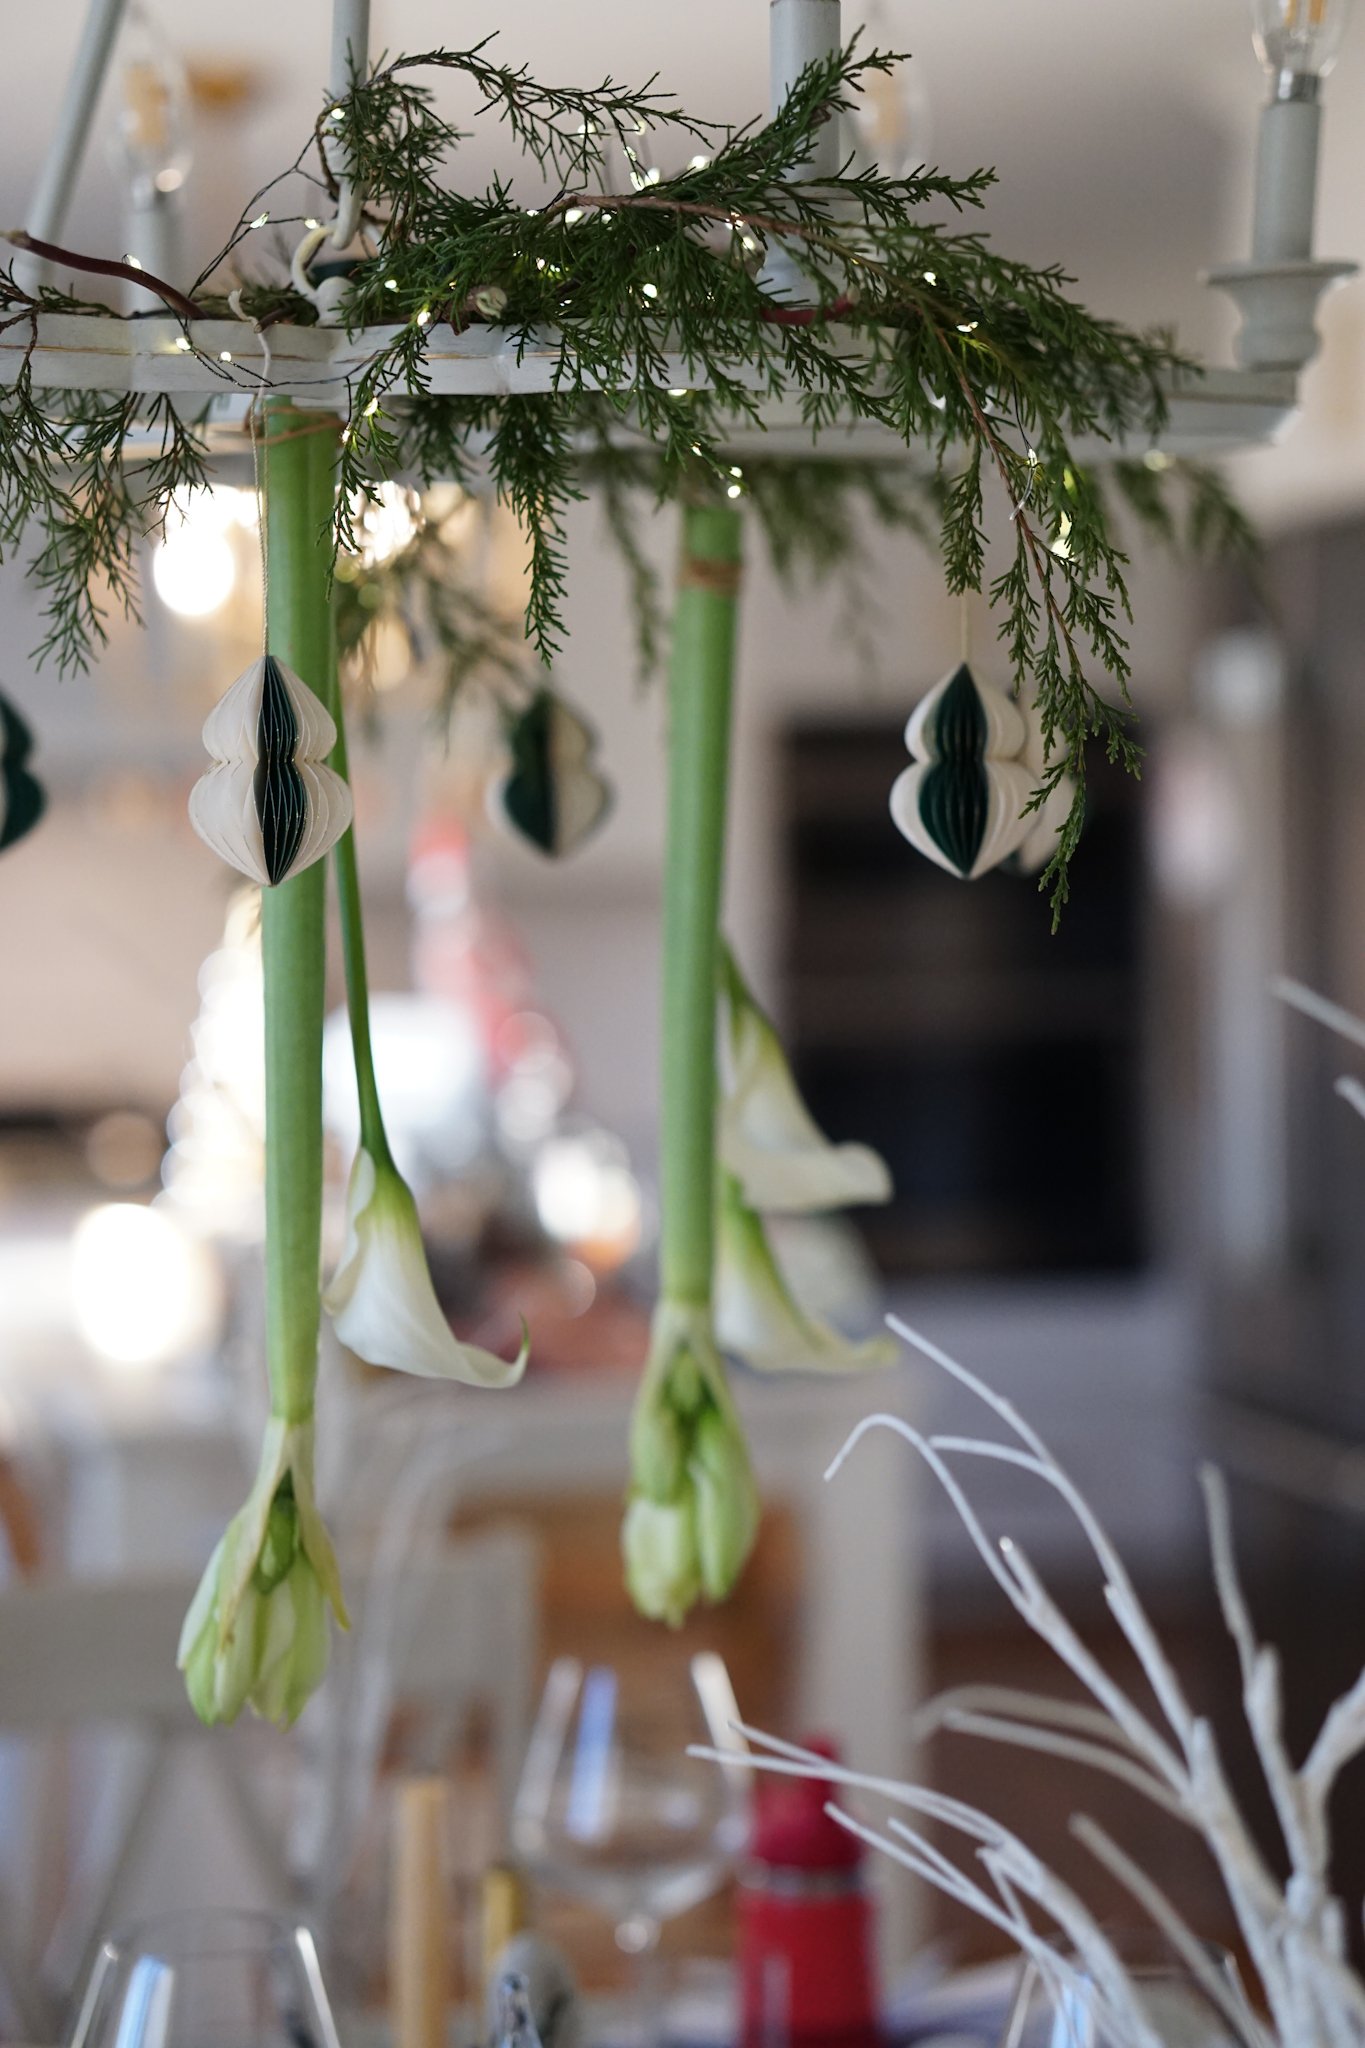
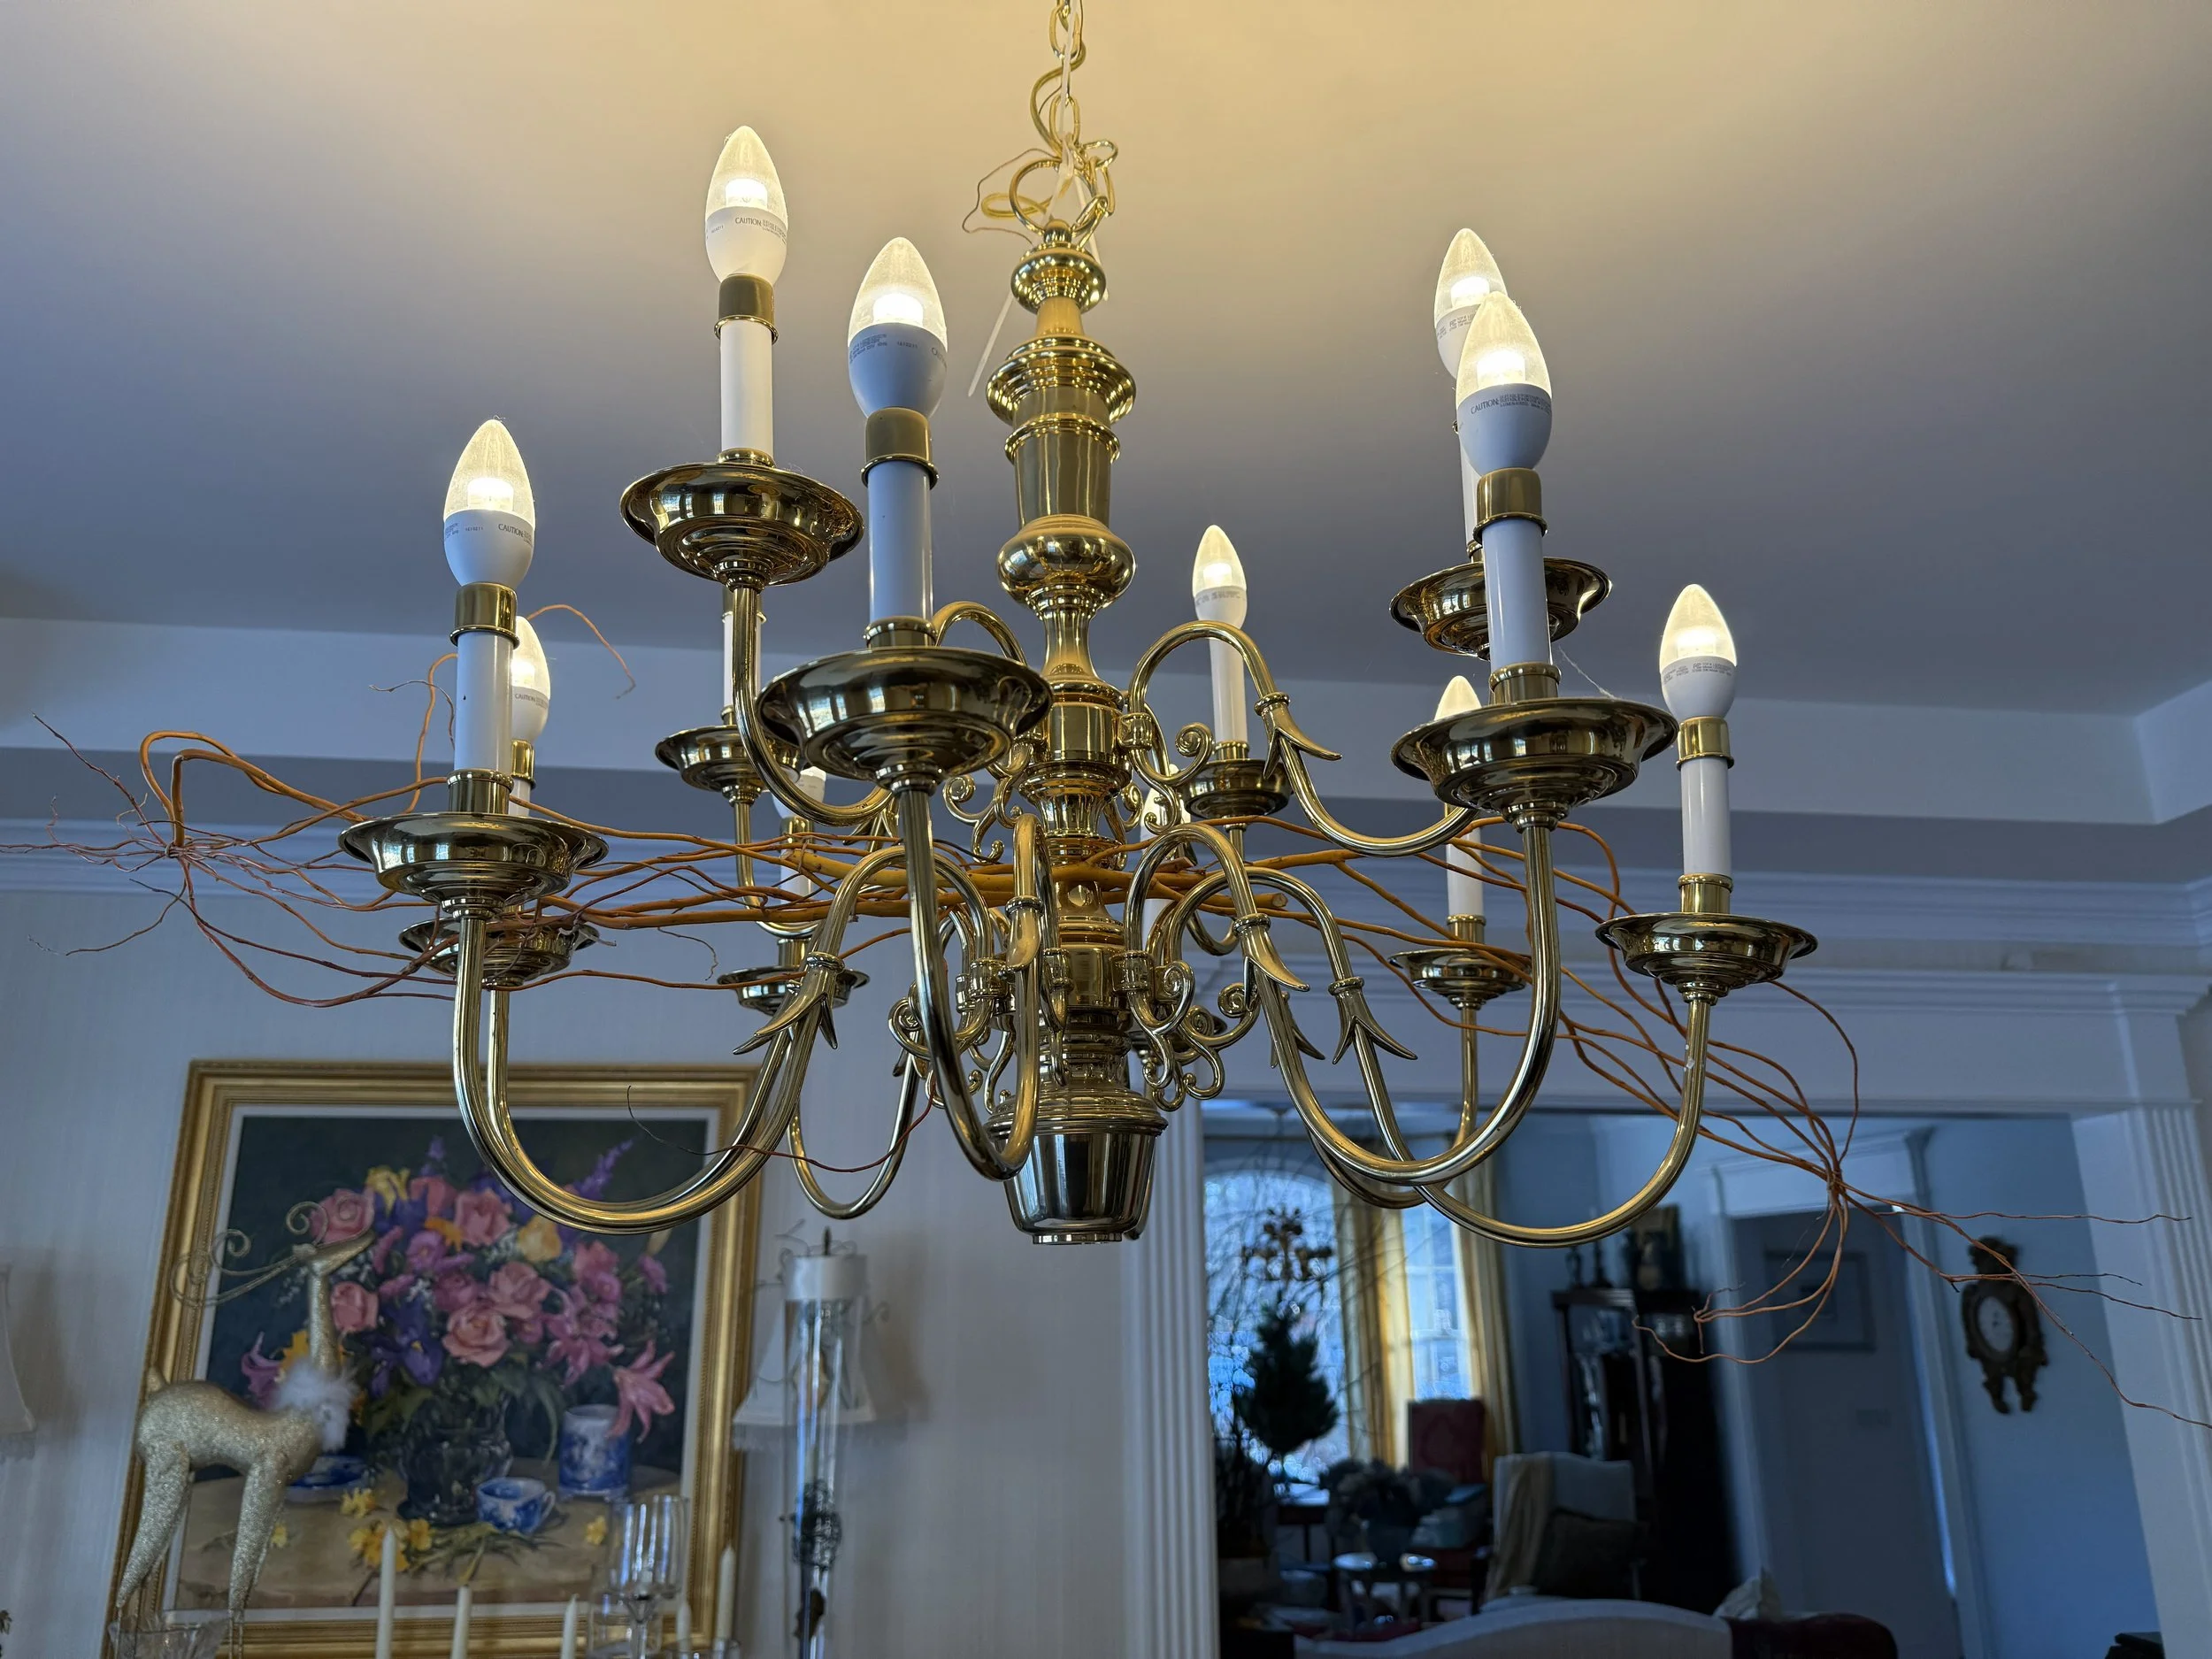
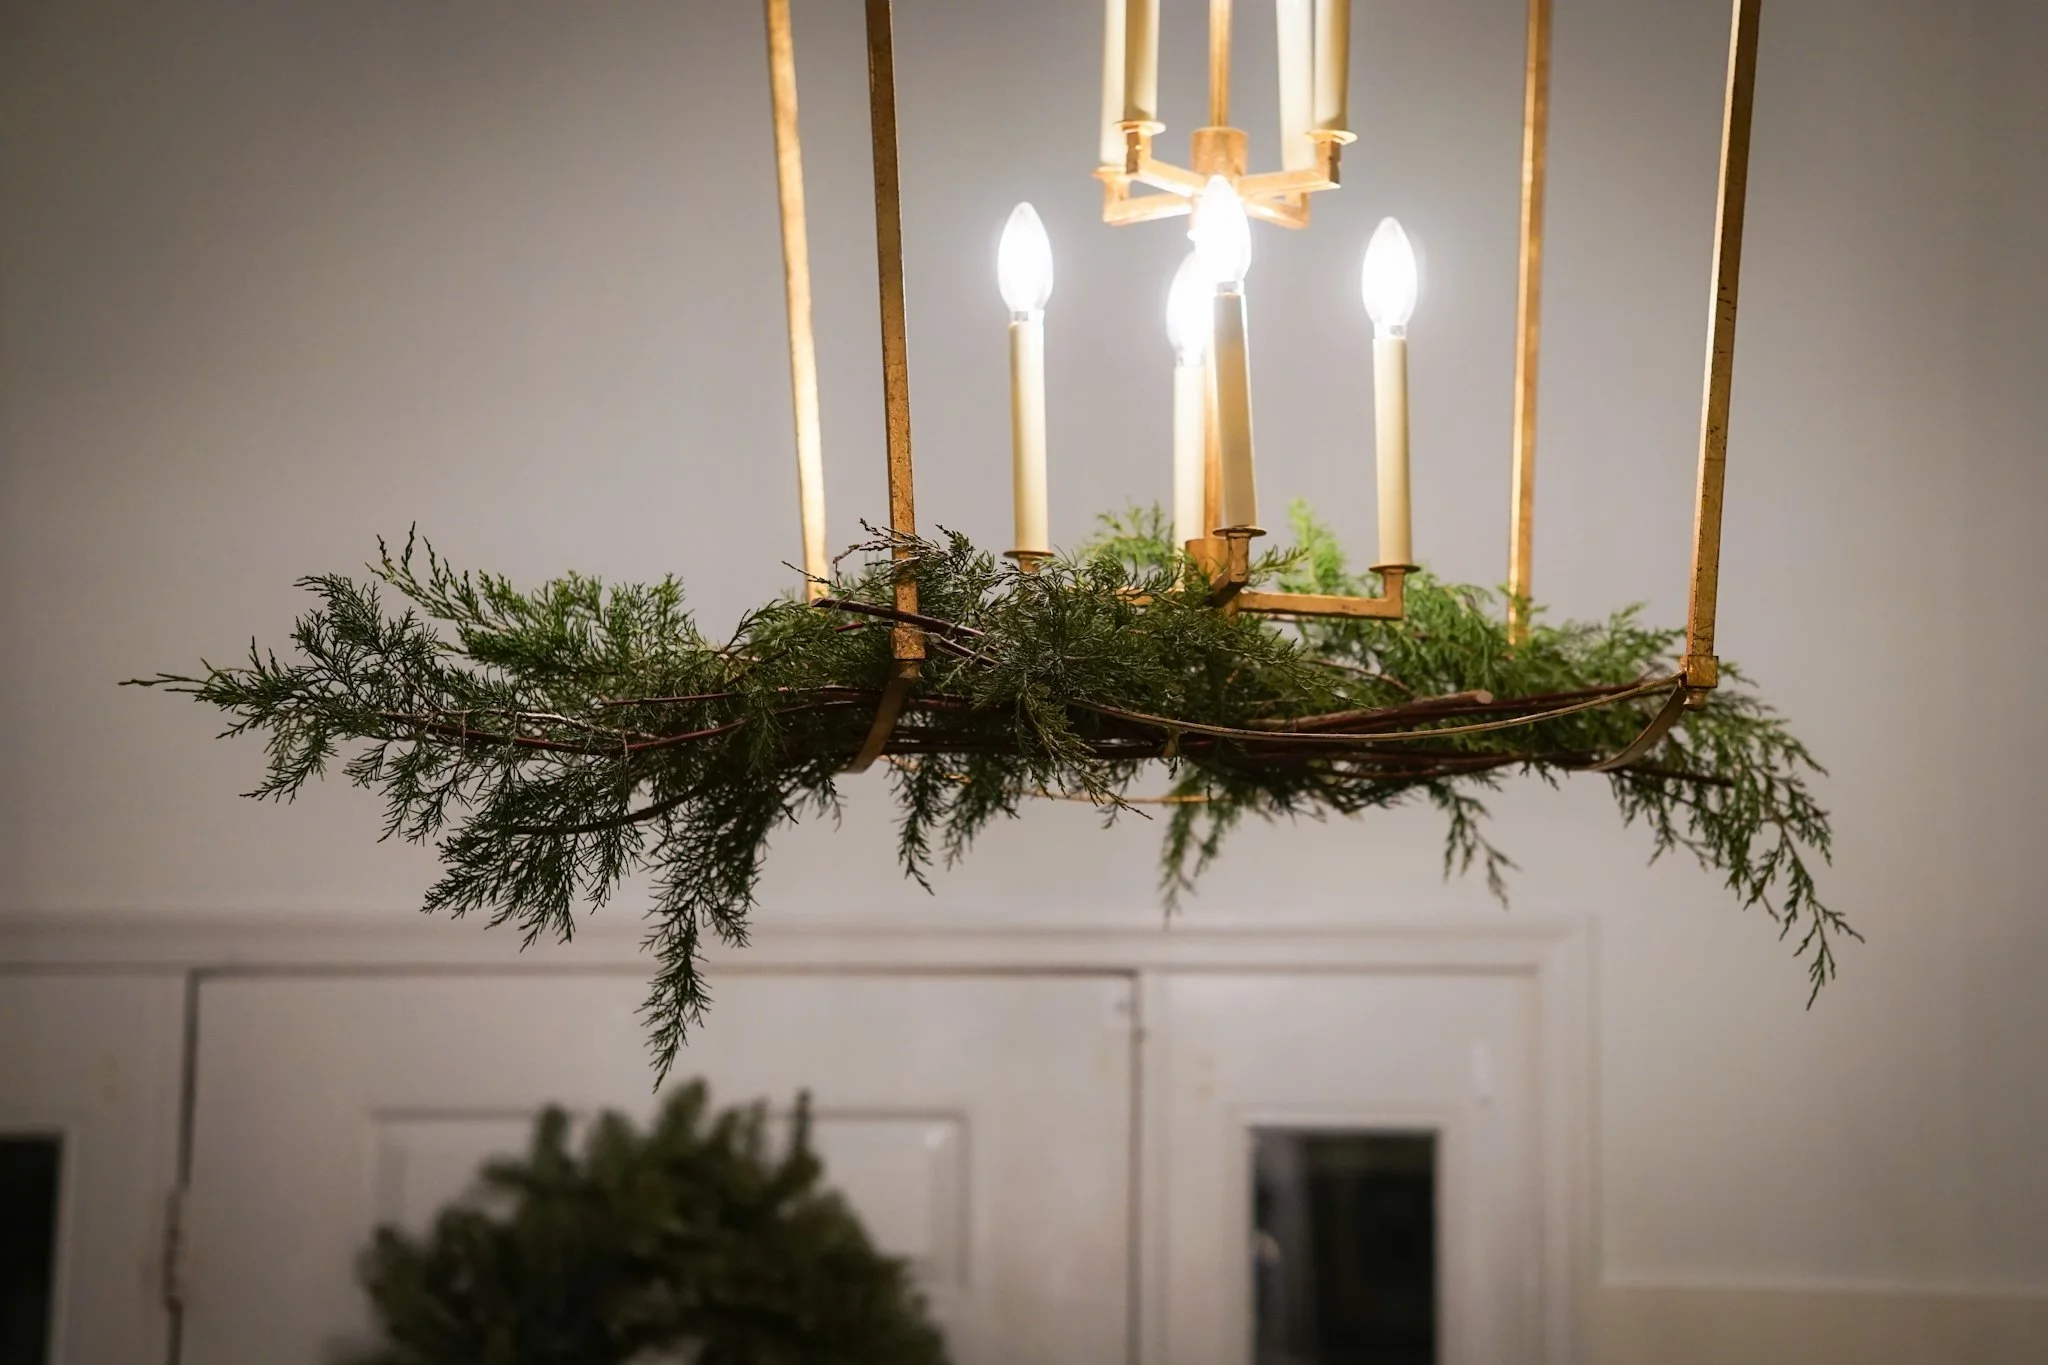
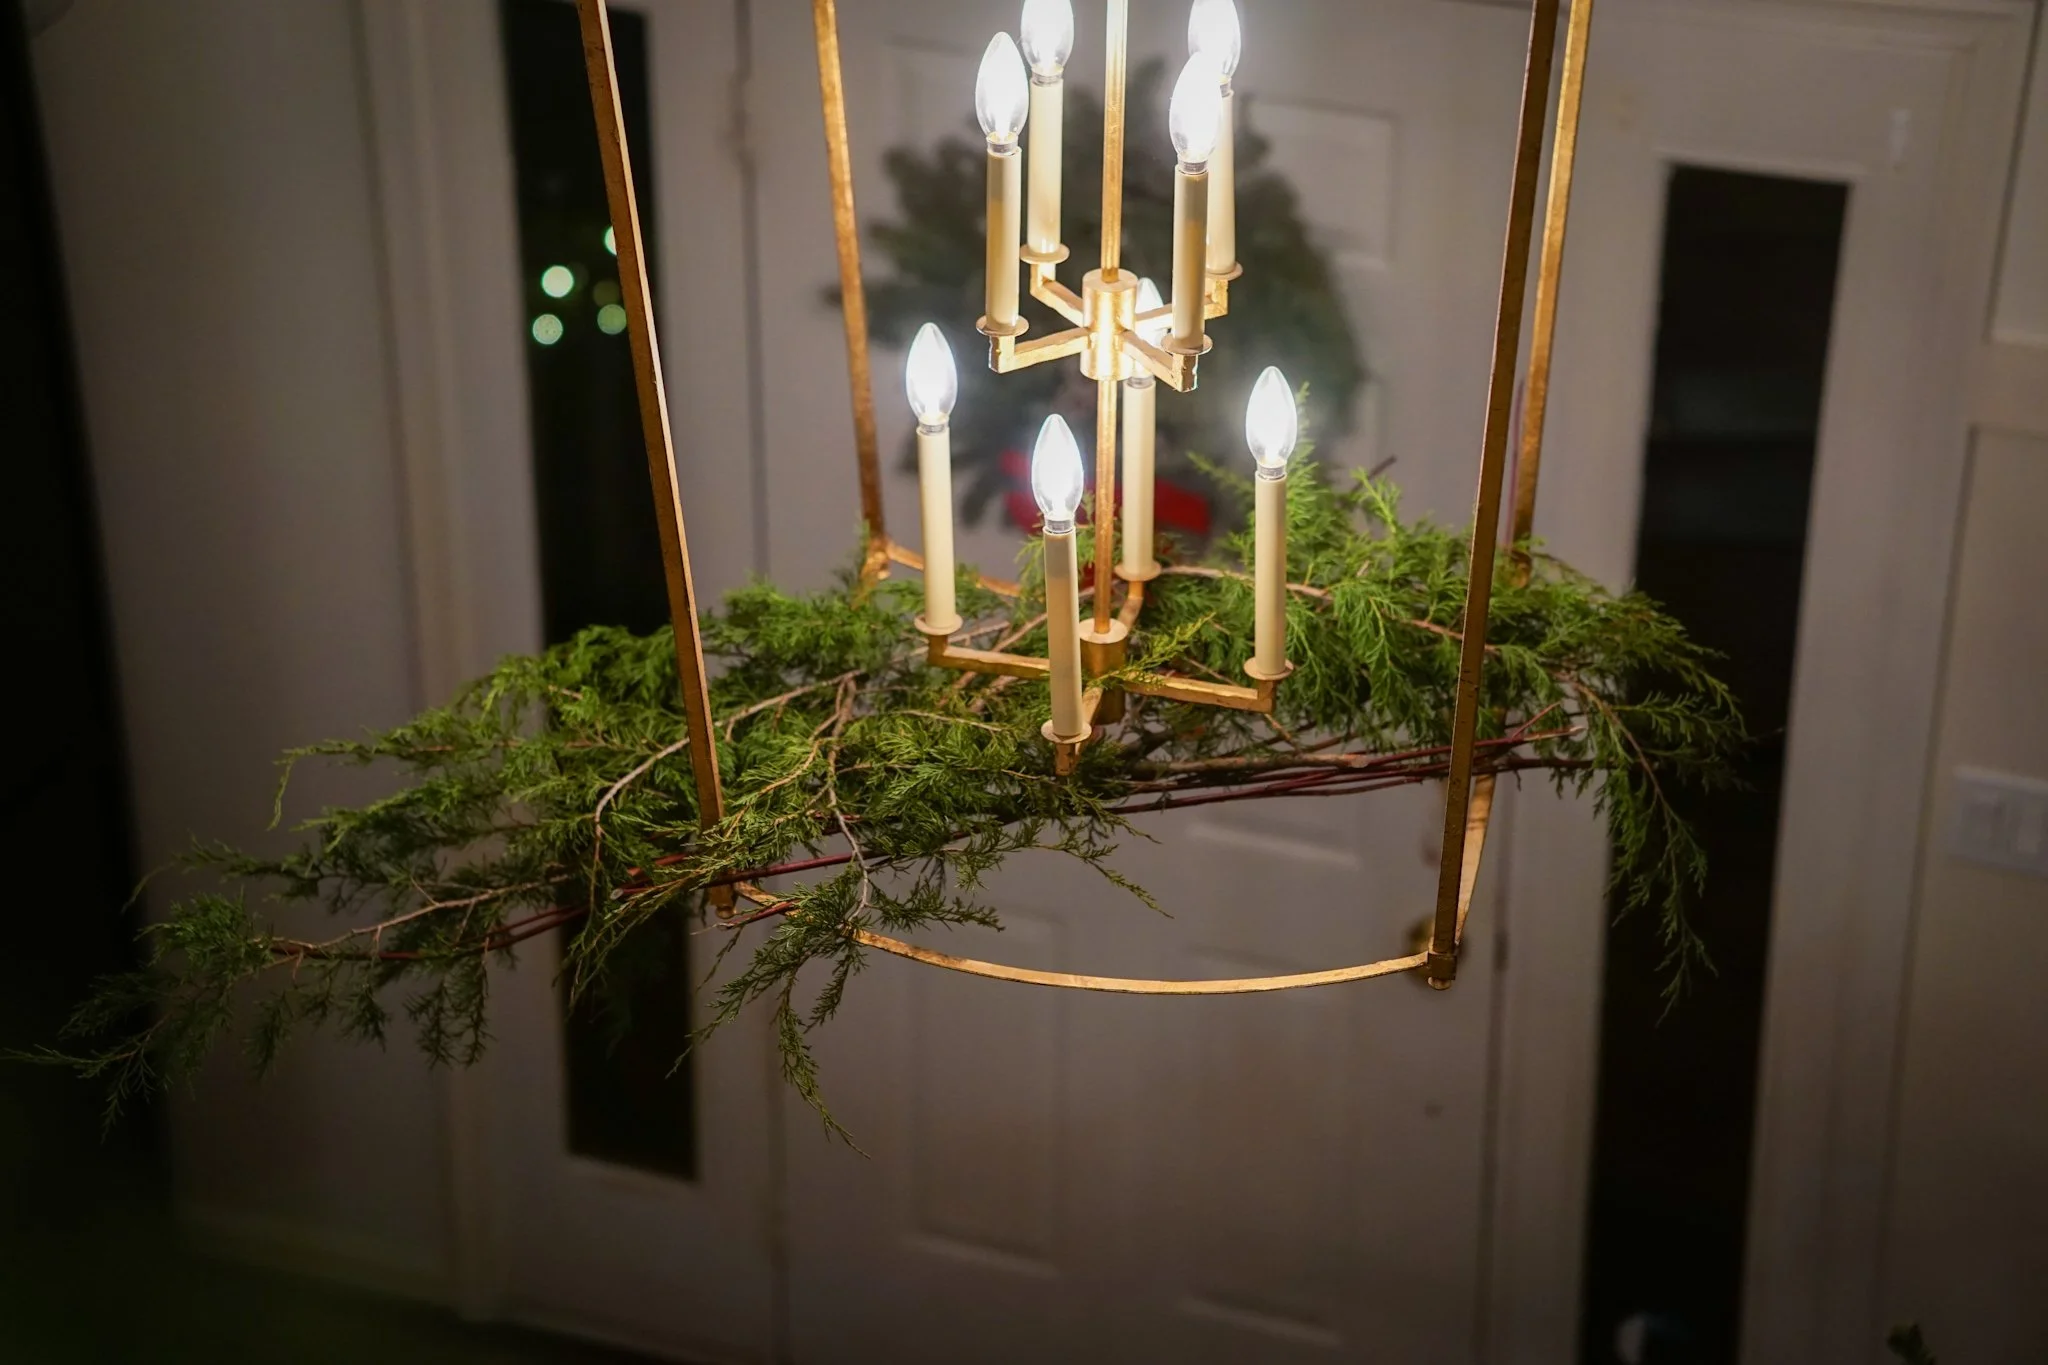
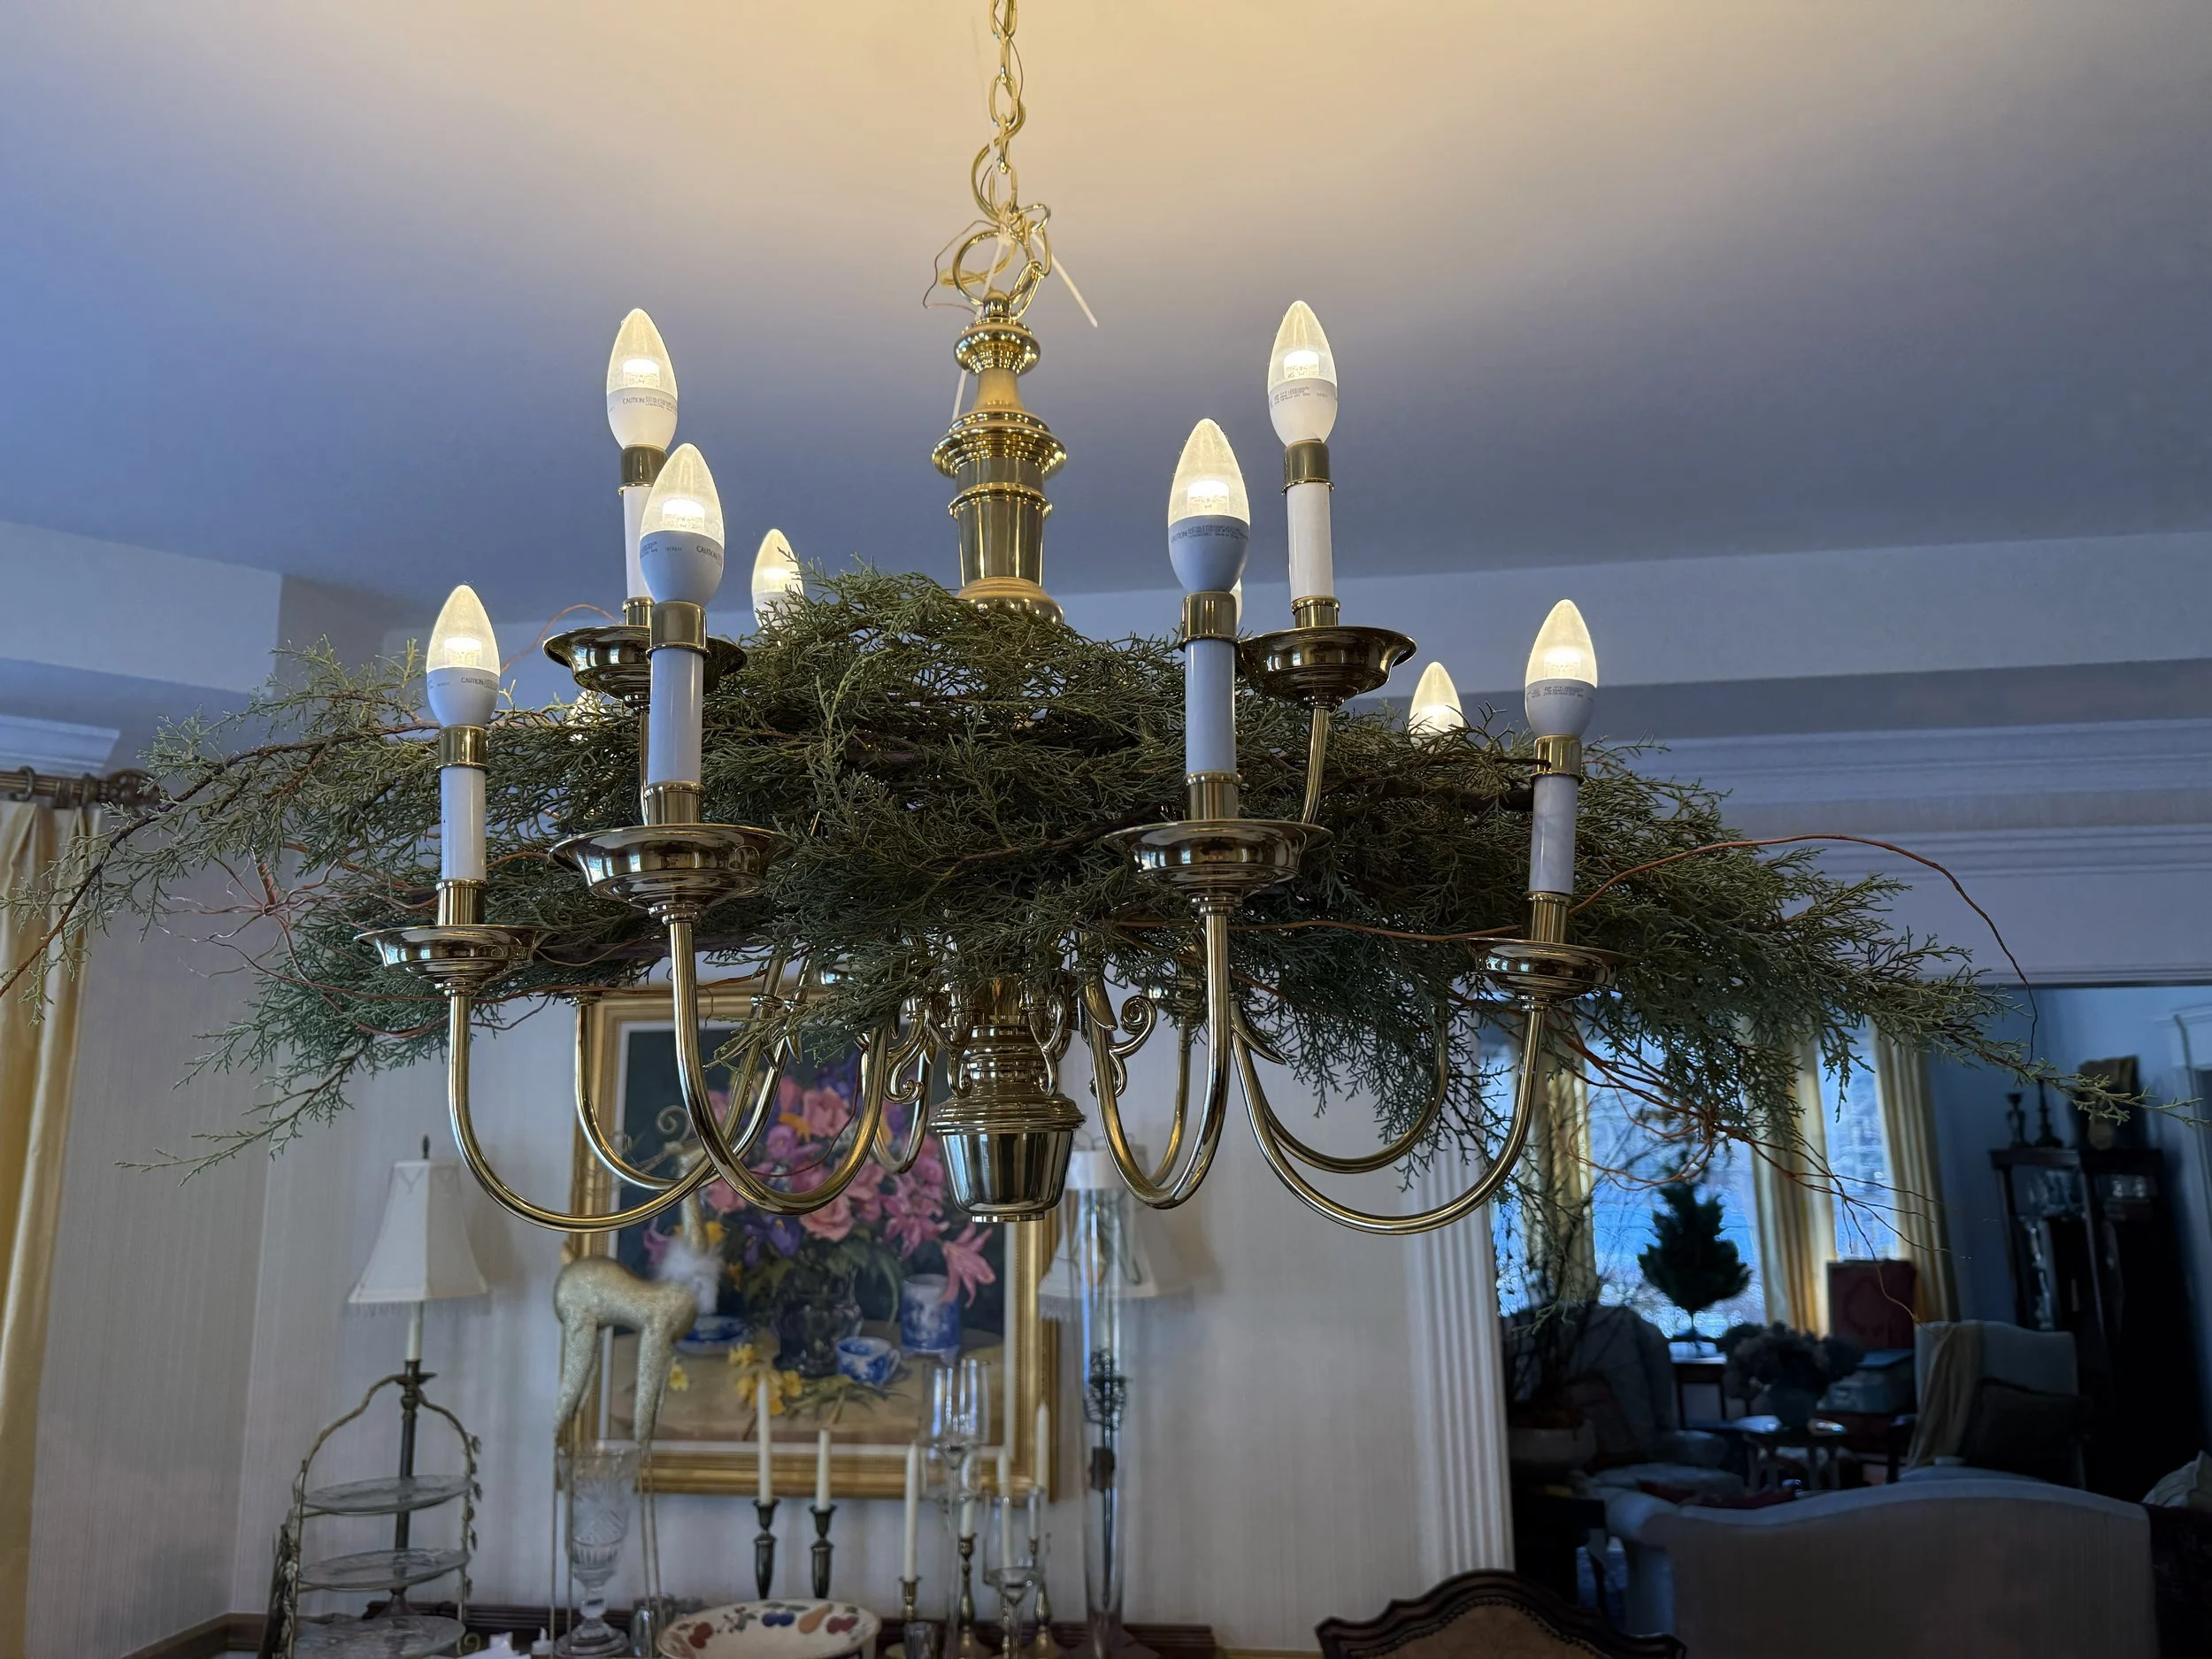
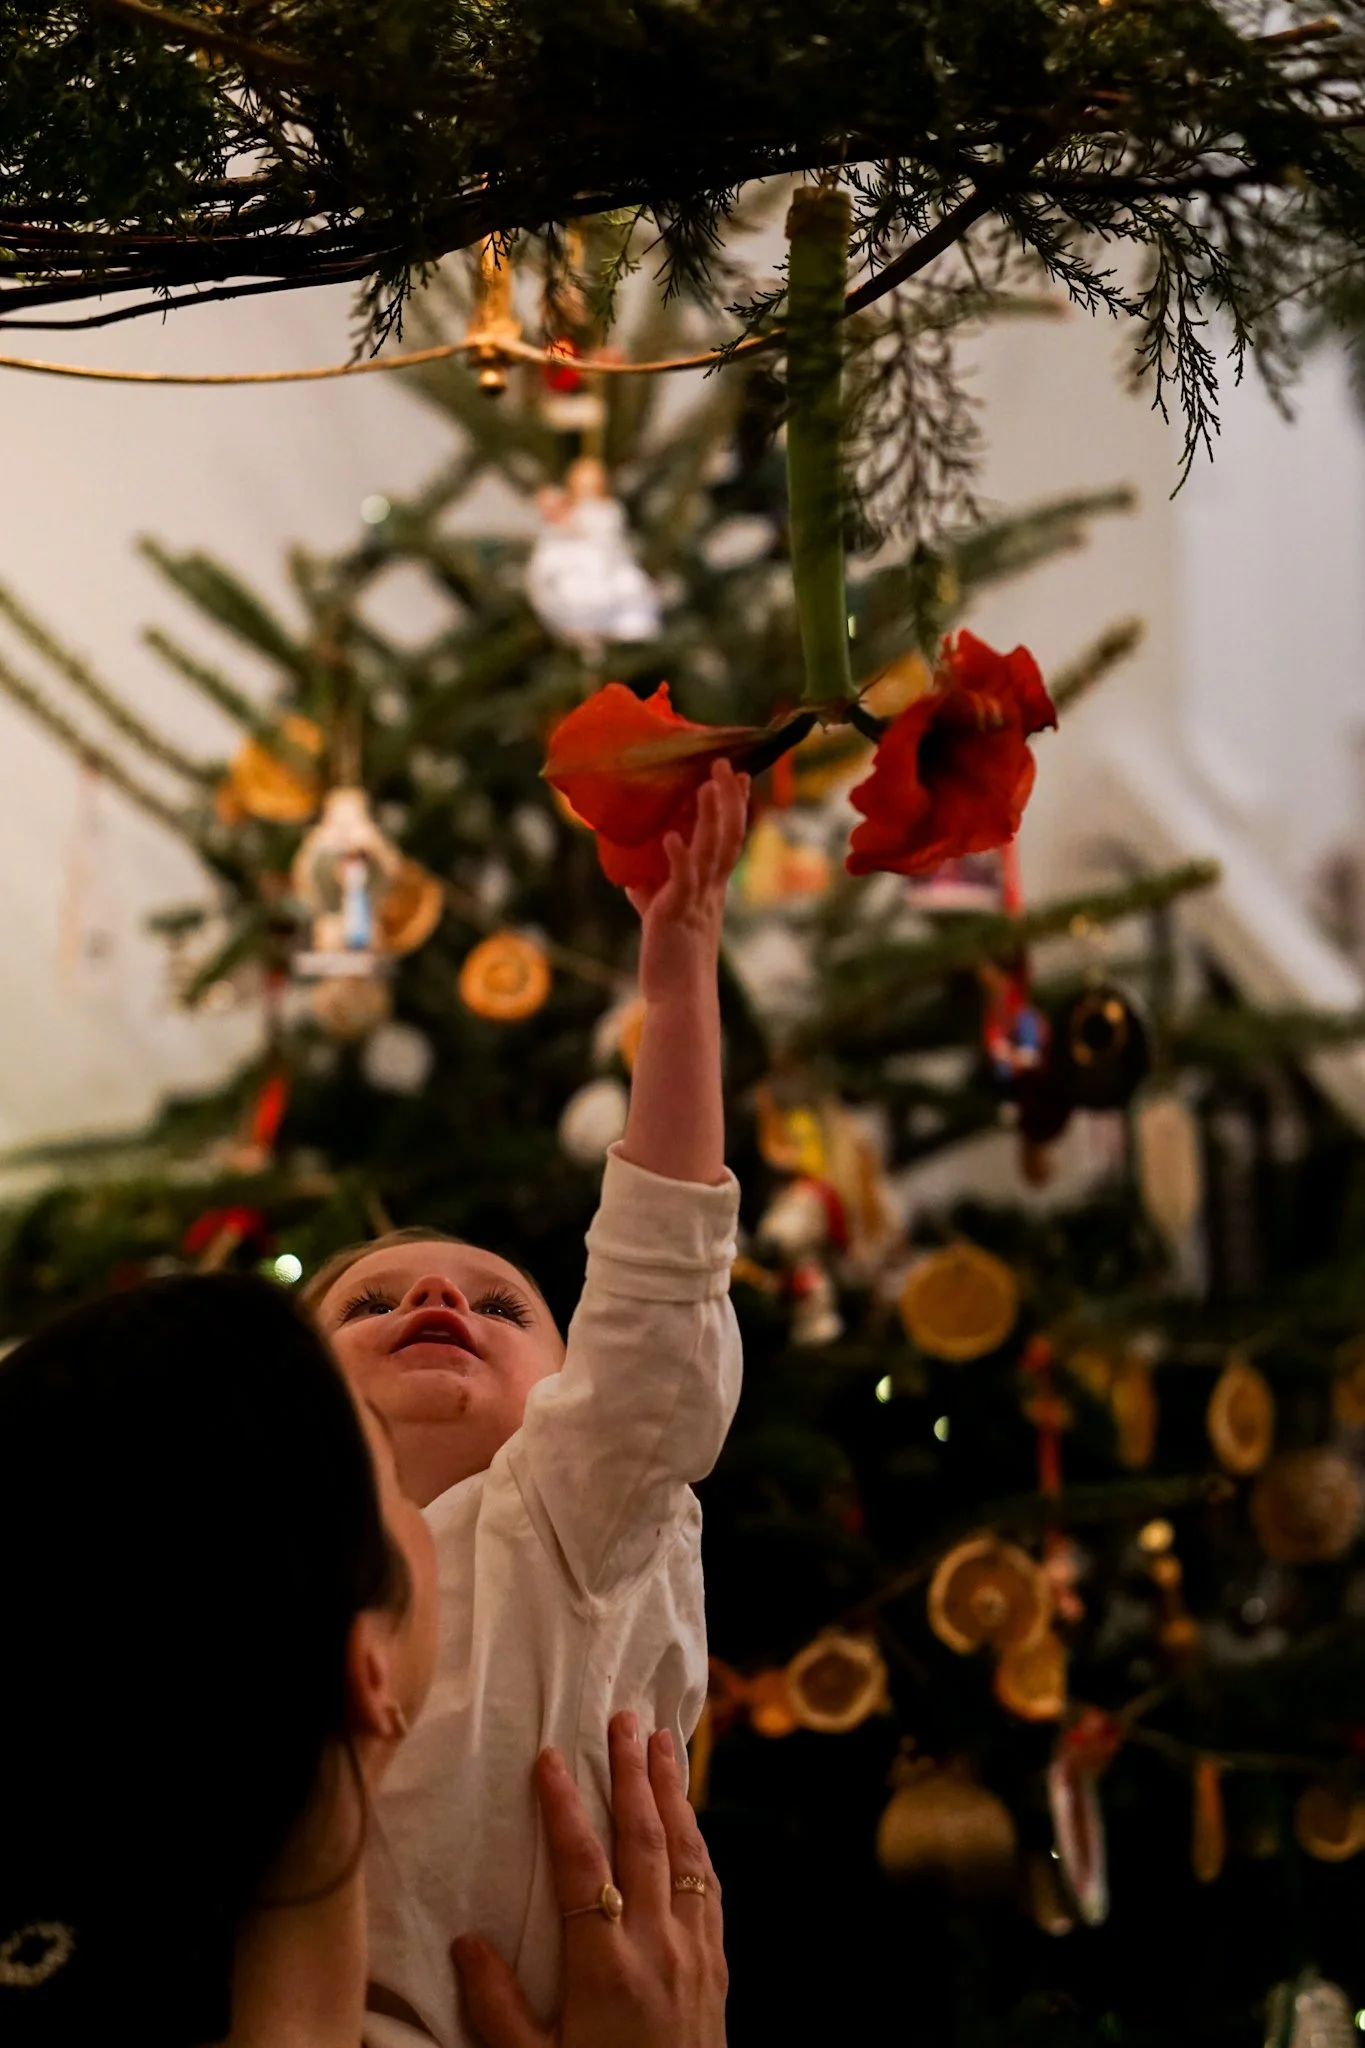
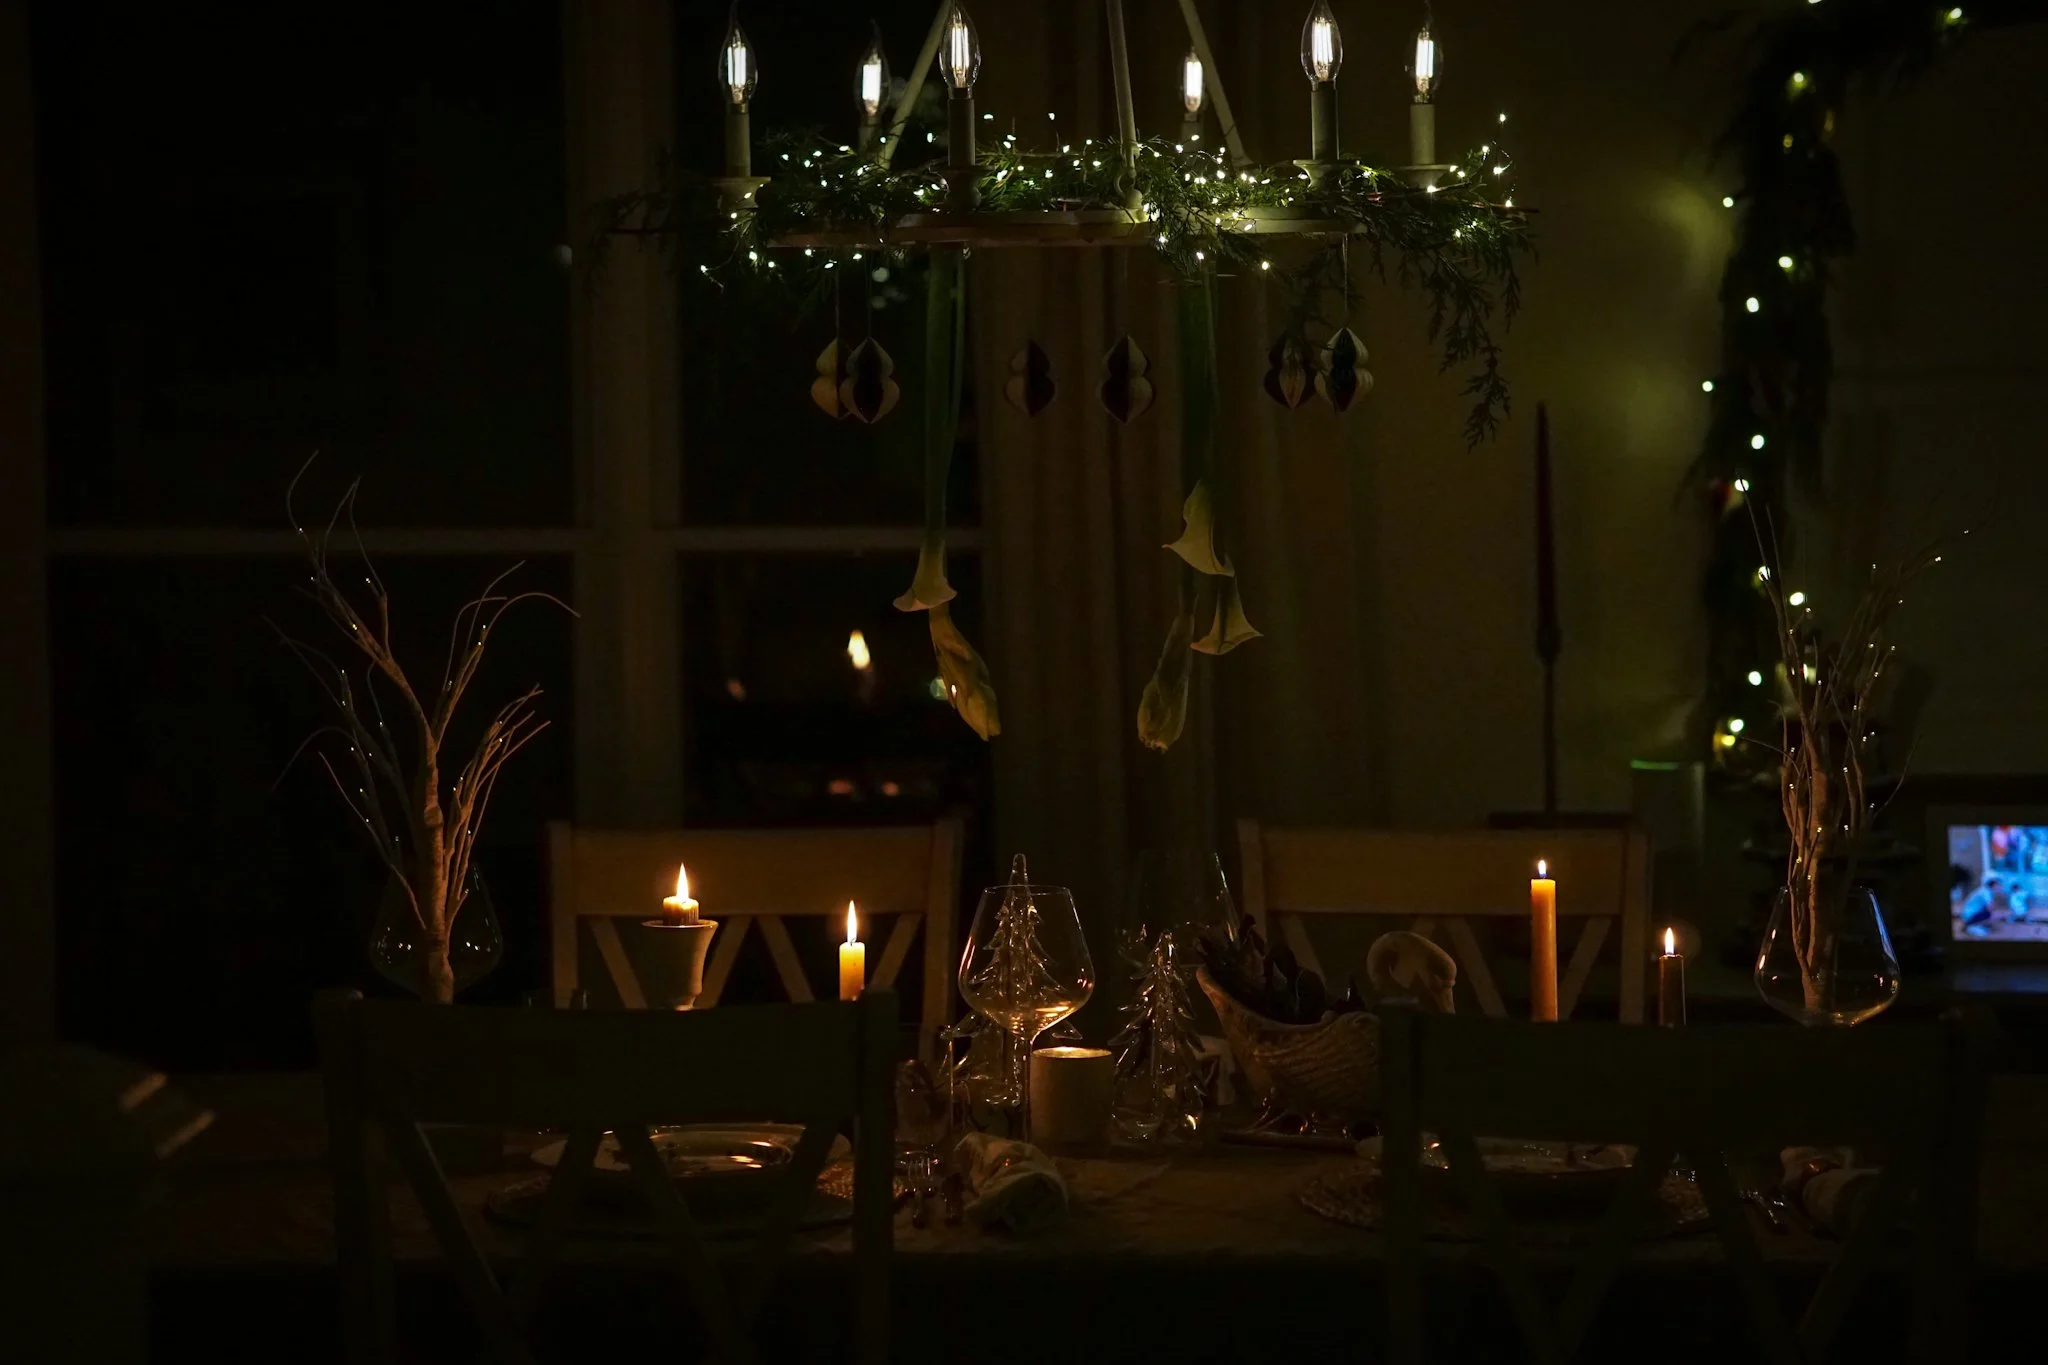
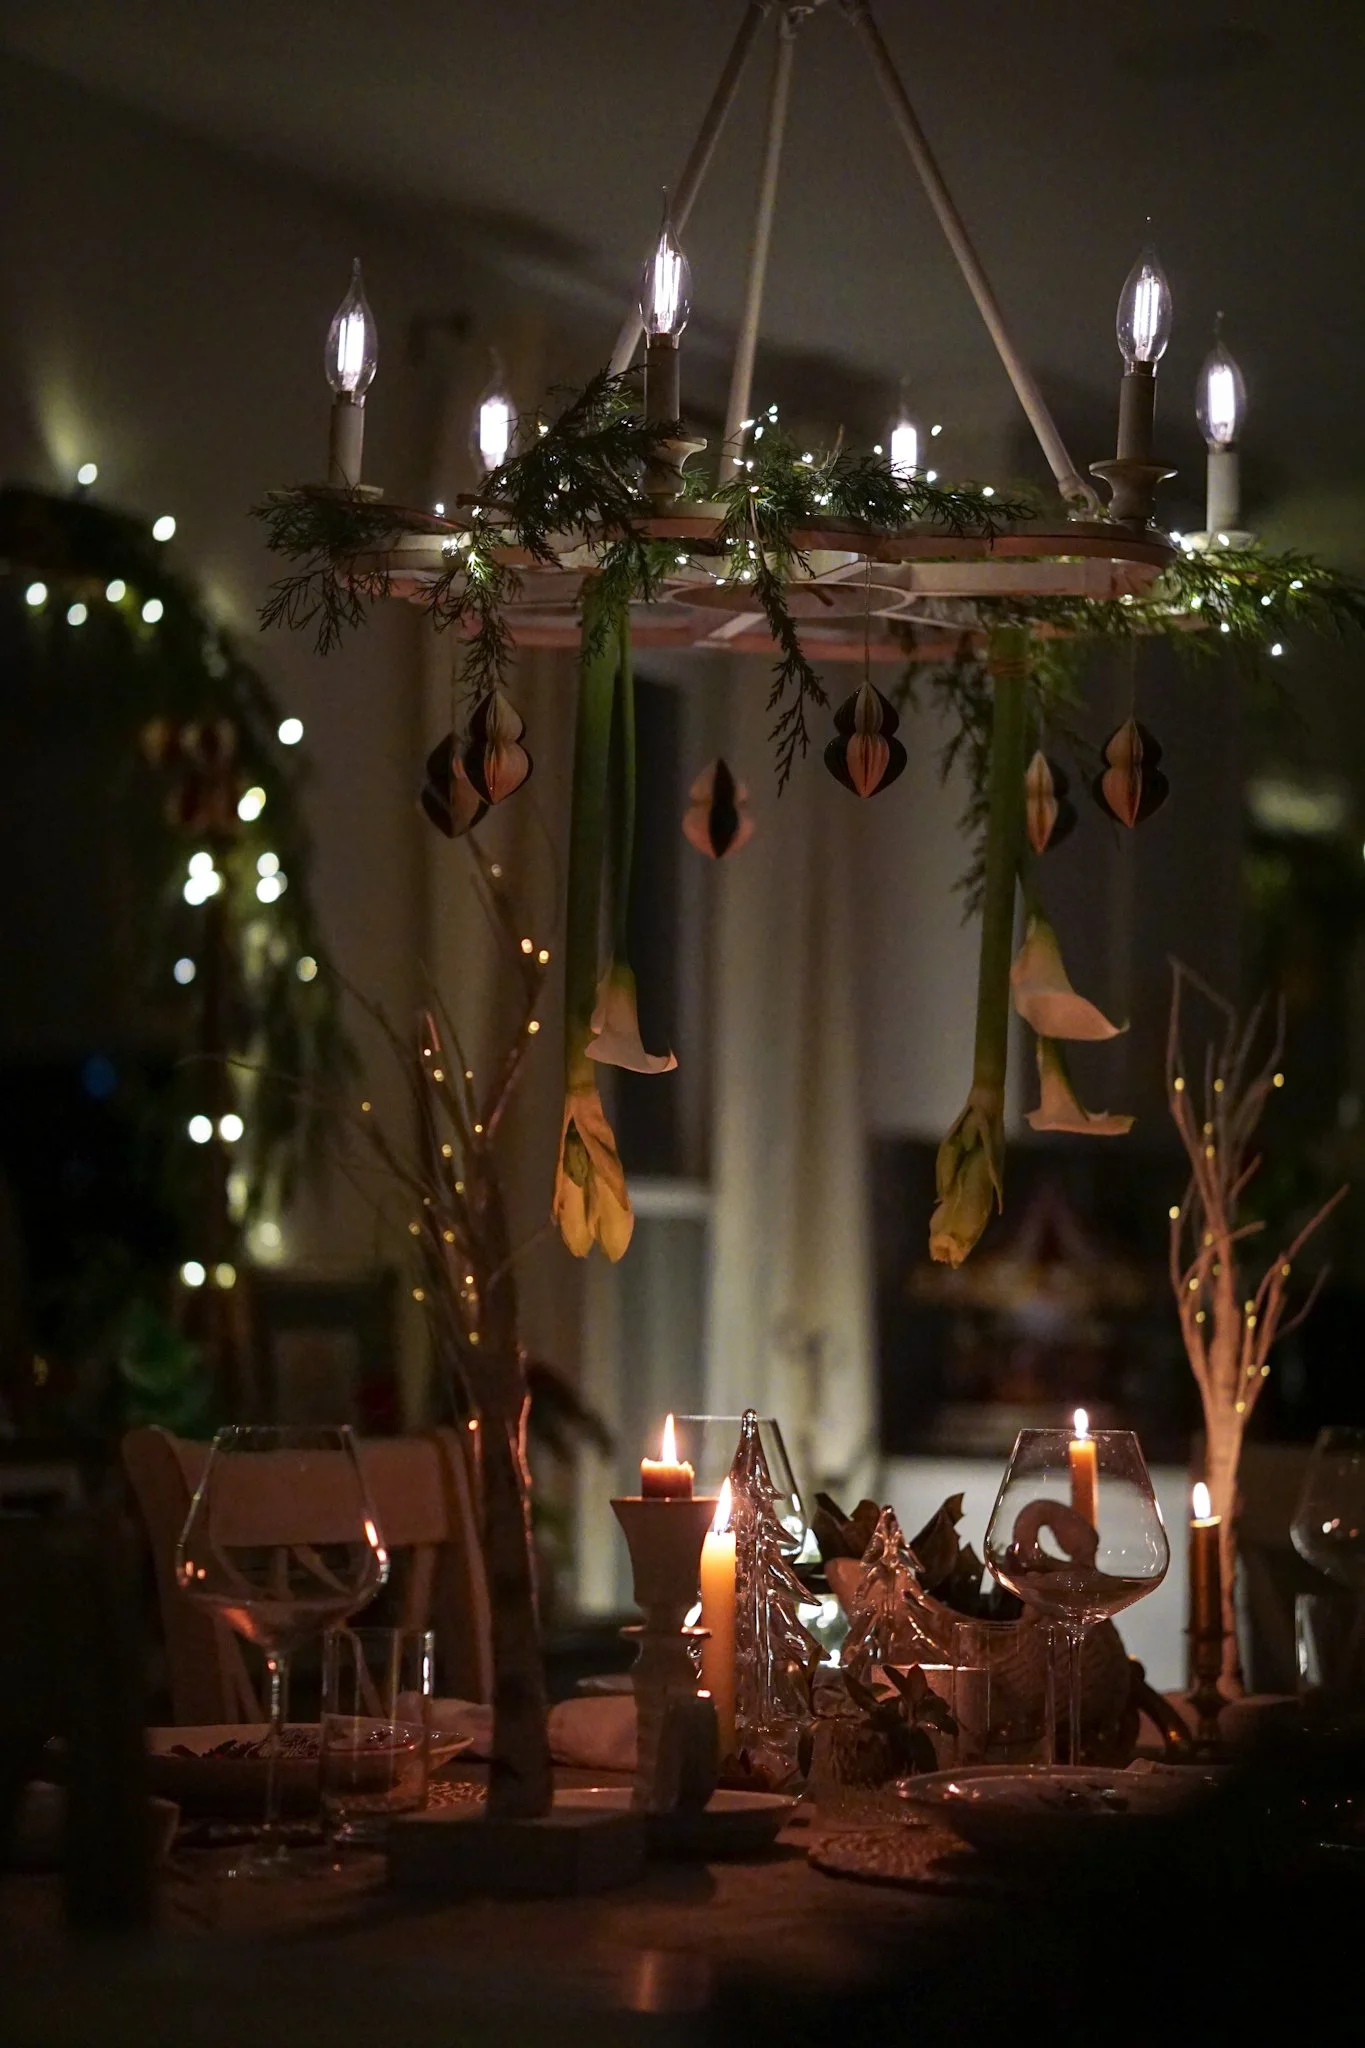
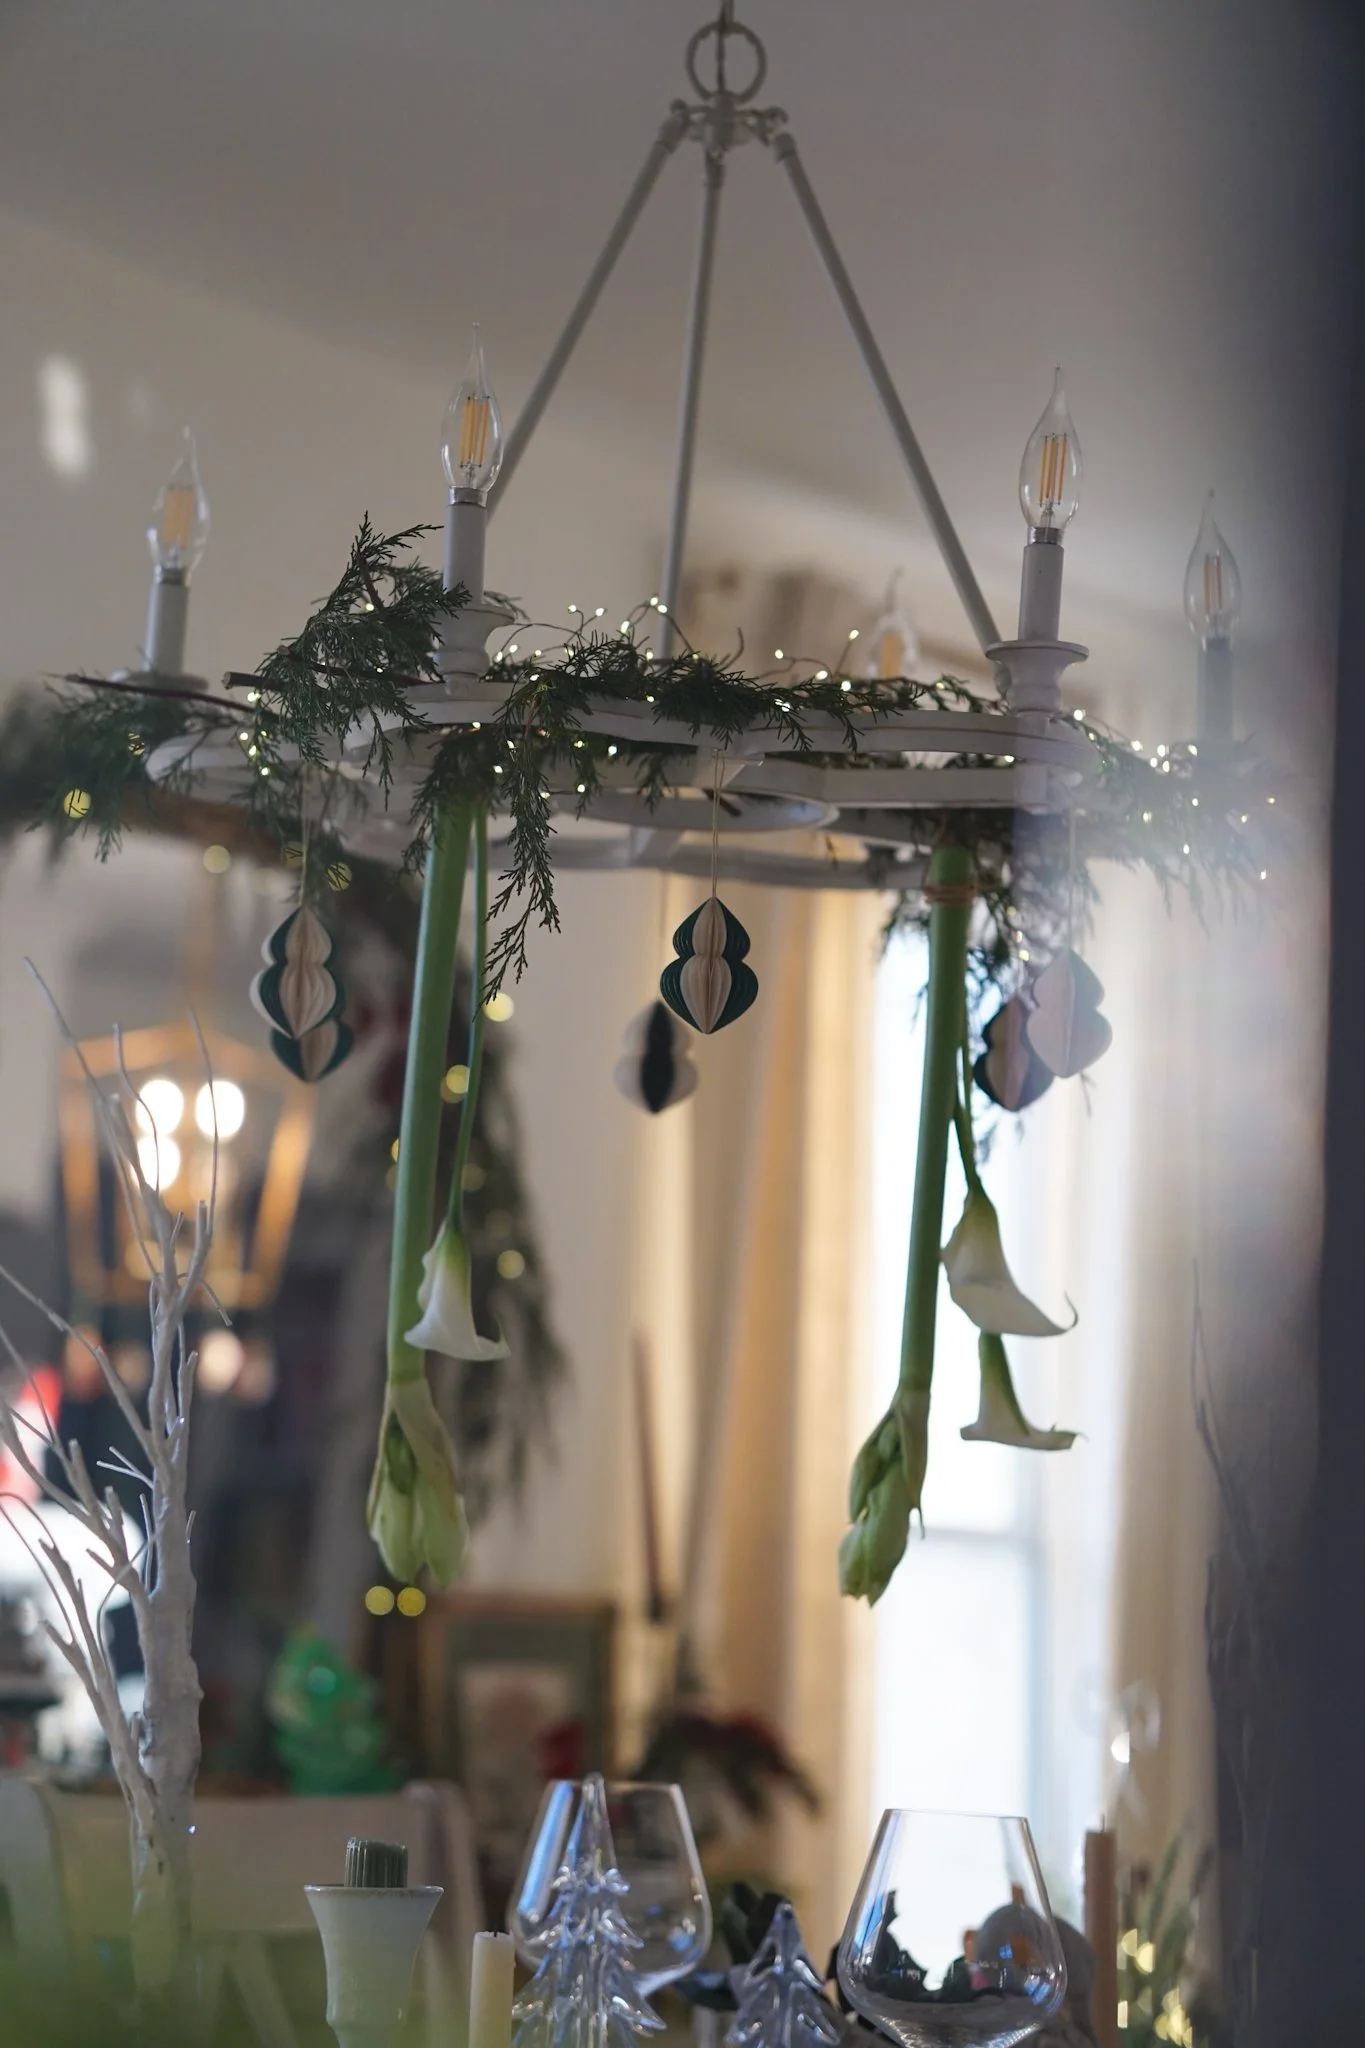
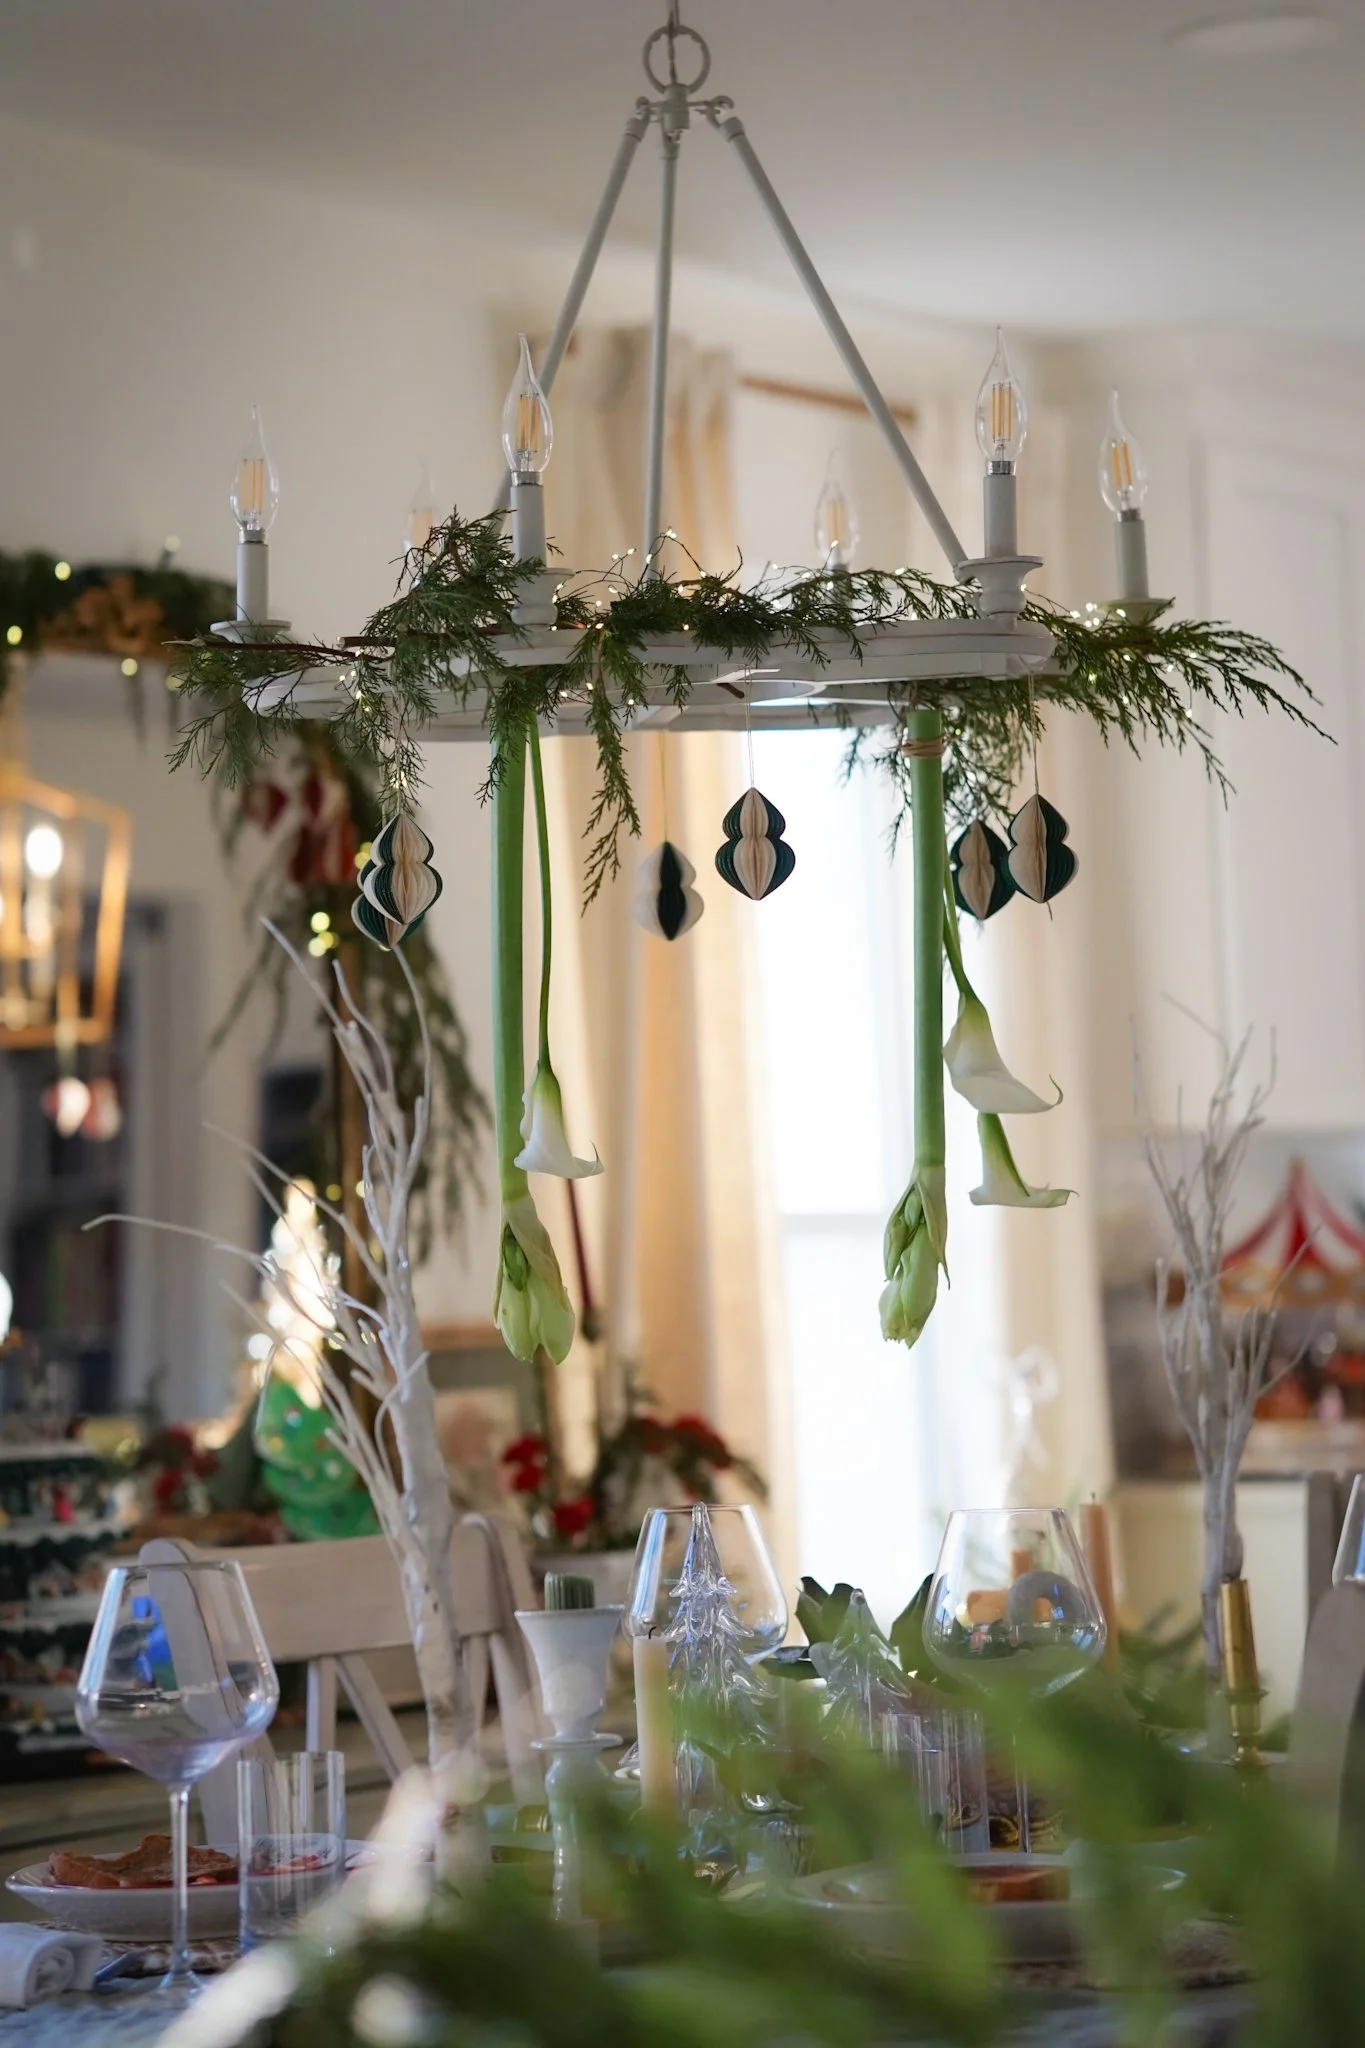
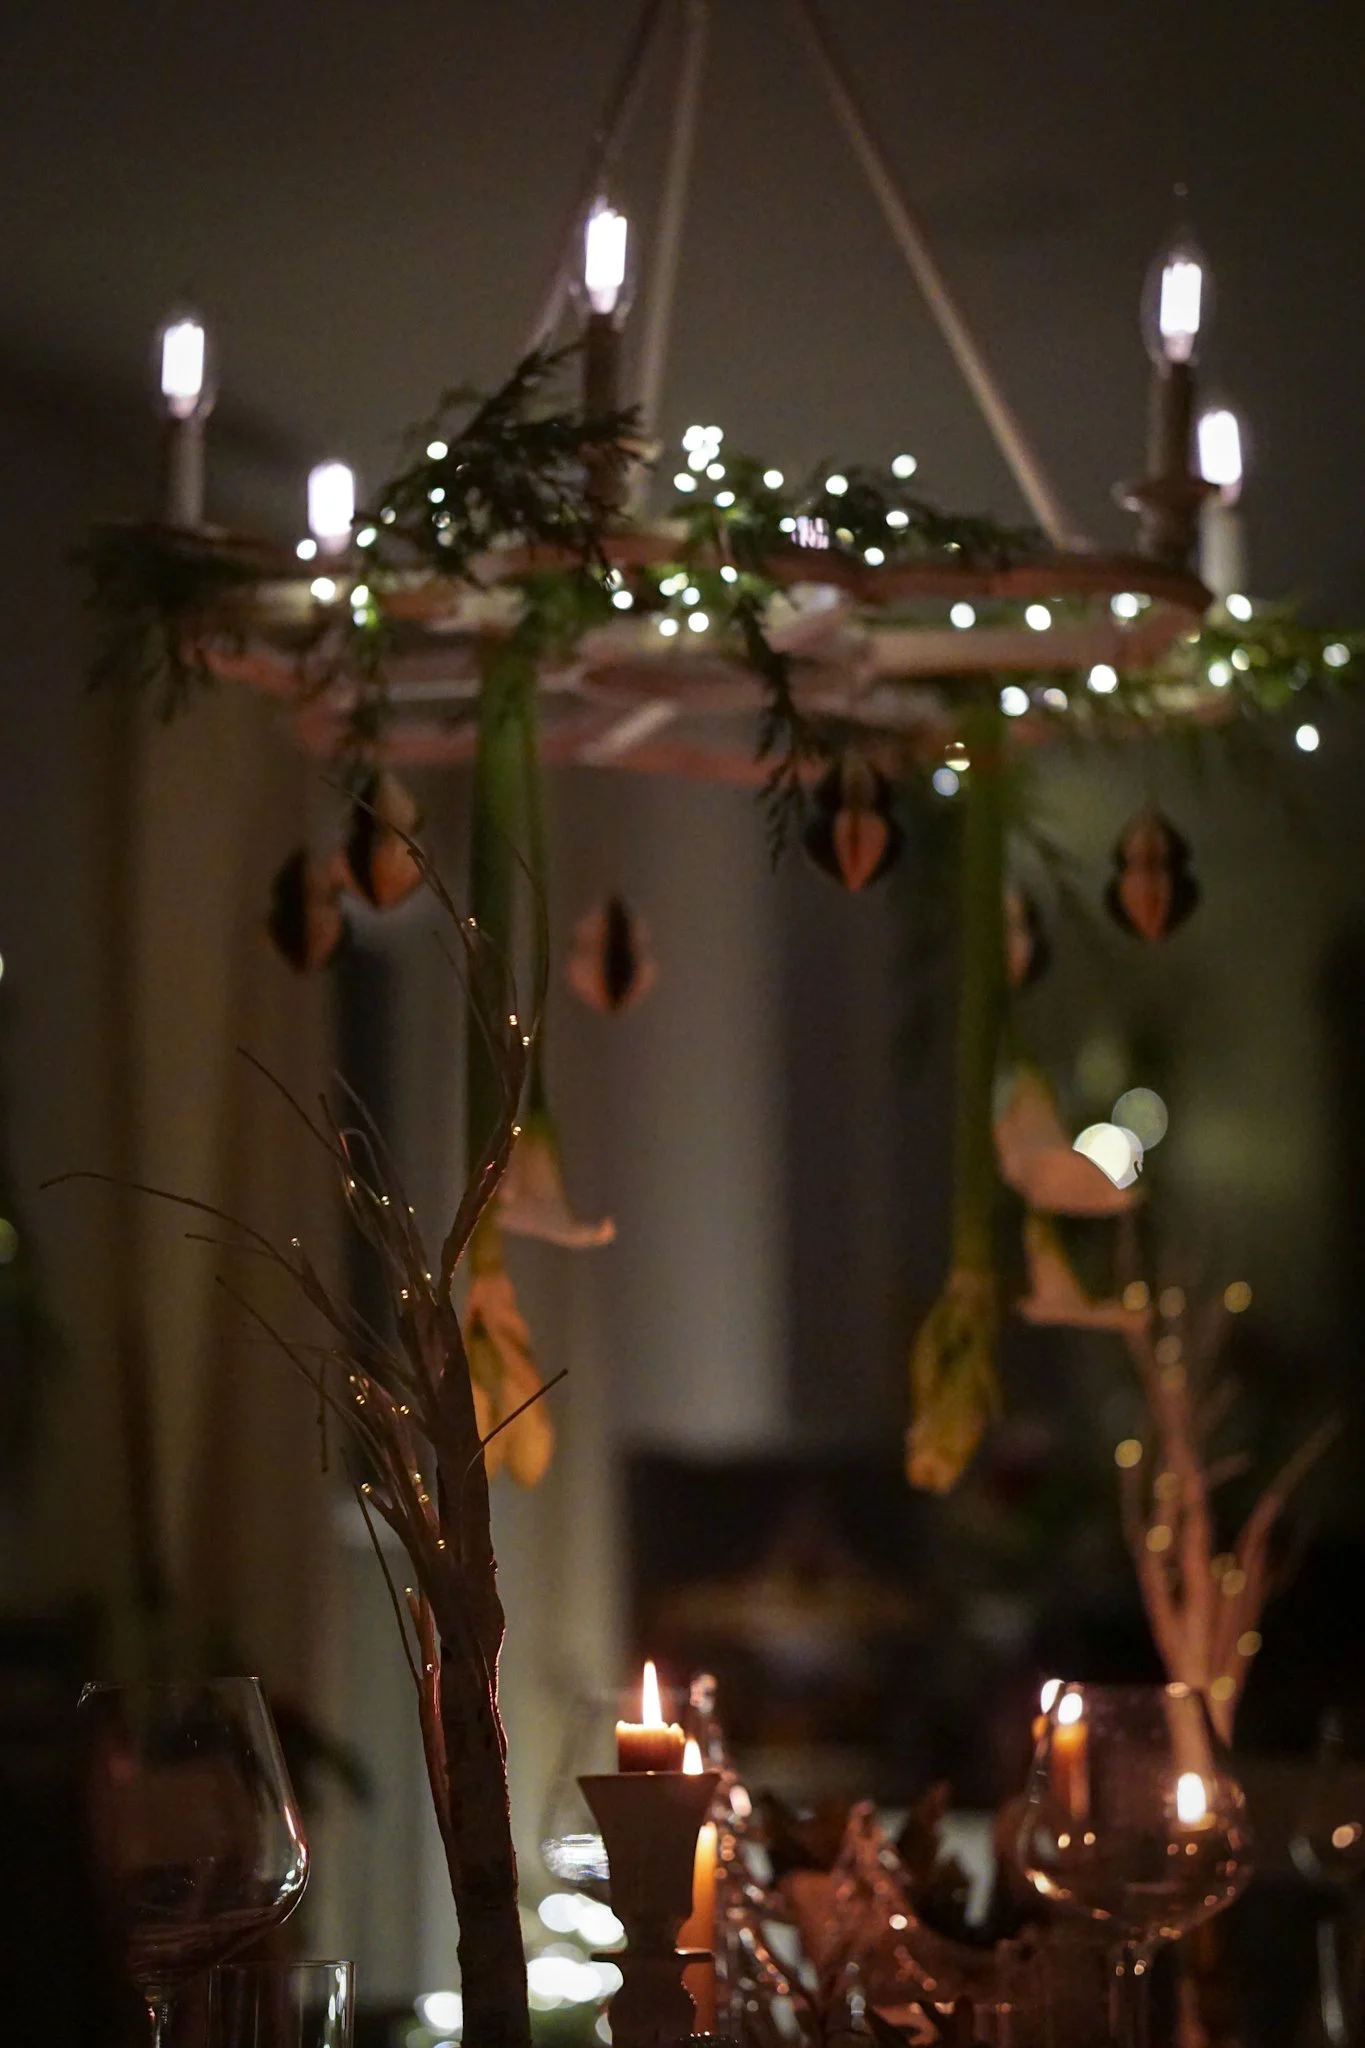
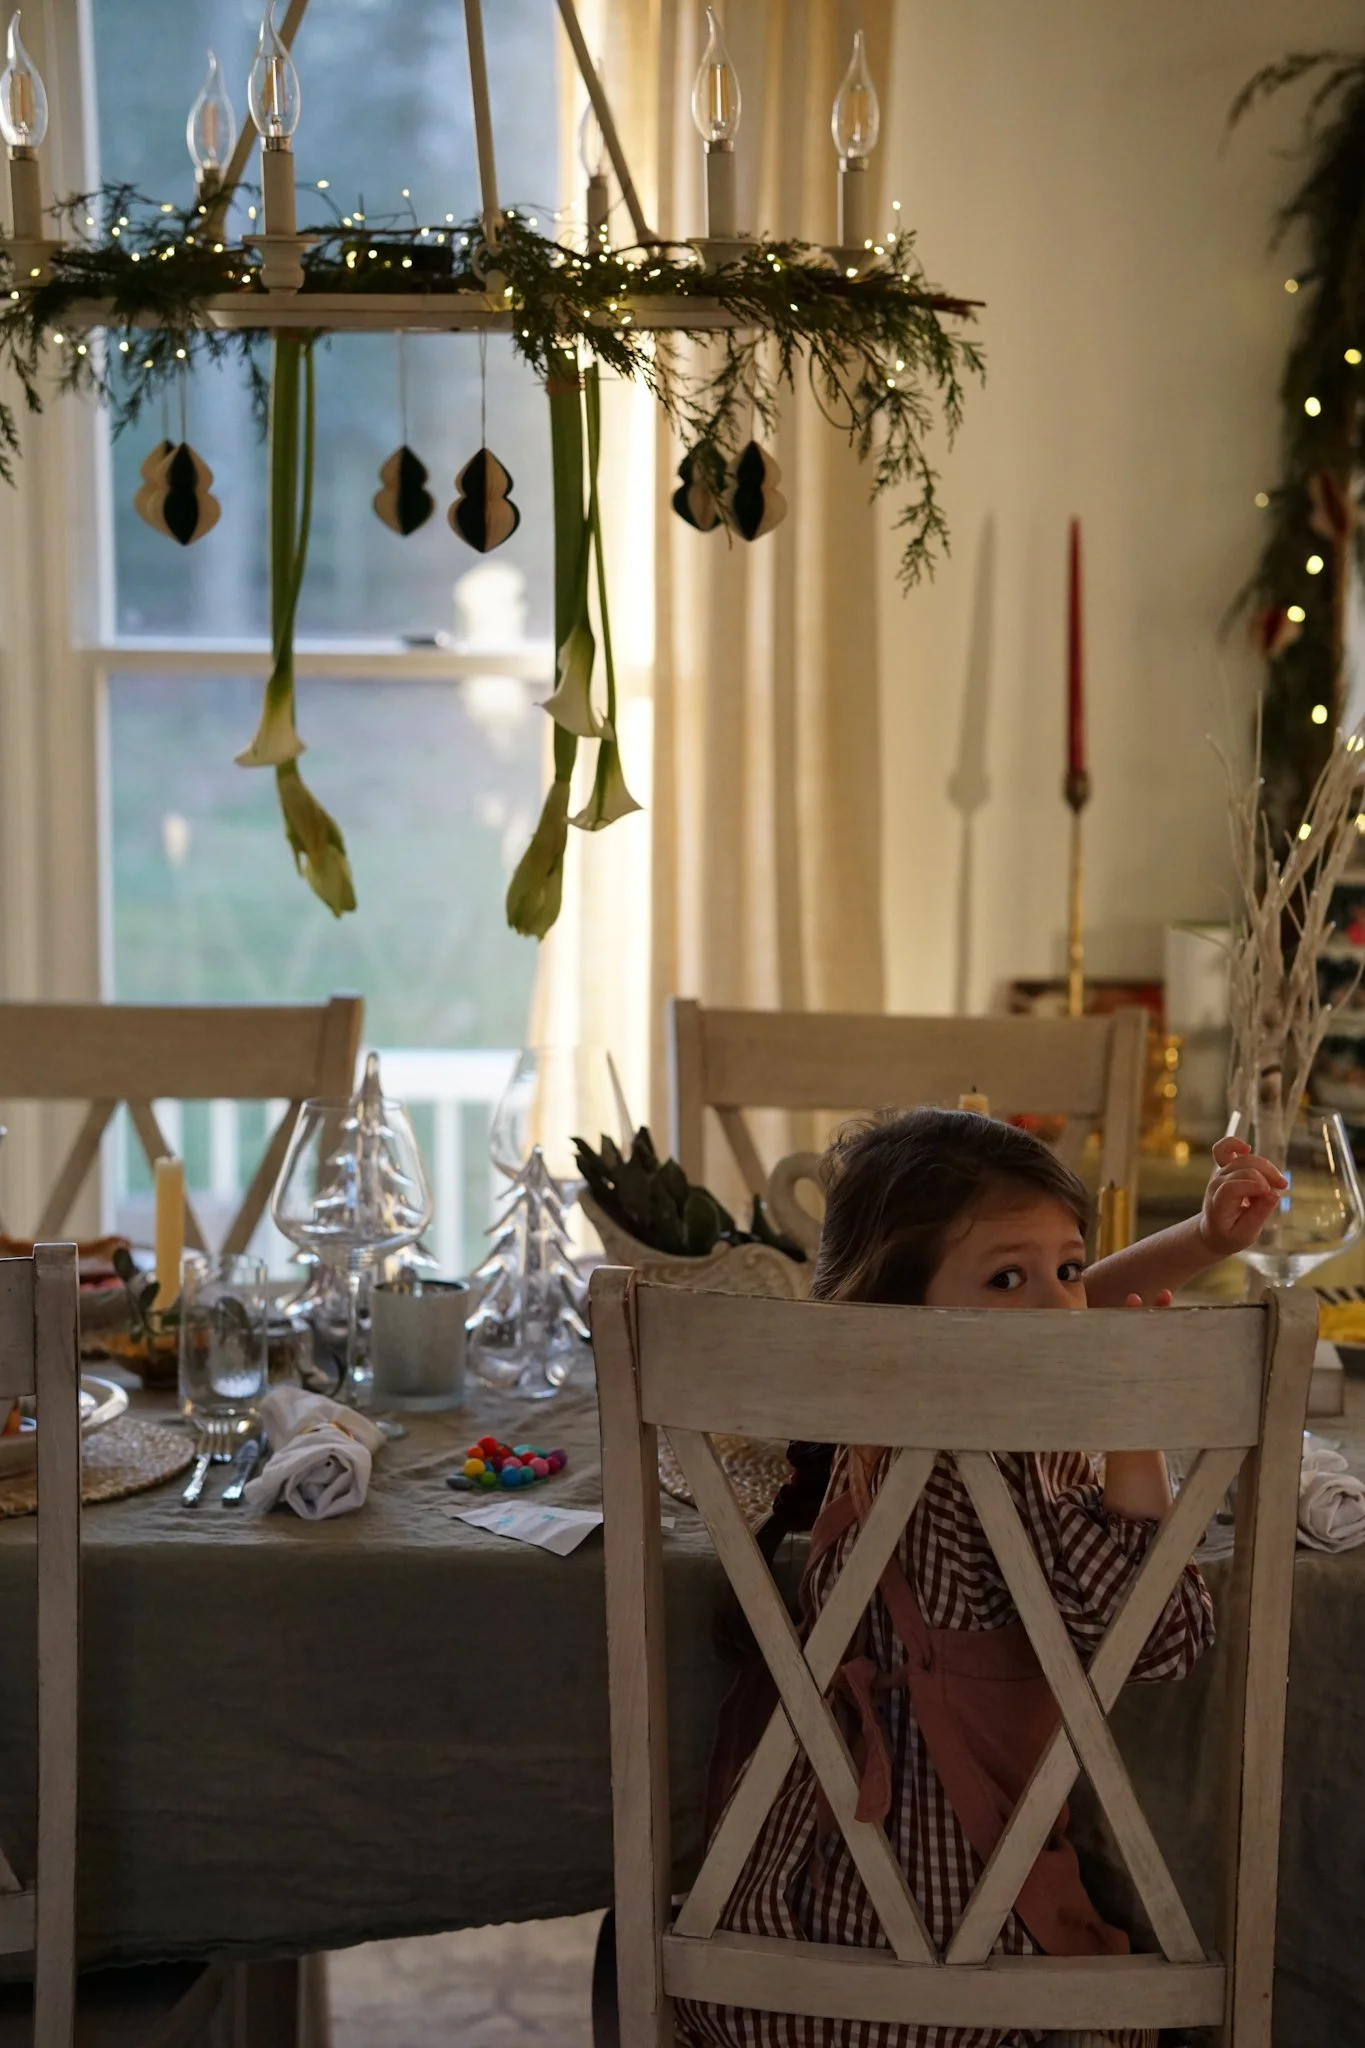
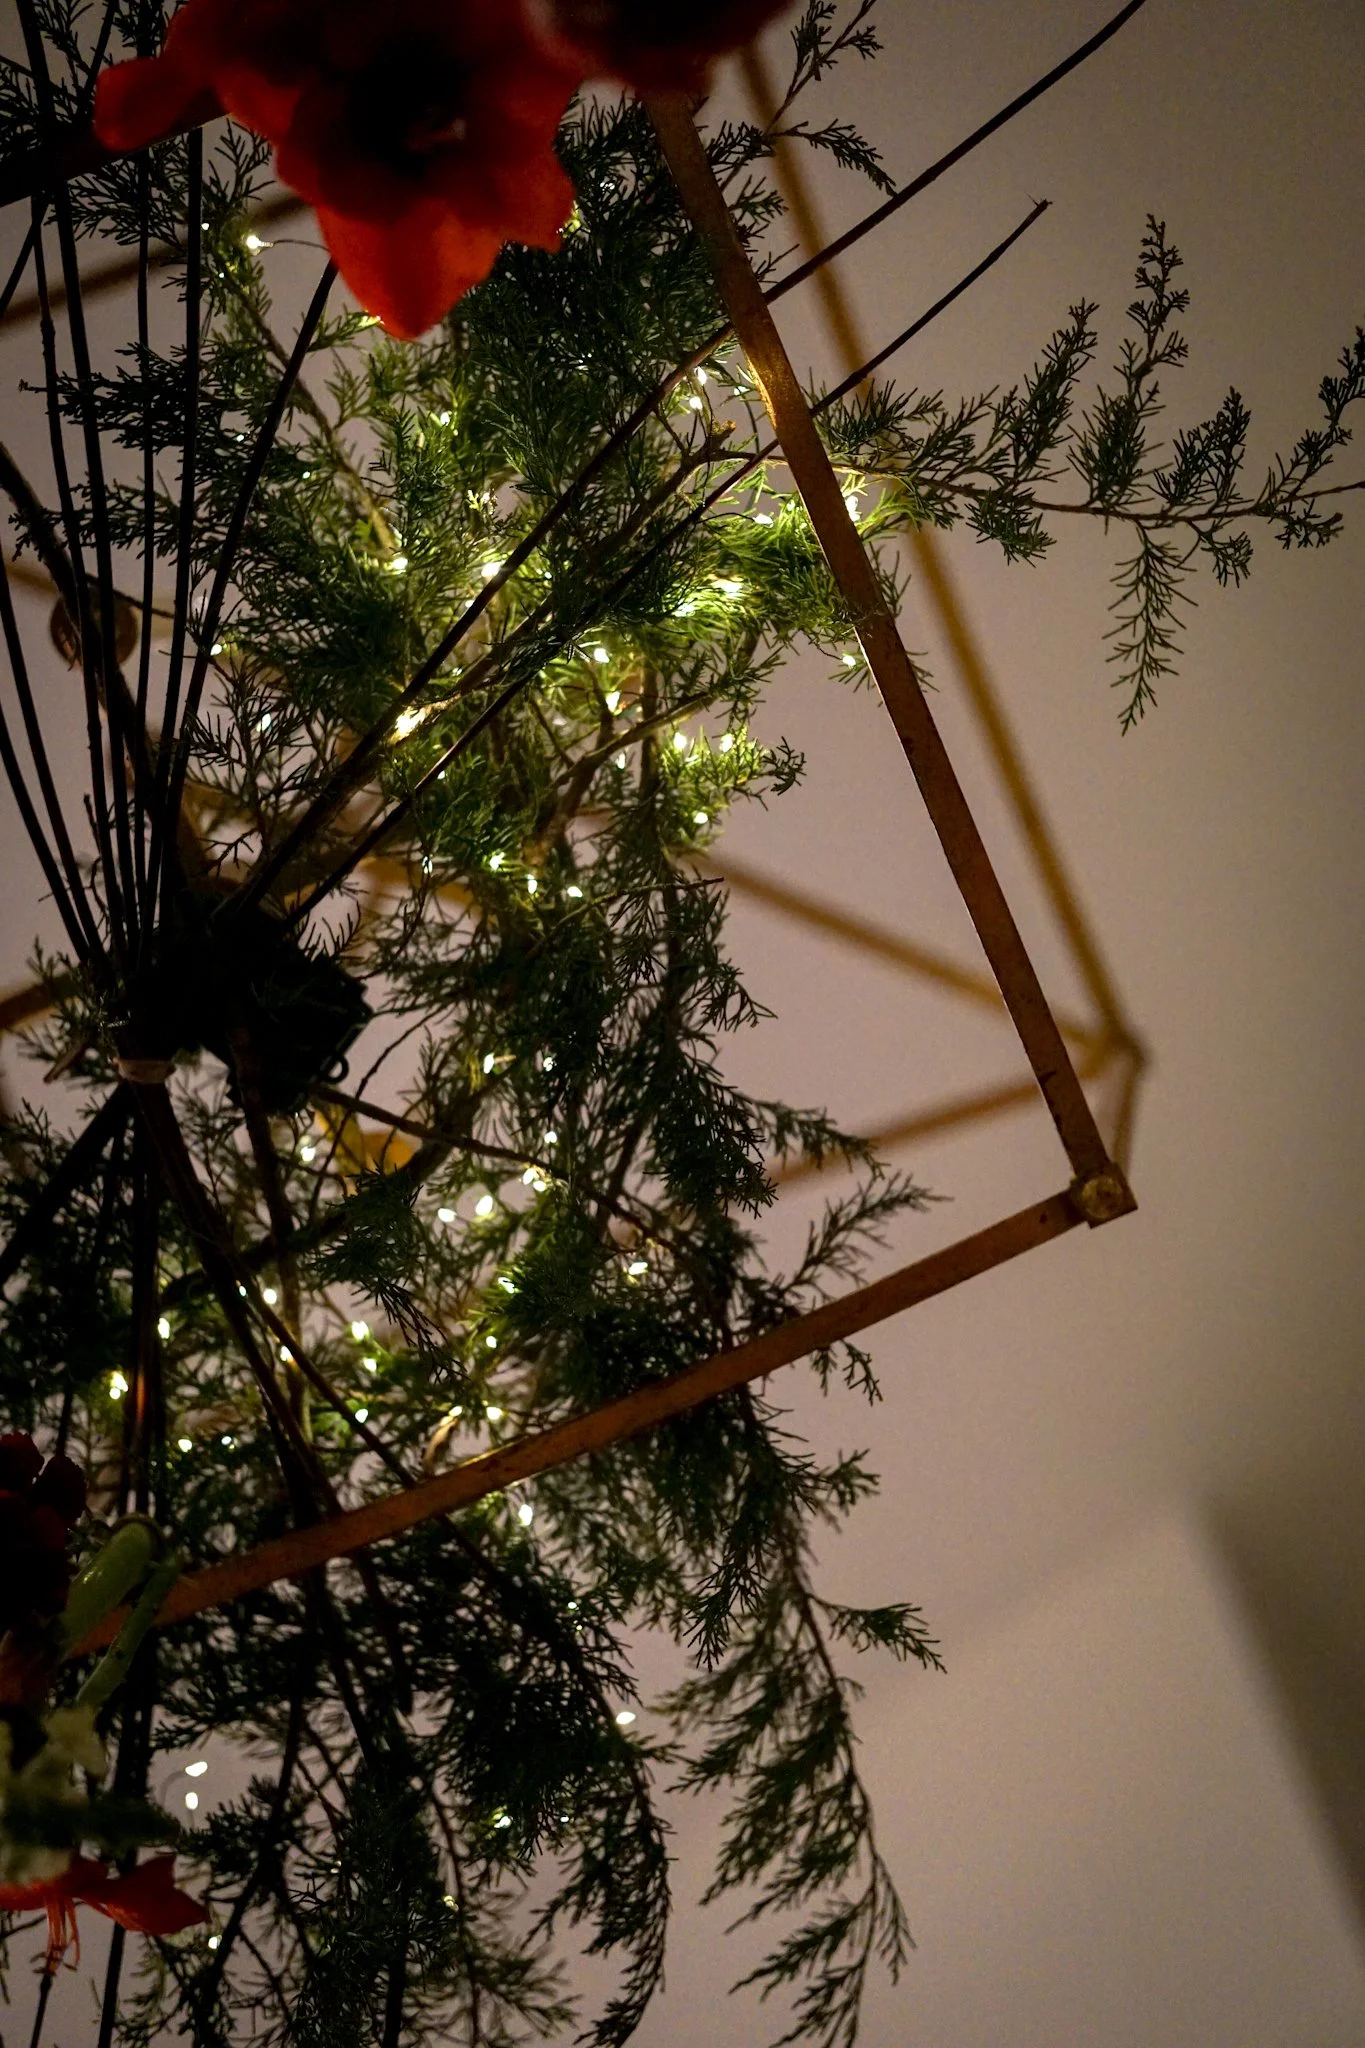
It’s the holiday season. Today is, in fact, Christmas Eve, and if you celebrate, your home is likely in its peak state of decoration. Christmas trees, wreaths, garlands on banisters, garlands over windows, string lights twinkling. You might be feeling like your home is full to burst with holiday cheer and festive decorations. We felt that way, but we made room for one more—actually, two—and wow, what they’ve added to our decor. When Maureen of Floral Notes and I chatted about what I was dreaming for this, I knew I wanted something Christmas-y but elevated, and something that we could all create at home learning simple techniques as we grow our knowledge. Maureen absolutely delivered and somehow found a surface in our home that was not yet covered in greens or decor: our chandeliers. This design can be placed on pendant lights or chandeliers.
We hang little ornaments from some of our pendants, and of course you may have mistletoe hanging. But I hadn’t thought about greenery on chandeliers, let alone greenery with twinkling lights and cascading flowers. Read on below for instructions on how to create this in your own home. It doesn’t take long to make (truly!), was a lot of fun to put together, and is something you could probably pull off this evening or on Christmas Day just in time for a special Christmas meal. Or, create it for your New Years festivities.
Don’t hesitate to reach out with any questions on how to execute this. We’d love to see your own creations. Now let’s make something full of magic and beauty!
Note: we created and photographed two versions of this in our own home, and Maureen created a version as well, taking photographs along the way to teach us. I’ll include photos from both homes and try to note whose is whose :)
Please enjoy the spaceship our elf Marvin was flying on a few mornings ago
Equipment
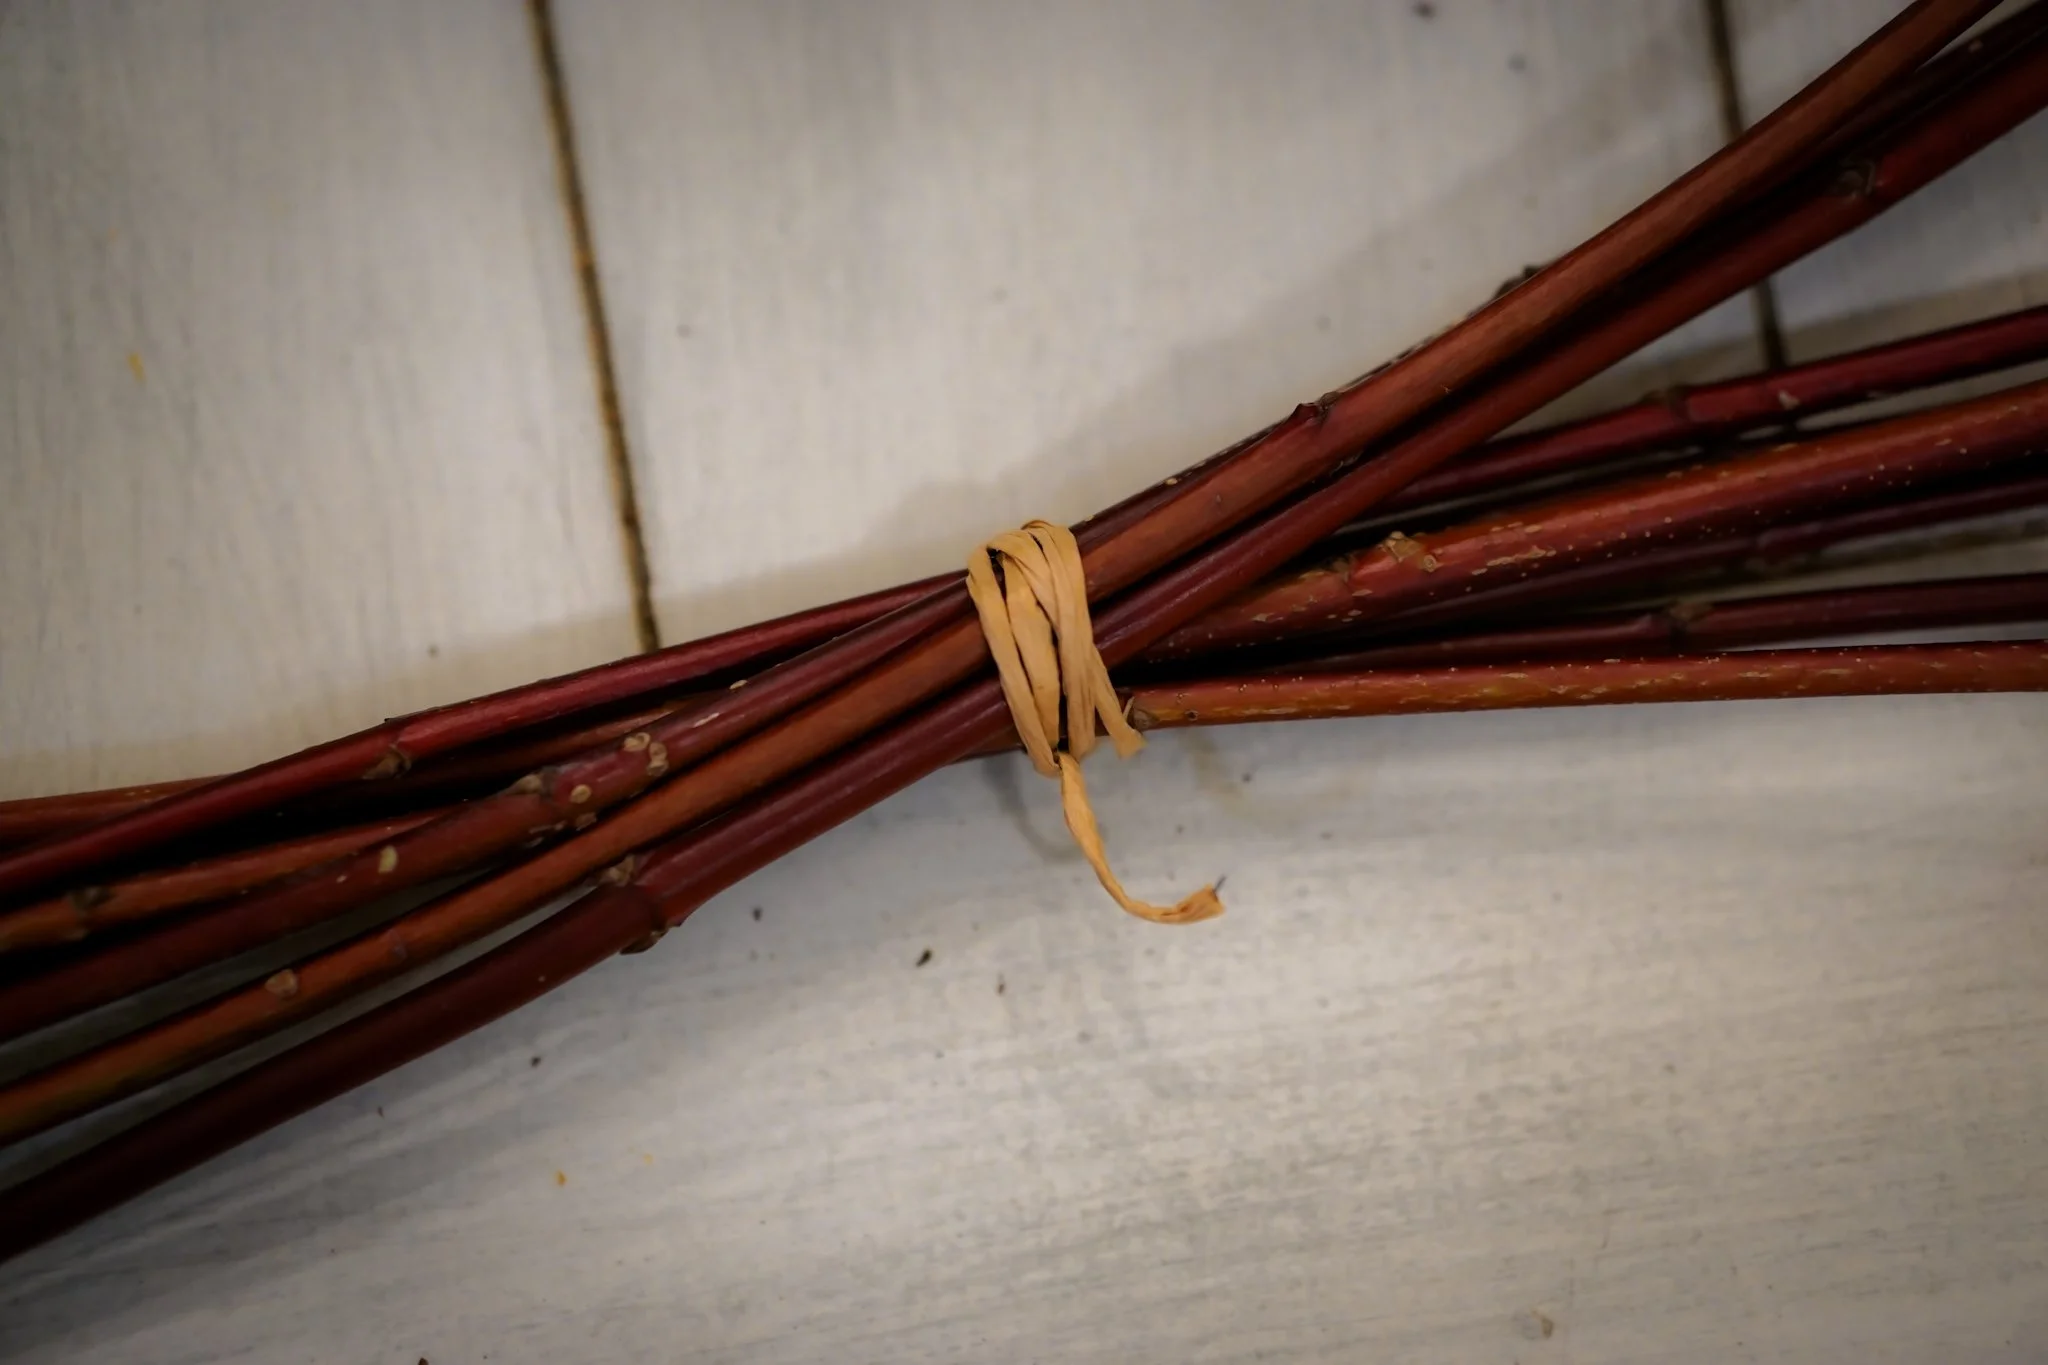
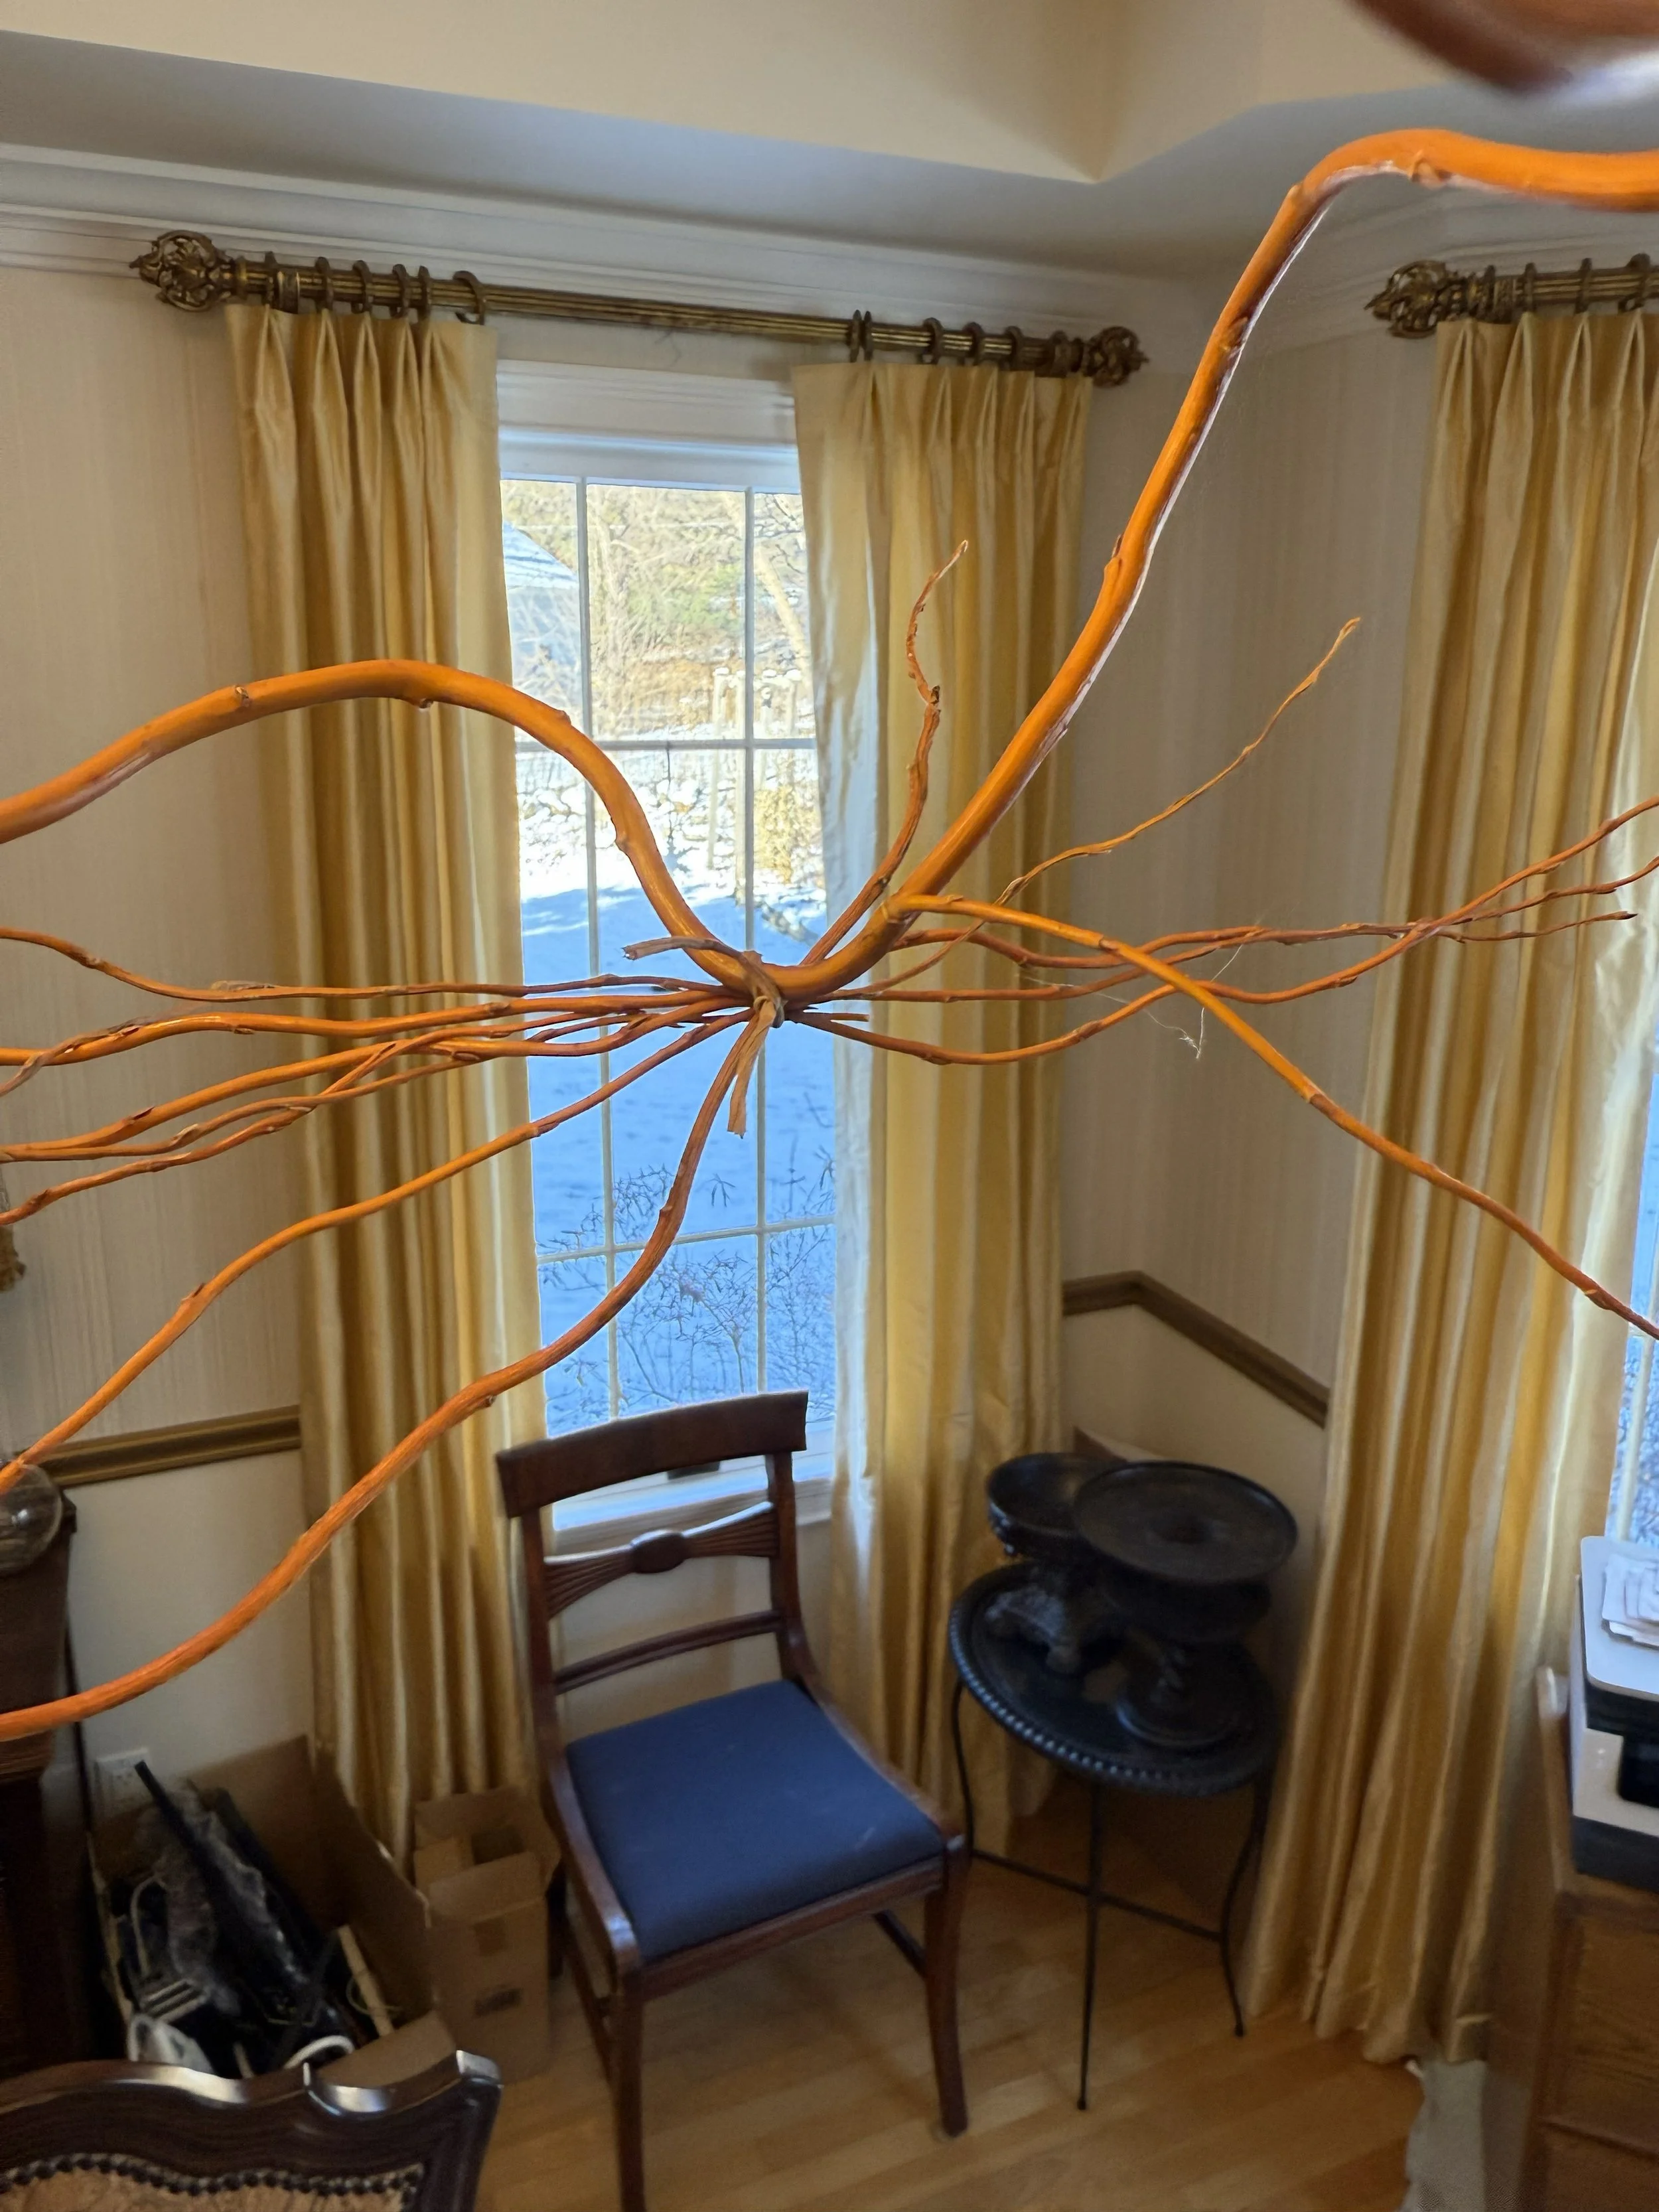
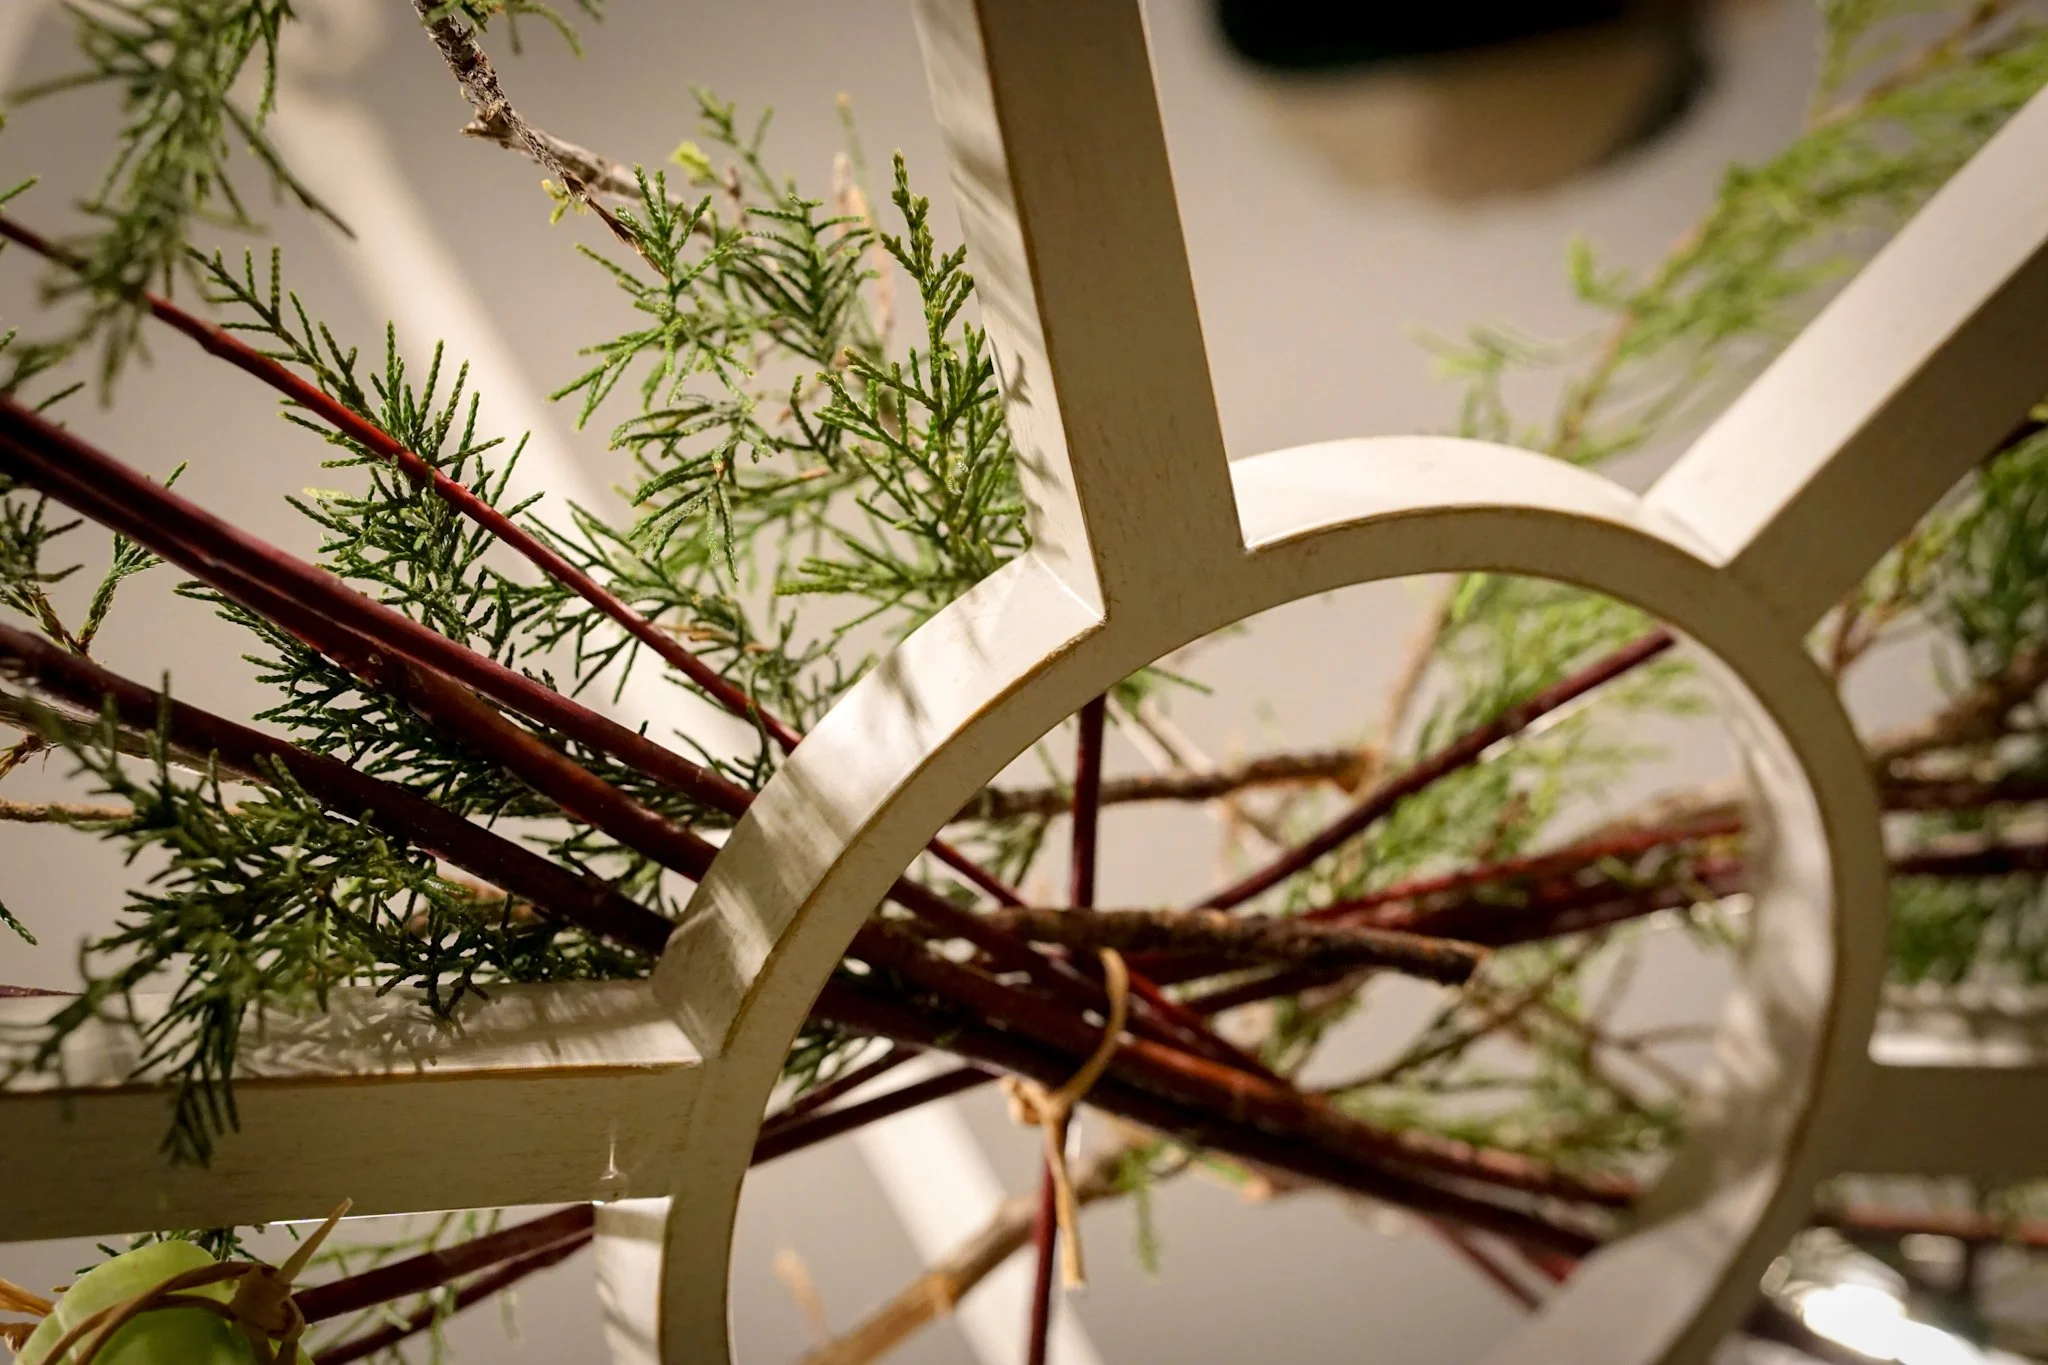
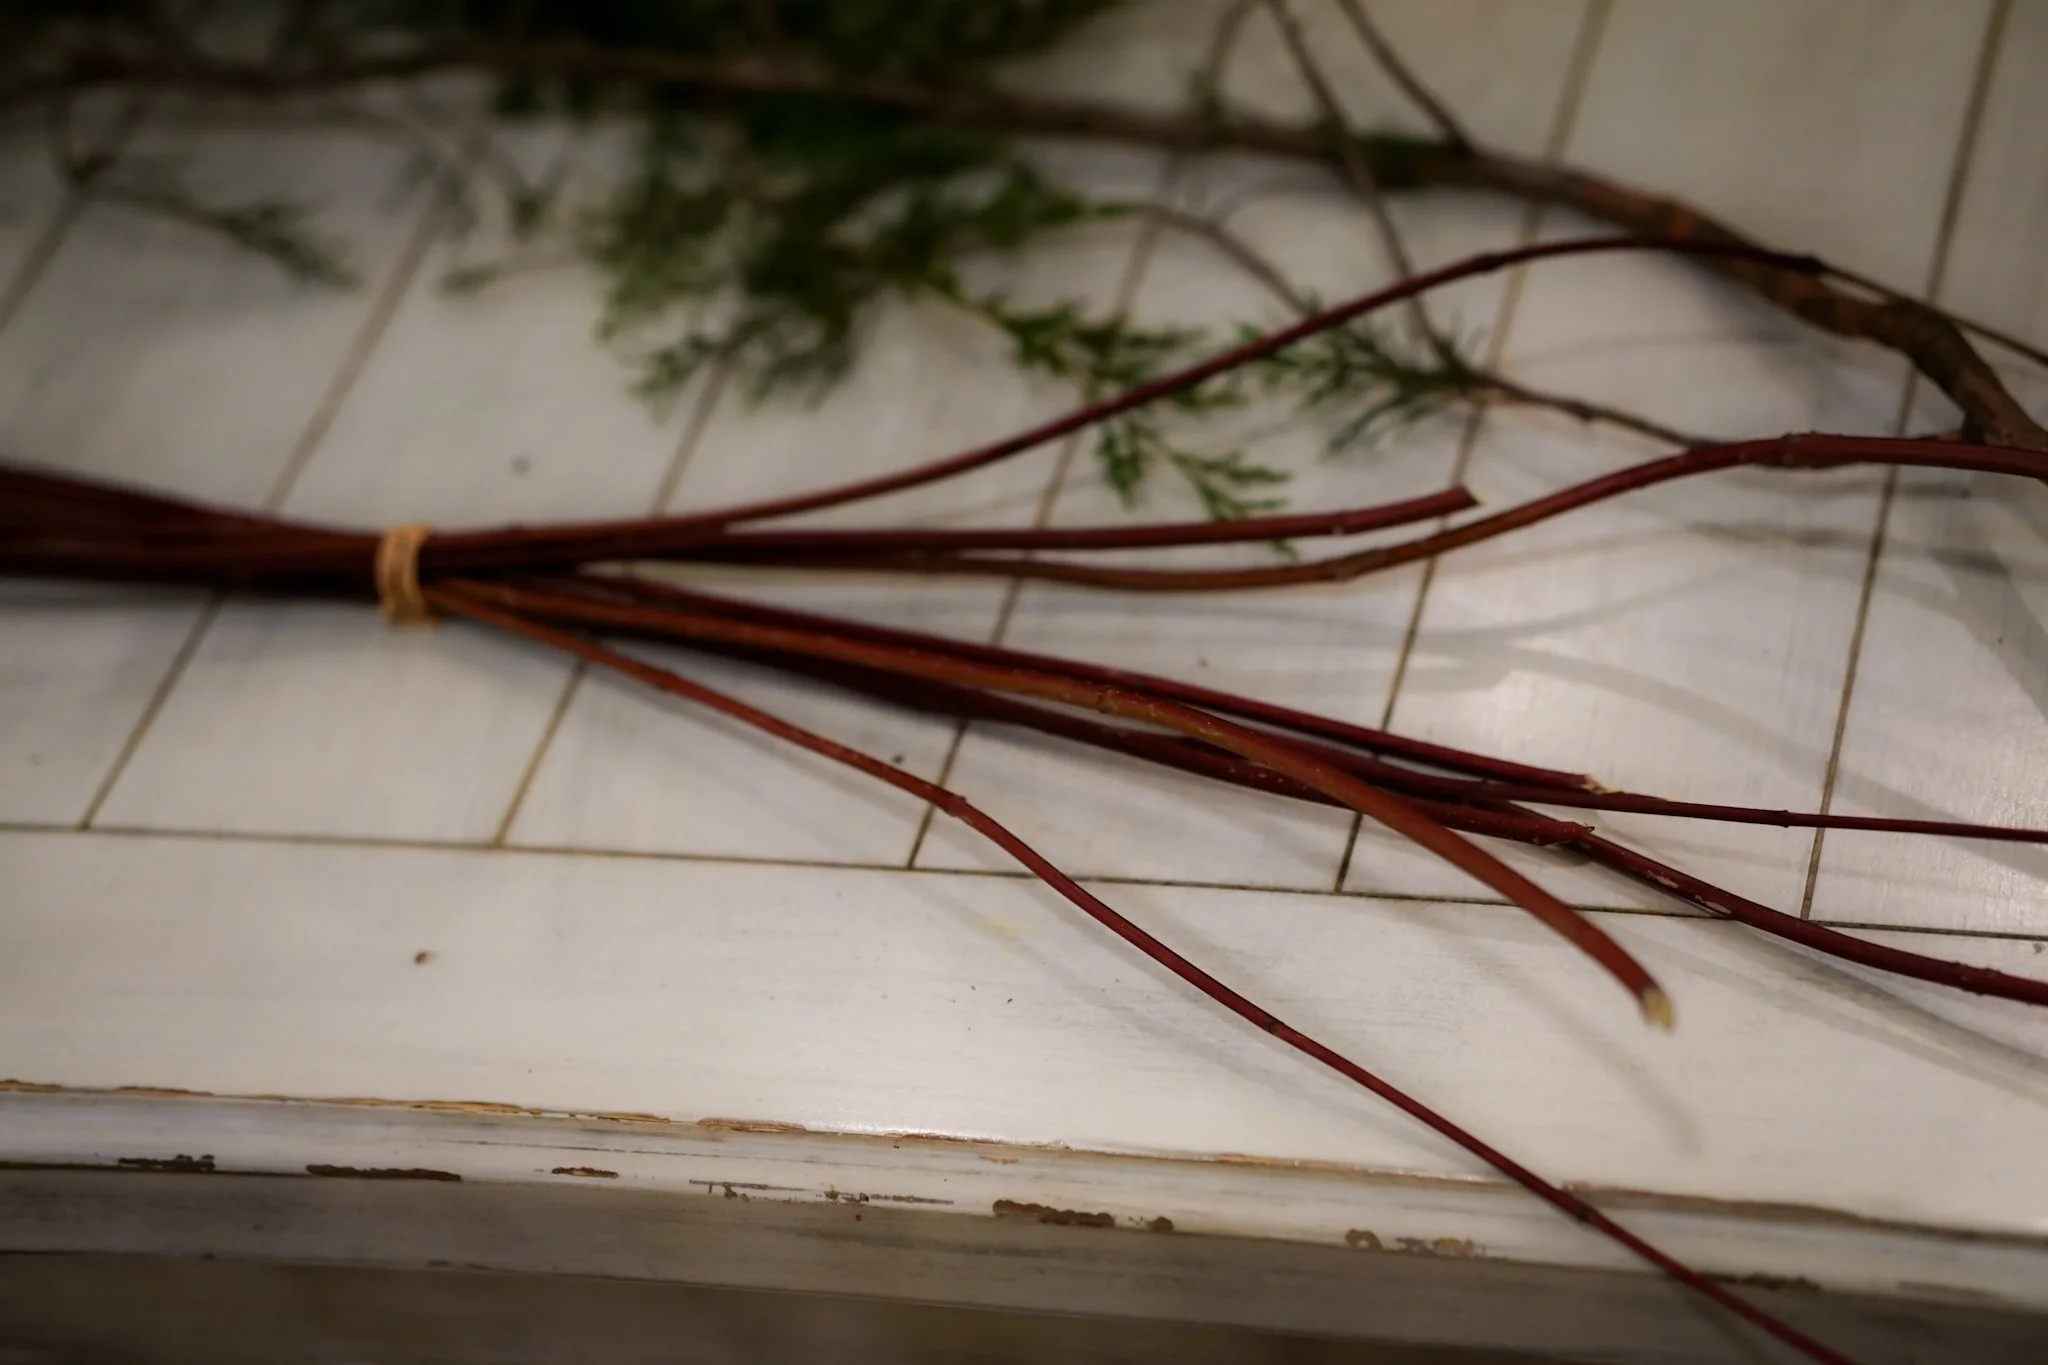
Curly willow or other long, slim branches. We used long, thin bendable branches harvested from a currently leafless tall bush in our backyard, and they worked great! Maureen used curly willow. You can also substitute any long thin sticks / branches you can find in your backyard
Bind wire (paper covered wire) by Smithers-Oasis. Maureen confirmed that jute, wool or string can also work
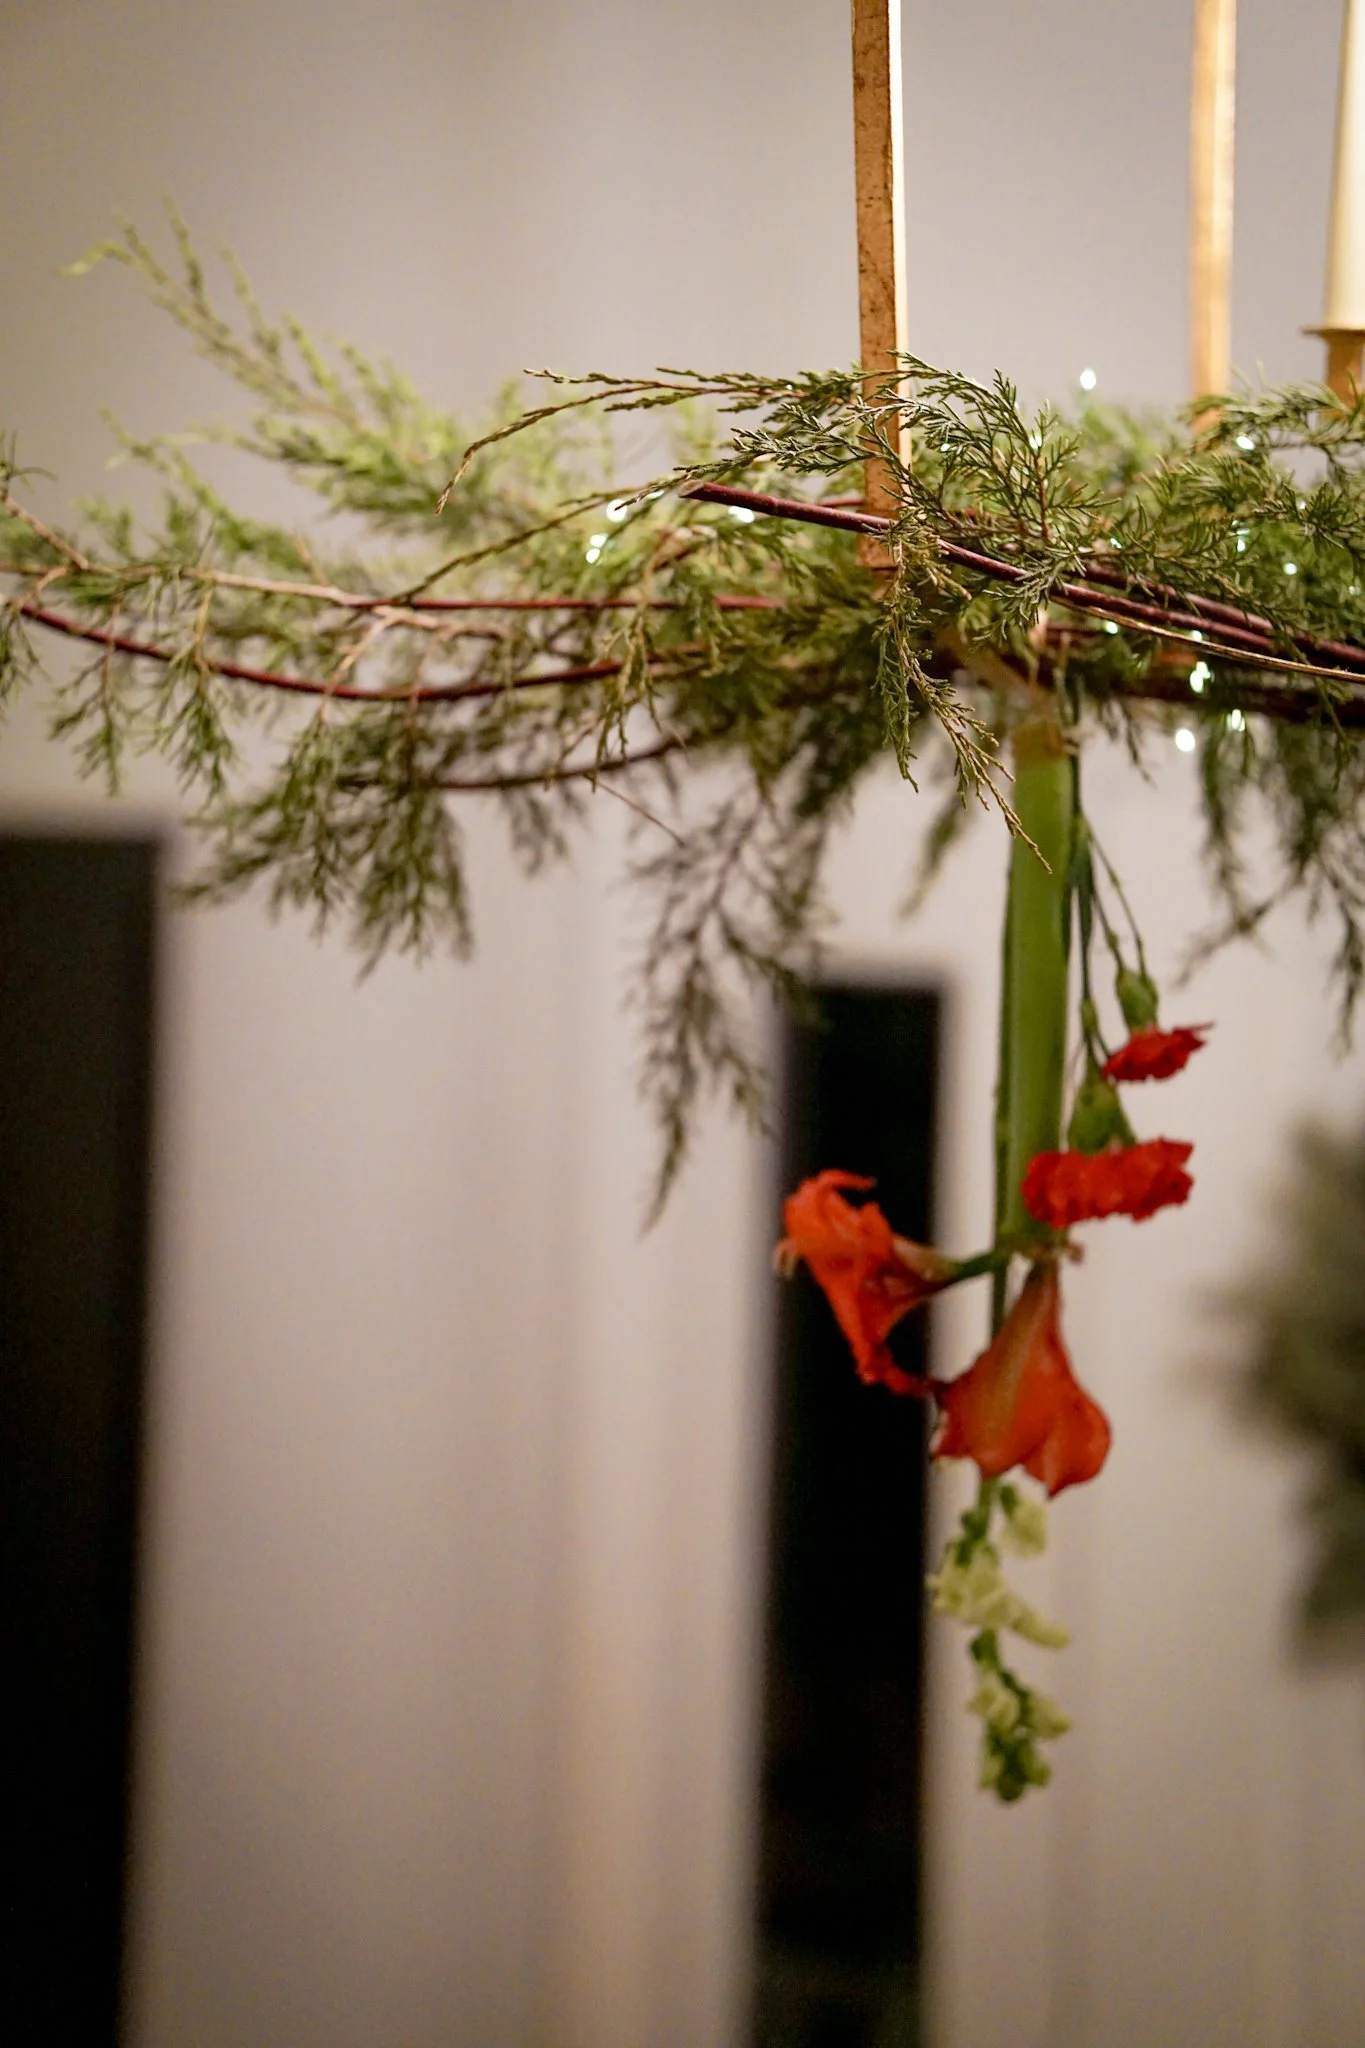
Branches of greenery (Maureen used Carolina Sapphire greens and highly recommends, we used something evergreen—who knows), harvested from your backyard or bought from a store. We used a big armful for ours to create two chandelier pieces.
Toothpicks
Battery pack string lights
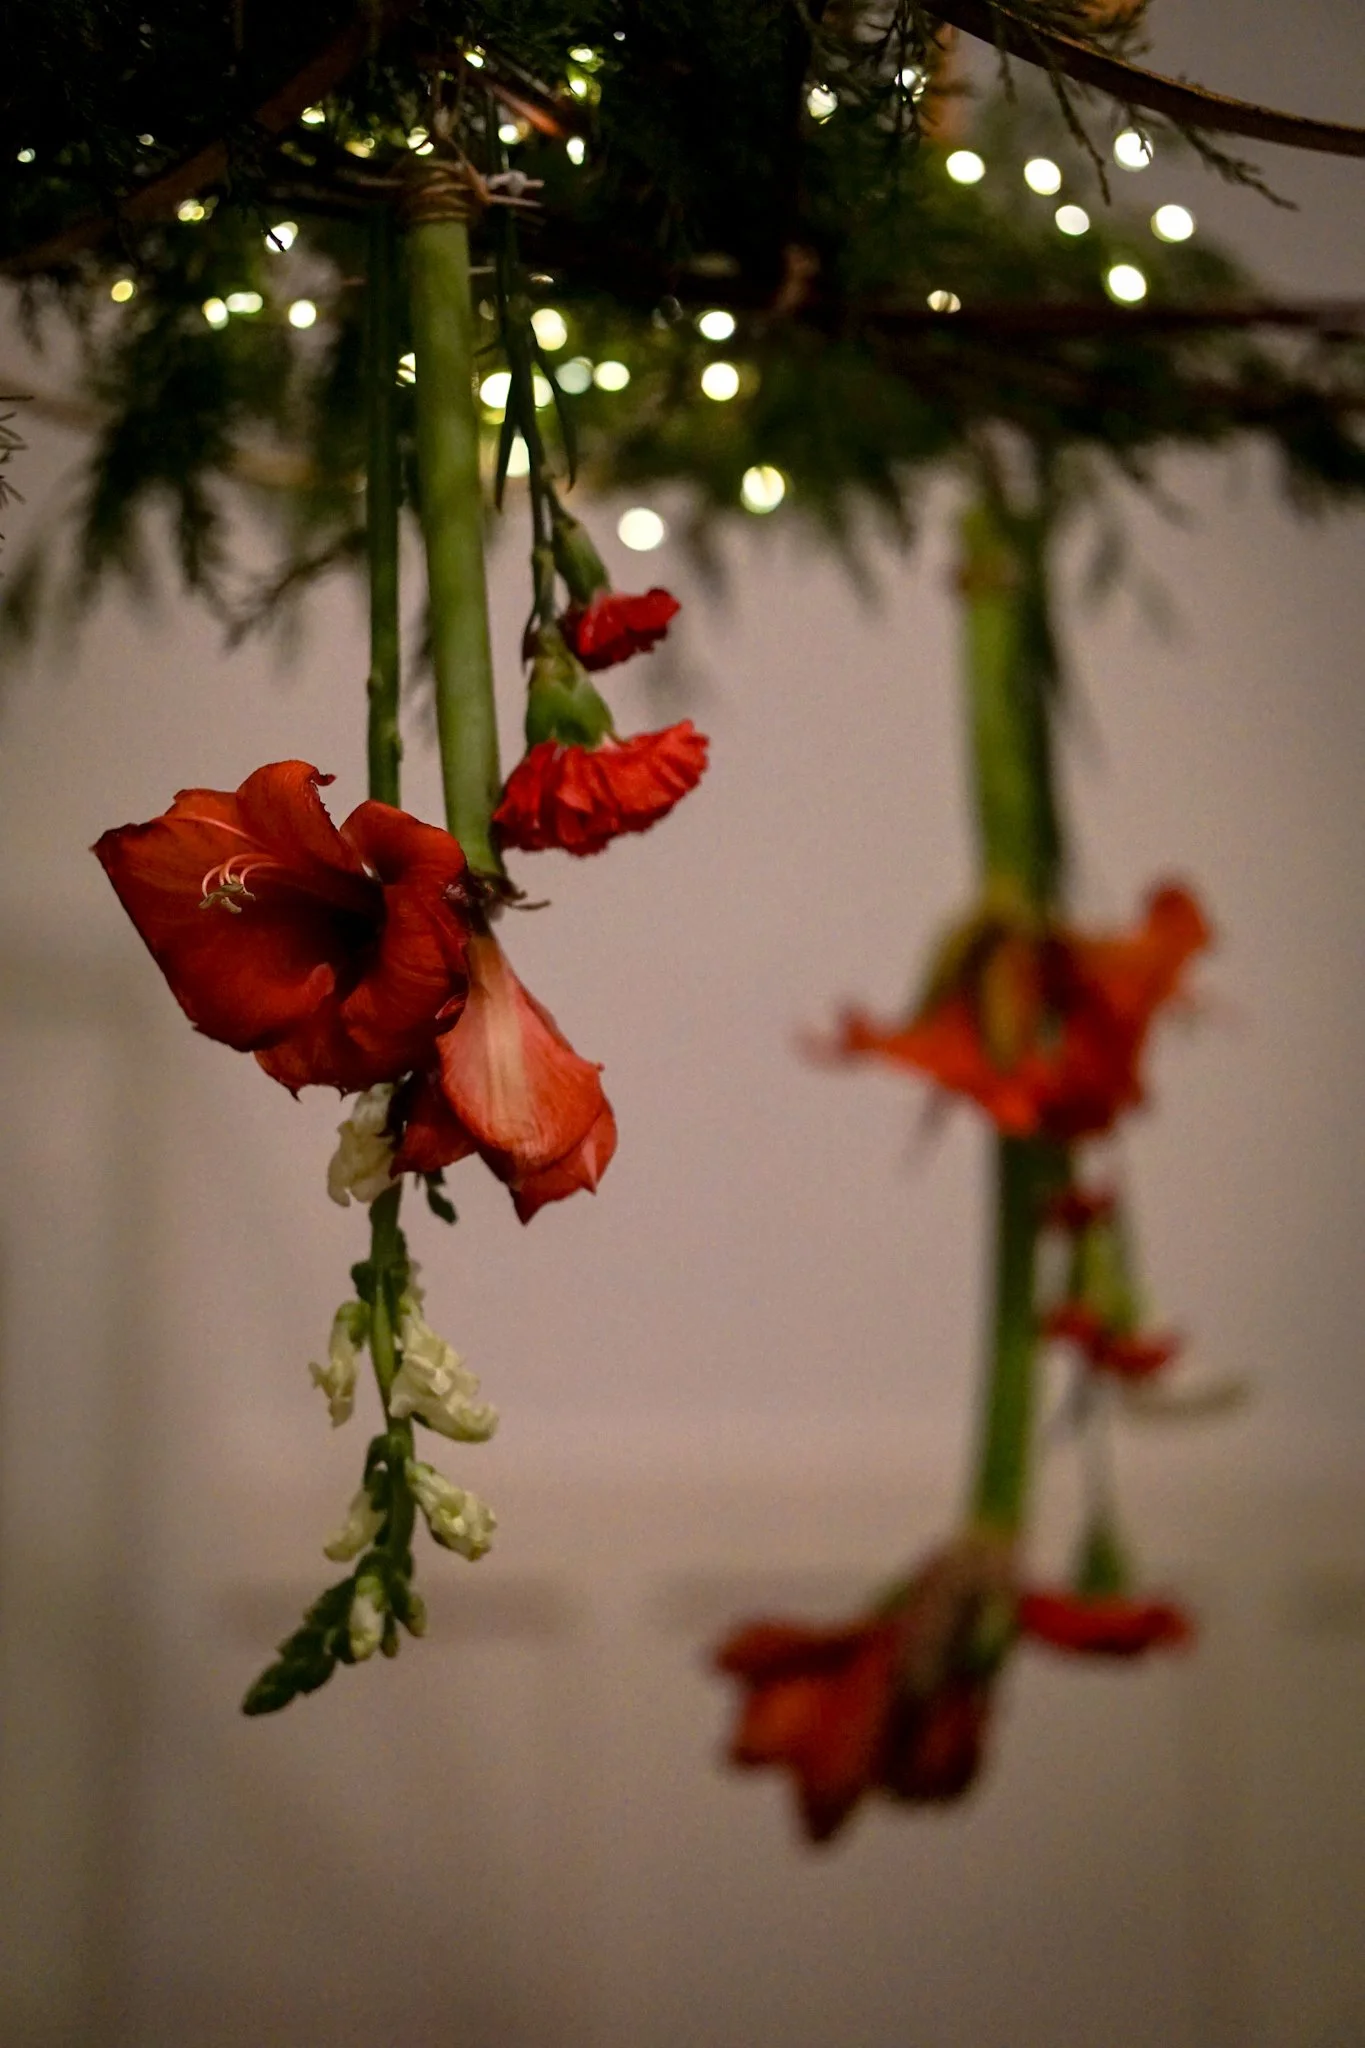
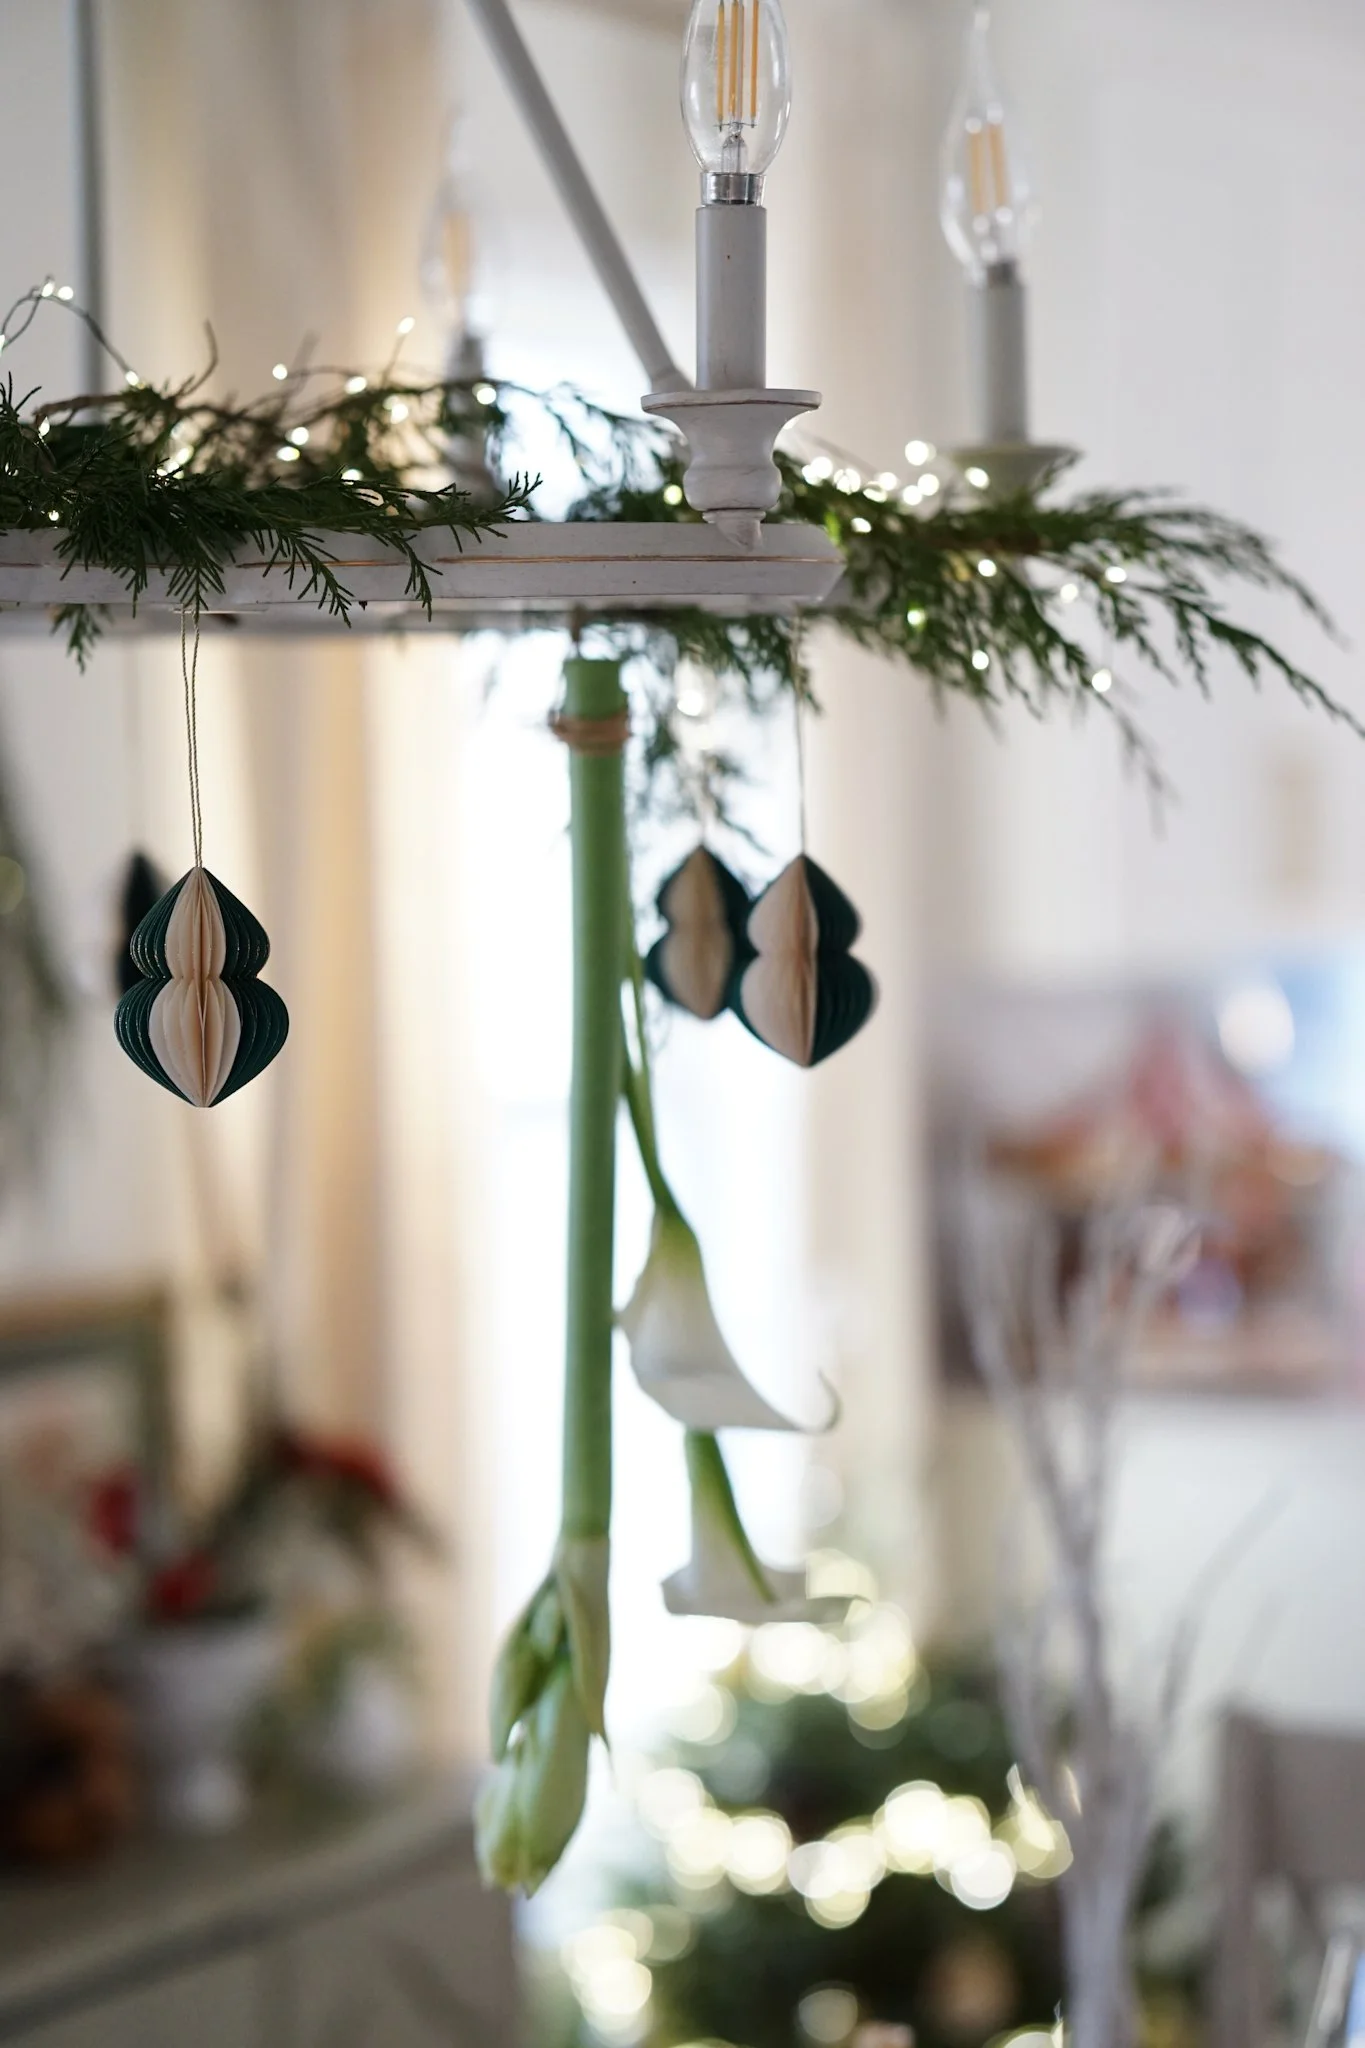
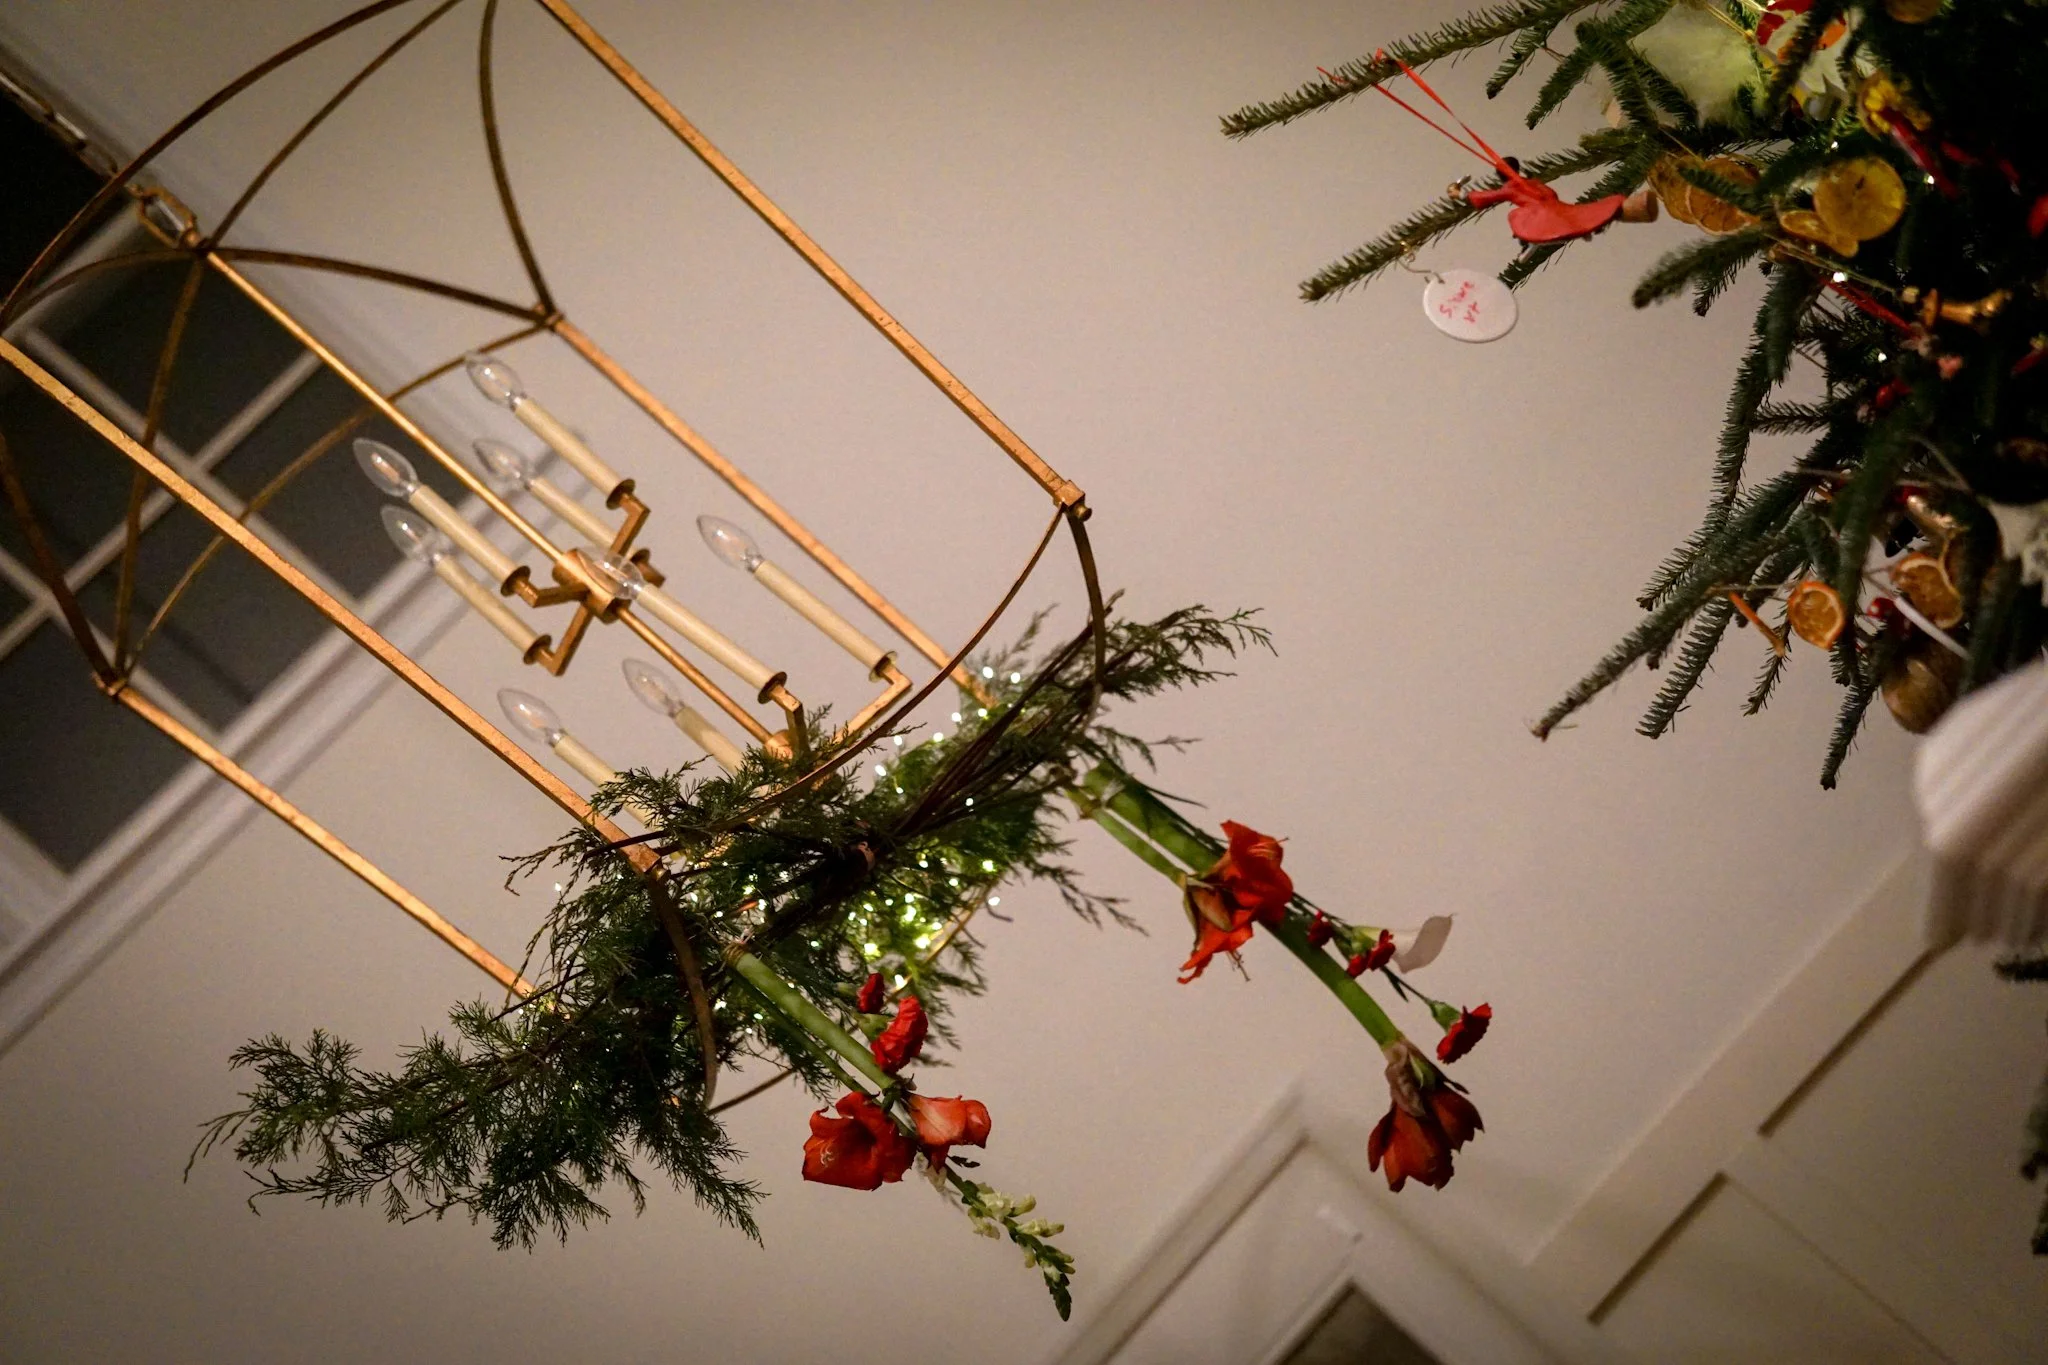
Flowers—a few stems of the following flower(s). The quantity depends on the look you’re going for! Could be as simple as 3 stems, or more for a more maximalist look
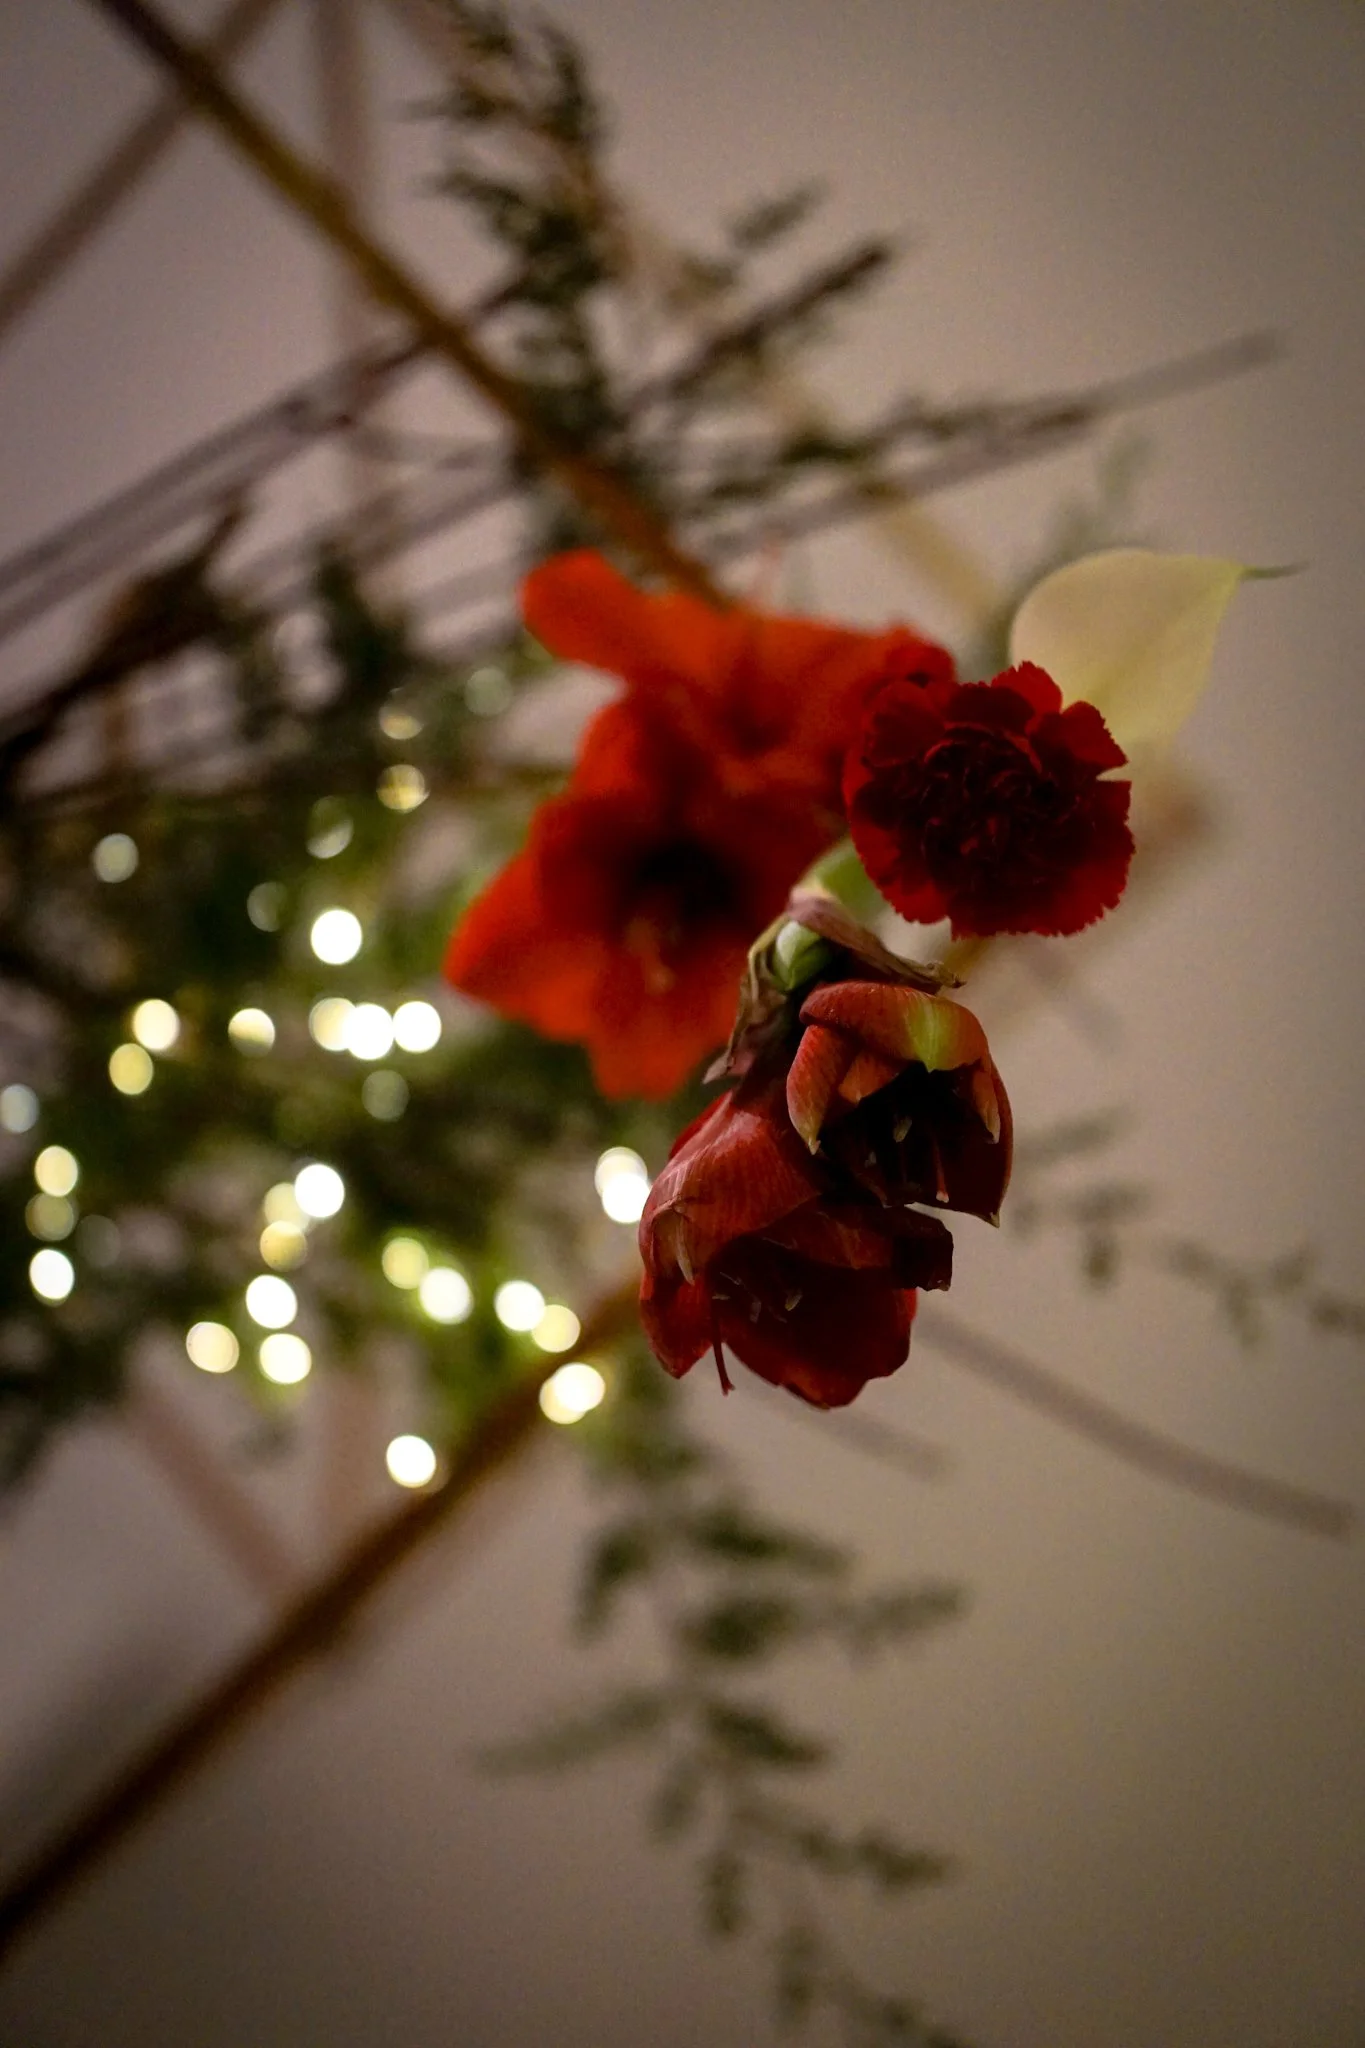
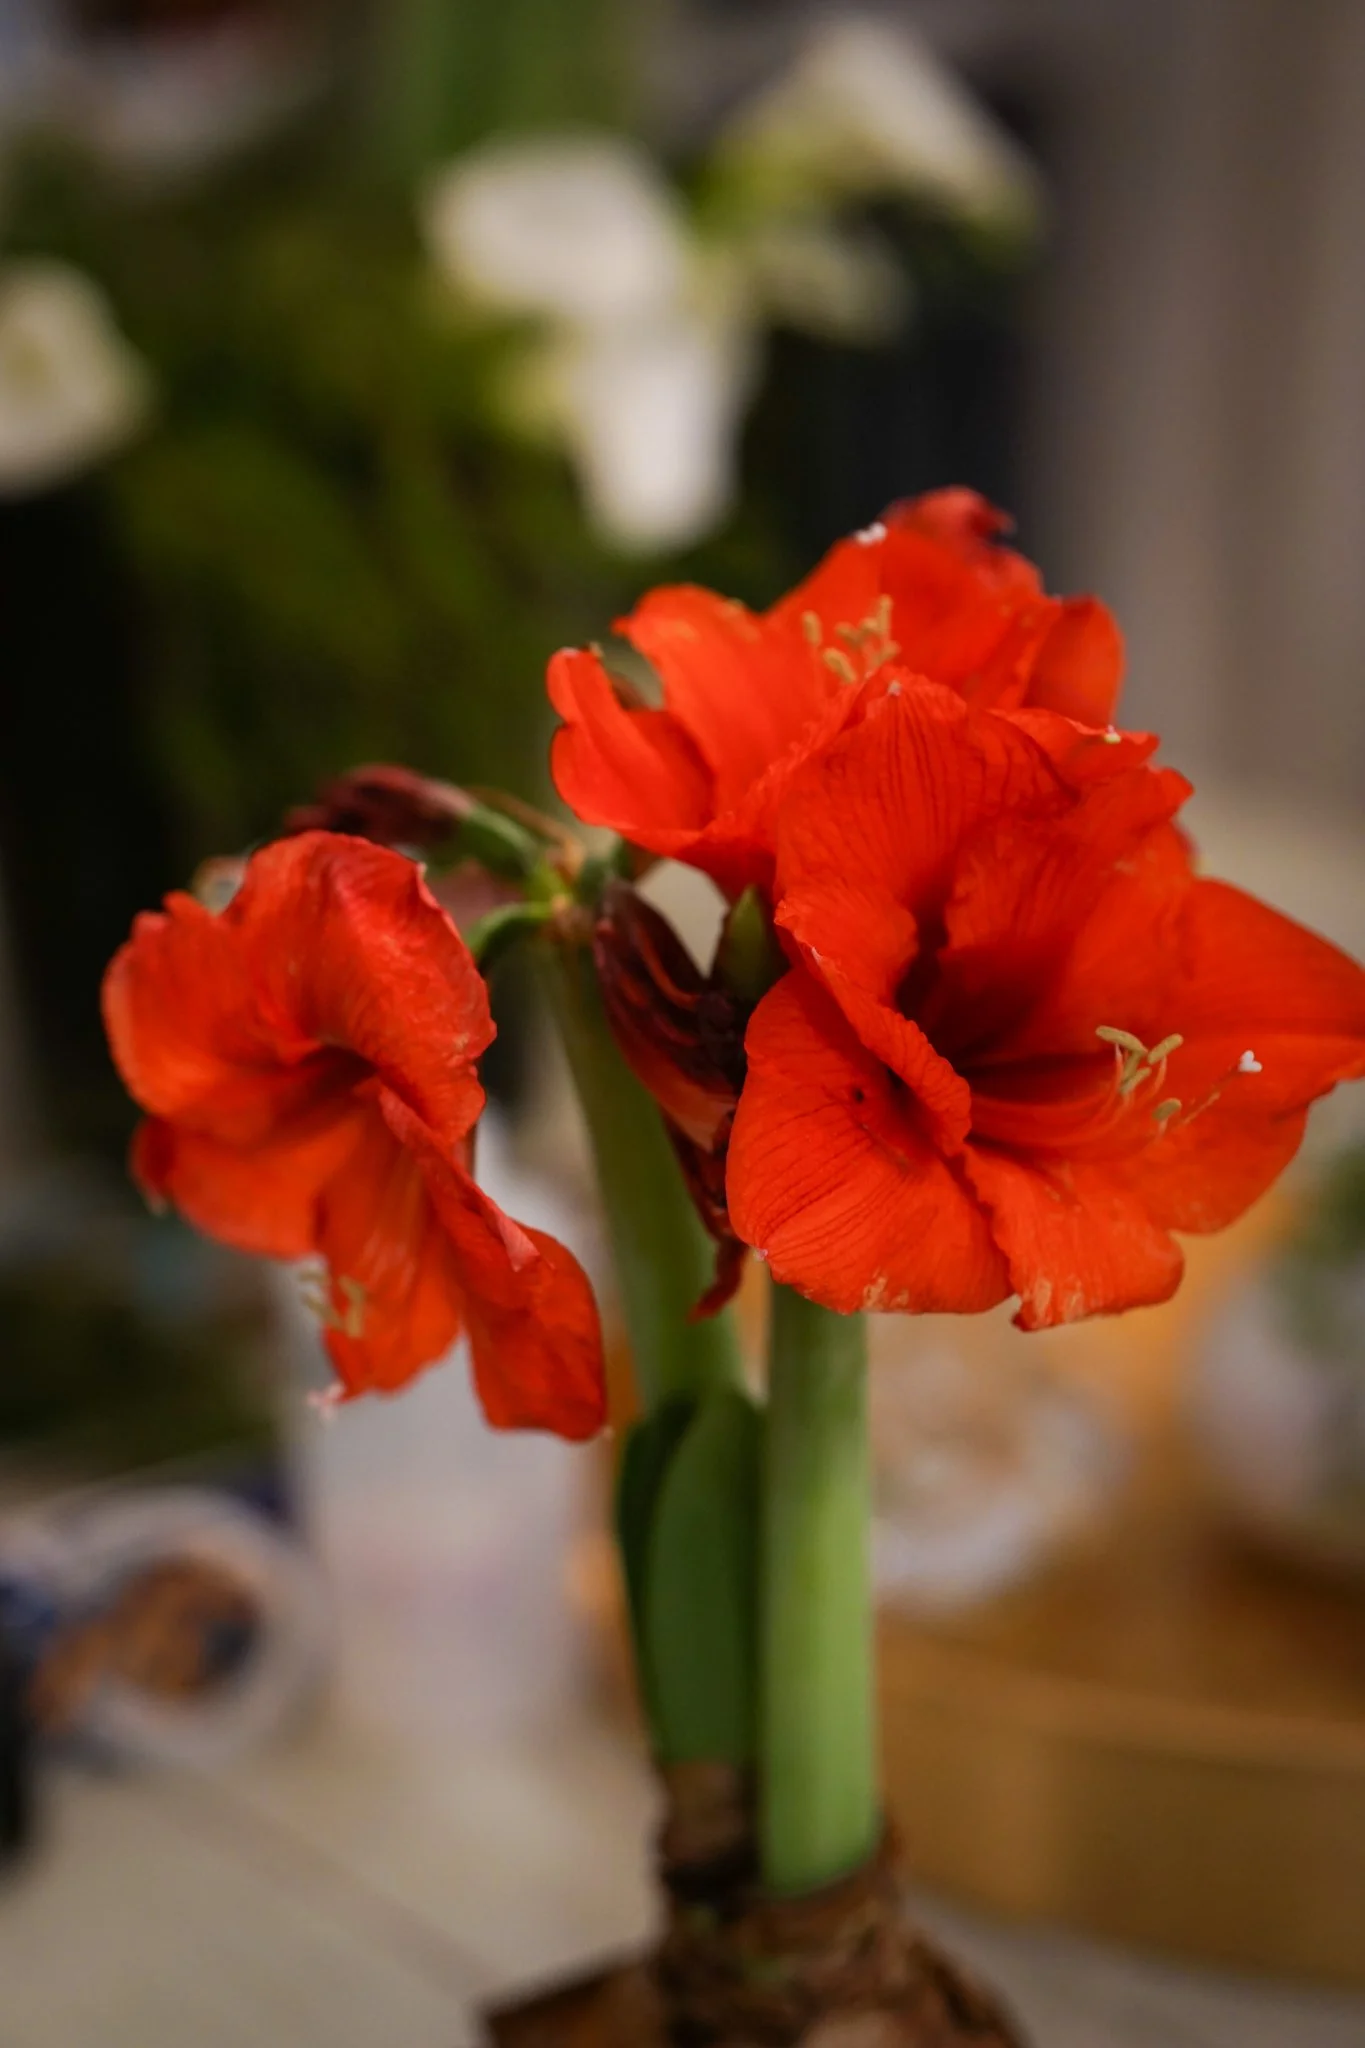
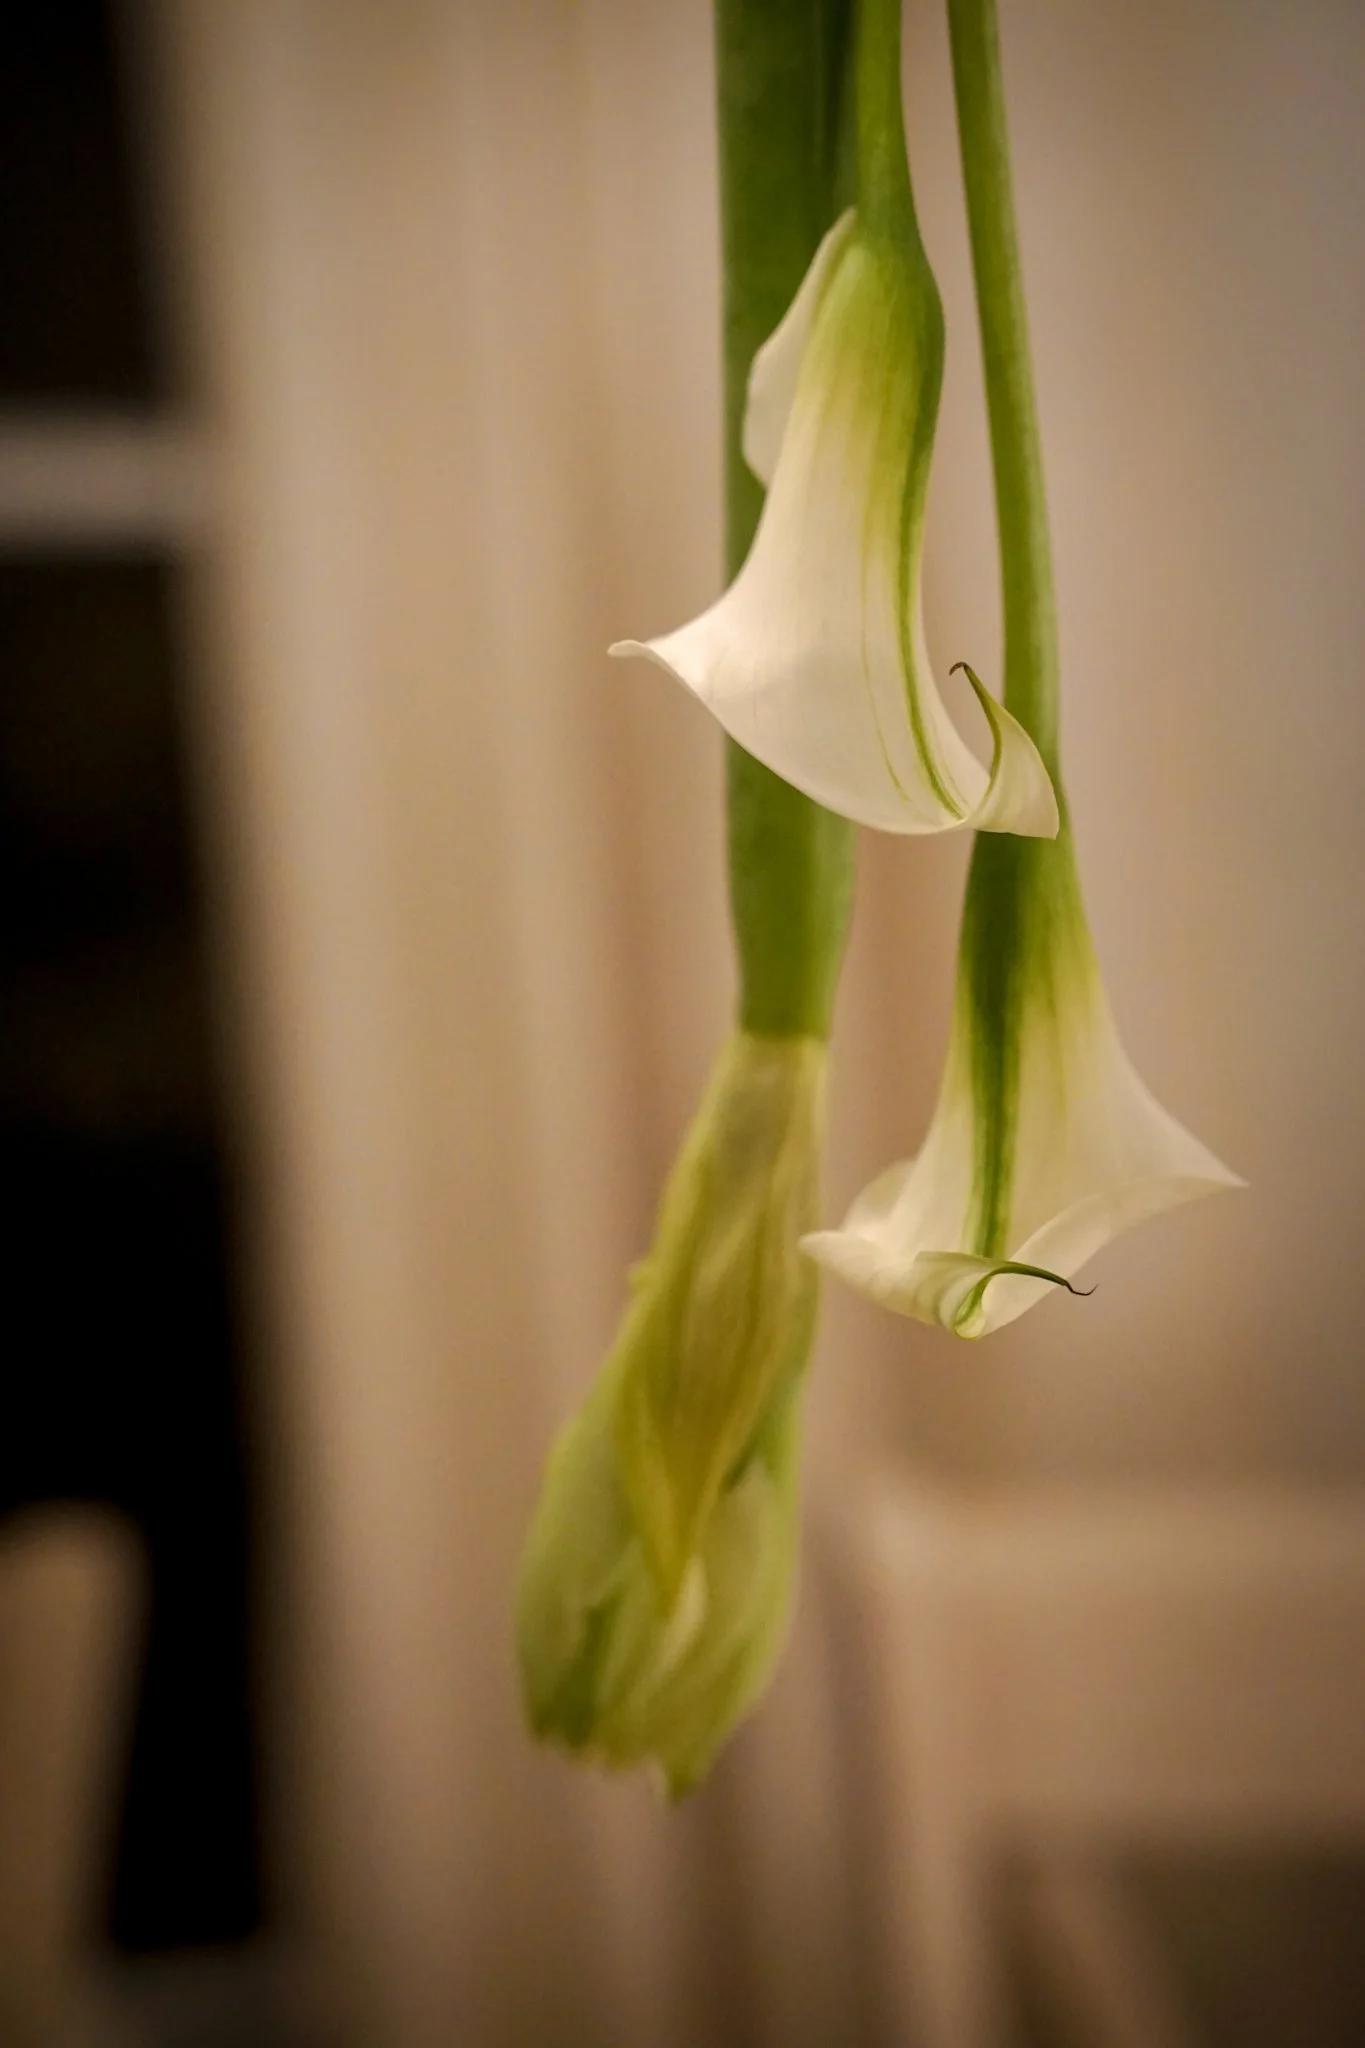
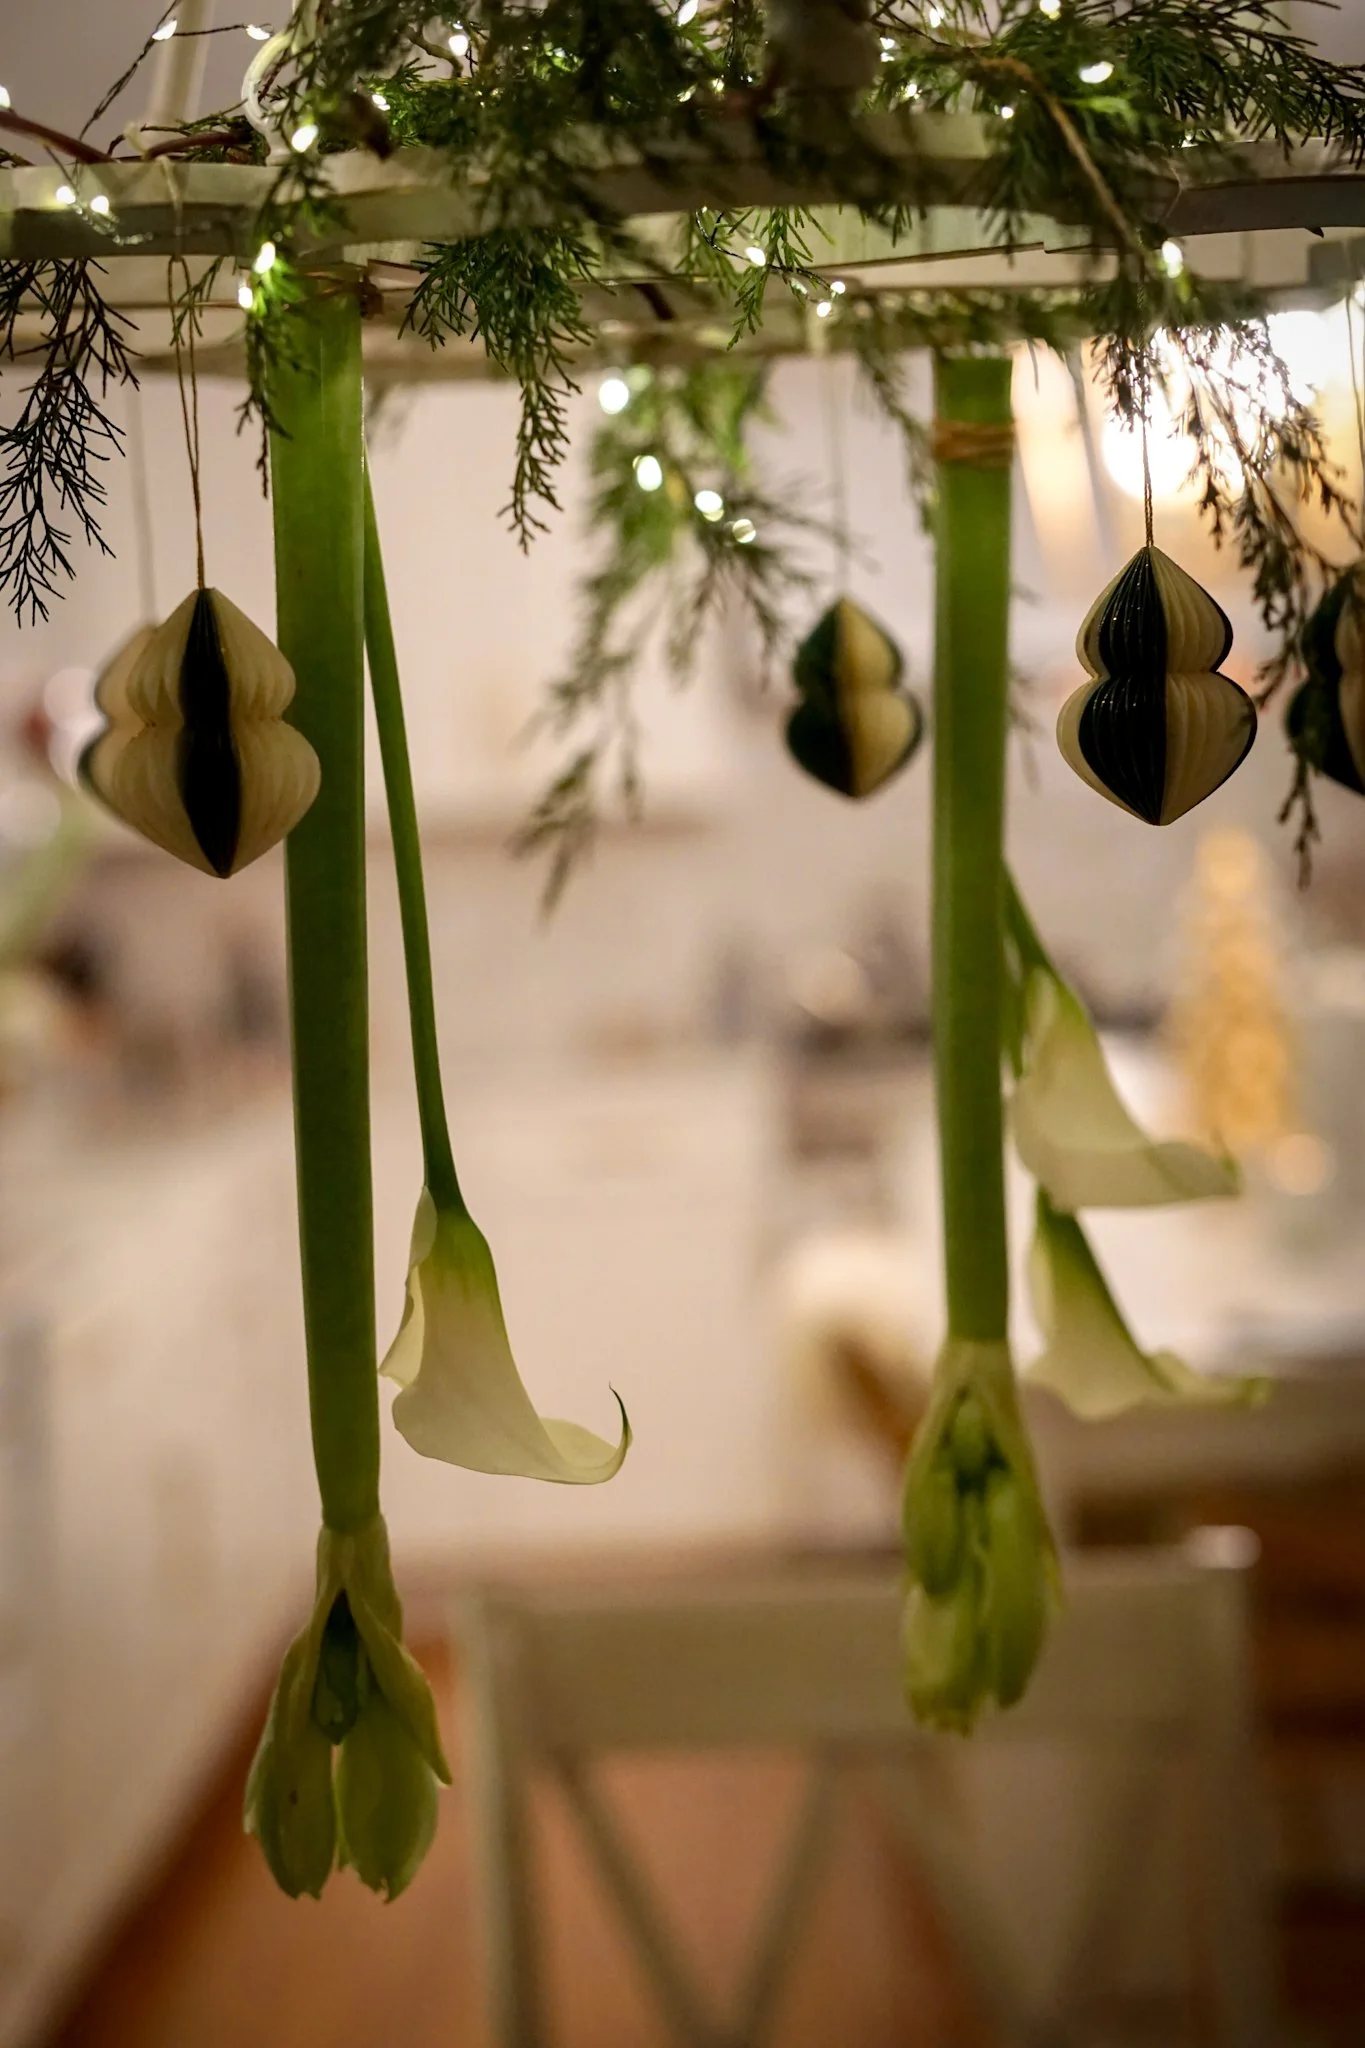
Amaryllis: these flowers have a long, hollow stem that make them perfect for this project. I found amaryllis in random grocery stores both in bulb form (I cut them right off of the bulb) and in long stem form.
Other flowers that could work: tulips, calla lilies. I also tacked on a few other flowers that probably won’t last long, but I can easily untack them.
Flowers should last for a few days at least, and you can always change them out when they start to wilt.
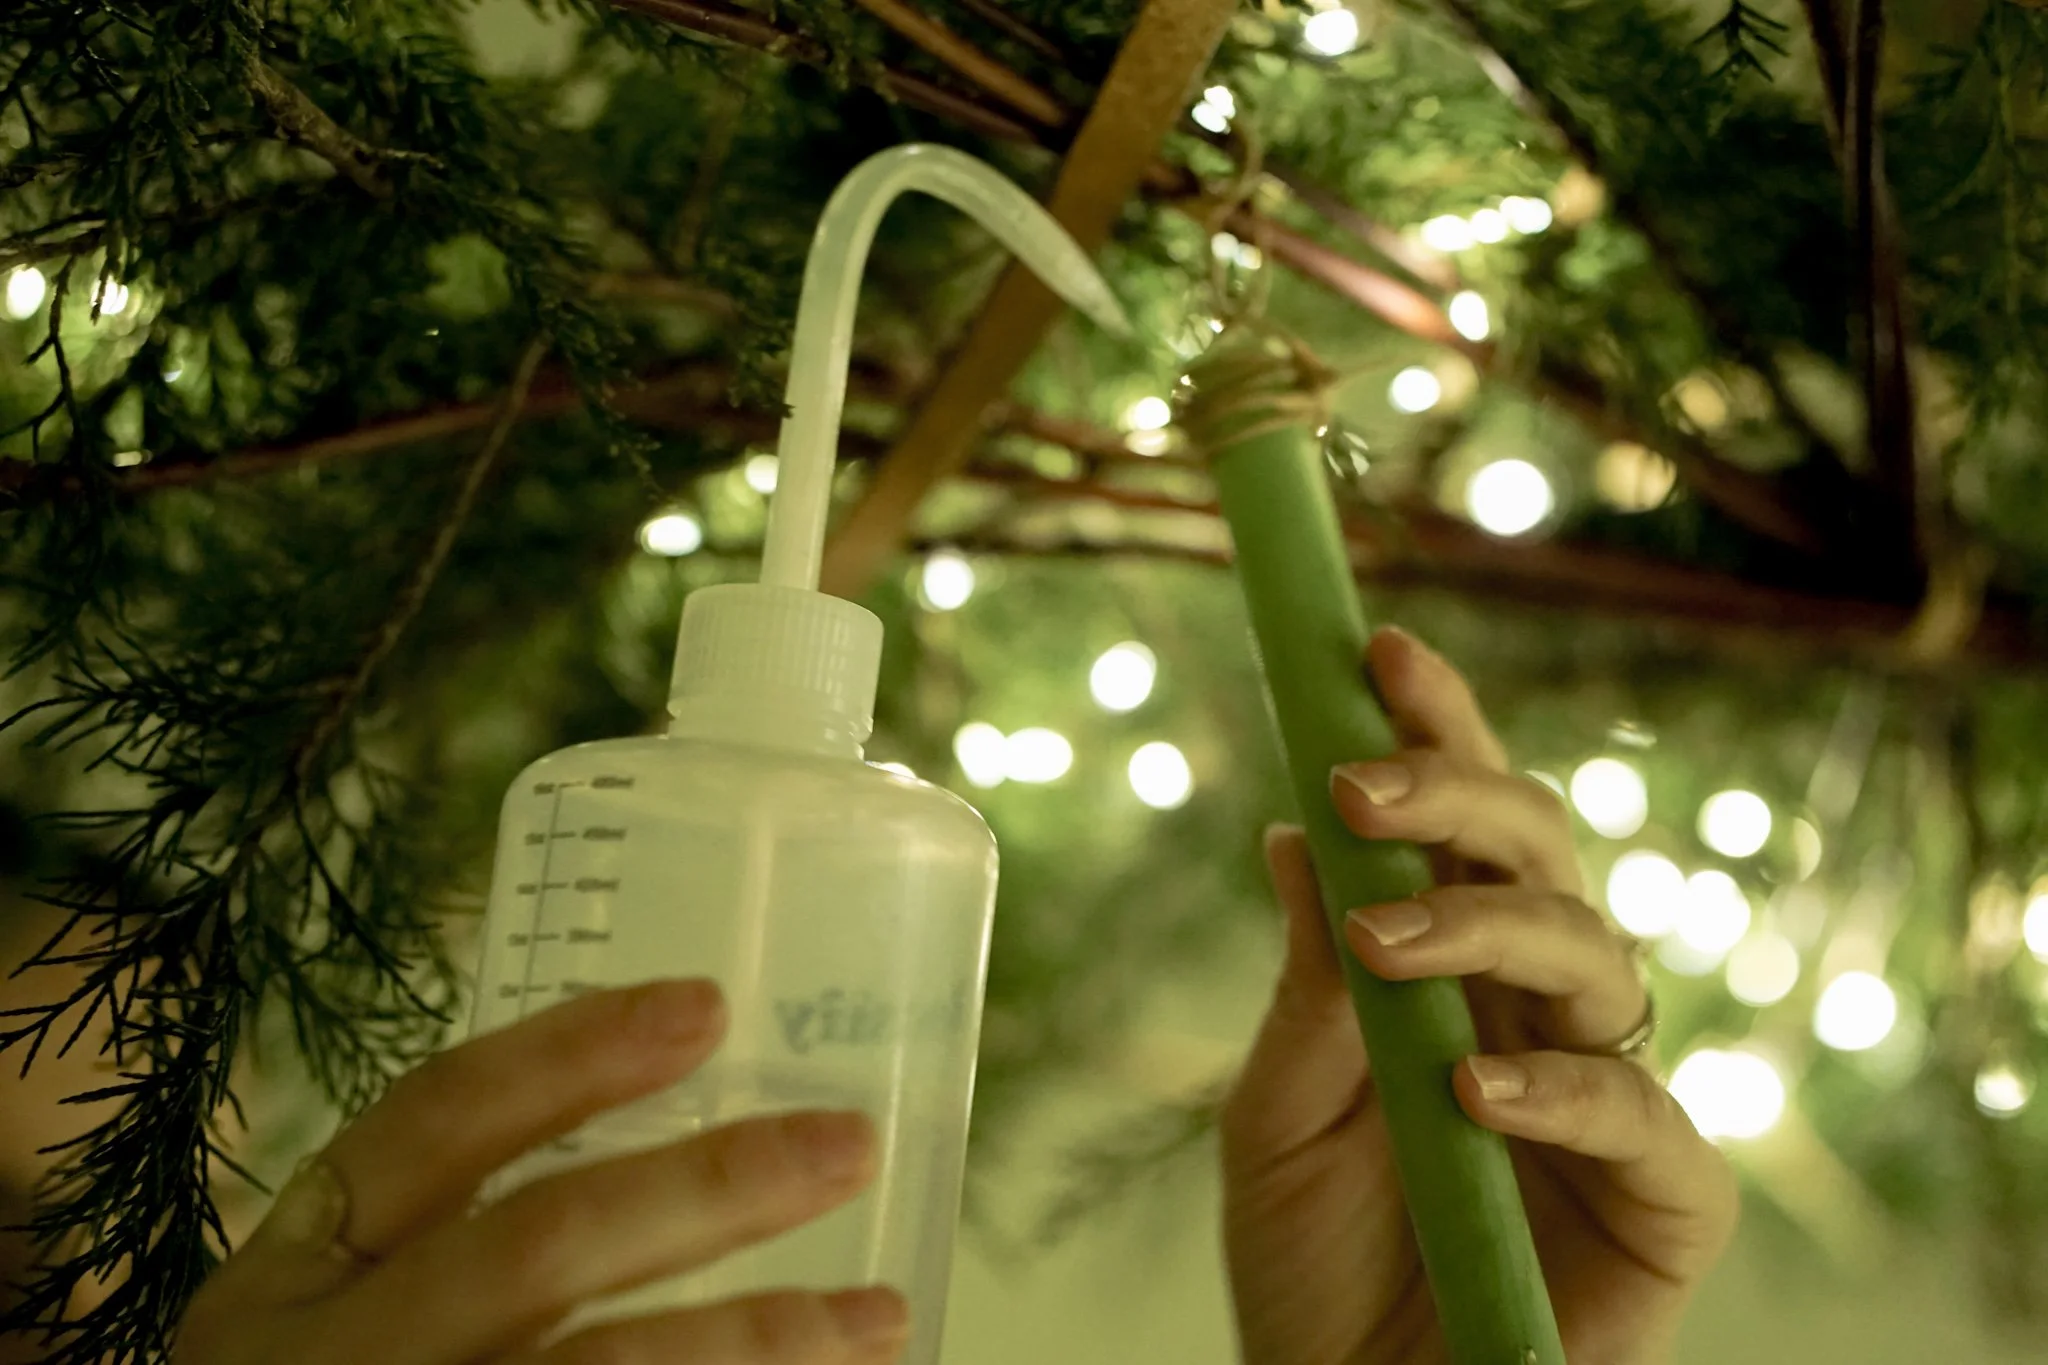
Squeeze Plant Water Bottle. When Maureen sent a picture of this, the first thing that came to my mind was my post-partum peri bottle and I truly pulled it out of storage to use. Luckily I found the correct bottle at a florist shop, but a peri bottle probably would have worked fine! Maureen said that a turkey baster works here, too. This is how you’ll get water into the hollow stems of your upside-down flowers hanging from your greenery.
Optional: if you can’t find flowers that will work, you can also use other things to decorate.
Wired ribbon is an example Maureen gave, you can have them curled and draping down from the greenery. You can even pair ribbon with the fresh flowers, too. Experiment!
Maureen added Harry Potter floating candles to her display and they’re magical! How fun for kids (and grown-ups) to use the wand to turn these on and off on Christmas. If we have time to find and do this with ours, we might too. Lots of room with this to get creative with things you could hang from this!
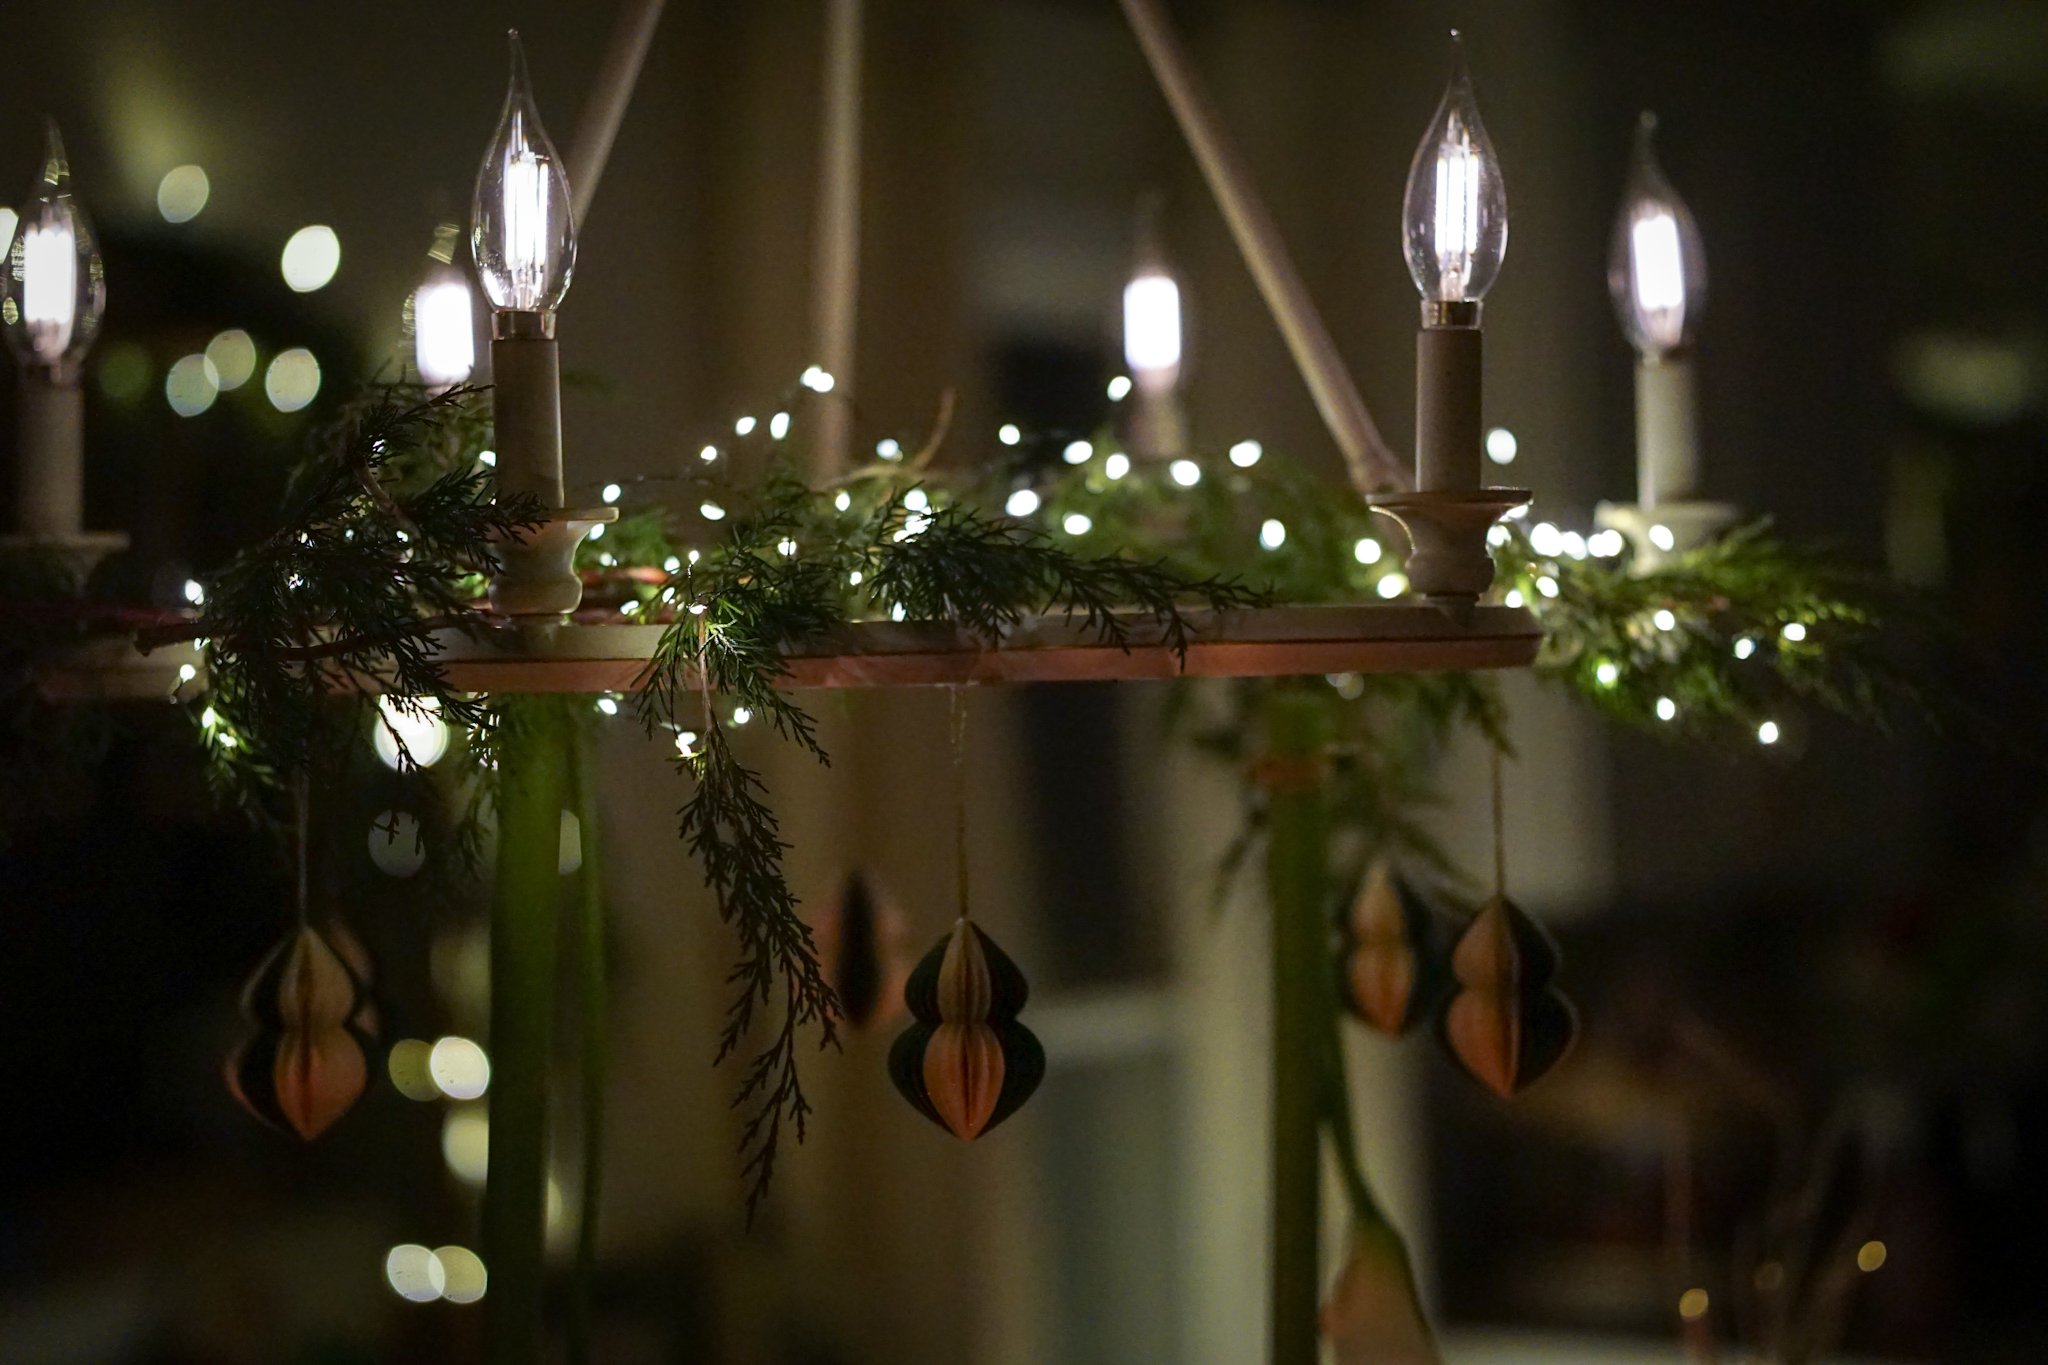
The first step depends on your chandelier. Our chandelier had a nice layer that we could lie the branches right on top, so we bundled our branches together, tying in the center with your bind wire (or twine / jute / wool). You want the branches to be splaying out at different angles rather than all sitting parallel to one another, to create an interesting shape when you place the greenery. Once we had created our bundle, we placed onto our chandelier and moved the branches around a bit to achieve an interesting shape.
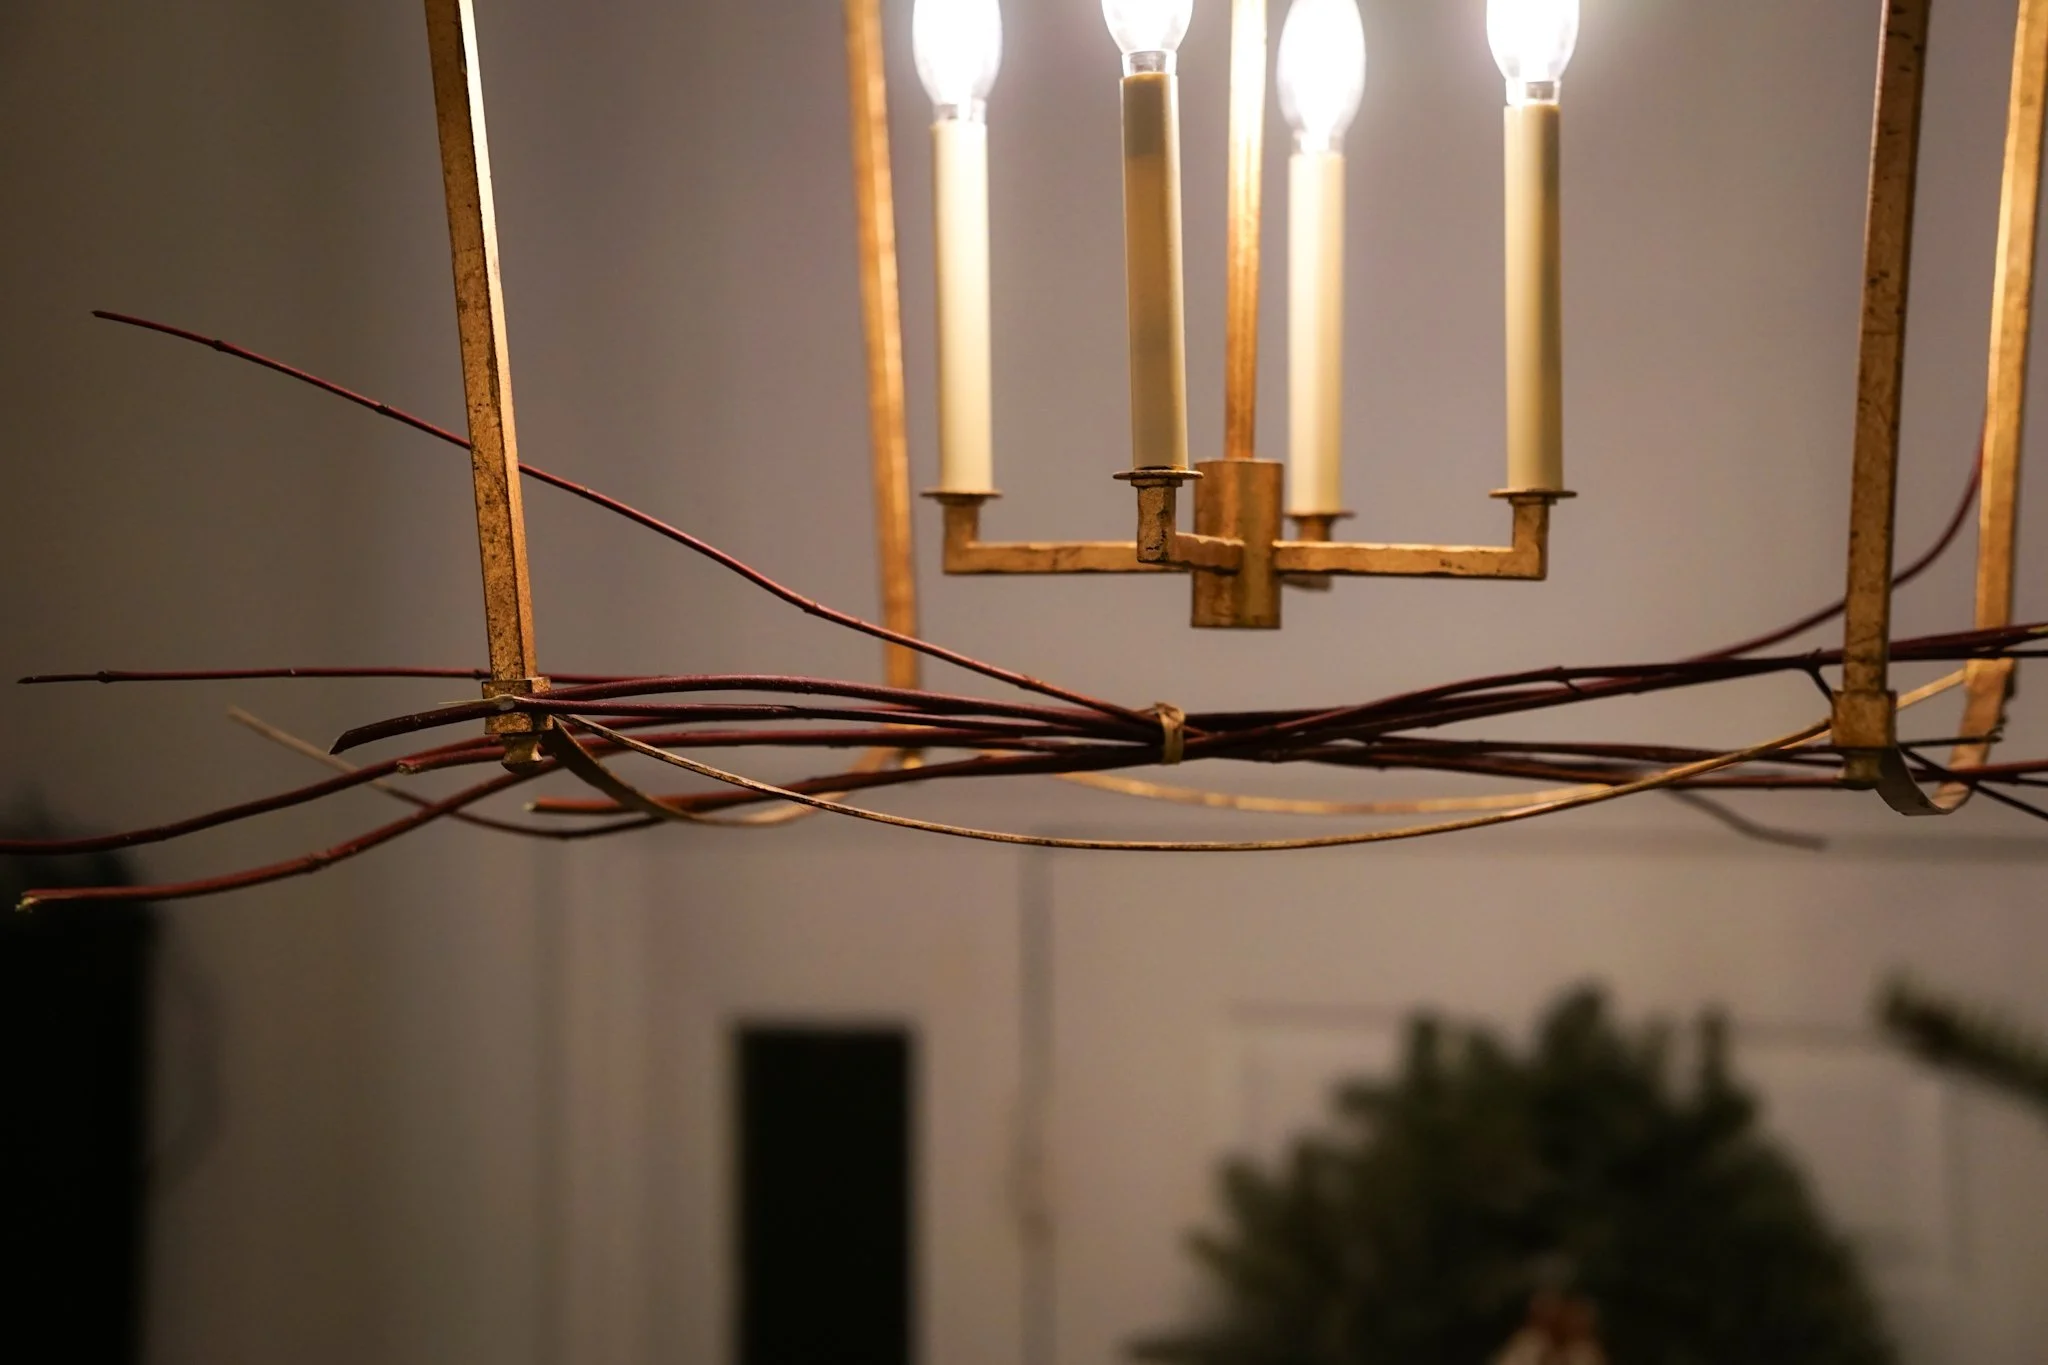
Maureen’s chandelier was such that she couldn’t lie the branches flat, so instead, she placed the branches onto the chandelier first, and then tied the ends together with bind wire.
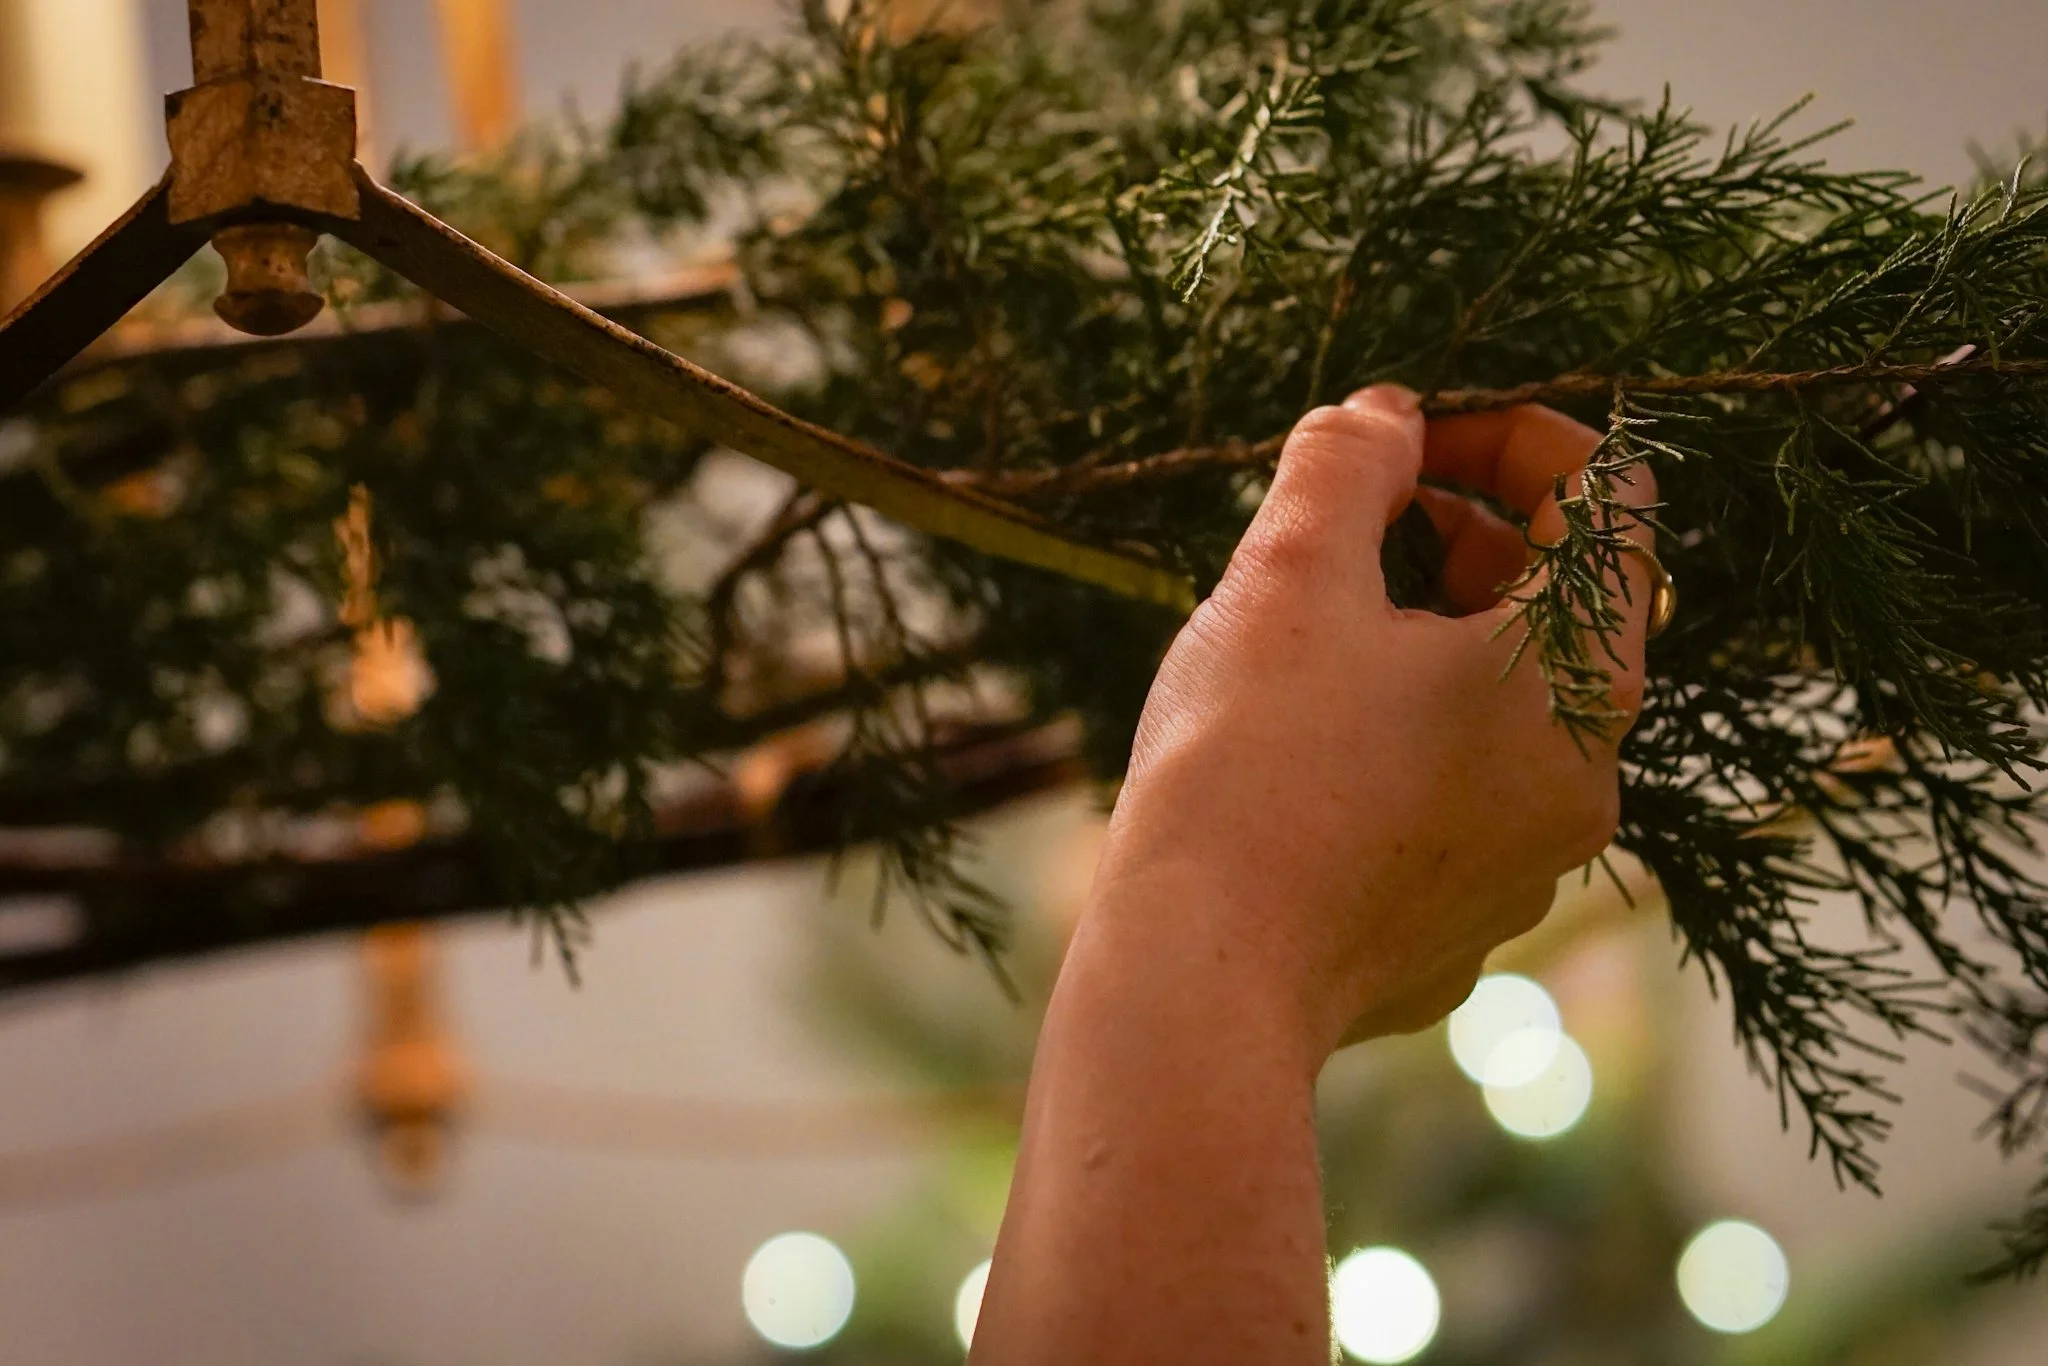
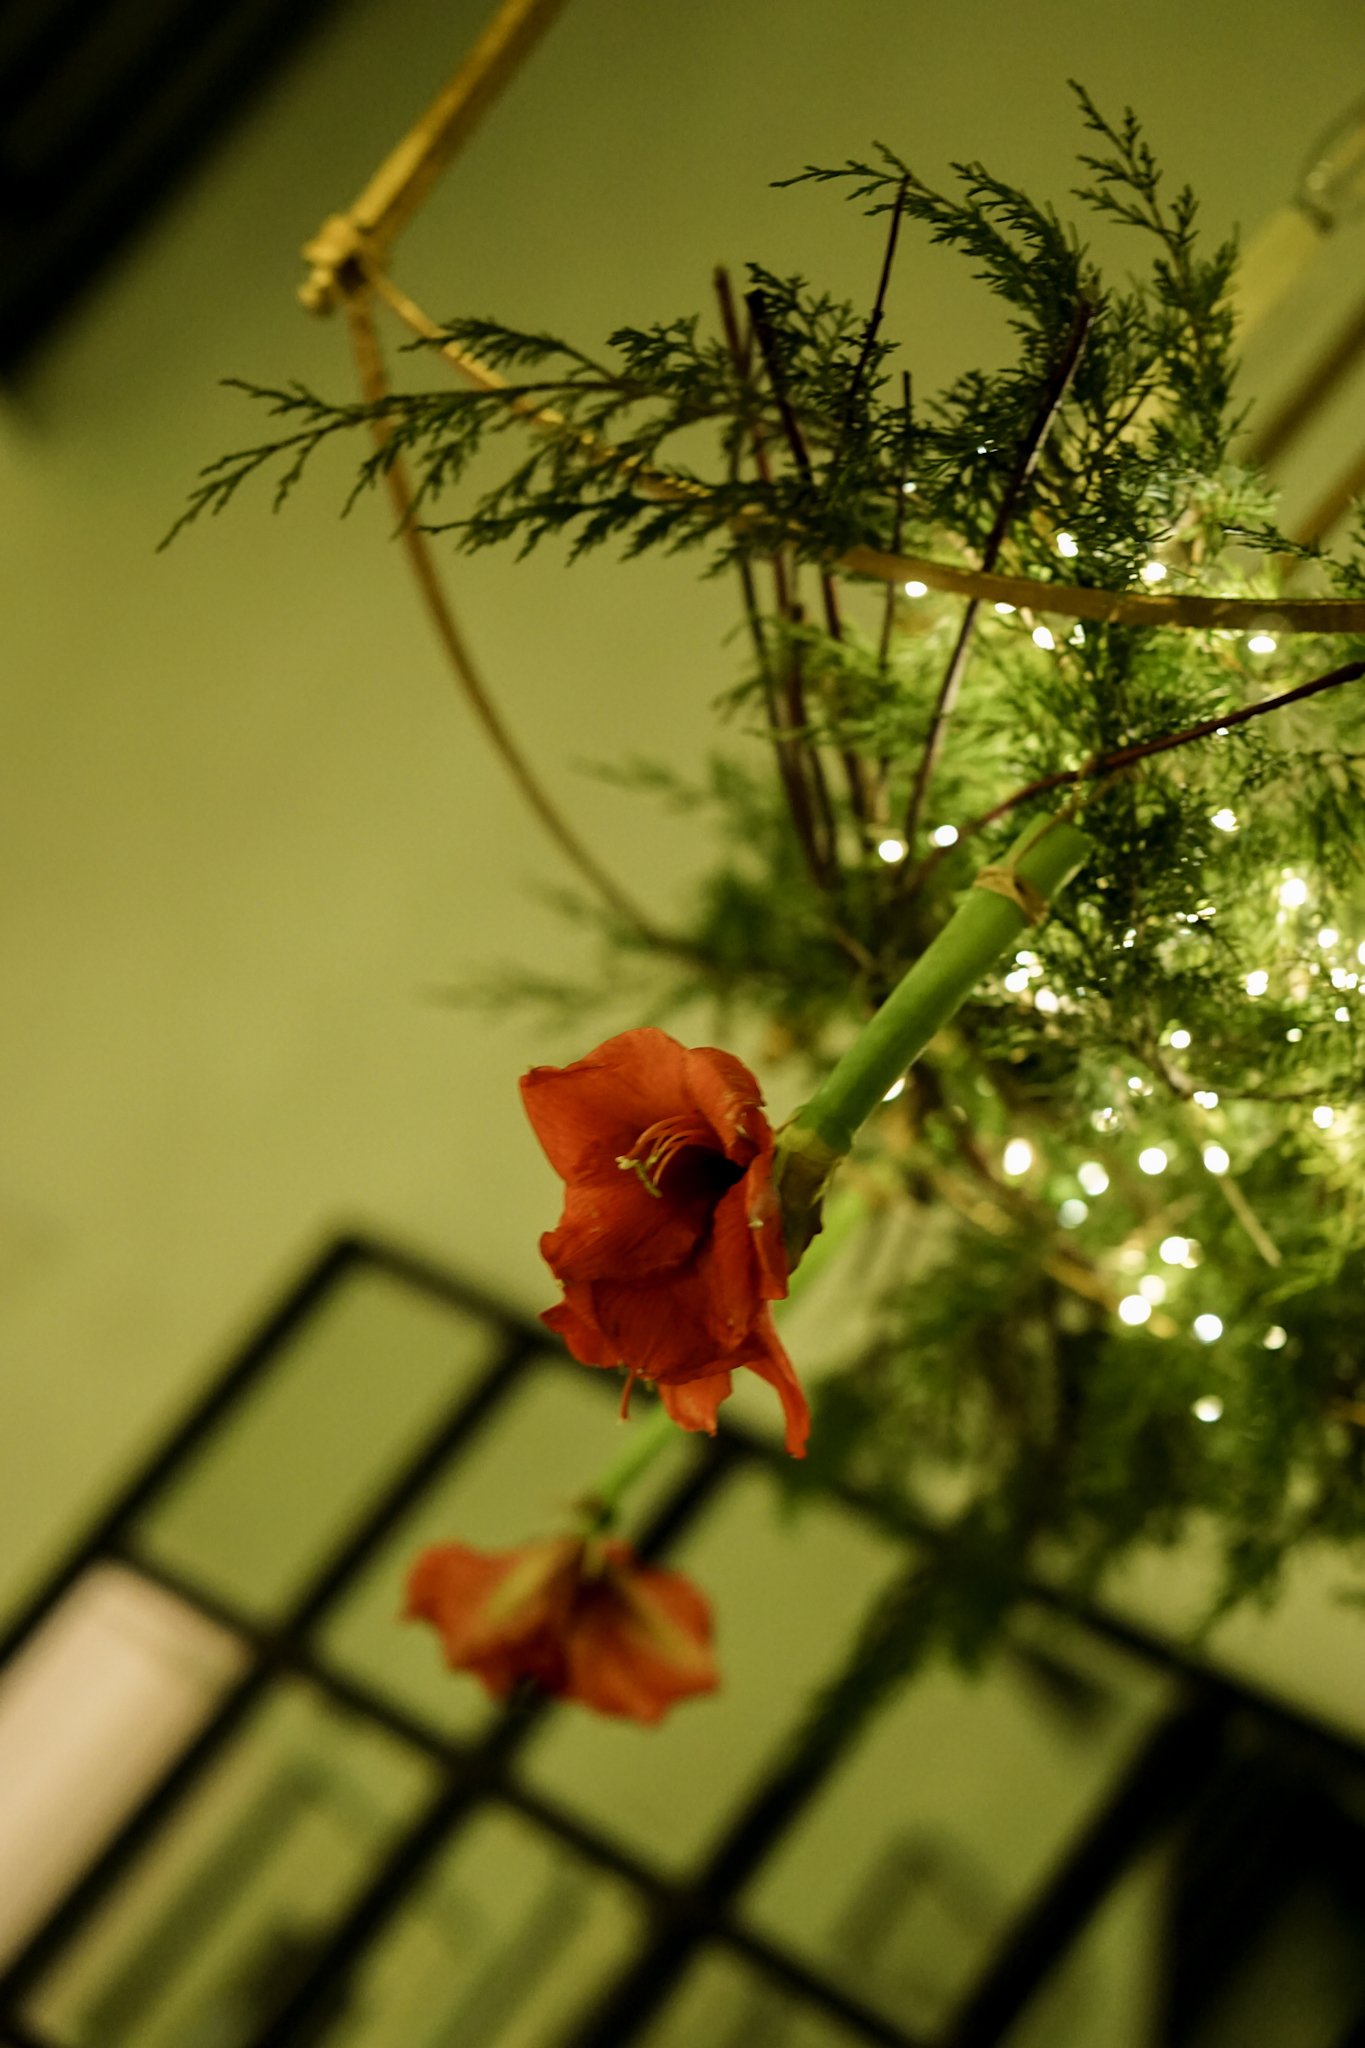
Nest or nestle your greenery on top of the branches. In our home, we rested the greenery right on top of the bundled branches. Maureen wove her greenery into the branches. You want to have enough greenery to mostly cover the branches. Arrange the greenery to your liking.
Maureen’s chandelier and gorgeous Carolina Sapphire greens
Trim your flowers as needed so that they can be cascading at the appropriate length. For the chandelier in our foyer, we made sure they wouldn’t be too in the way of people walking. Over a table, trim so they are a nice length but not touching the table. You can hold the flowers upside down before trimming to give yourself an idea of a length that looks good to you.
Add your battery pack string lights and spread the lights throughout the greenery. You can do this later, too.
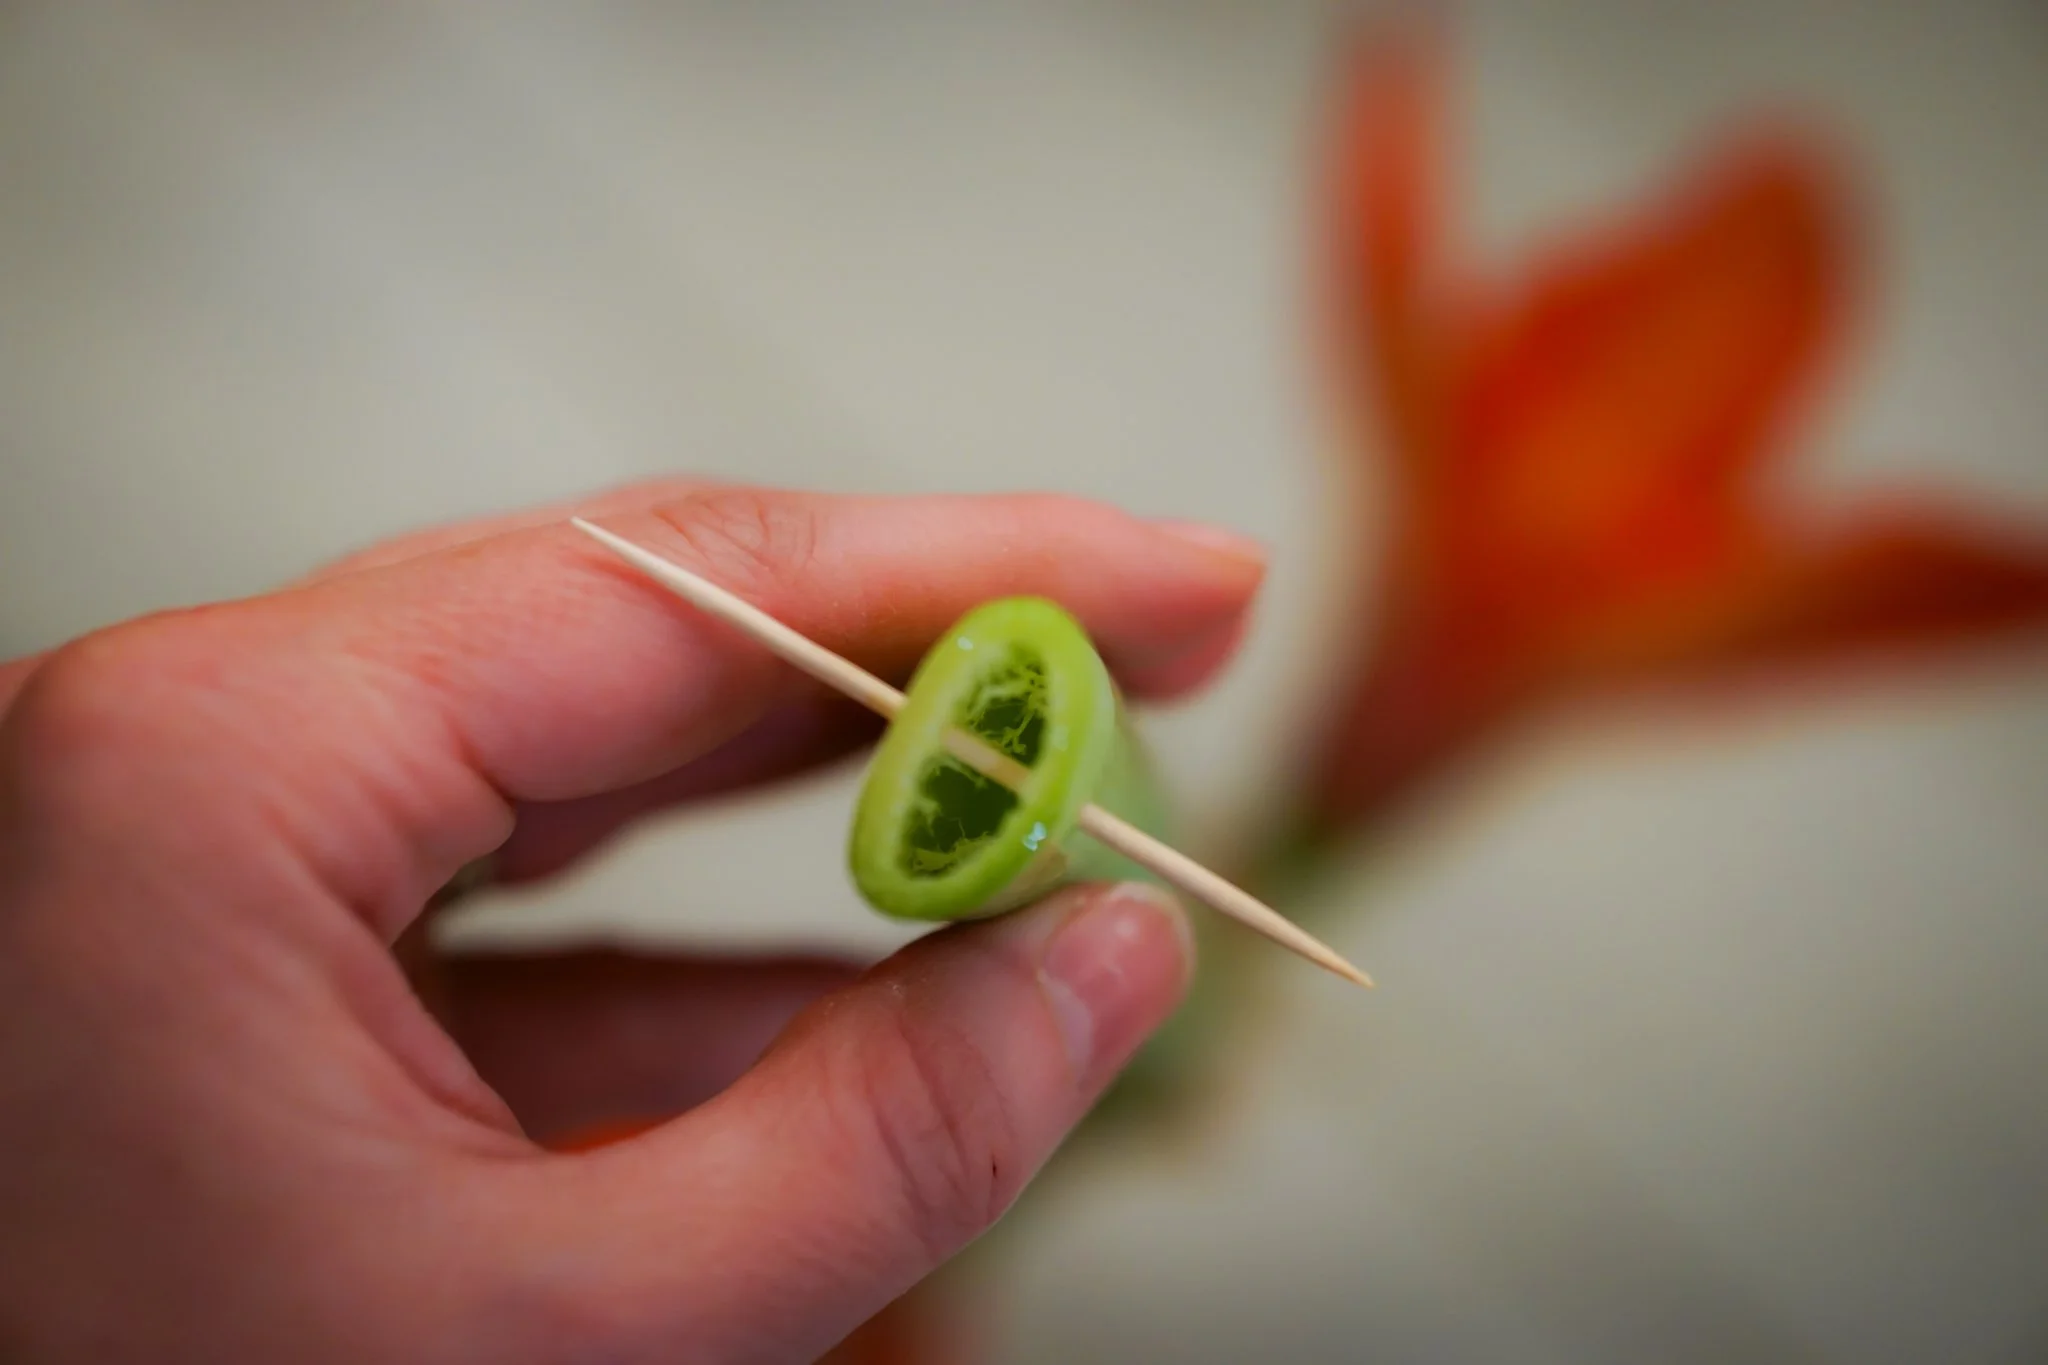
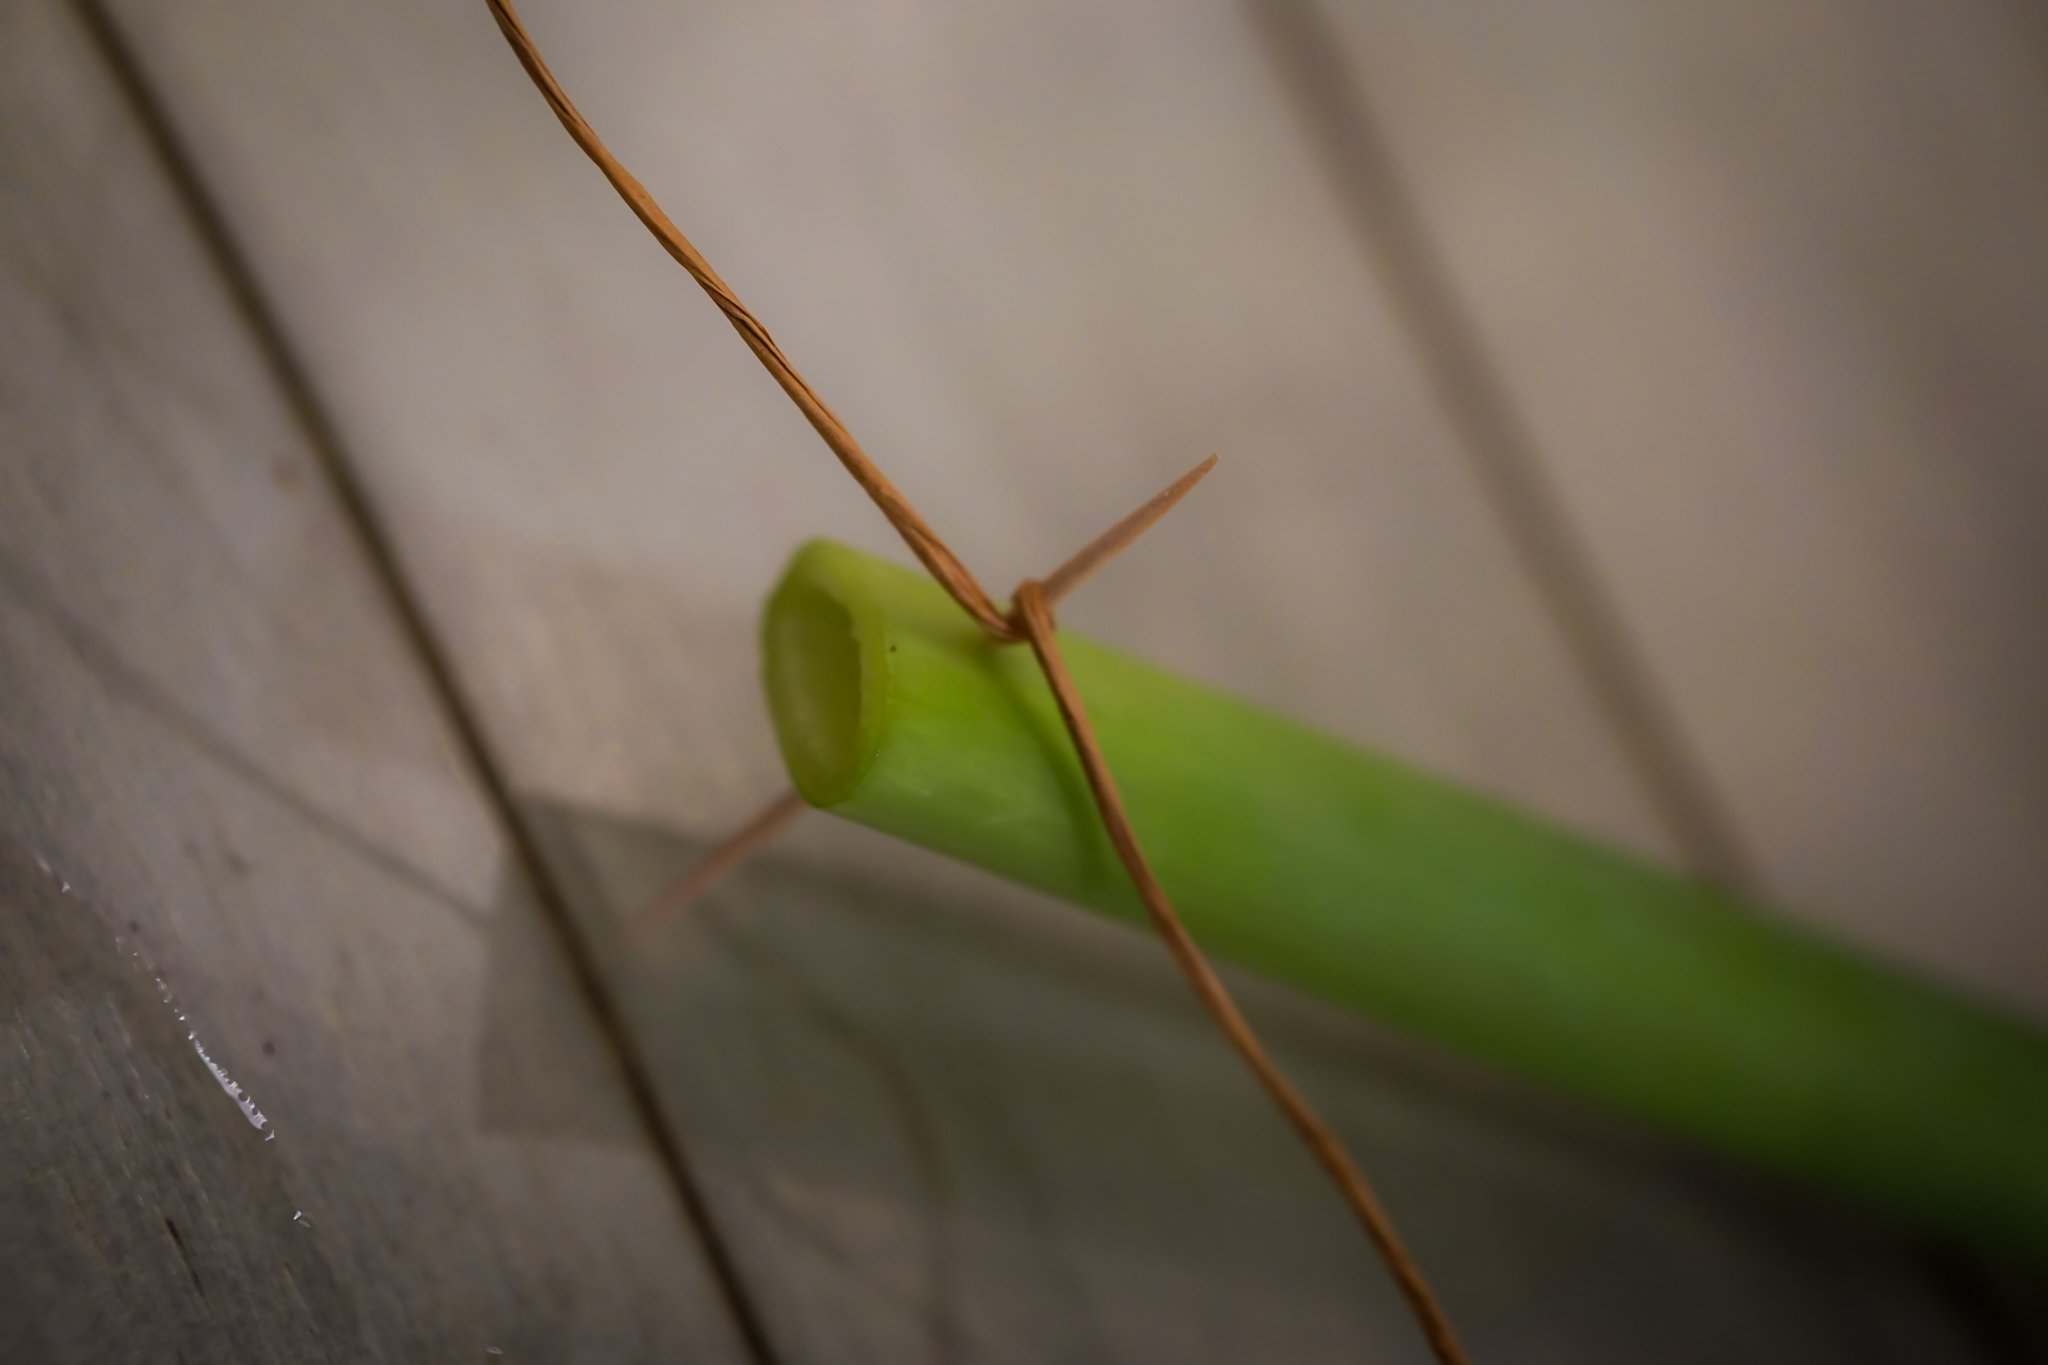
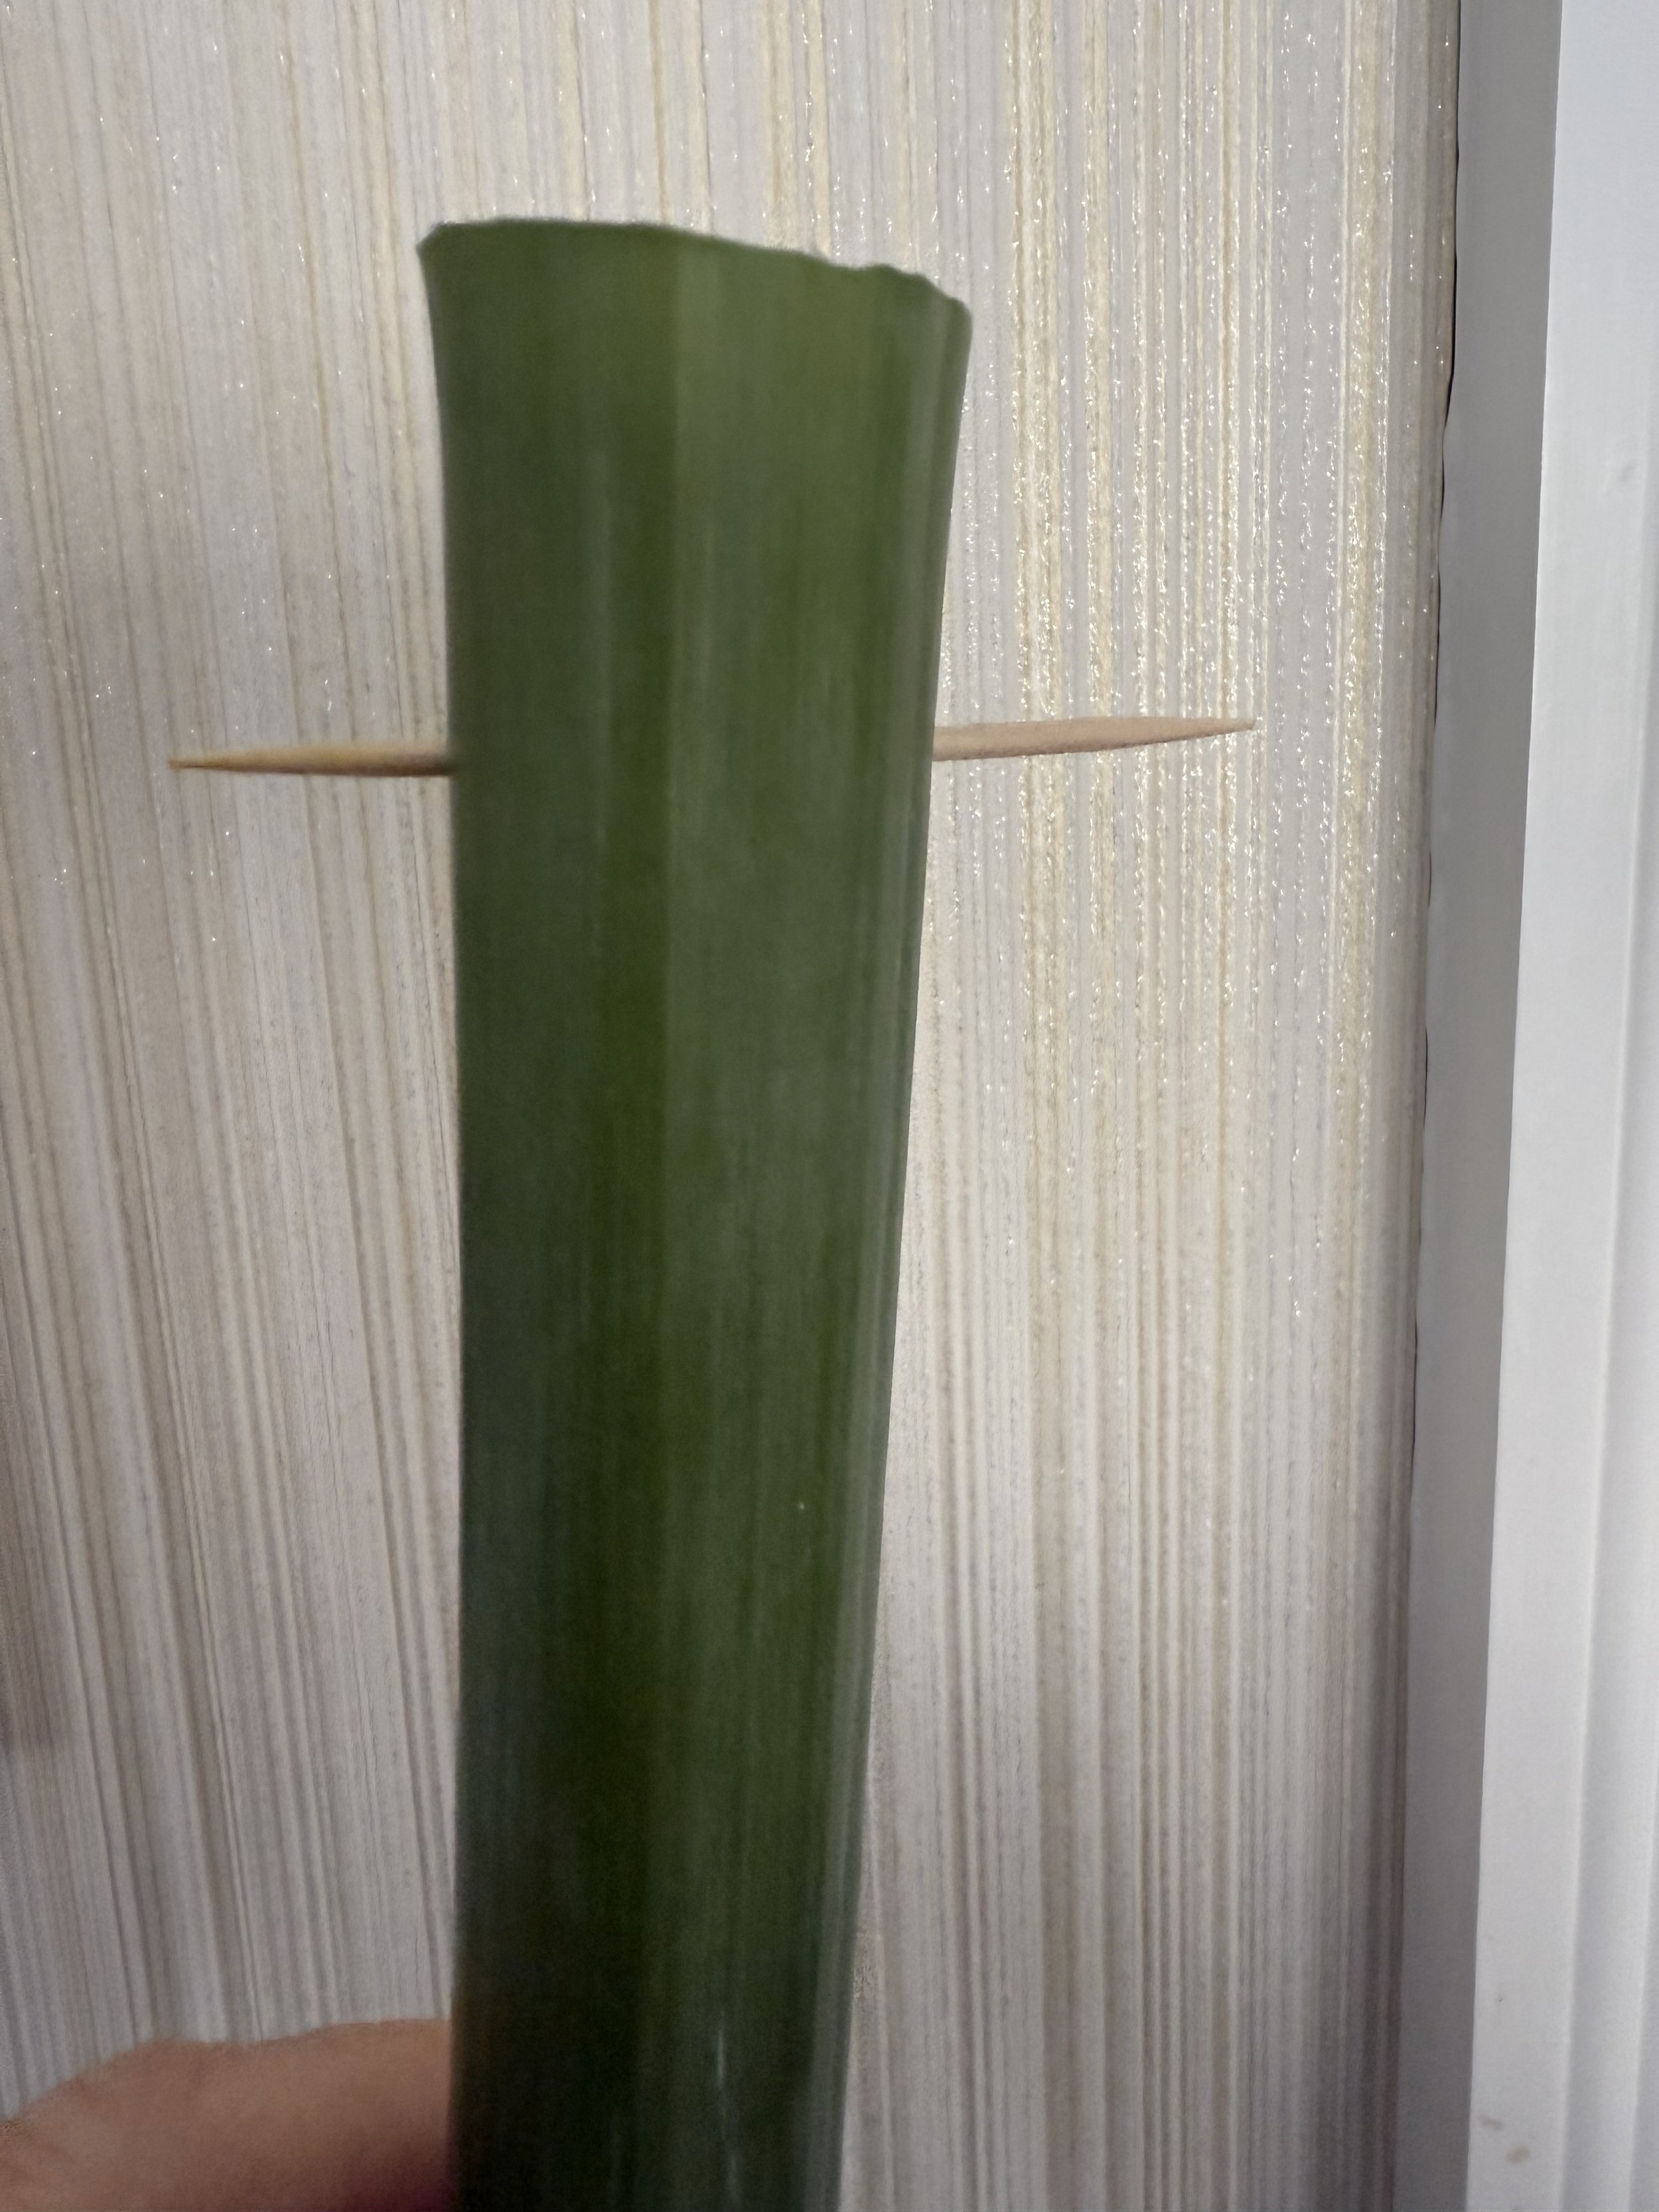
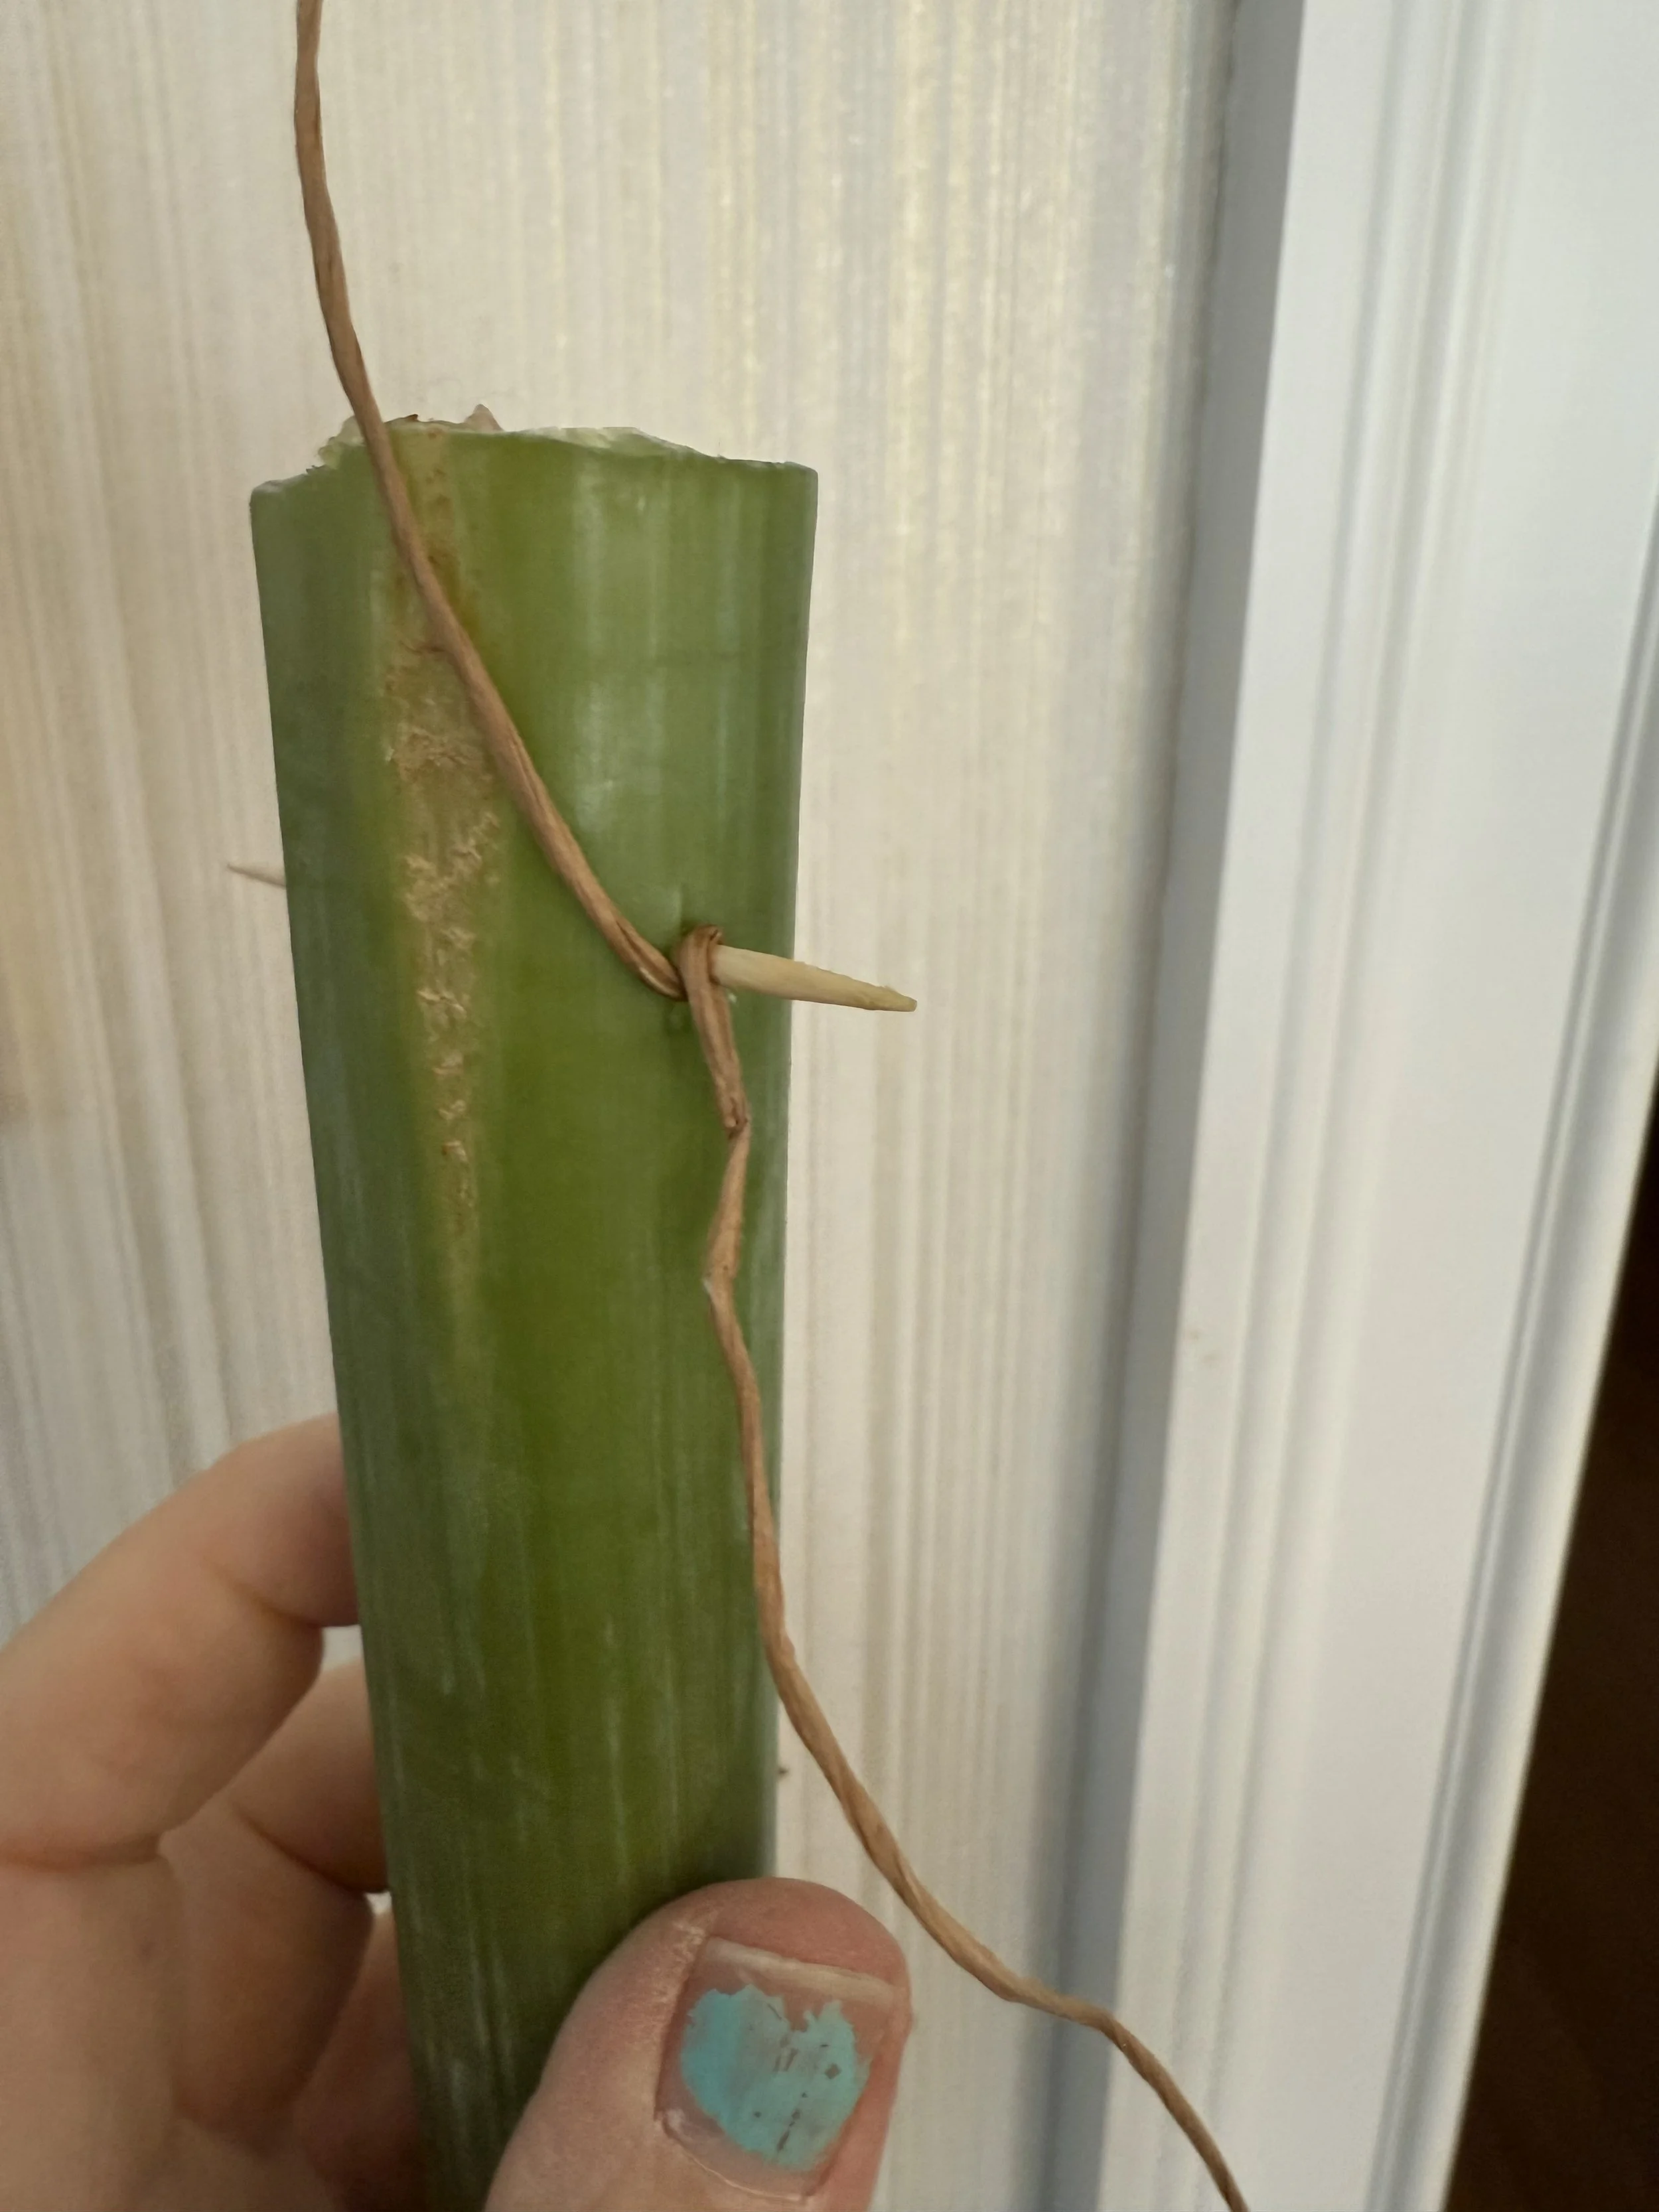
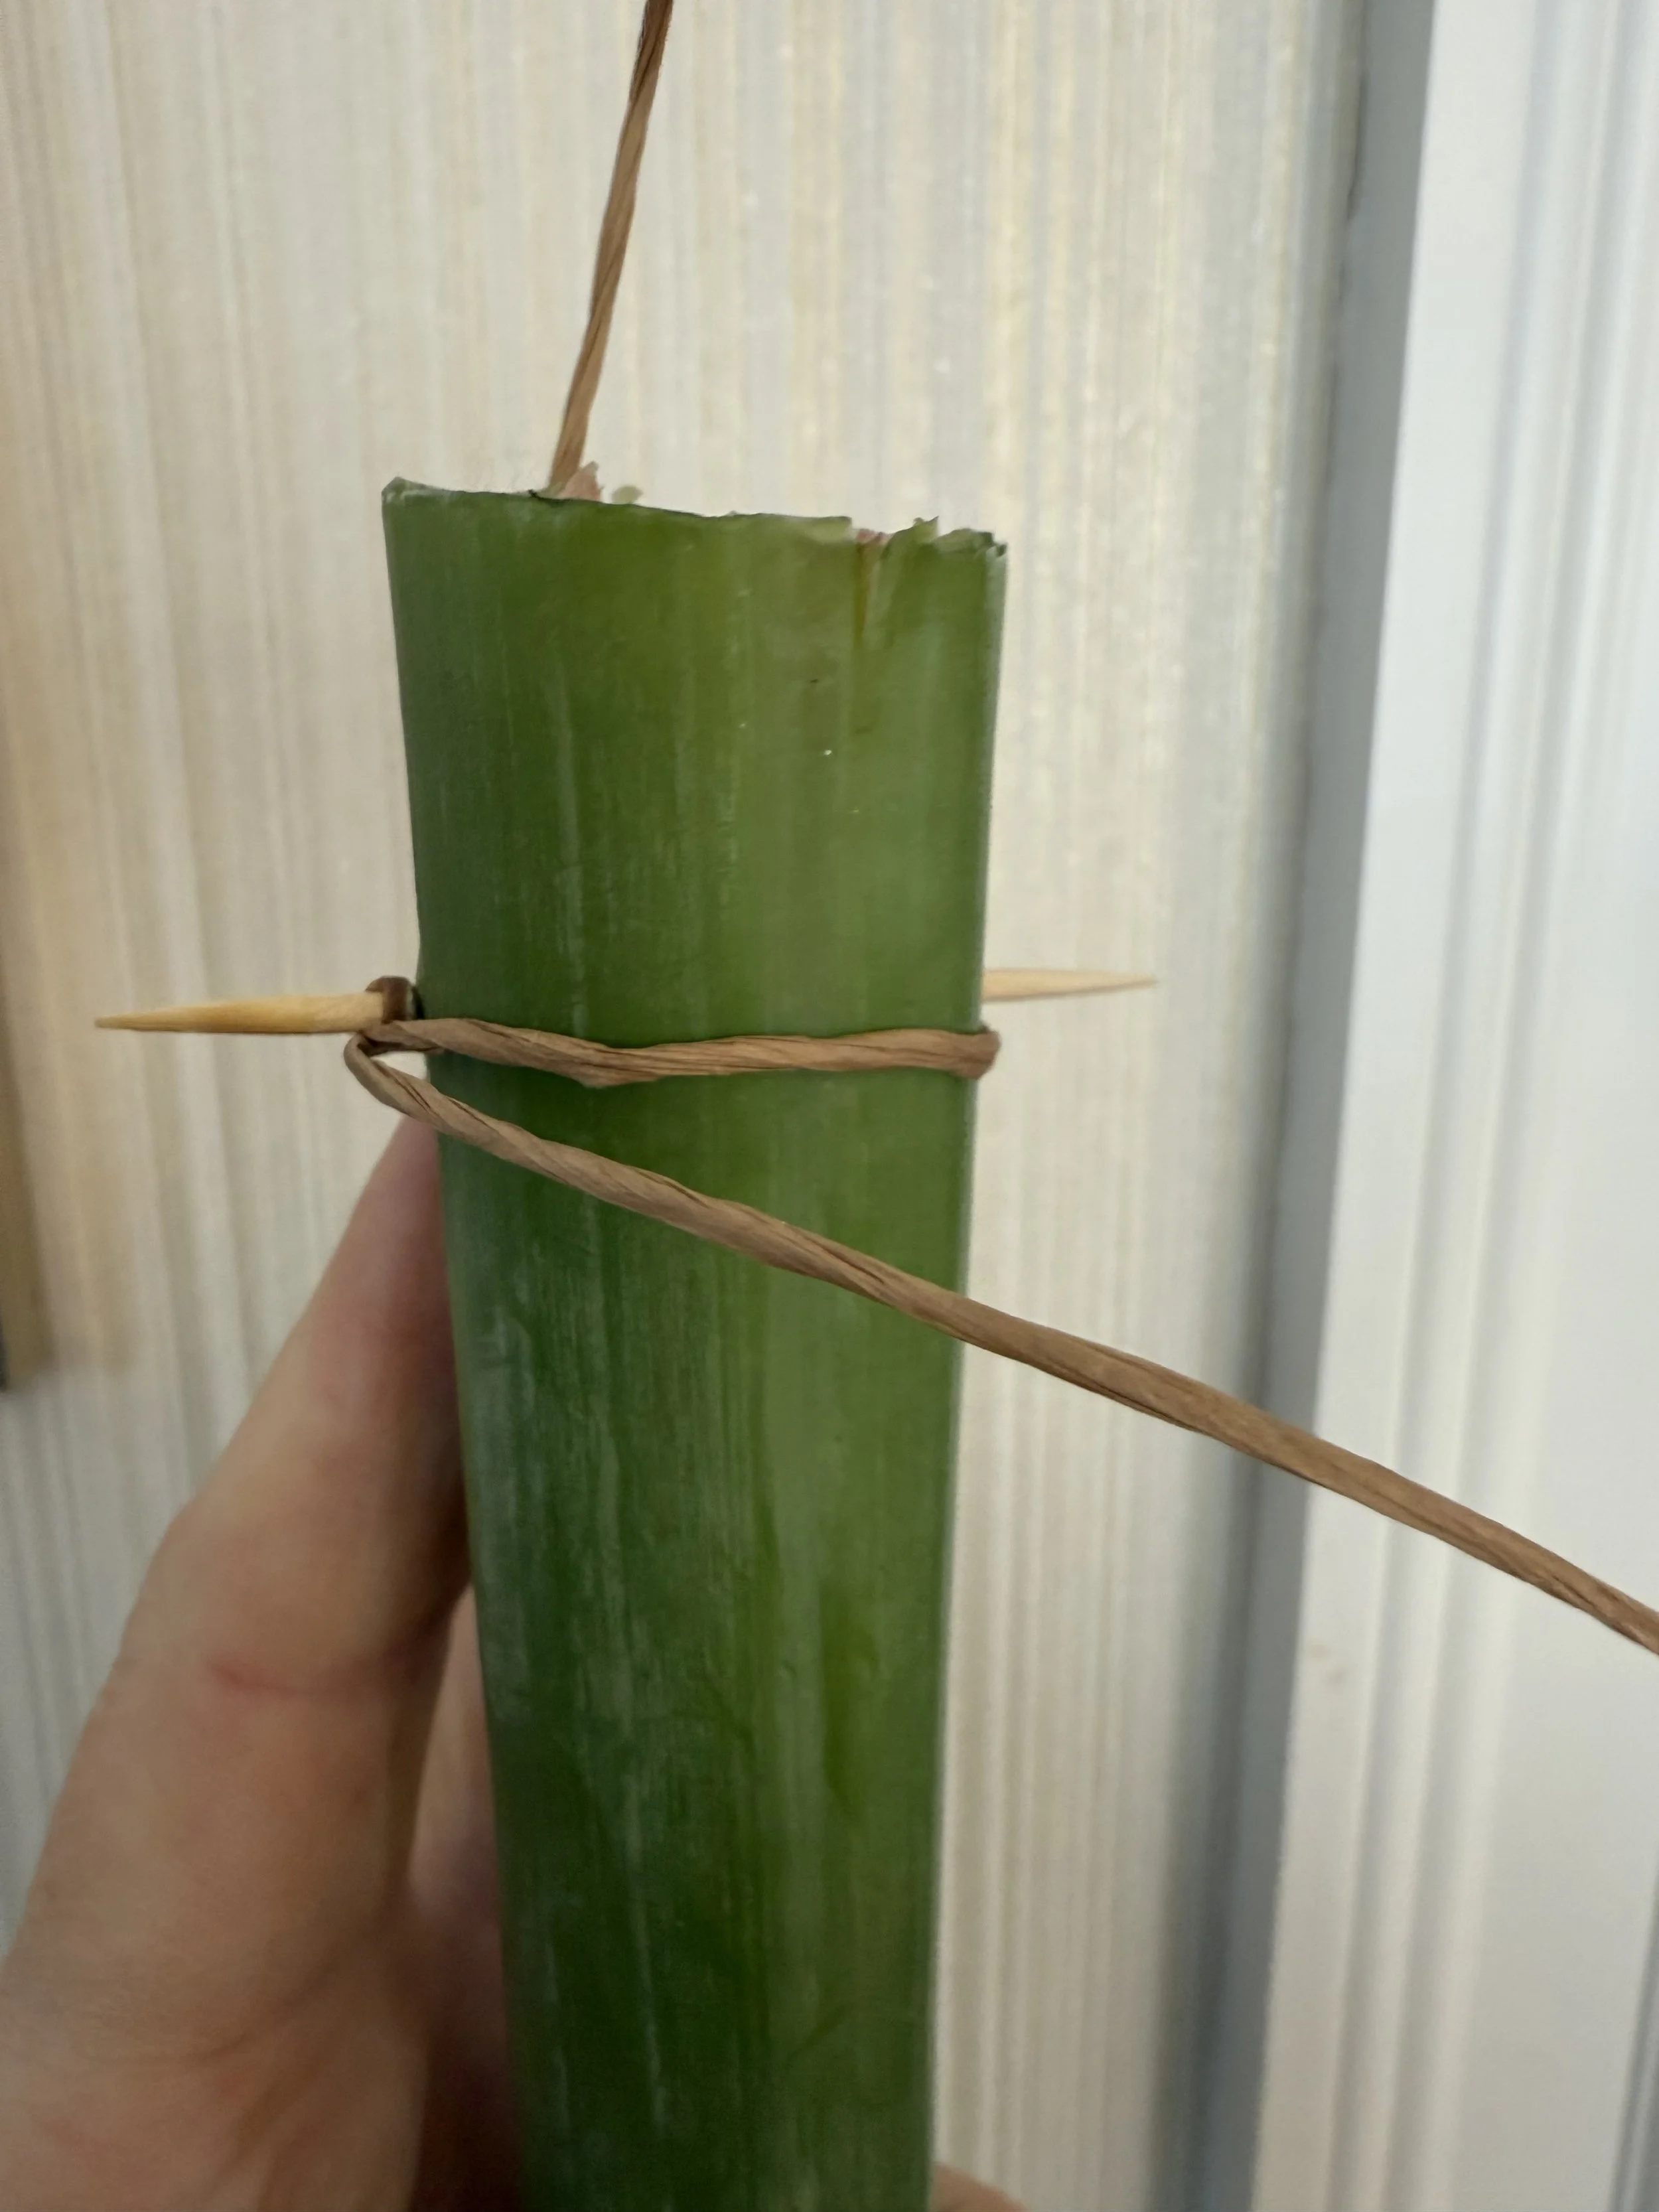
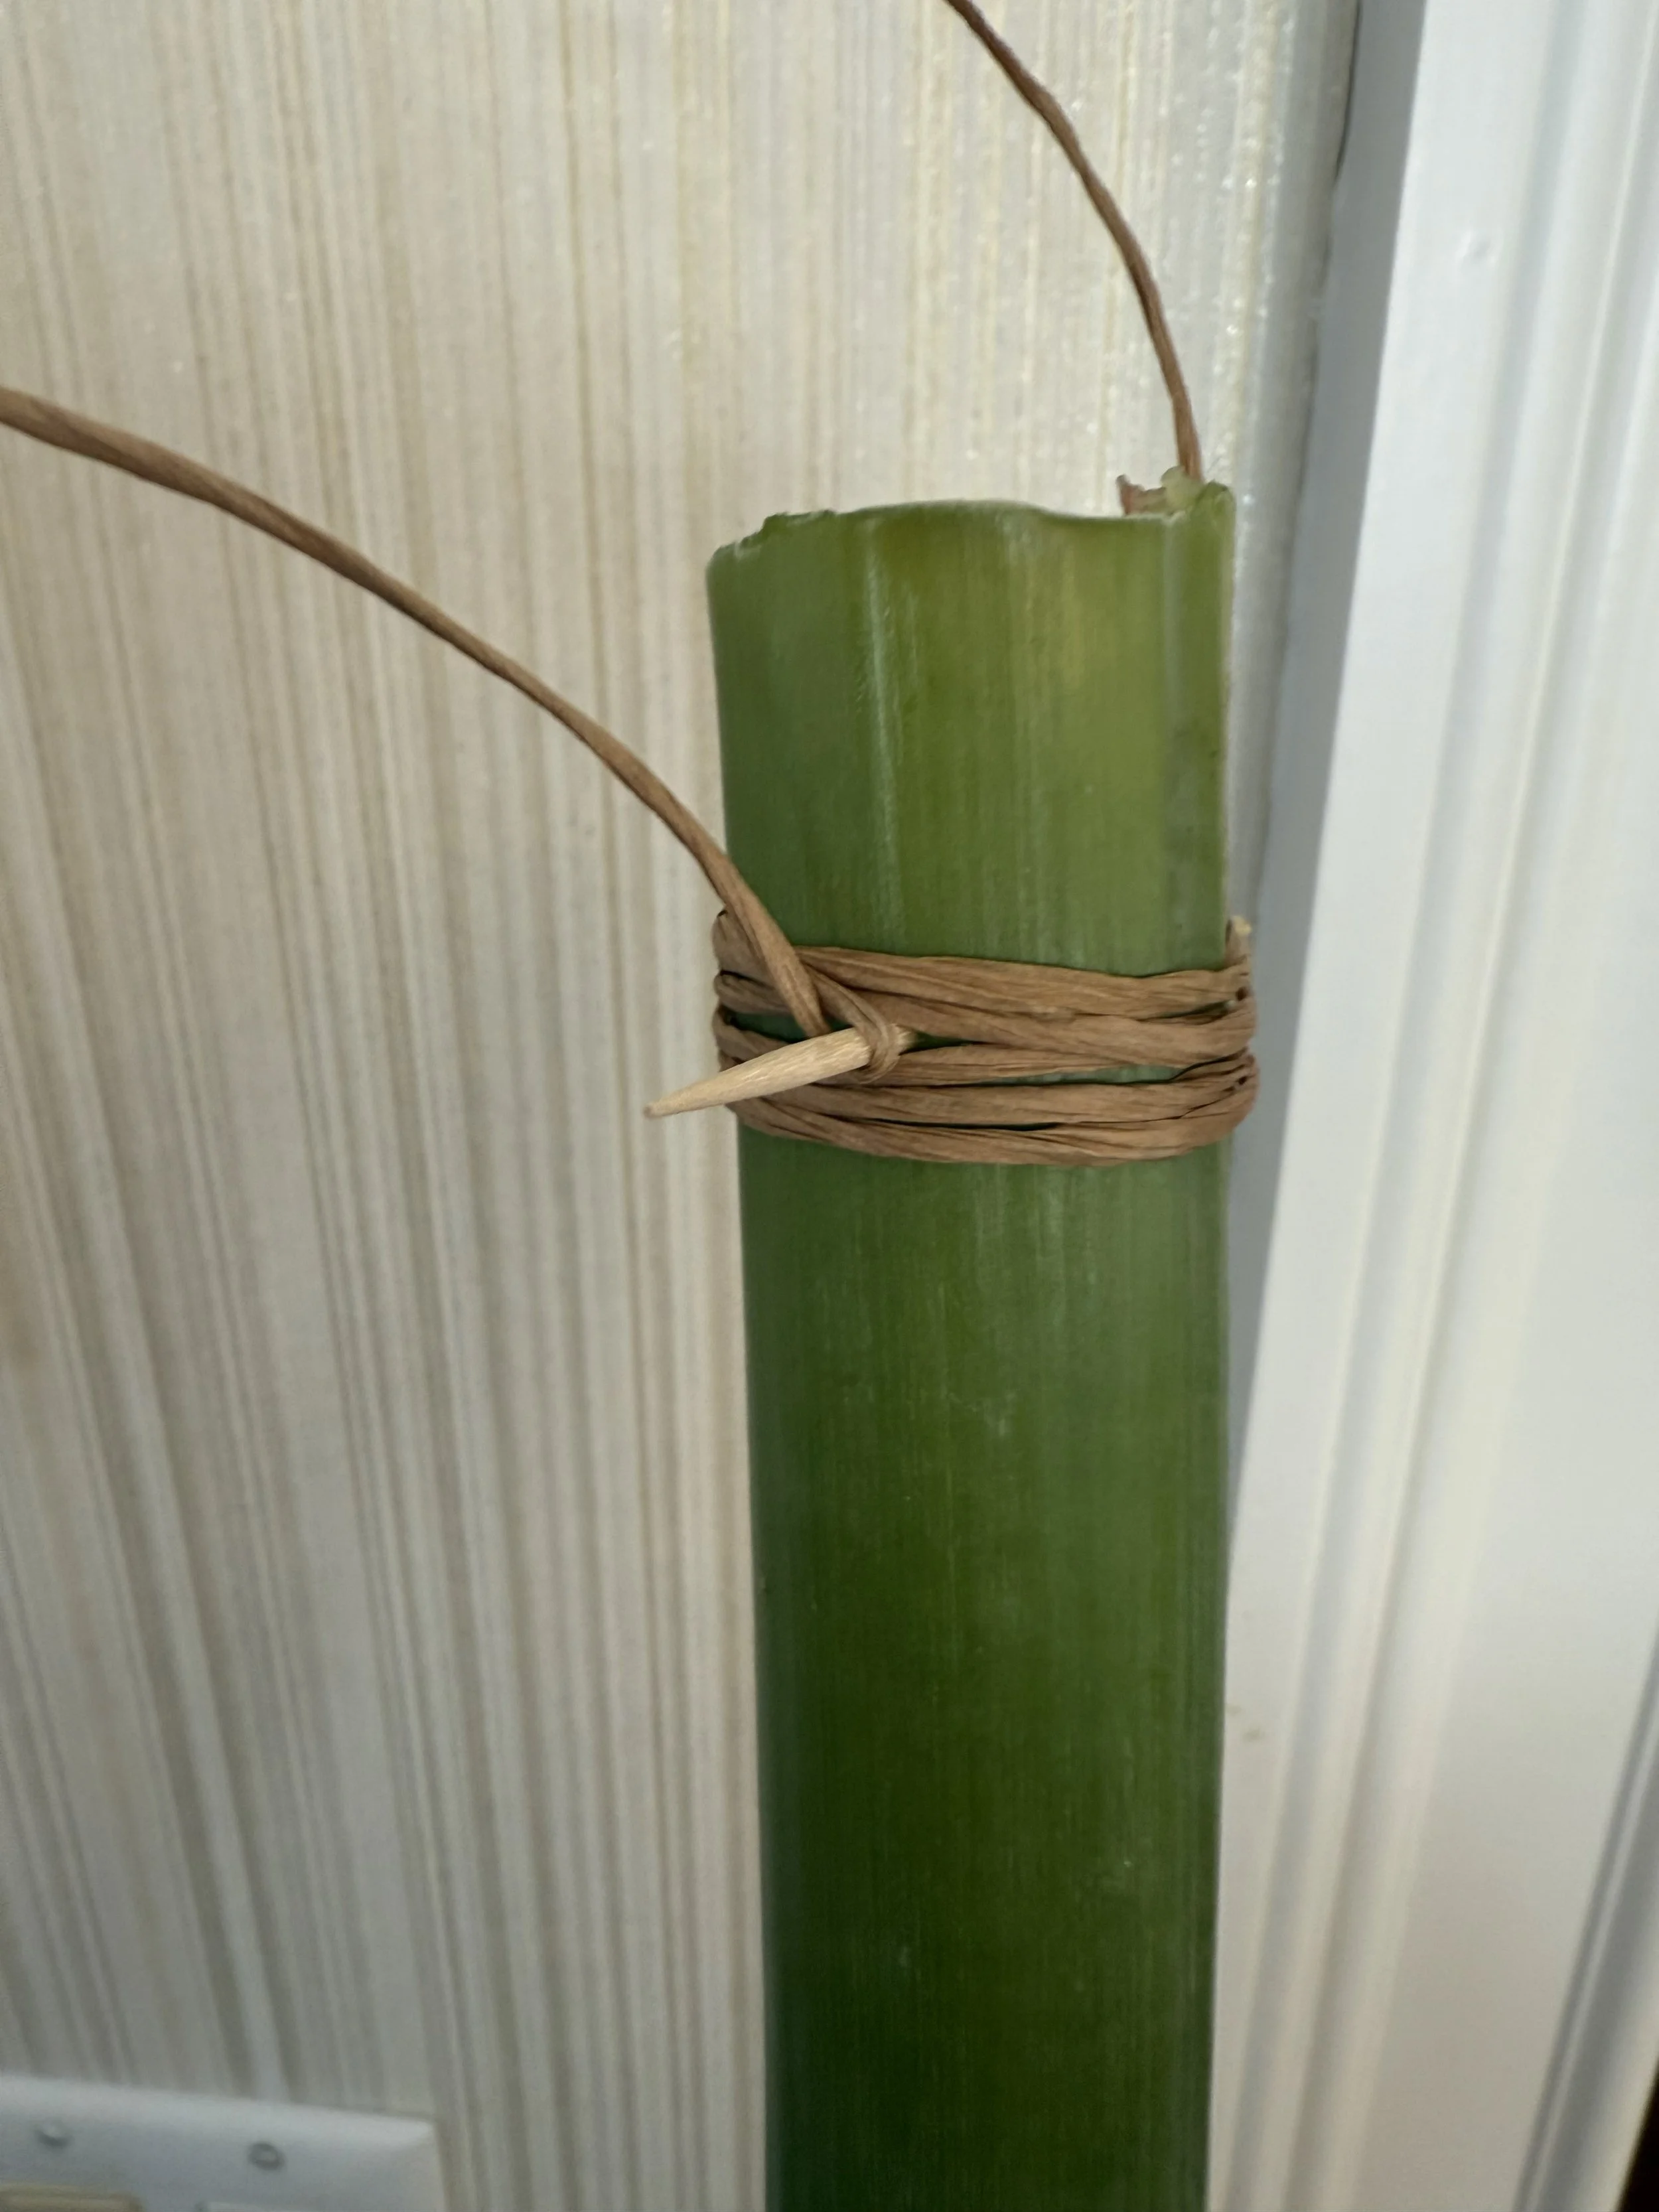
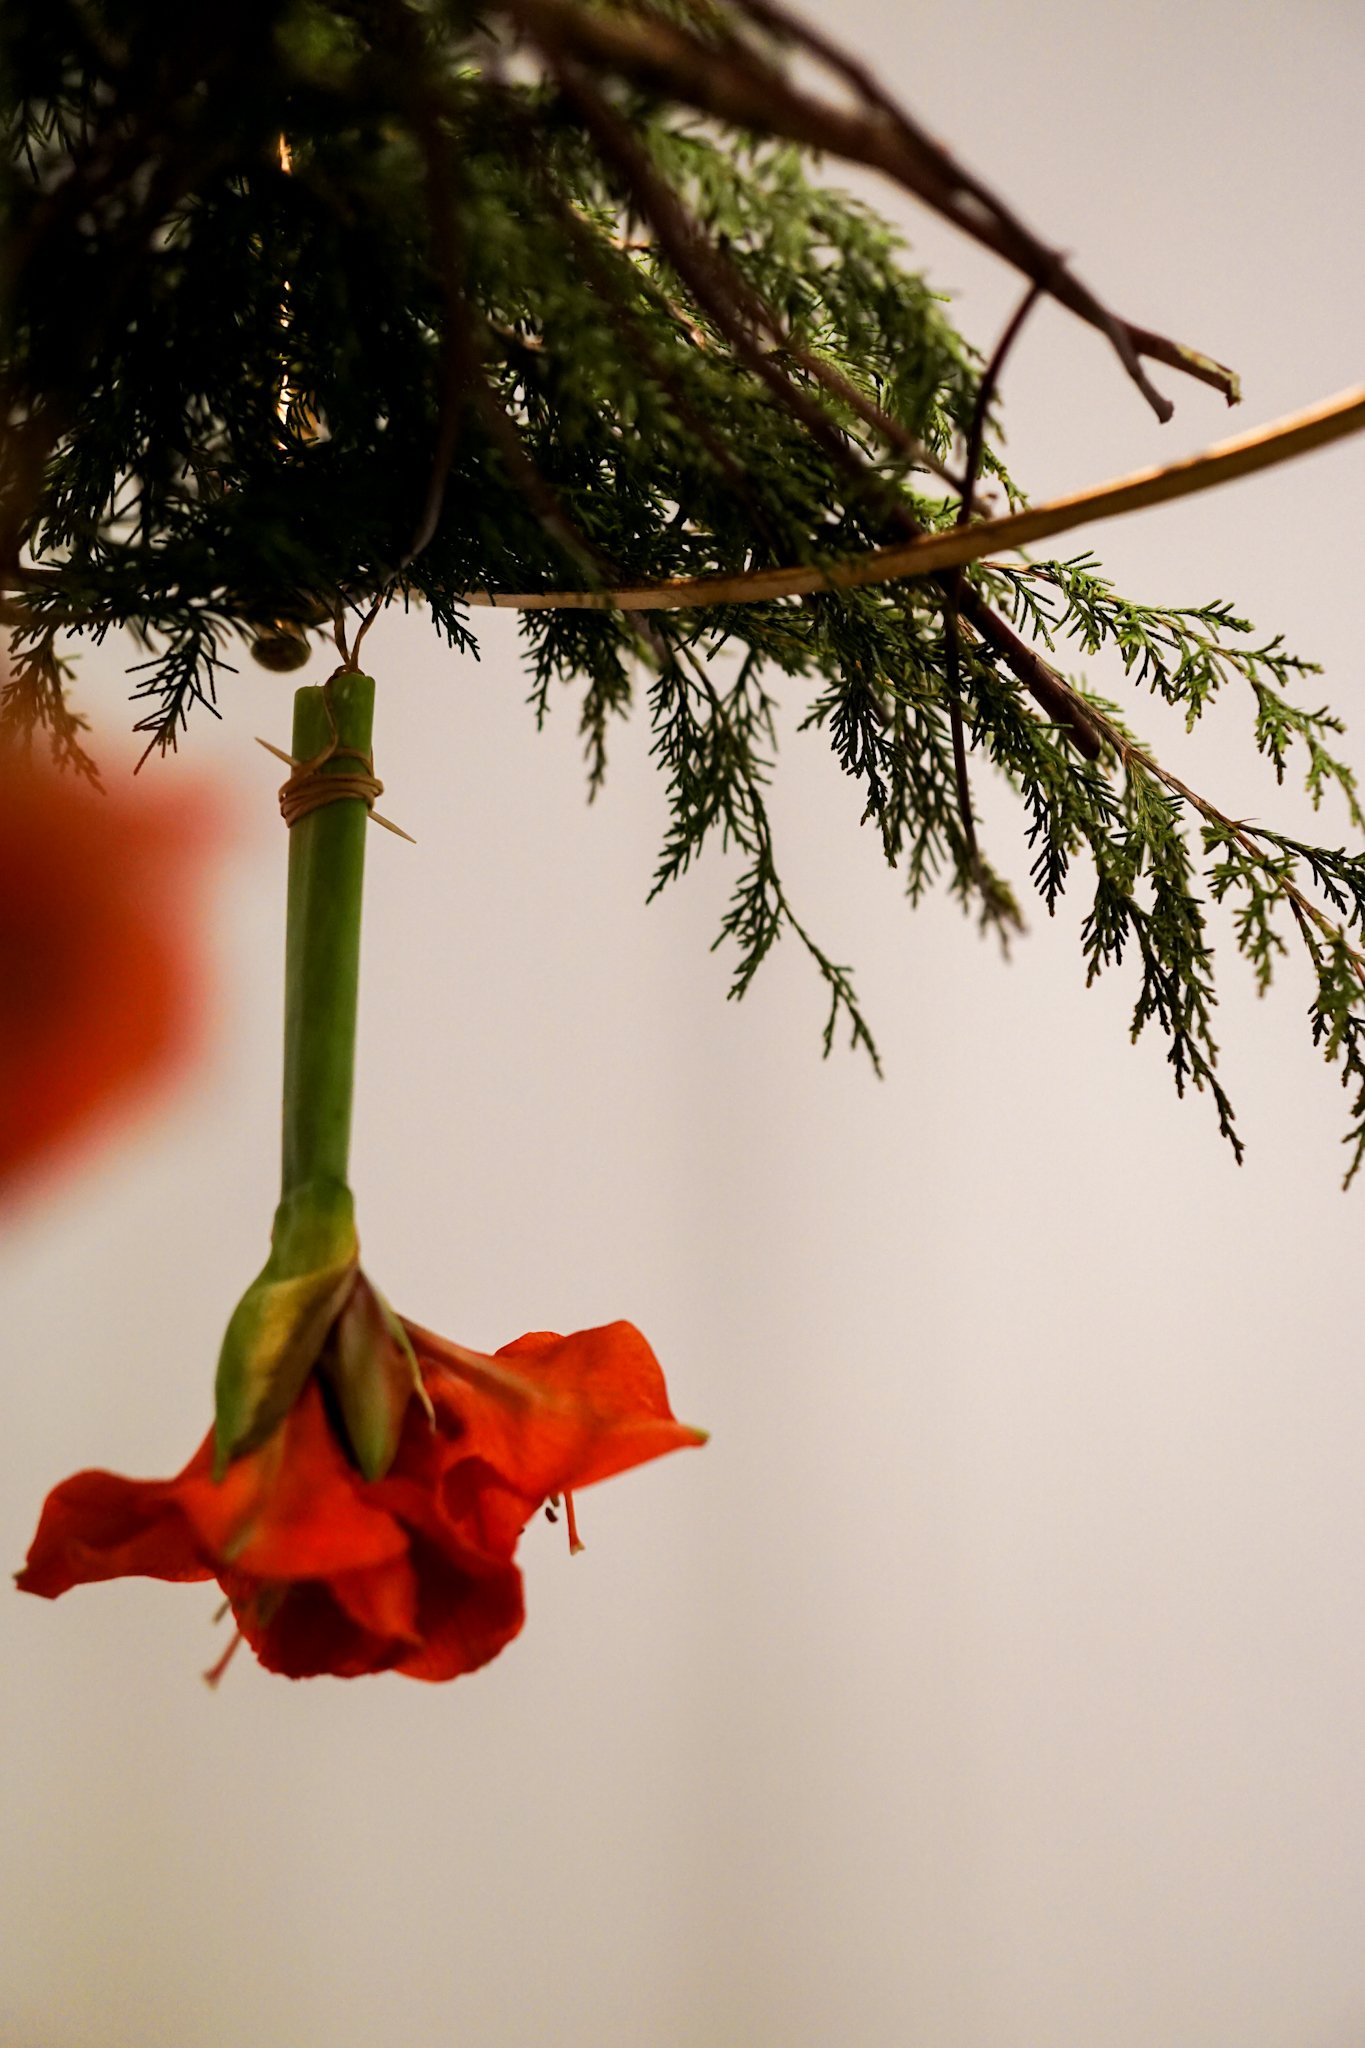
About an inch or two from the bottom of the stem, slide a toothpick through the stem.
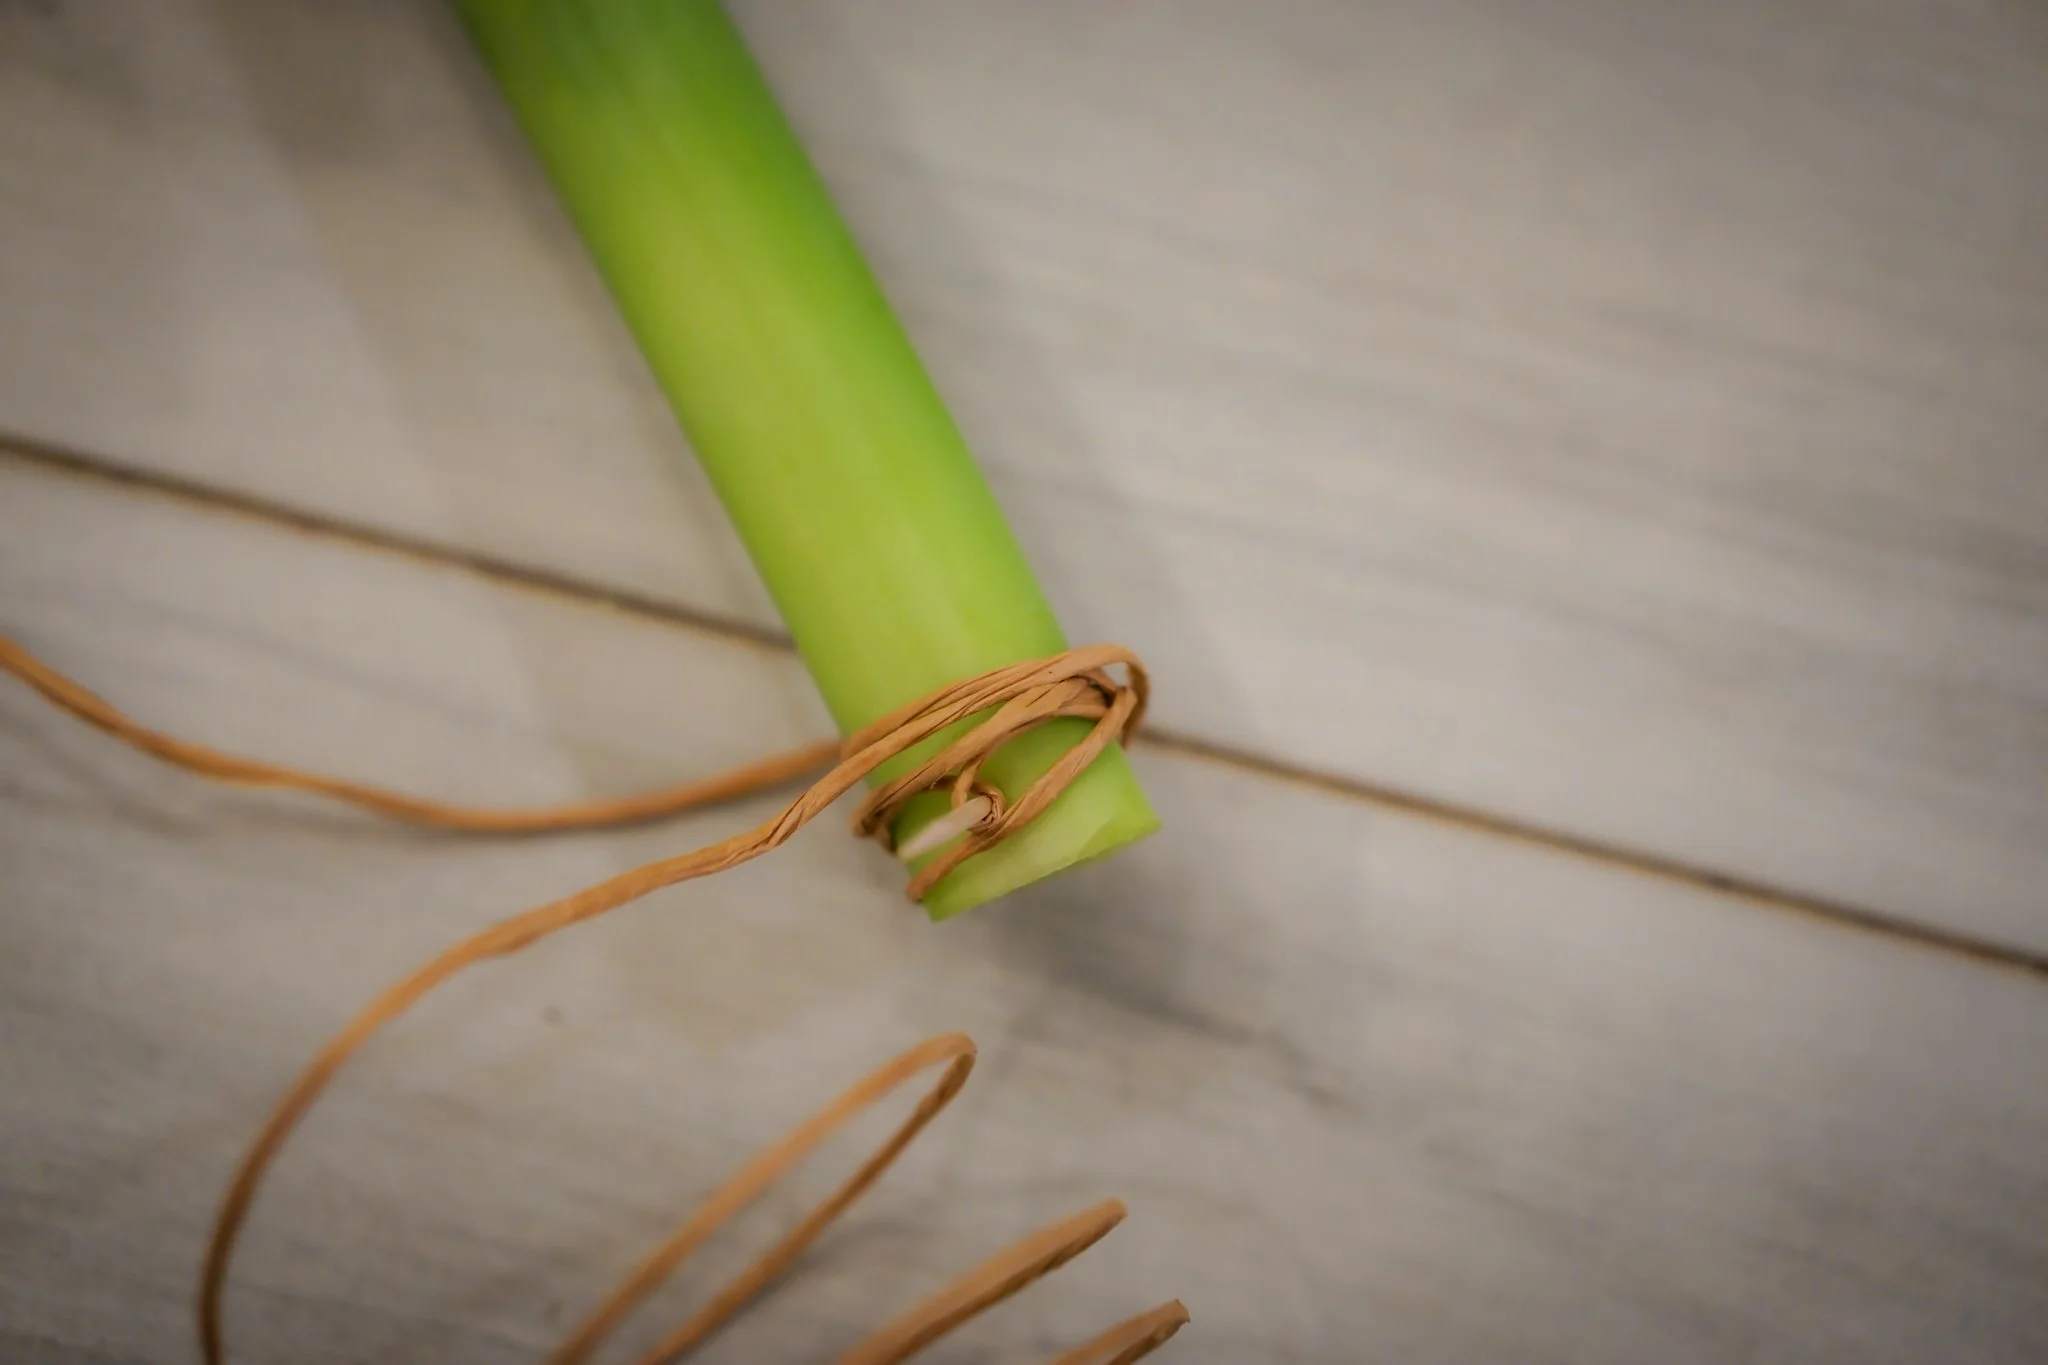
Twist your bind wire, jute, twine, or wool around the toothpick. Wrap the wire around the stem and both toothpicks to give it a good, strong anchor. Leave some room at both ends of the wire and tie them together with a knot directly hovering over the hollow opening of the stem. This way, the flower will hang straight.
Here are Maureen’s helpful photos of this process:
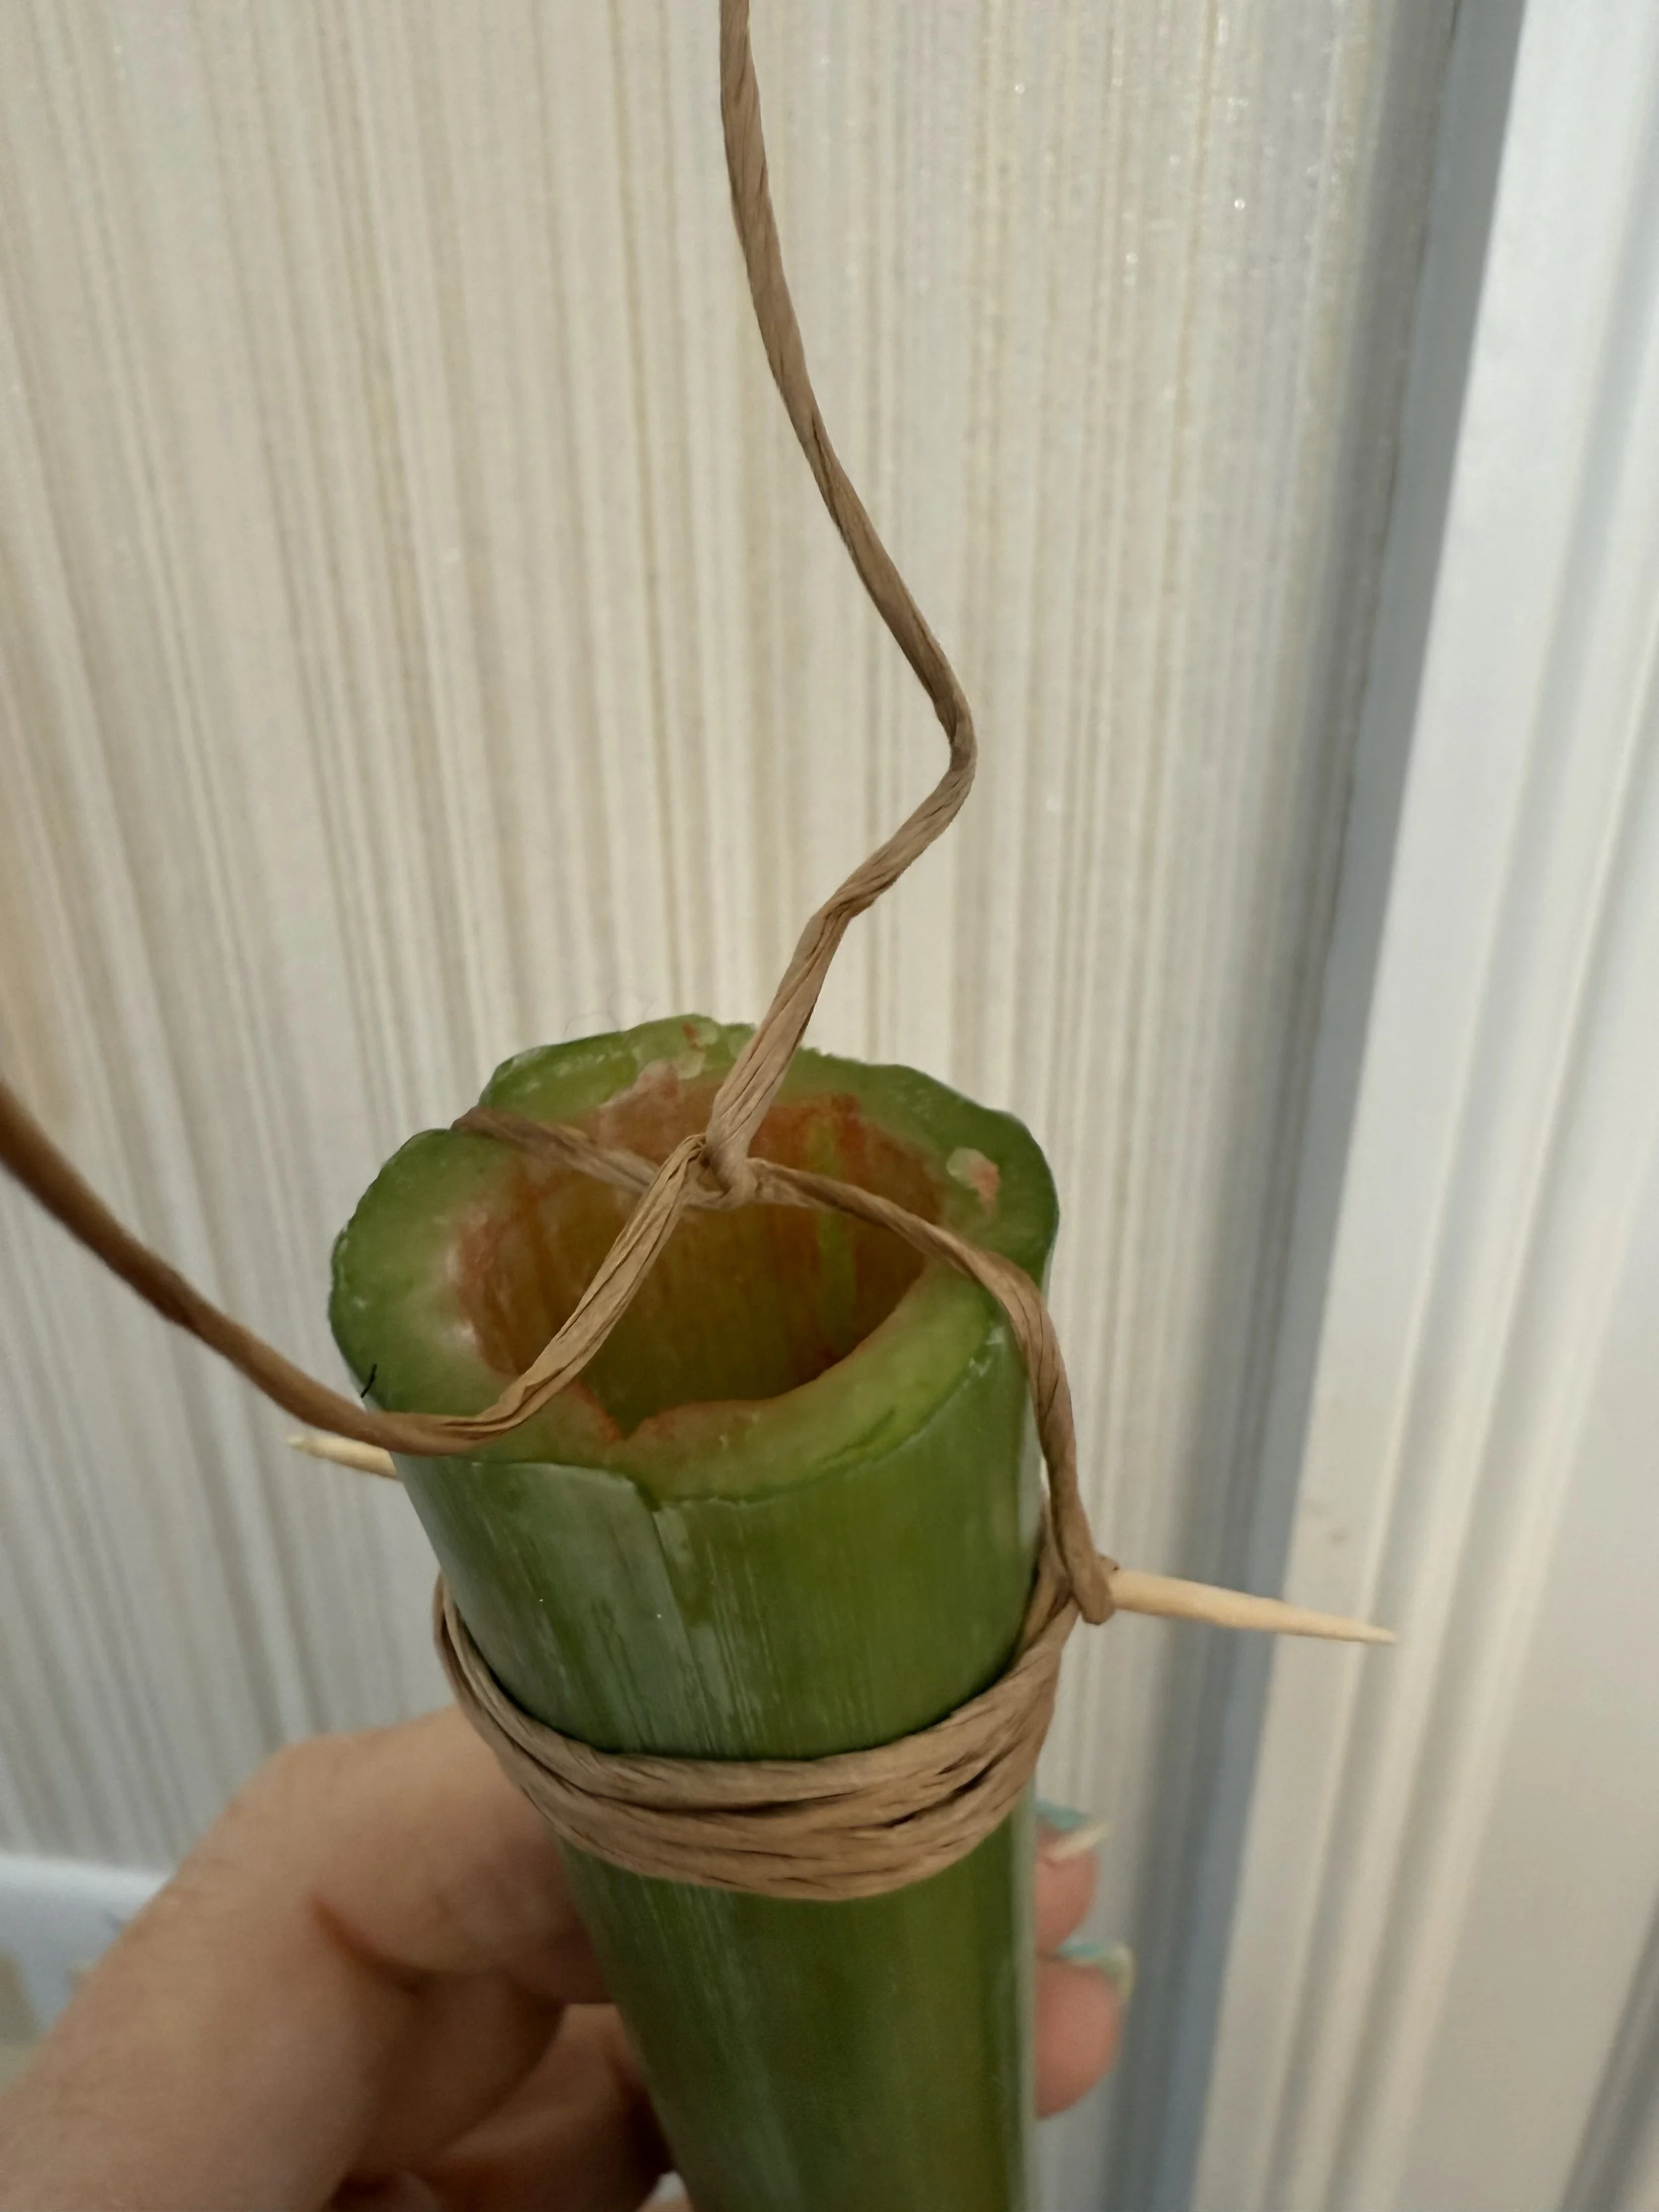
Tie the flower to a strong branch or even part of the chandelier if it’s concealed.
Repeat with other flowers until you have the arrangement you’re looking for. We pinned other, smaller flowers right to the amaryllis stem rather than using more bind wire.
Flower show judge note #1: “You’ll find using a minimum of 3 flowers/groups of varying lengths and not all on the same plane to be visually pleasing.”
Flower show judge note #2: “It’s good to try to hide the mechanics.” When you’re done wiring the flowers and before or even after hanging them (that’s us, we didn’t do this at first!), you can trim the toothpicks so that you can’t see the hanging mechanism.


Maureen’s styling. How magical with the snowy background!
Use your squeeze bottle (or peri bottle or baster!) to squeeze water into the stem of the flowers.
Step back and admire. This is stunning during the daytime, and when night descends and rooms darken, this twinkles with magic and whimsy. We absolutely love it and hope you do, too!
I don’t know about you, but I already feel like I know more simply using the phrase “bind wire”.
Have a very merry, magical Christmas to all who celebrate.


Hot chocolate brownie cookies and a quick trip down memory lane
Just in time for Christmas: an old favorite cookie recipe resurrected
Just in time for Christmas: an old favorite cookie recipe resurrected
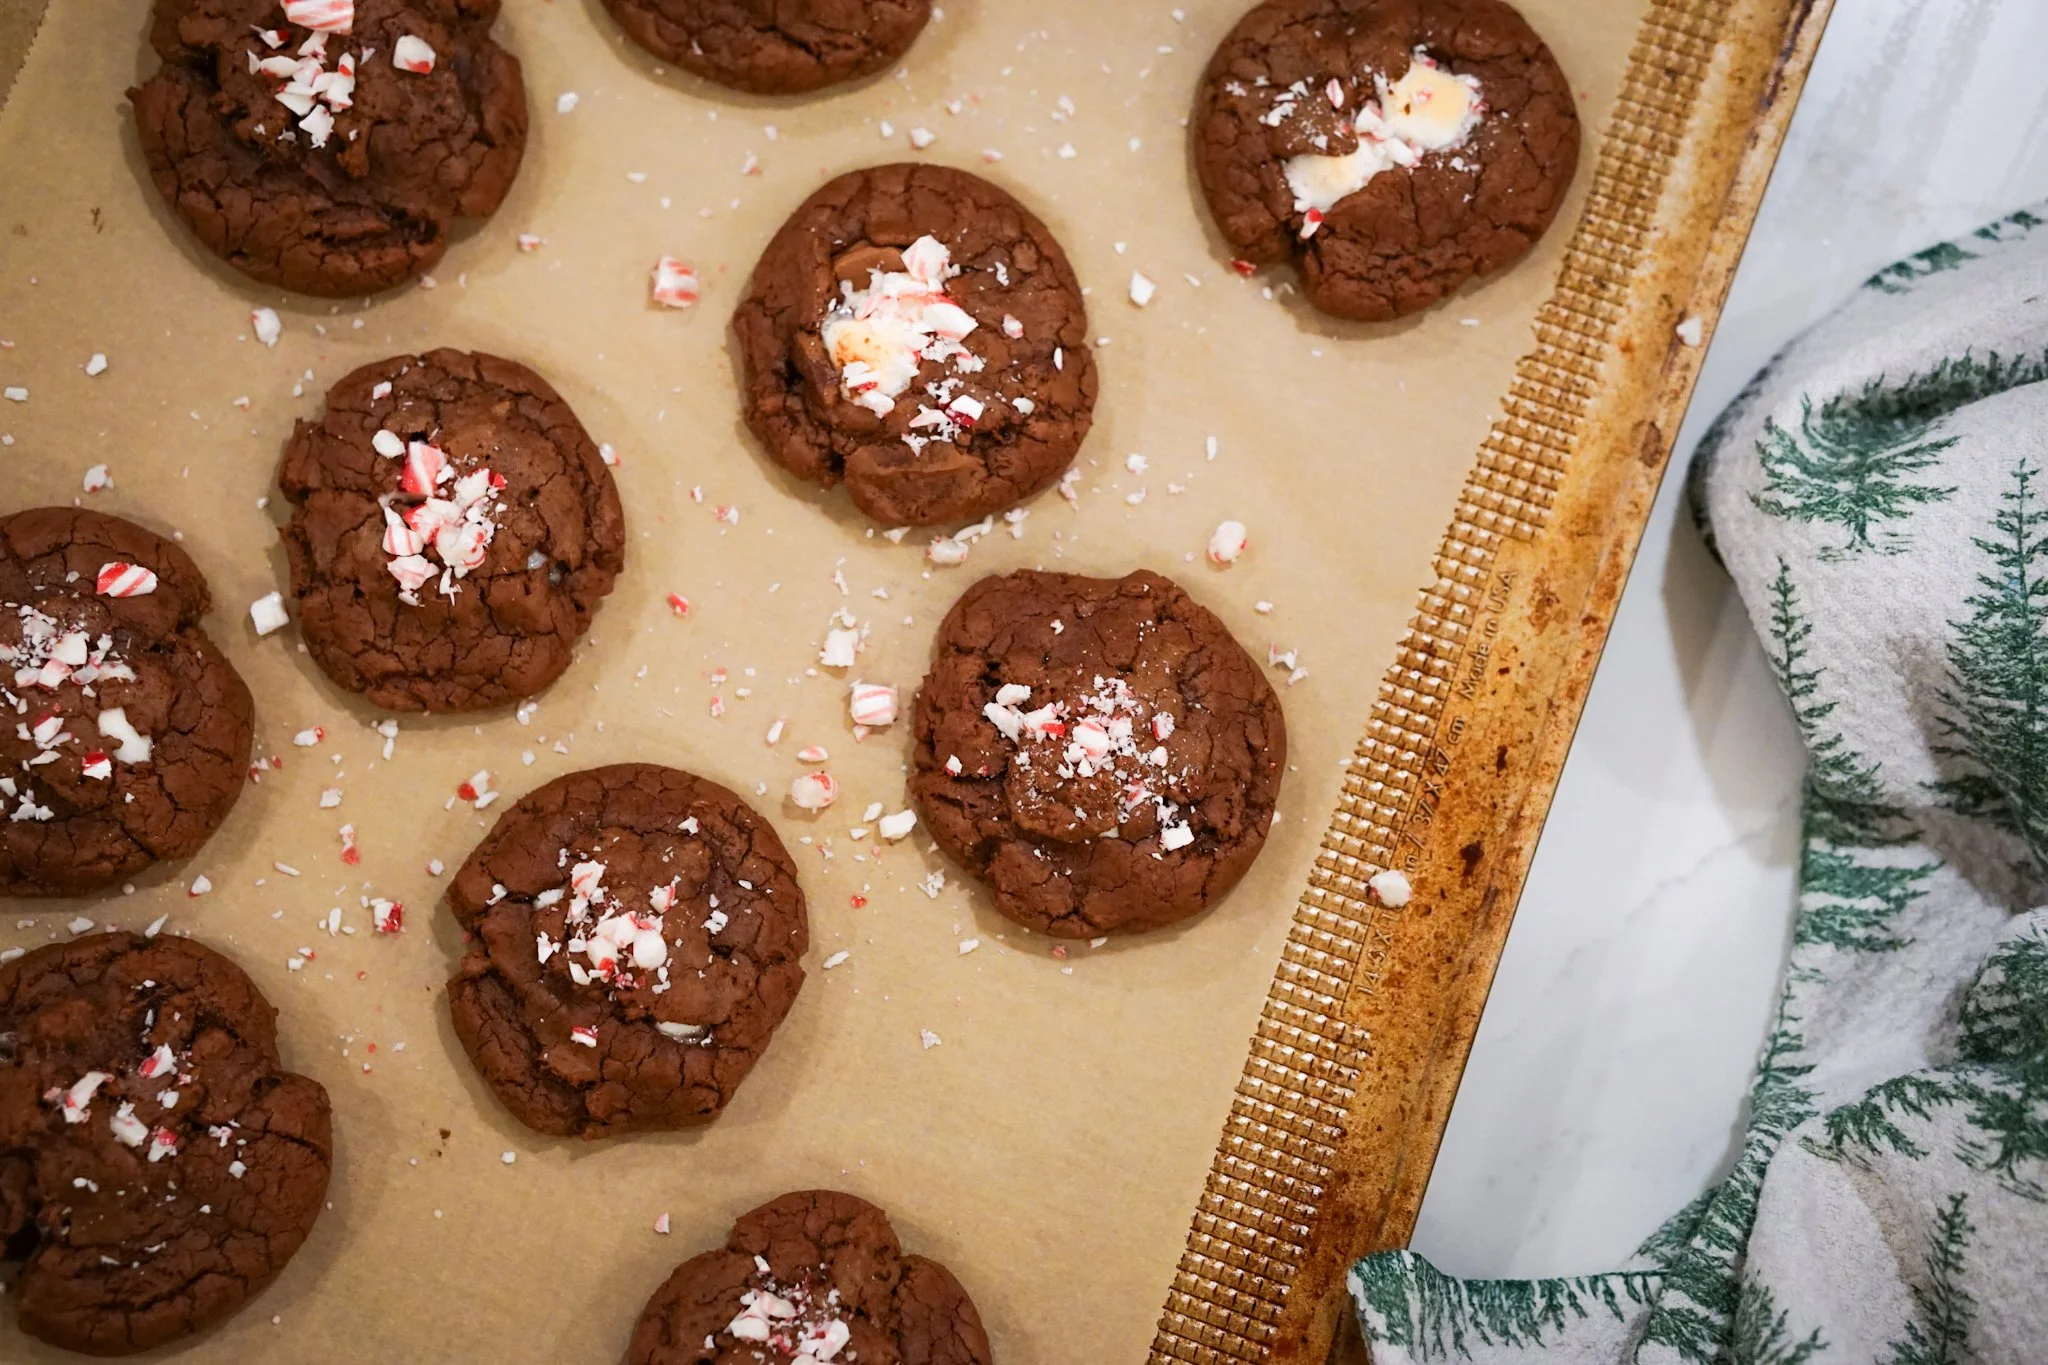
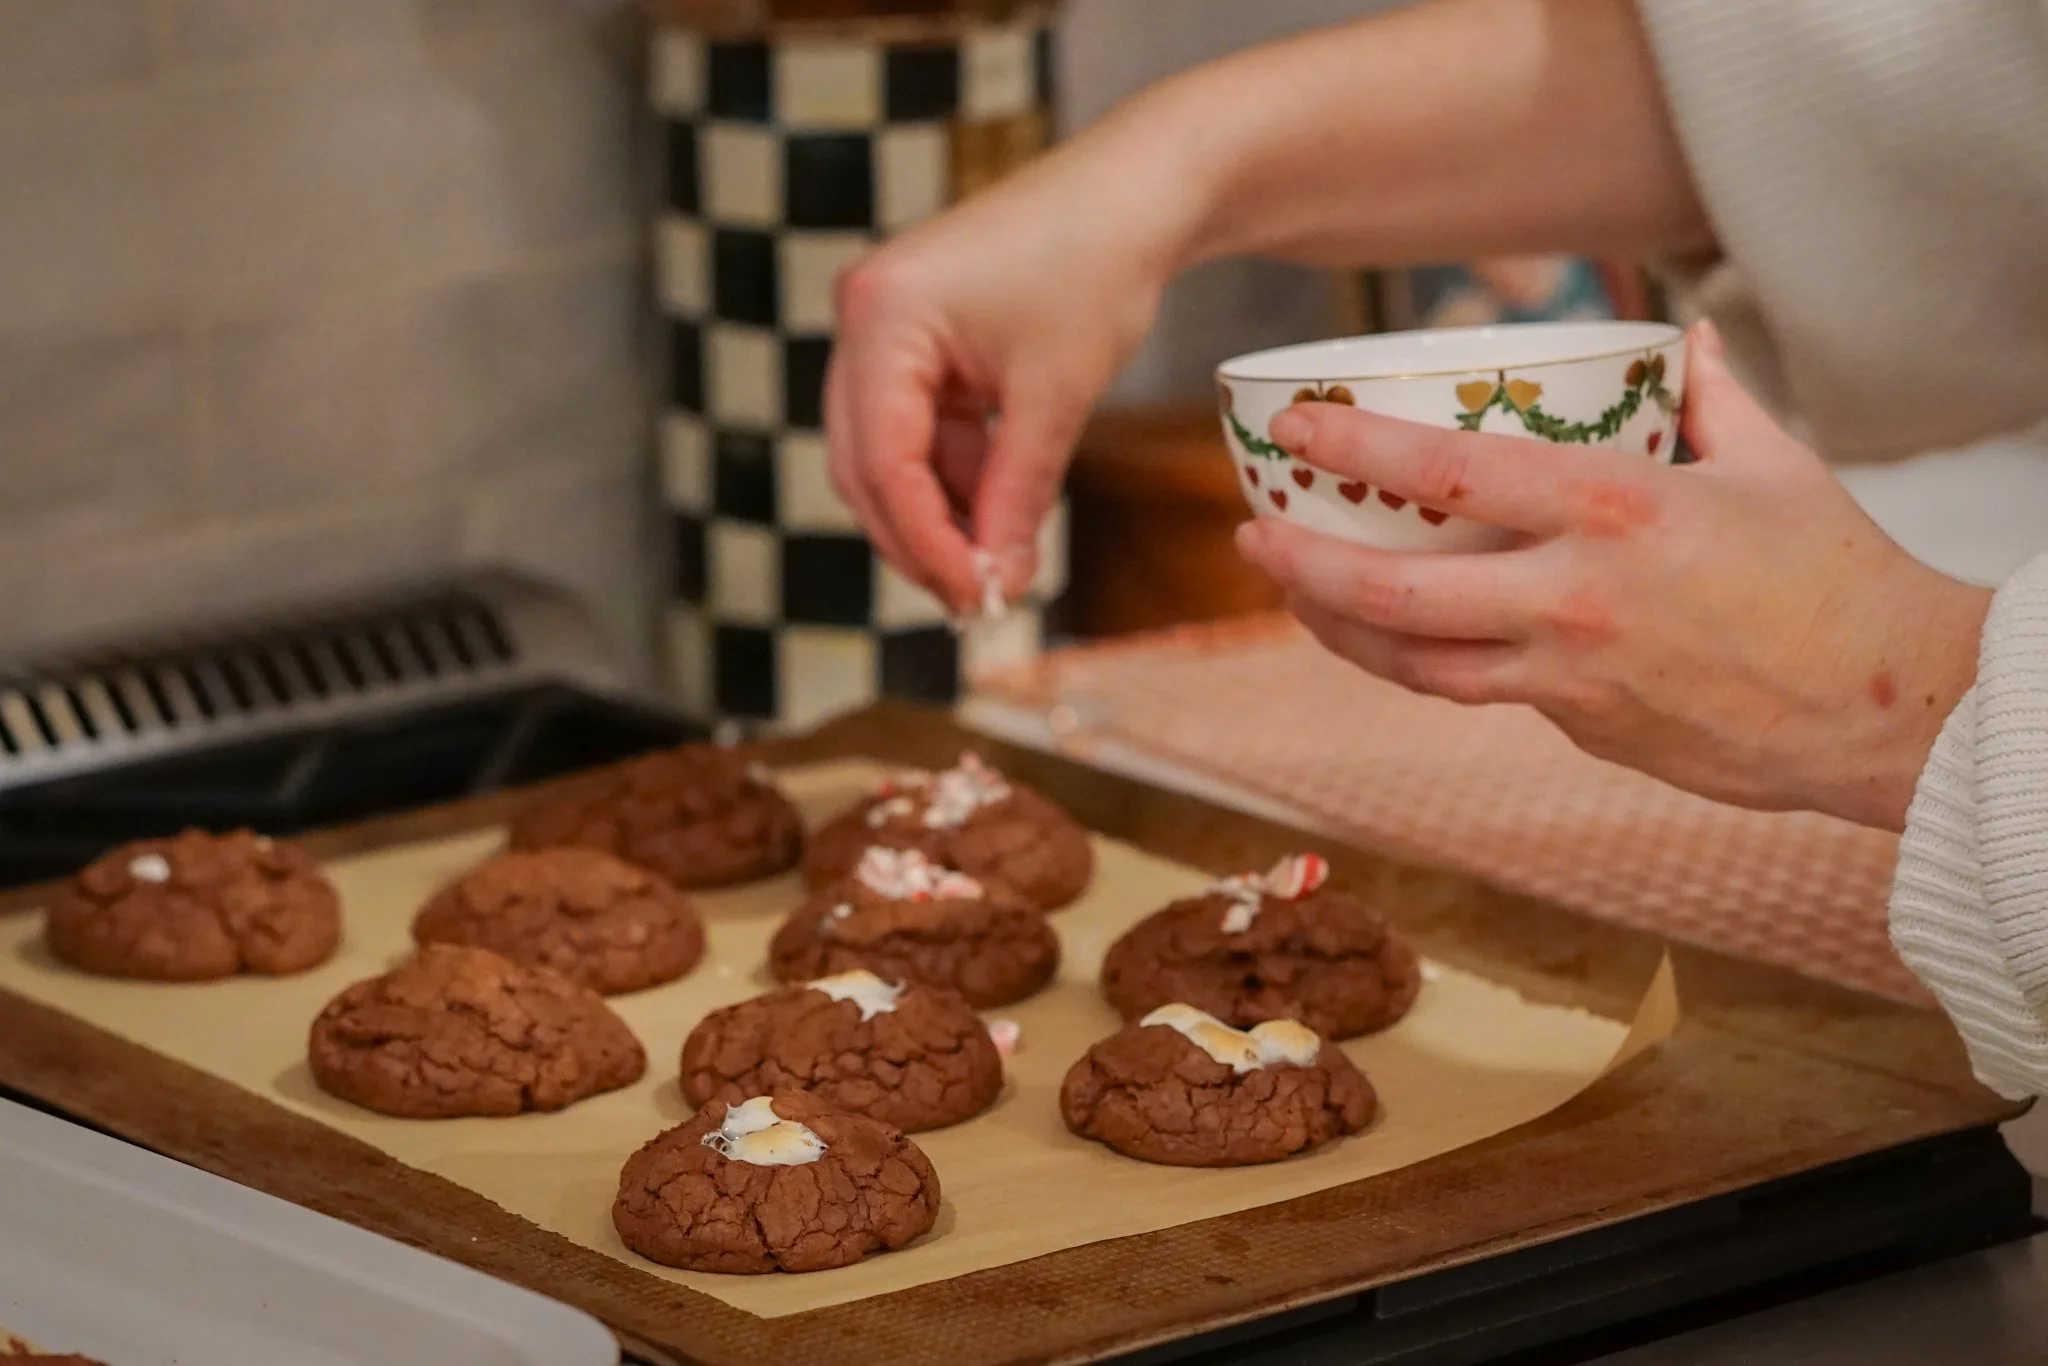
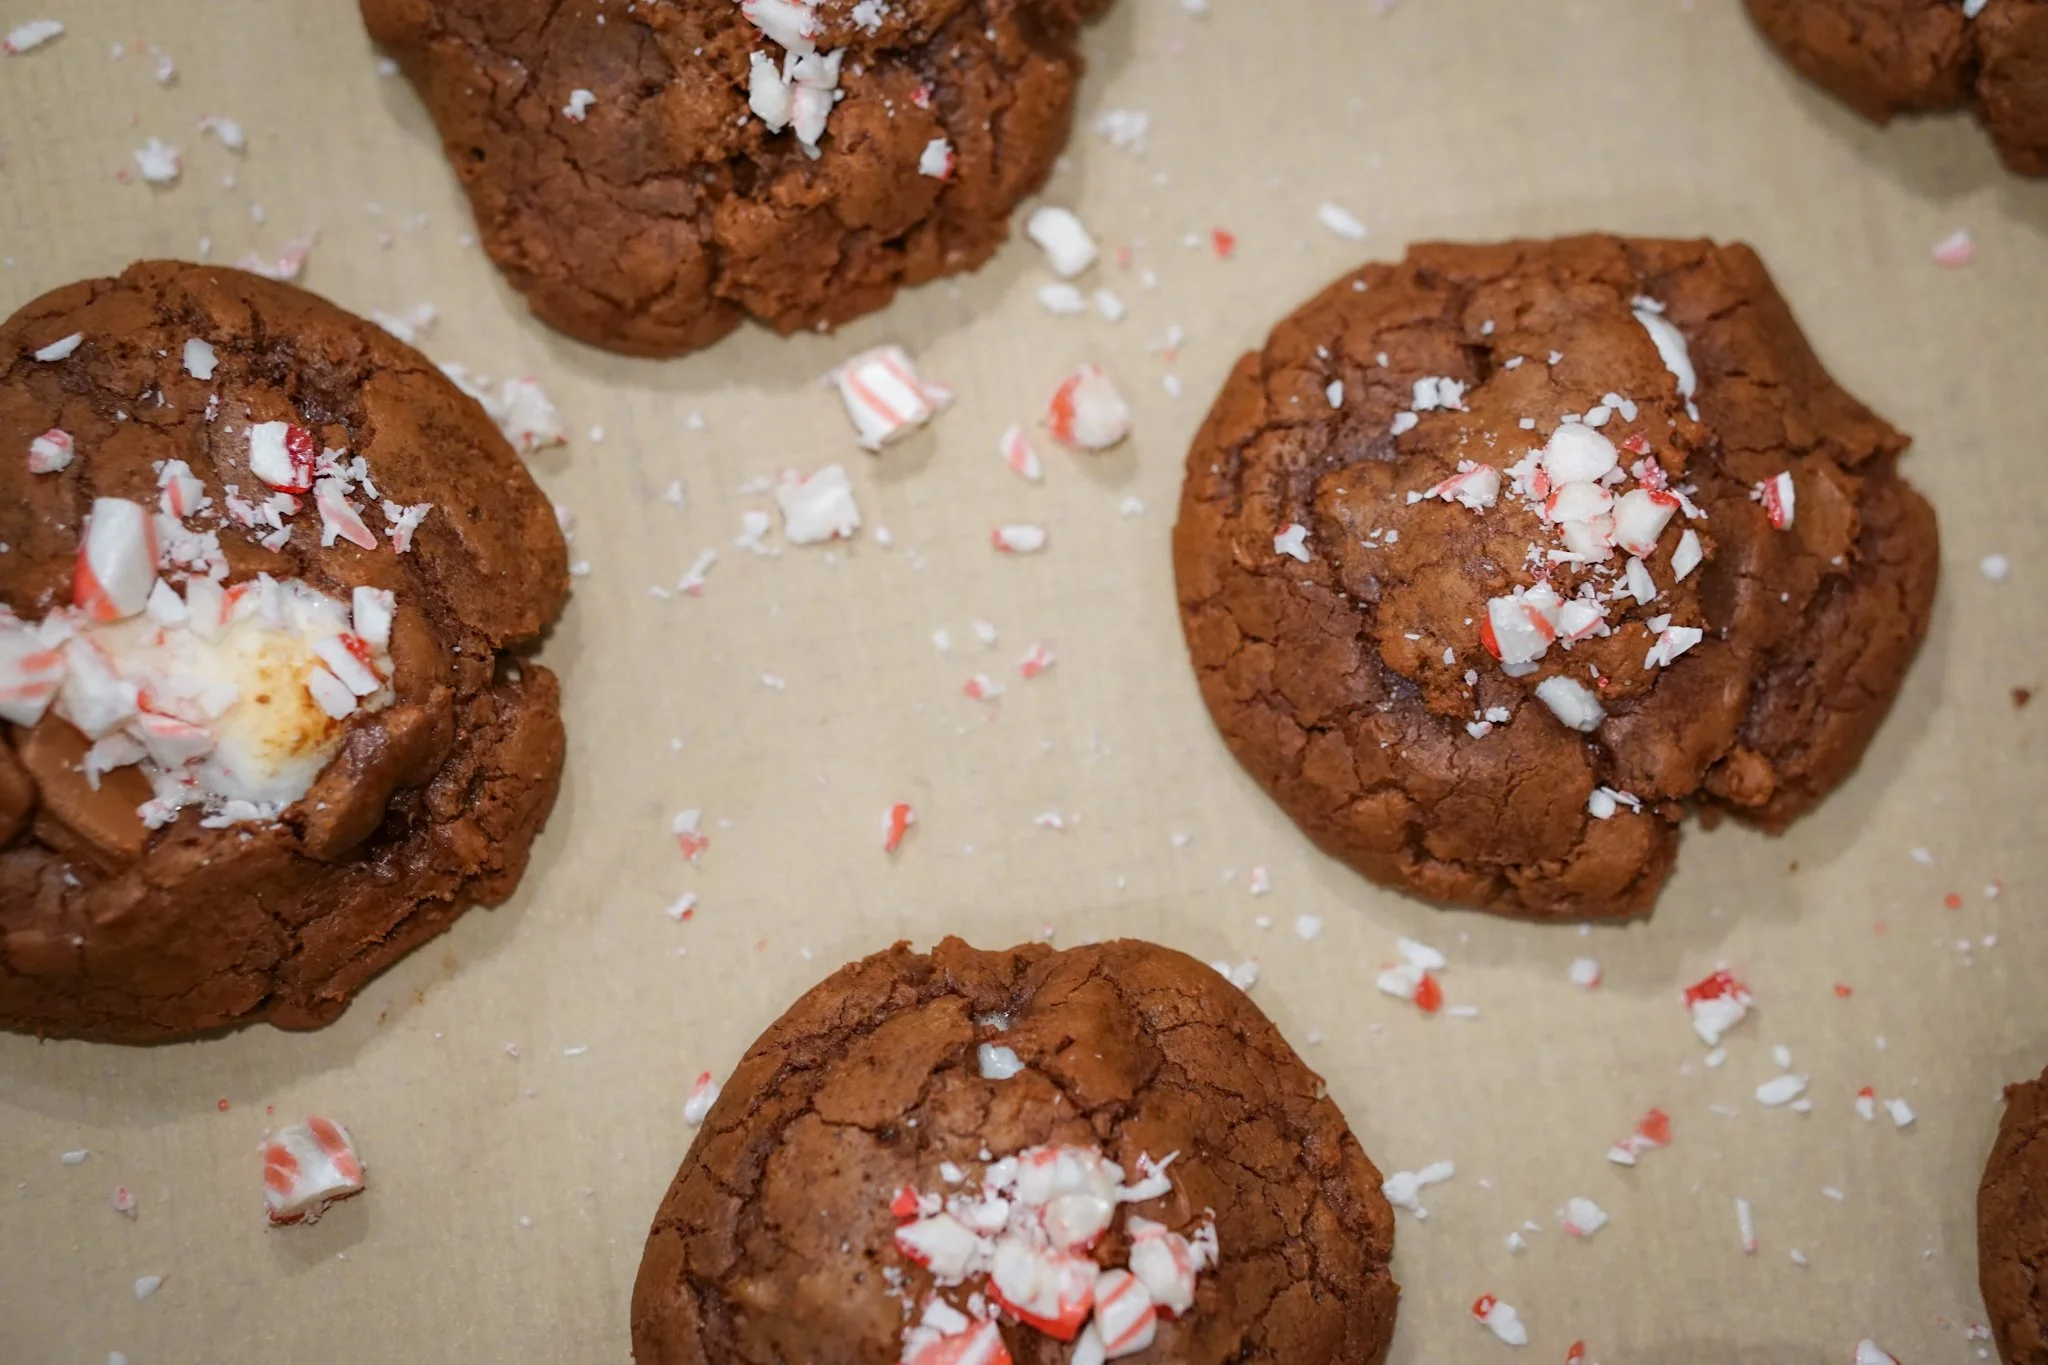
7 years ago, I created a cookie recipe that honored my lifelong love of hot chocolate. Sort of a brownie, sort of a cookie, full of hot cocoa trimmings—I loved this cookie.
One of my sisters recently asked if I still had the recipe. Digging through archived PDFs from my old blog was like reading an old diary, a time capsule from a different phase of life. On 12/17/2018, the date I posted this recipe, Tommy and I were newlyweds living in downtown Boston with one of our dogs, Ghost. It’s always funny to think back on how we spent our time before having kids—hard to precisely pinpoint and yet you typically felt busy. Everything is relative, isn’t it. We both worked long hours for the same company. Outside of work, the memories that come to mind are exploring Boston’s restaurants, having friends and family over for parties, walking Ghost in search of small patches of grass (I don’t miss that), obsessing over Game of Thrones, cooking, baking, reading physical books (I am eternally grateful for audiobooks, without which I’d never be able to keep up with as much reading as I used to), driving up north to ski, and doing puzzles—endless puzzles.
How you allot your time shifts during life. That’s normal. And while my surroundings look quite different today, I can’t help but sit here and feel that while so much can change, some things don’t change much at all. As I hover in the mental state that exists somewhere between the fog of a week-and-a-half long (and counting) relentless barage of viruses and the dazzling joy and excitement that comes in the days leading up to Christmas, I feel the space-time continuum bend just a bit (or, I like to think I do). Maybe it’s the fog, maybe it’s the excitement, or maybe it’s just simply sitting at a computer and writing, but it’s me—still me, just a girl who loves hot chocolate.
I can see 10-year-old me making hot chocolate with free Swiss Miss packets in the kitchen of my dad’s downtown Boston office on weekends. 16-year-old me making batches of hot chocolate for family using our beloved (and sadly, retired) Cocomotion machine. There’s 22-year-old me, now working in the same office as my dad, making the same hot chocolate in the same kitchens all of those years later. 27-year-old me dreaming up this recipe in my Boston apartment and writing a blog post about it. 34-year-old me sitting here recreating the recipe and reminiscing, while drinking hot chocolate almost daily with my kids*.
Okay, back to the present and off of memory lane. There’s something about the Christmas spirit and scents of the season that truly stirs up your nostalgia.
Wishing you all a healthy, merry and delicious Christmas.
xo,
Shannon
P.S. - to anyone who read my blog before, or this recipe in particular, I included a few tweaks to both style and steps. Hope you enjoy!
*Note: it feels important to point out that we have identified a “healthier” hot chocolate but still mix in good old Swiss Miss. Having kids really makes you re-evaluate ingredient labels! Also, with the retirement of our old Cocomotion machine, we now have something called the “Velvetiser” by Hotel Chocolat which makes small batches but we love it.
Hot Chocolate Brownie Cookies
recipe makes 16-20 cookies
If I picture my perfect cup of hot chocolate, this is what I see: the cocoa itself, whipped cream, and marshmallows. If I were going all out, I’d add a mini candy cane and maybe some chocolate shavings. This recipe attempts to incorporate all of this, minus the whipped cream. Everyone has their own idea of the perfect hot chocolate, though, so modify it however you’d like. If you’re not a fan of marshmallows, maybe tuck in some white chocolate chunks instead when you get to that step. If you don’t love candy canes, skip that step or sprinkle on some flake salt. As I said in my 2018 blog post, “if you don’t like chocolate, why are you here?” This cookie recipe won at least one office Christmas cookie contest—I hope it brings you a little joy and a moment of decadence.
Ingredients
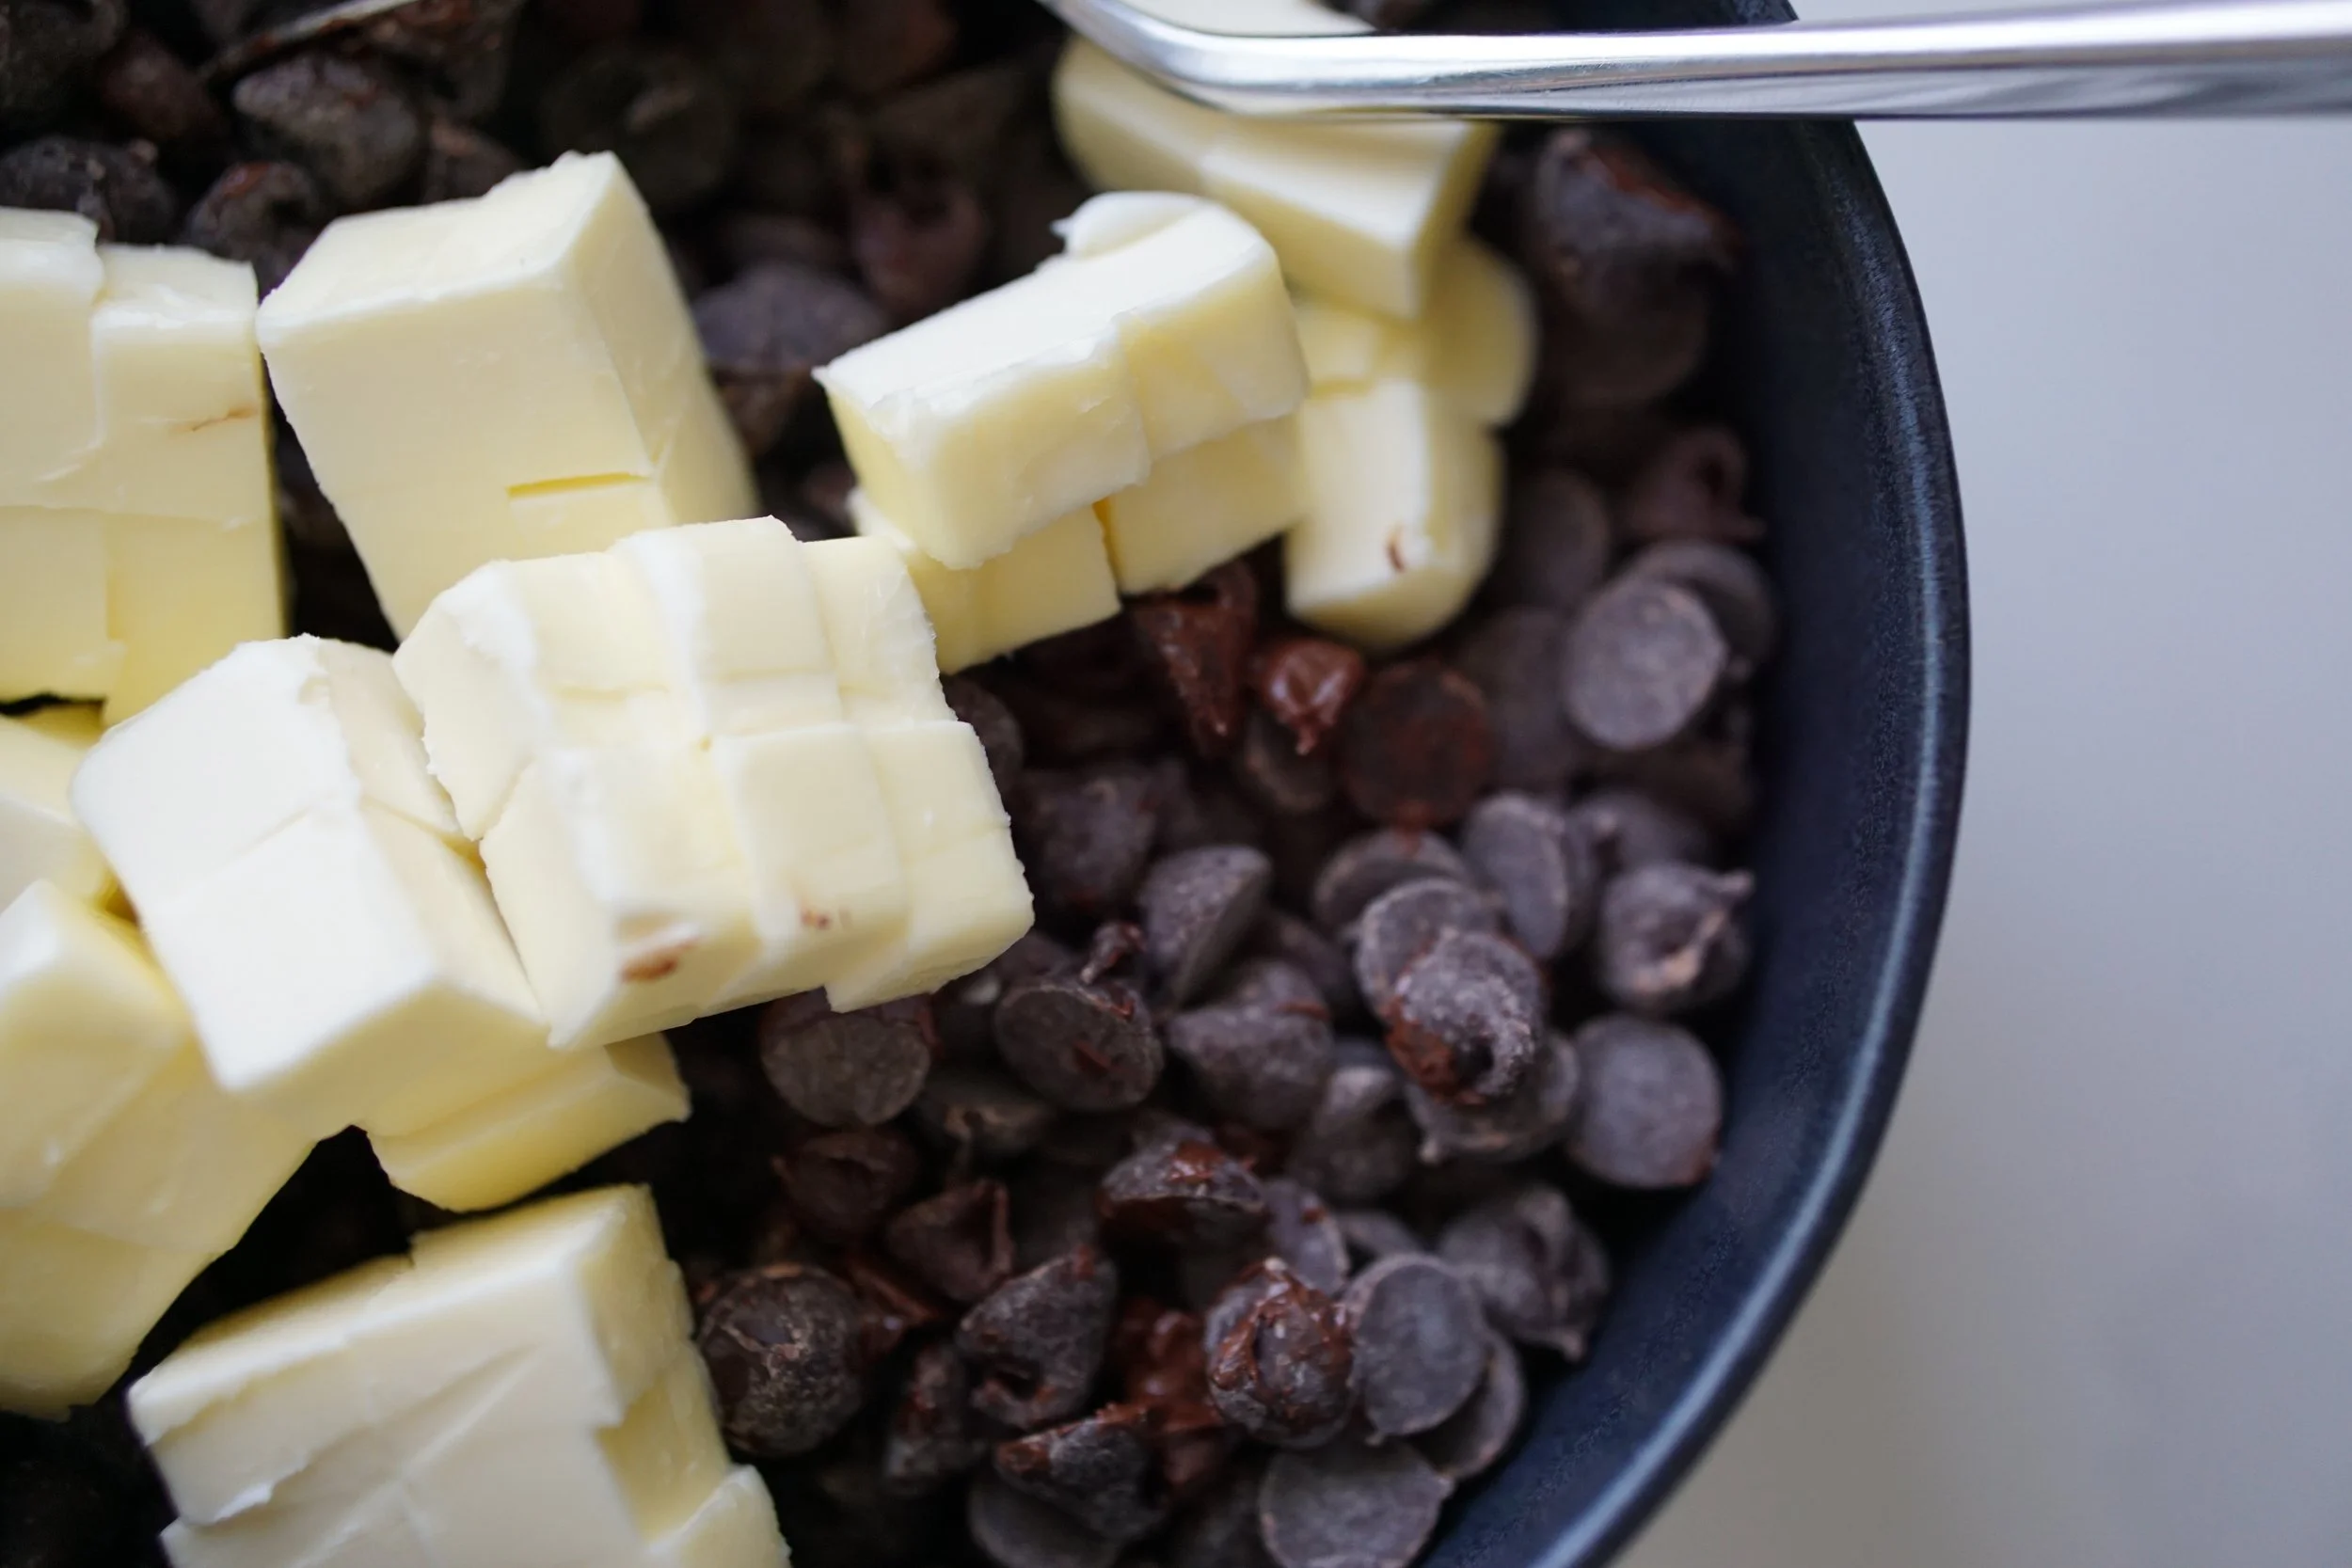
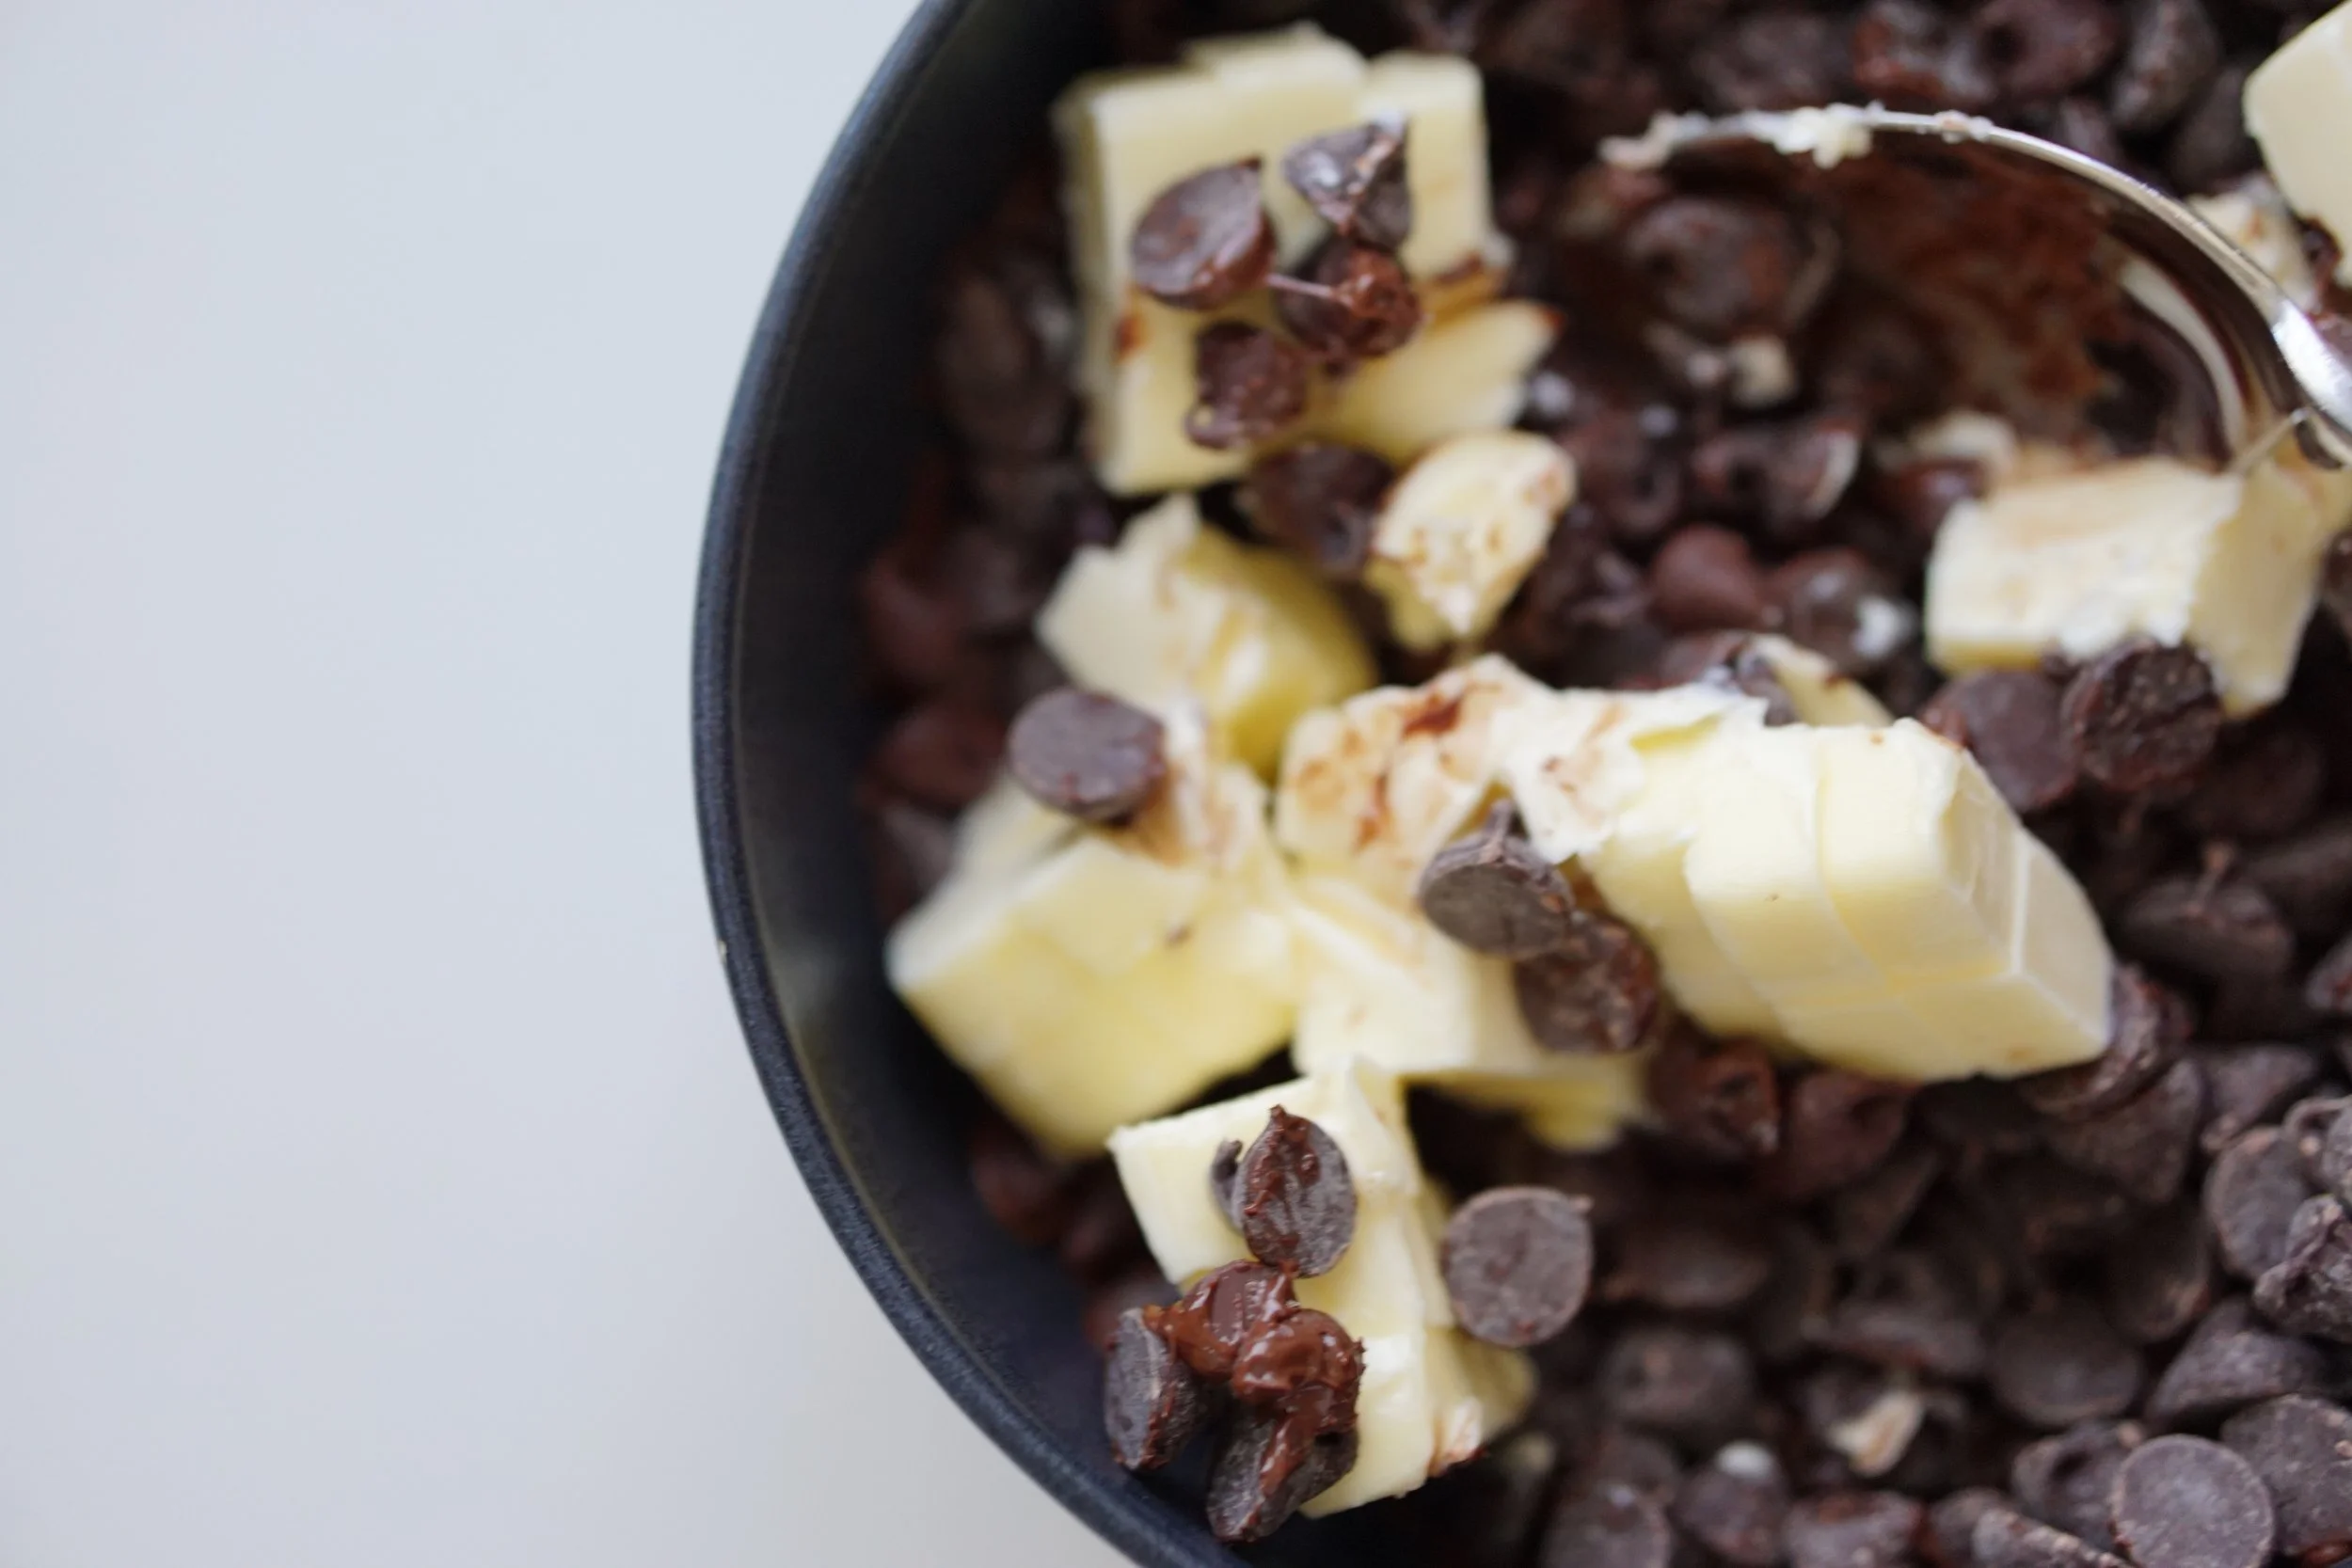
12oz bag of semi-sweet chocolate chips
1/2 cup of butter, cubed
1 cup all purpose flour
1 teaspoon cornstarch
1/2 teaspoon baking powder
1/2 teaspoon salt (fine sea salt or Kosher)
1/4 cup cocoa powder
1 cup brown sugar
2 eggs
1 egg yolk
1/4 cup maple syrup
1.5 teaspoons vanilla extract
1 tablespoon water
“Hot Chocolate” toppings:
Mini marshmallows, about 1/2 cup to 3/4 cup
Your favorite eating chocolate, roughly chopped - roughly 1/4 cup to 1/2 cup. Our favorite here is Lindt milk chocolate
A few candy canes, crushed
1. Preheat your oven to 350ºF. Take your eggs out to get to room temperature about 30 minutes prior to baking. Put your mini marshmallows in the freezer.
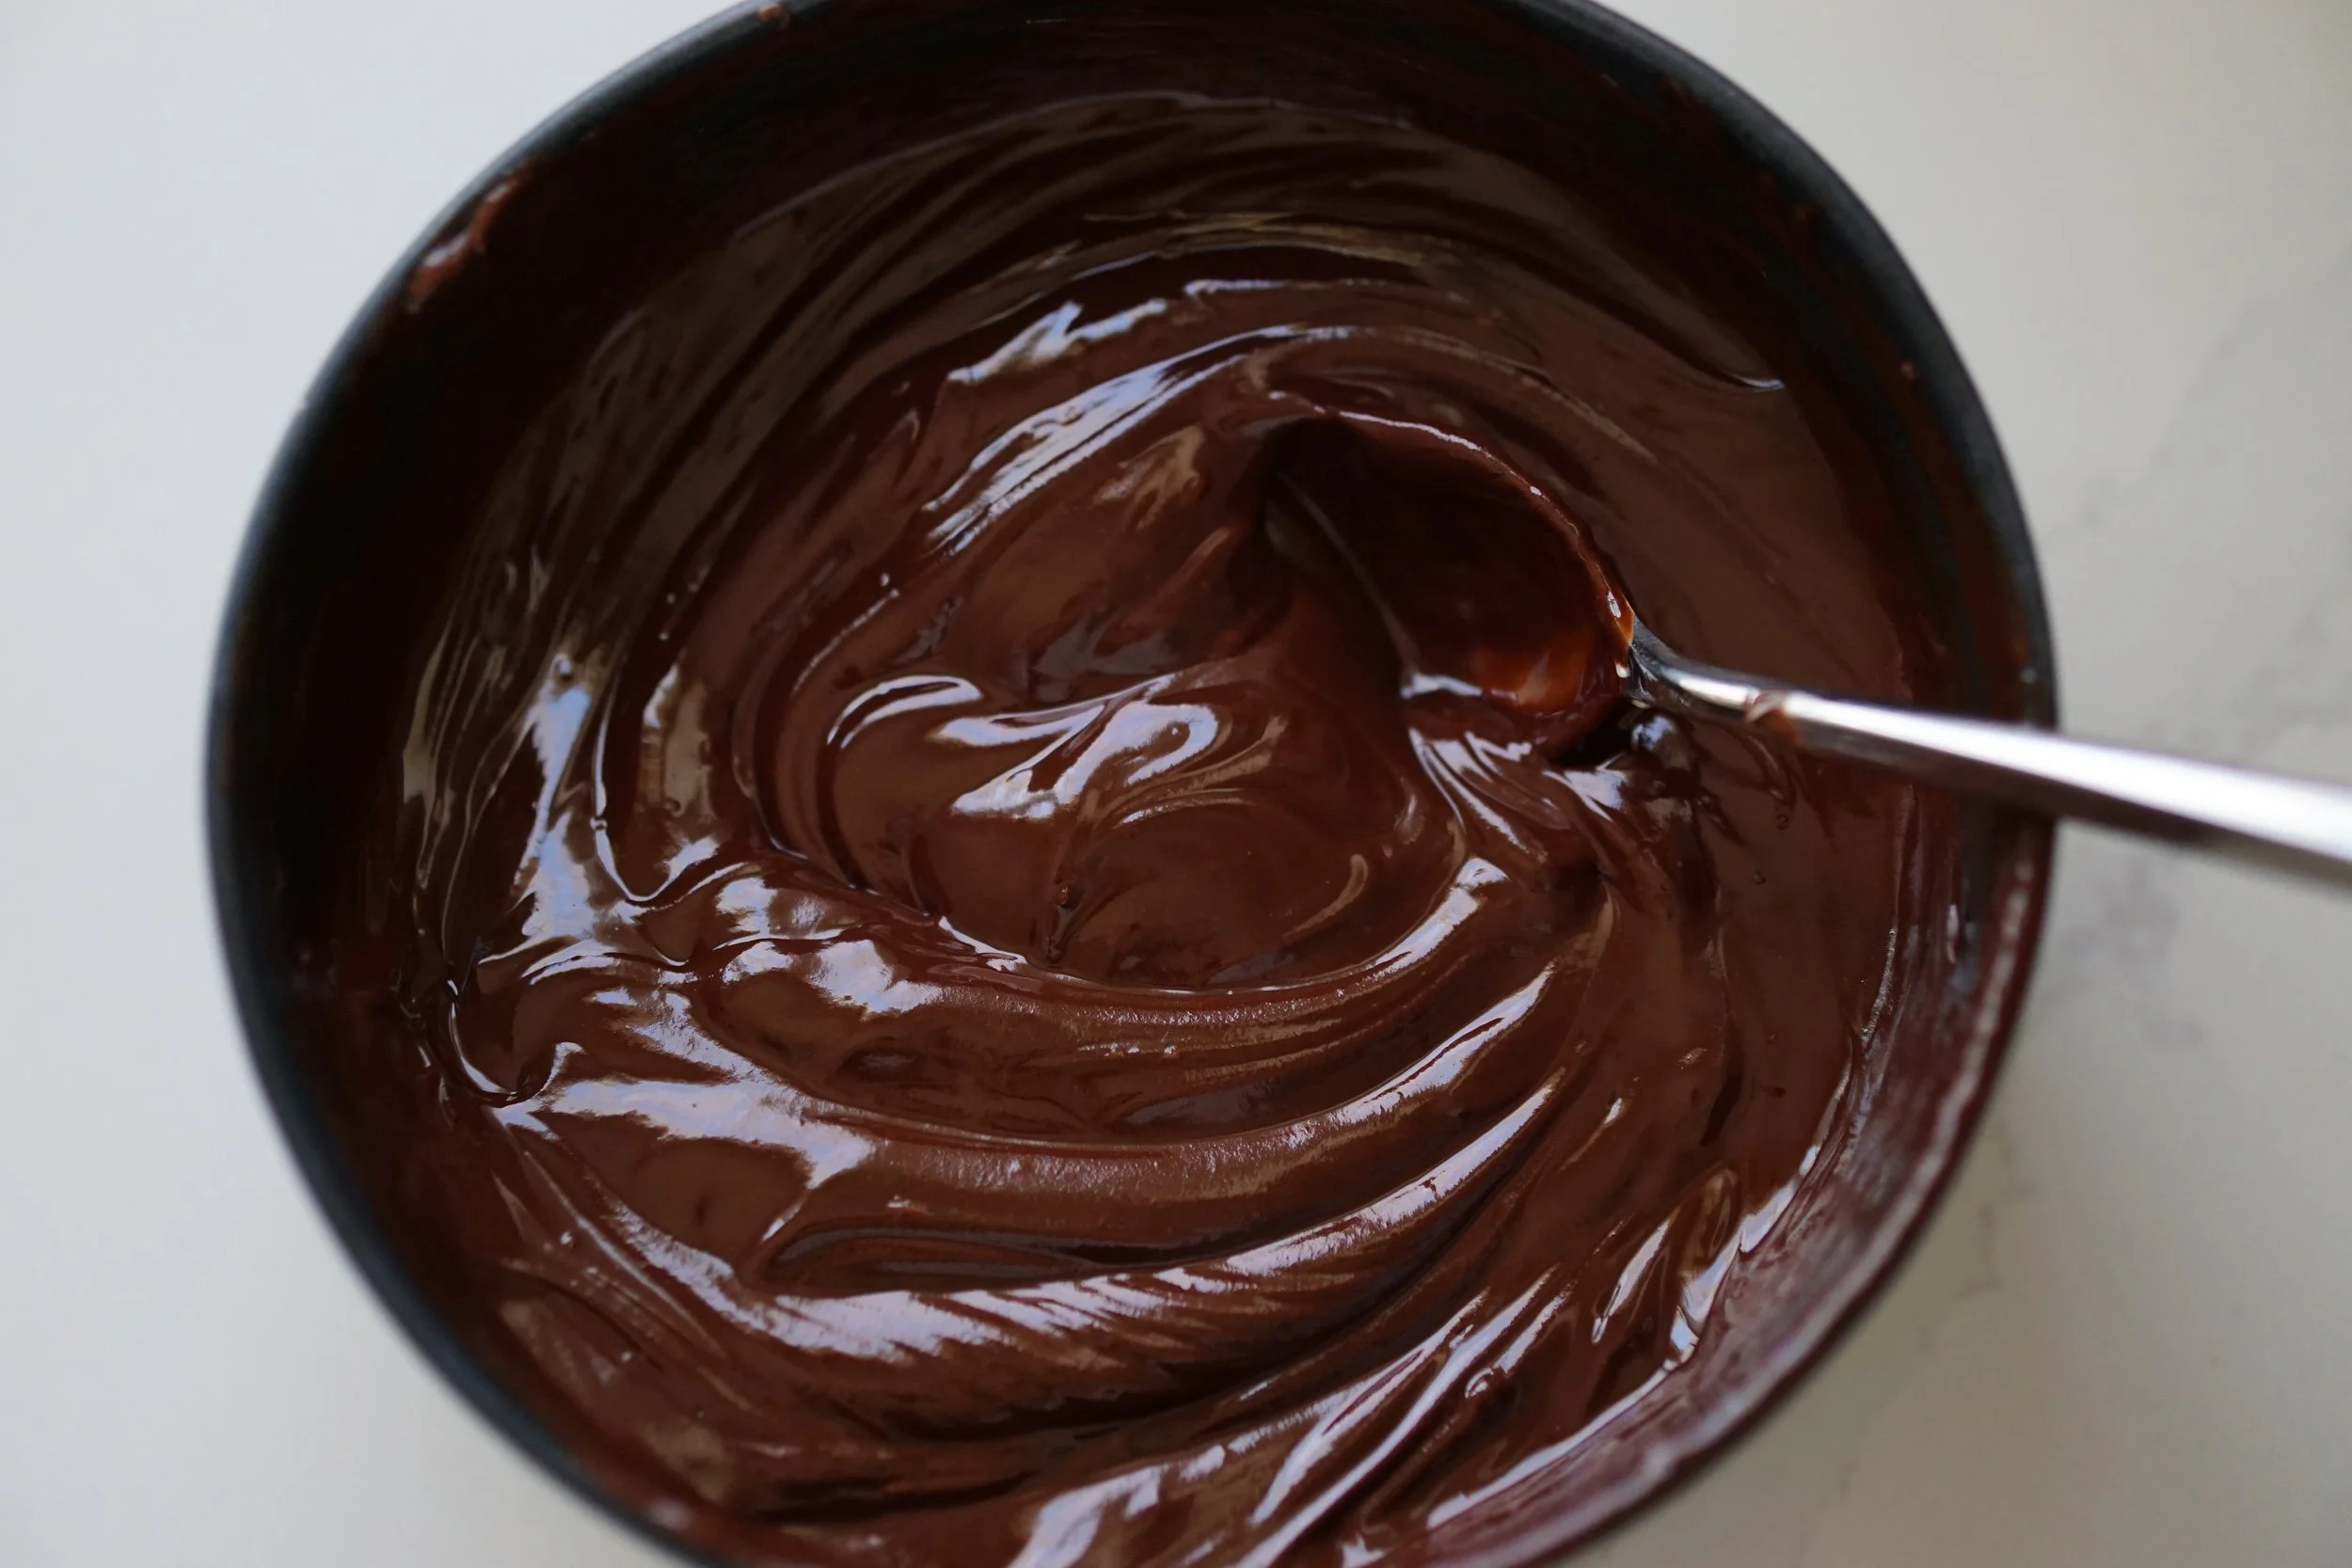
2. Melt semi-sweet chocolate and cubed butter together. Use whatever method you prefer here:
Double boiler method: using a heat proof bowl set over a pot of simmering water (ensuring the bottom of the bowl does not touch the water), melt the semi-sweet chocolate and butter together. Stir frequently until the mixture is uniform and smooth. Set the bowl aside to cool.
Microwave method: in 20-30 second increments on high heat in a microwave safe bowl, melt the chocolate and butter together. Stir between each increment. Repeat until the mixture is uniform and smooth (about 3 increments for us). Set the bowl aside to cool.
3. Combine your dry ingredients in a separate medium to large sized bowl: flour, cornstarch, baking powder, salt, and cocoa powder. I typically use a sifter with flour these days. It’s fun (my toddler Nellie actually always loves to do it) and useful in many recipes for smoother mixing. Whisk all dry ingredients together until combined.
4. In the bowl of your standing mixer (or yet another bowl and a handheld mixer), whisk attachment, combine the brown sugar, 2 eggs, and 1 egg yolk on medium speed until thick and combined, maybe 3-4 minutes. It should turn a nice caramel color.
5. Add the maple syrup and vanilla. Mix on medium speed until combined (another minute or so).
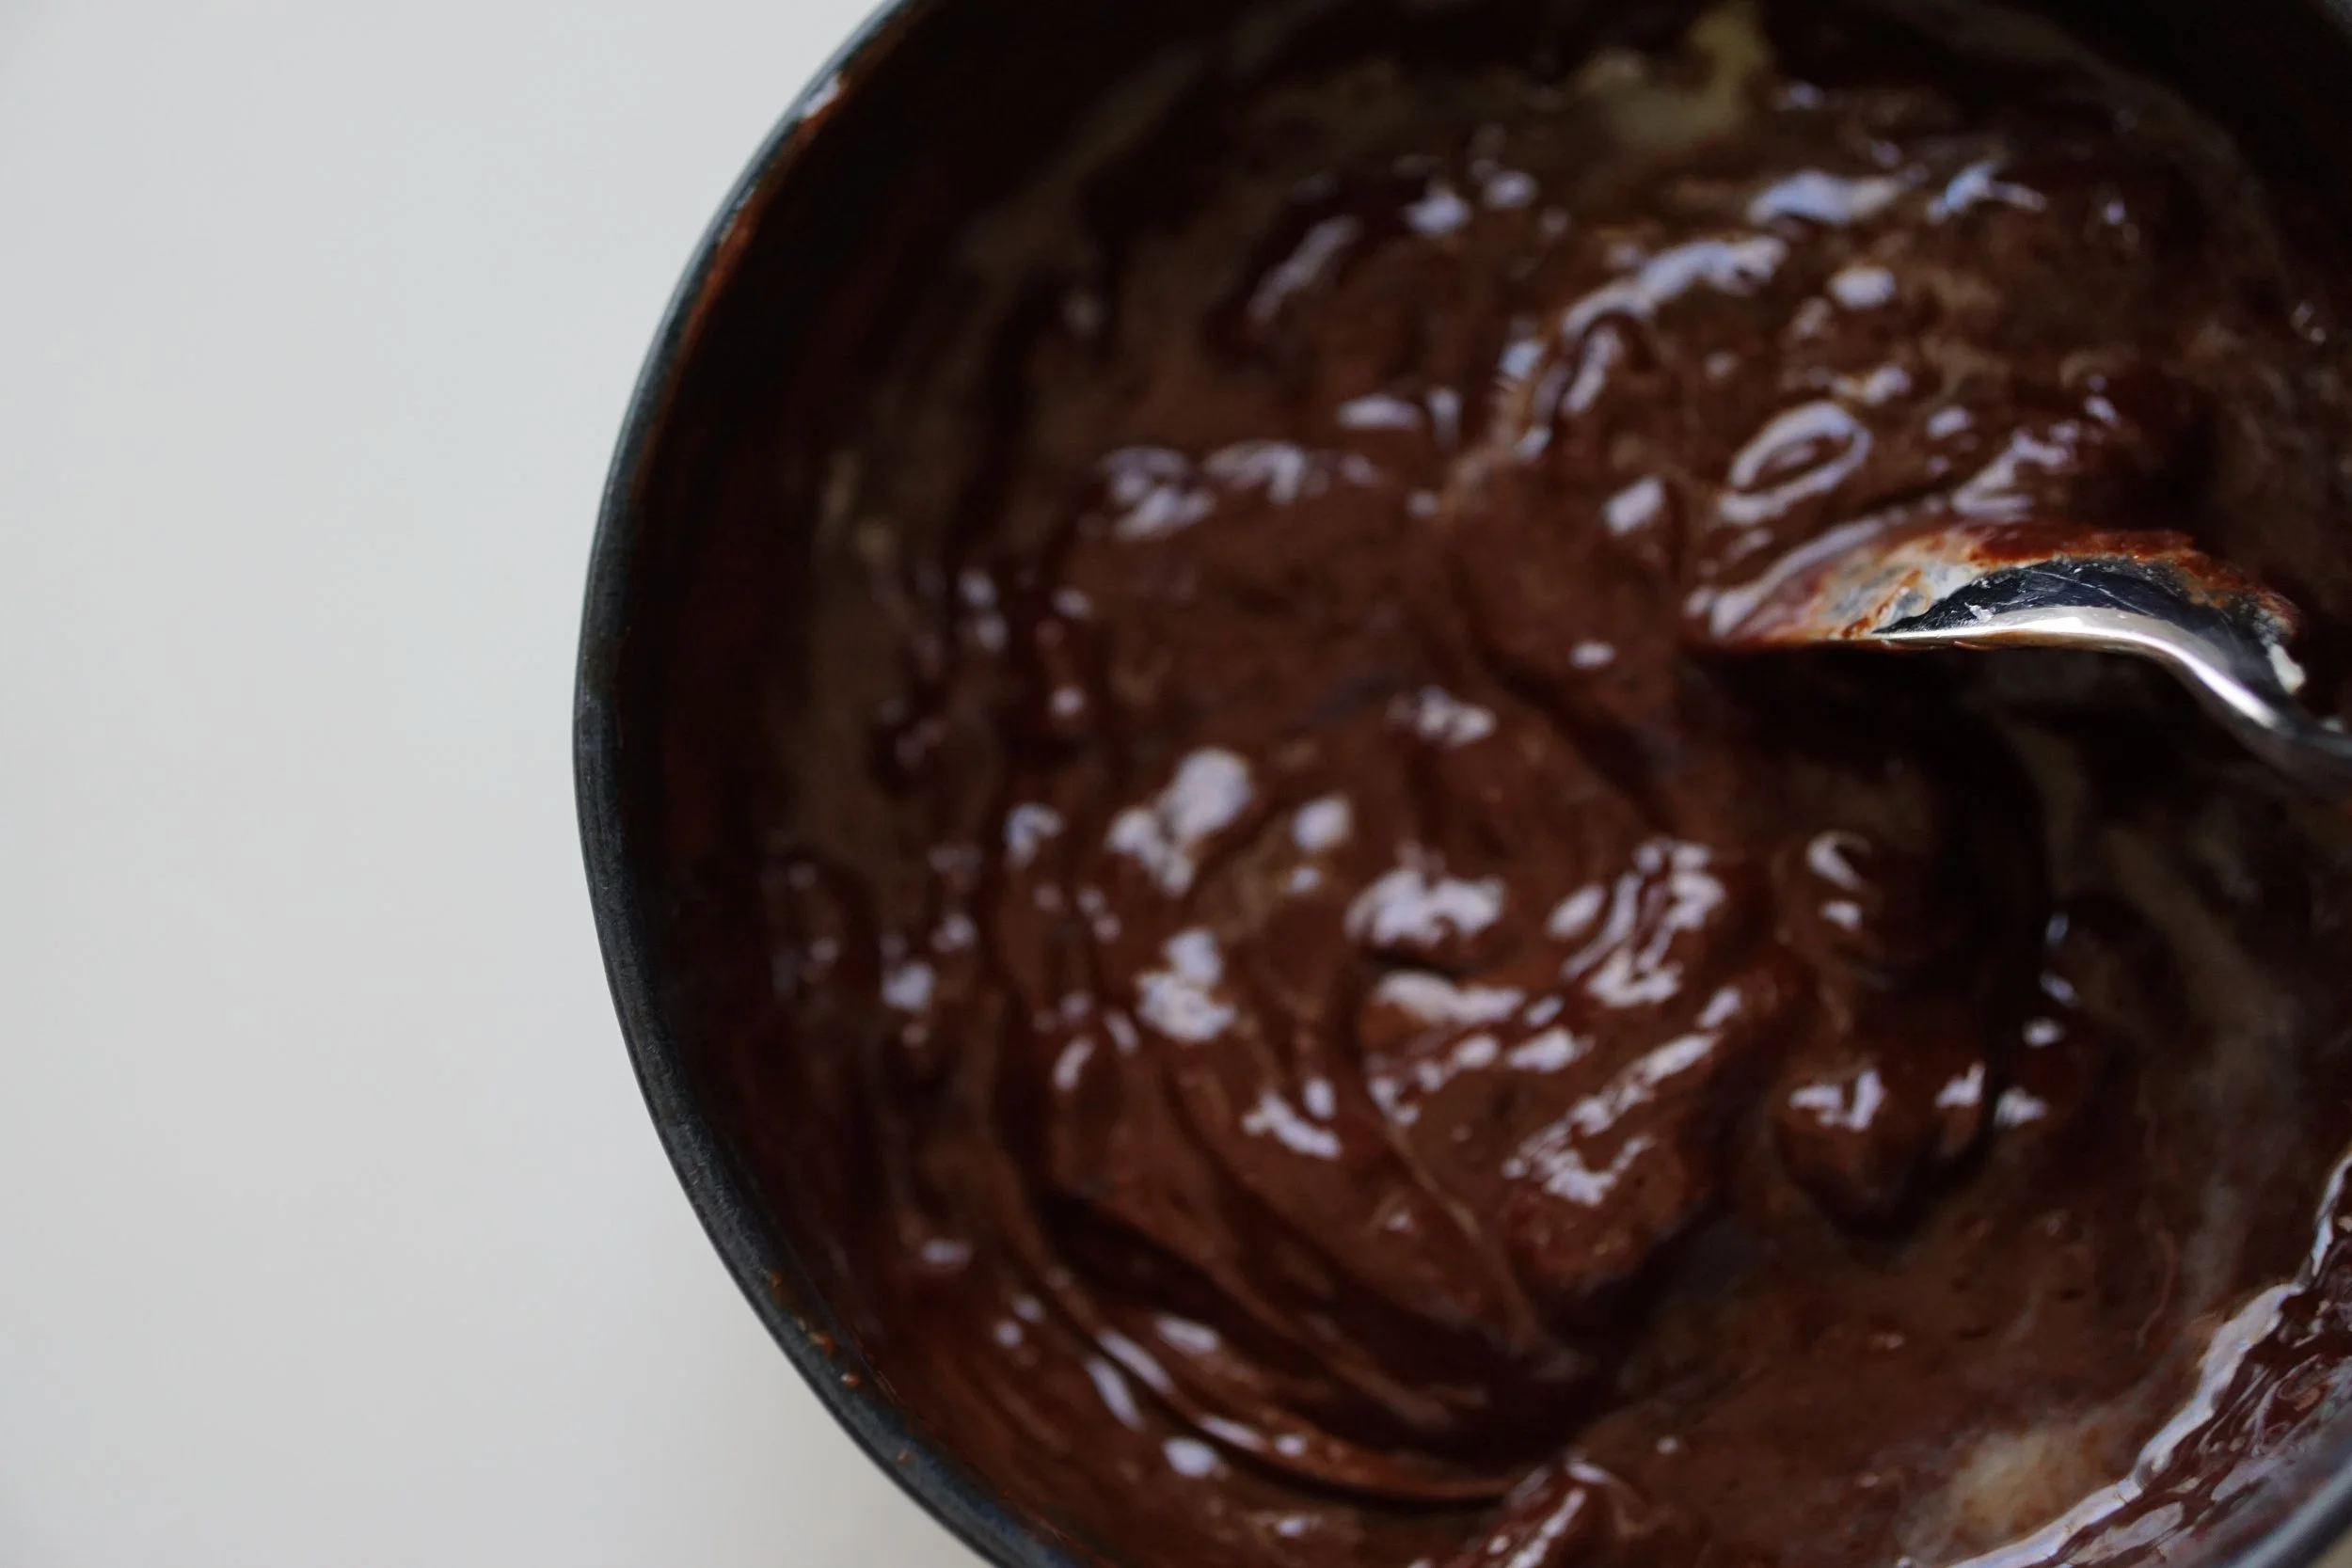
6. Add the melted chocolate mixture, and mix on medium speed until combined (another 2-3 minutes).
7. Add the dry ingredients in batches. Add maybe a quarter of the dry ingredients, mix on low until just combined, and then repeat until all of the dry ingredients are incorporated. Only mix each batch in until you can’t see any more flour, and scrape down the sides if needed.

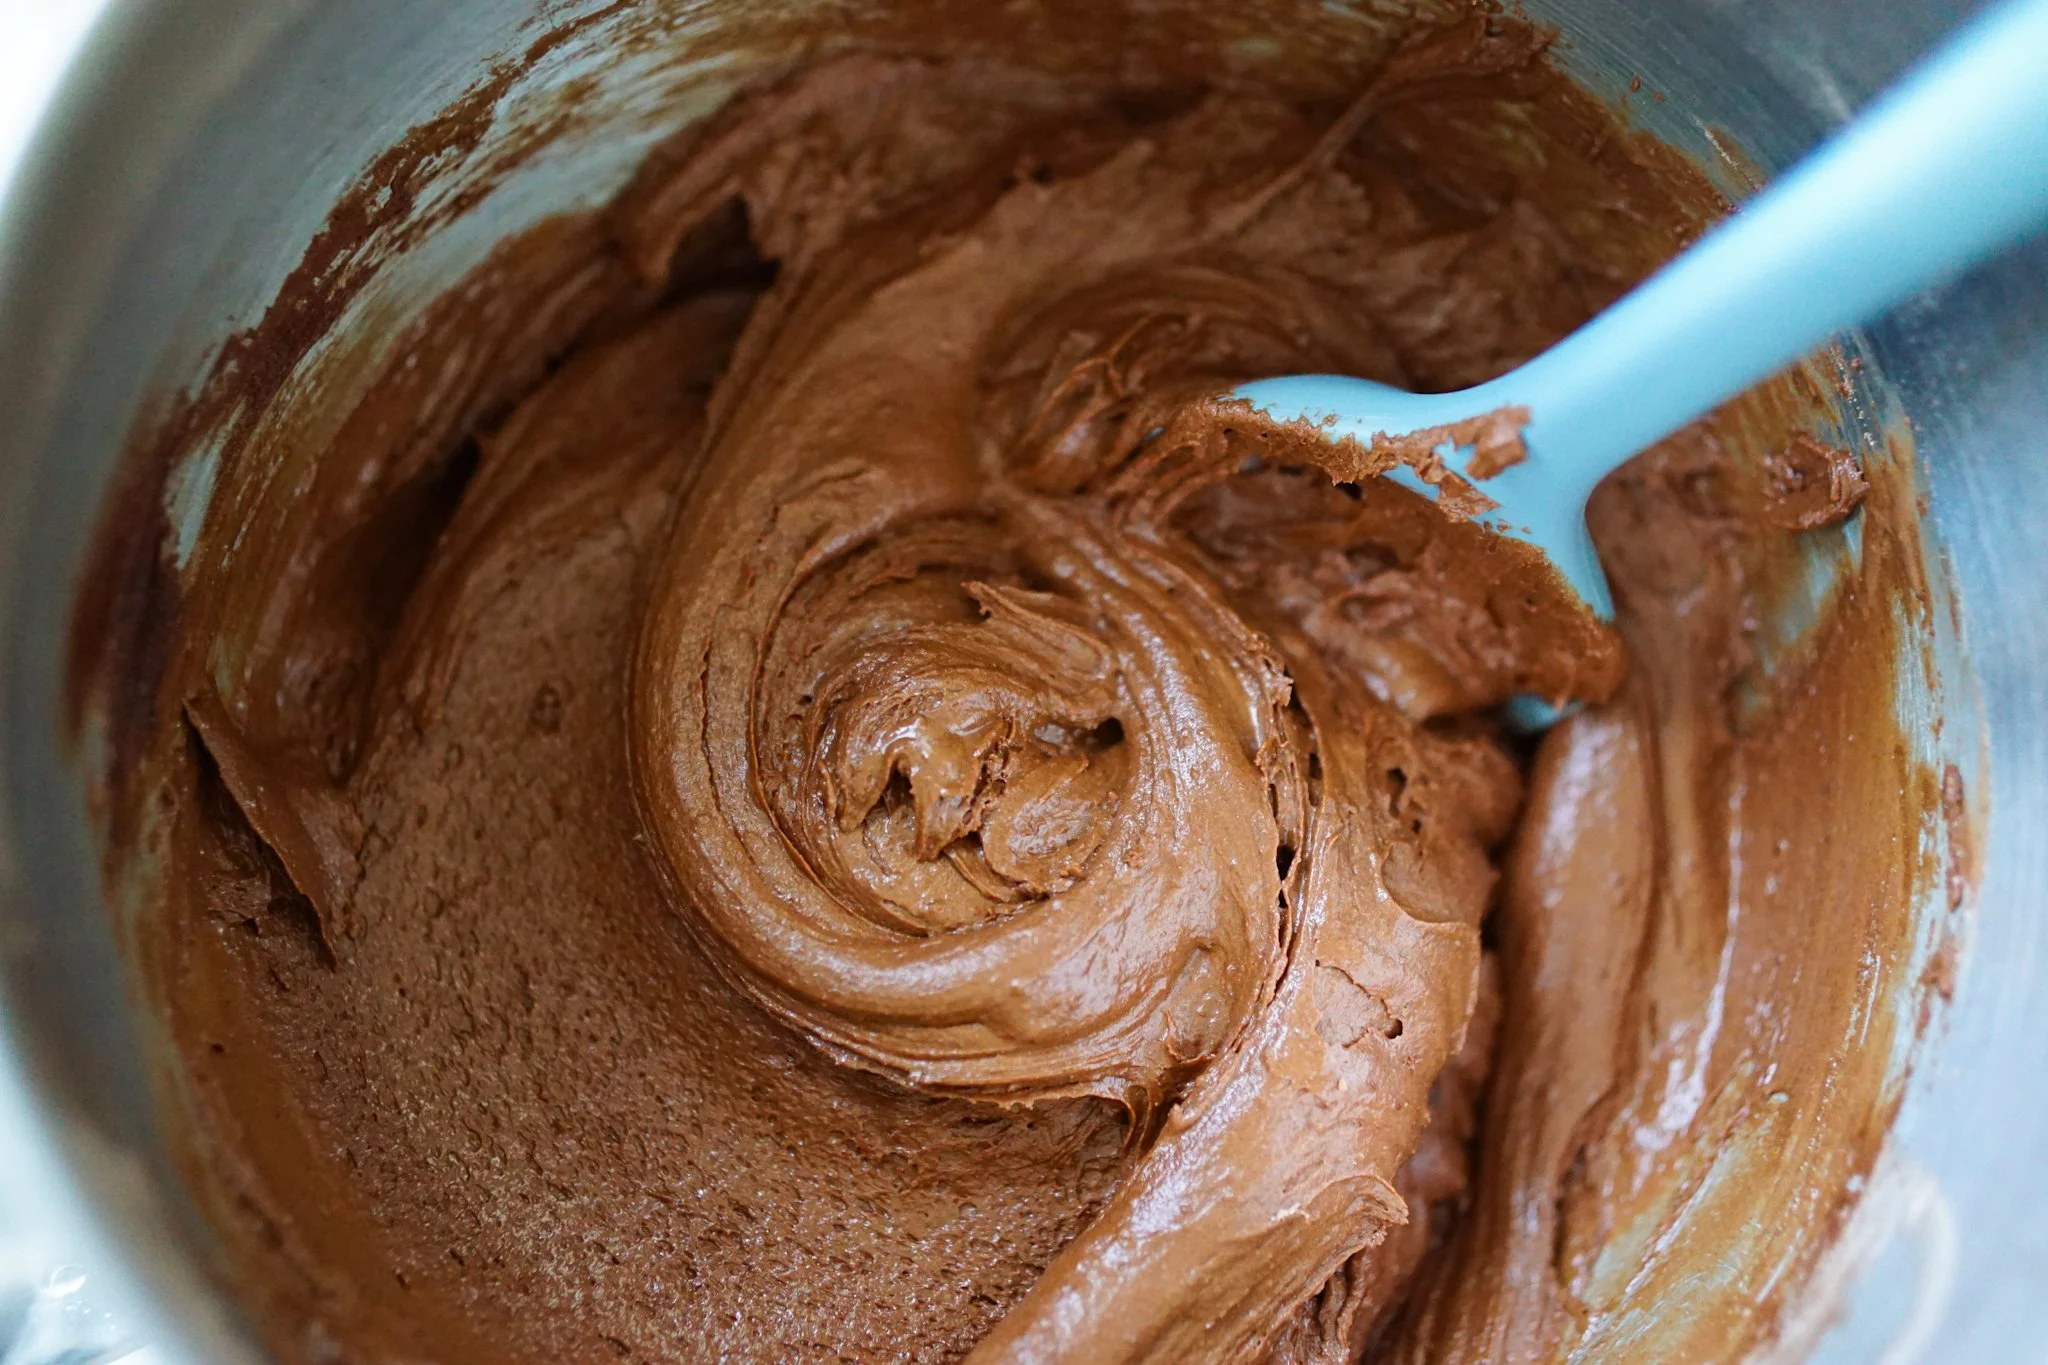
8. Add the tablespoon of water and mix on low for a few more seconds until combined. The mixture will be thick and chocolate-y.
9. Cover the bowl with plastic wrap and refridgerate for 15-30 minutes. While your dough is chilling, do any final prep: crush your candy canes, break your favorite chocolate into pieces, line two baking trays with parchment paper, preheat your oven to 350ºF if you haven’t yet—or sit down for a little break!
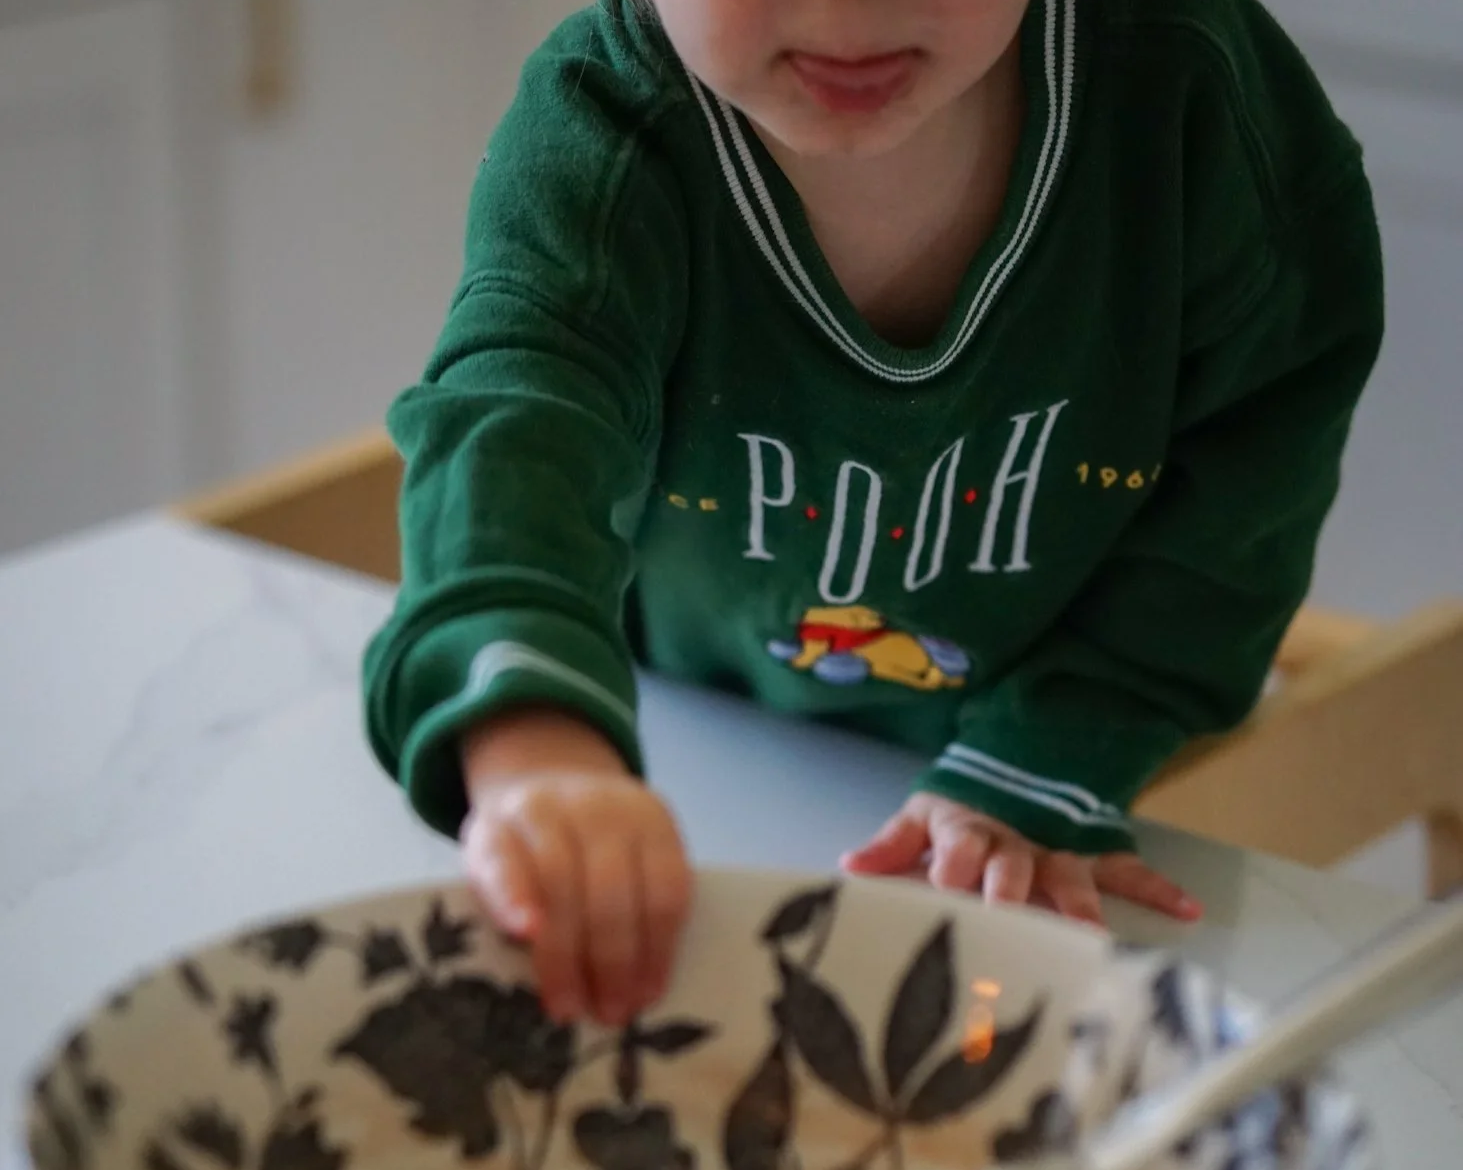
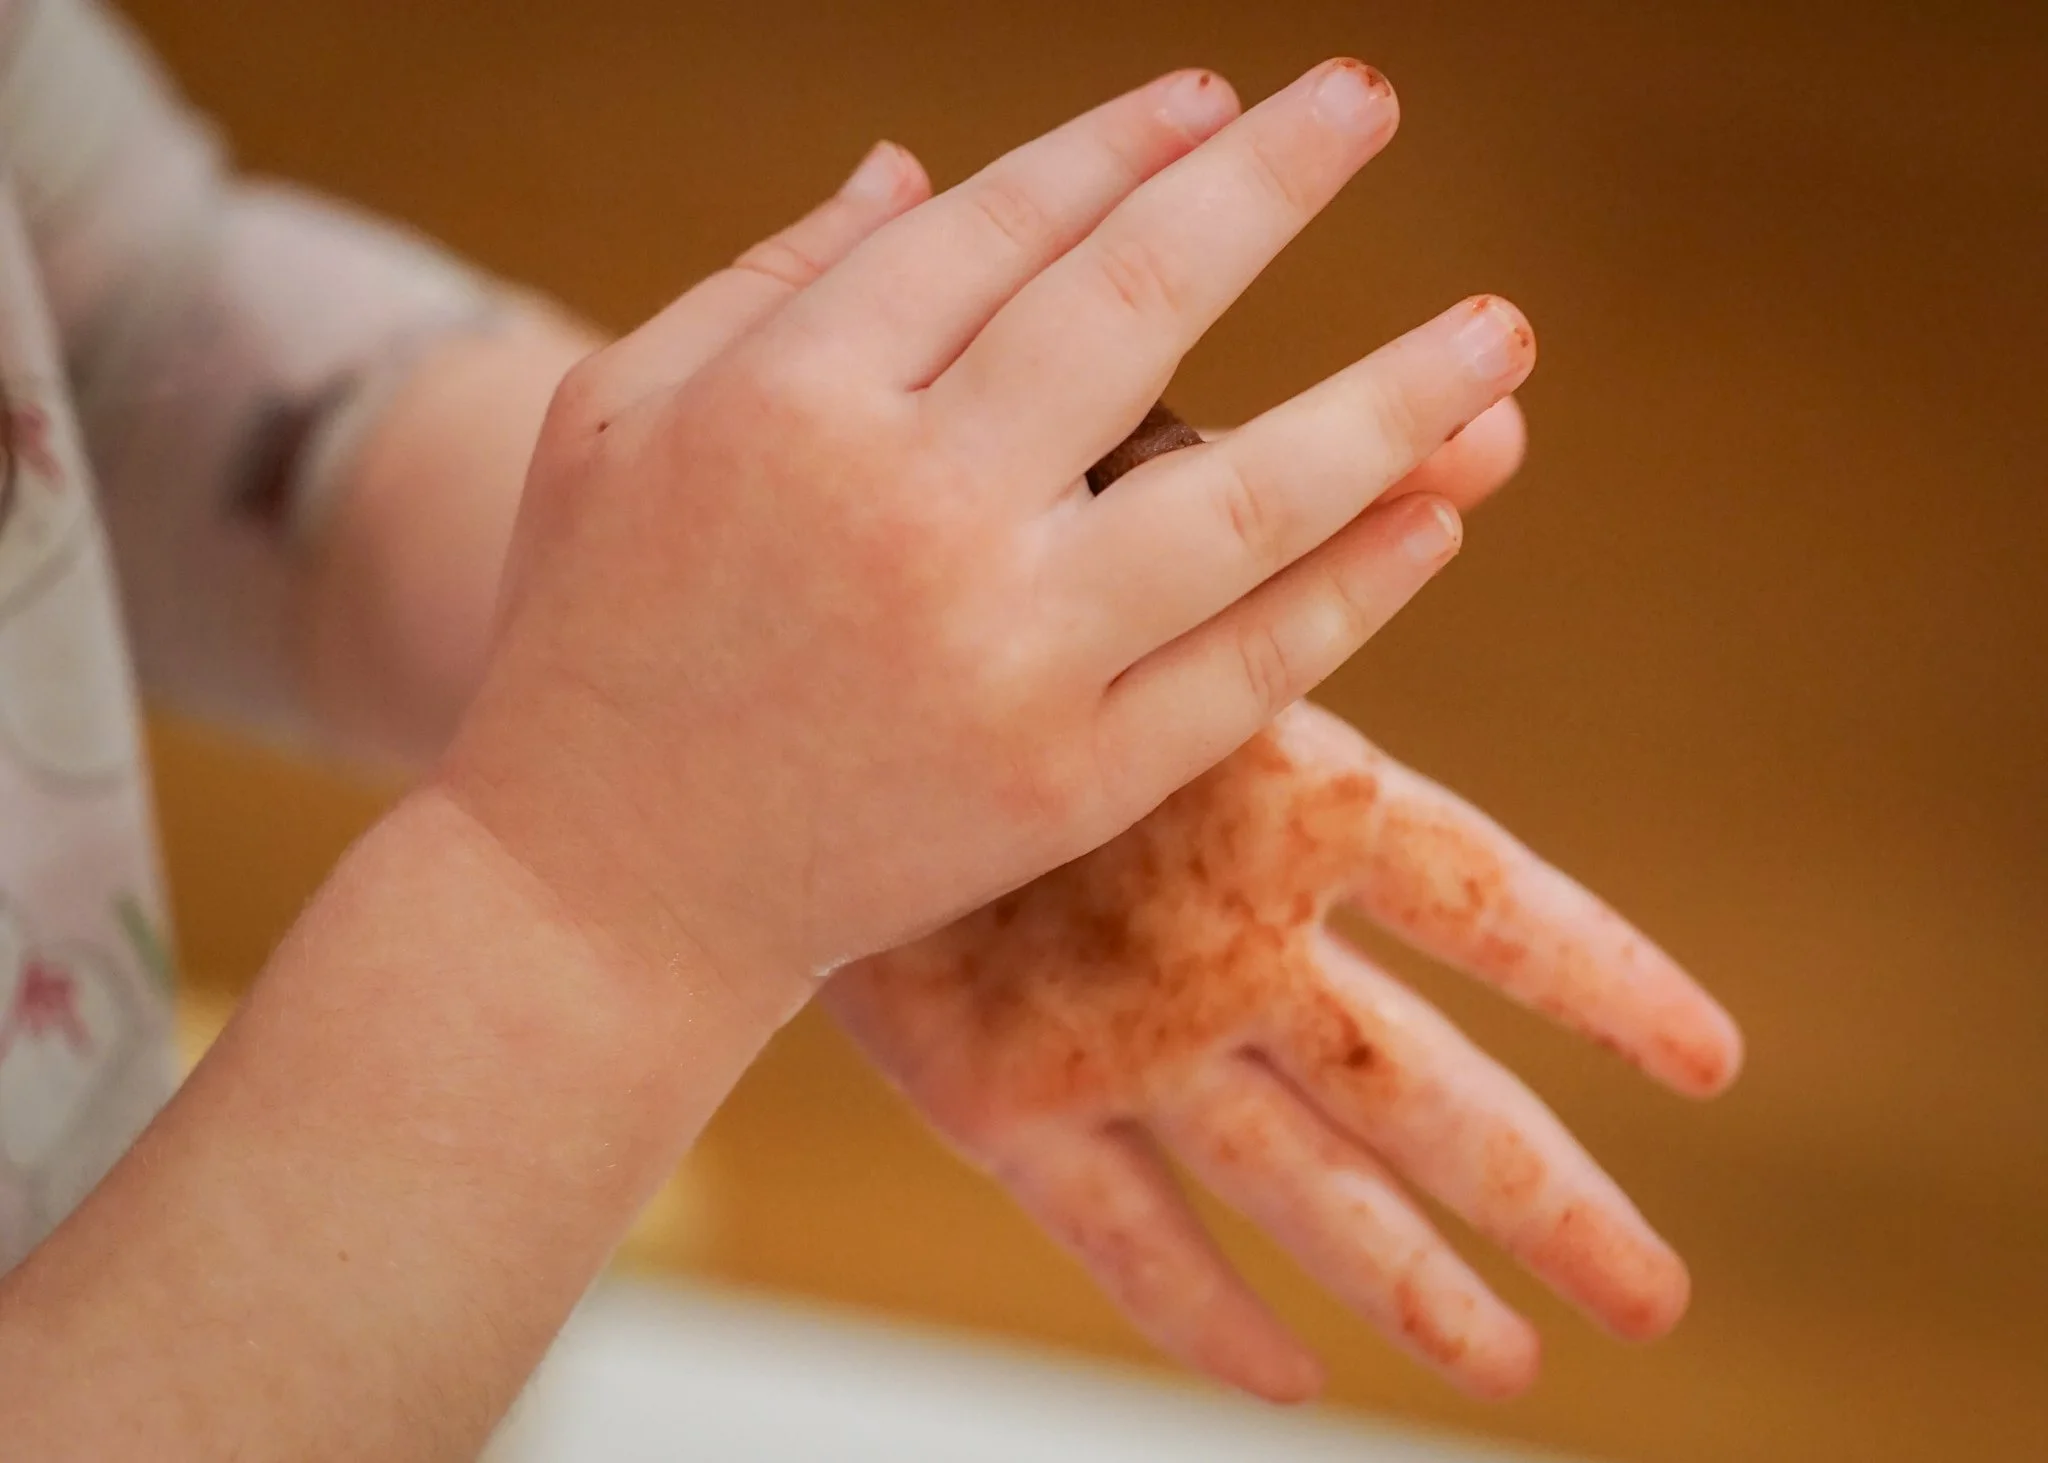
10. Pull the dough out of the fridge. This part is a bit messy, but fun! My toddlers loved it. Form into 2-3 inch balls and place on the baking trays. Leave some dough in the bowl, maybe enough leftover to form one more ball. You’ll use this extra in a few steps.
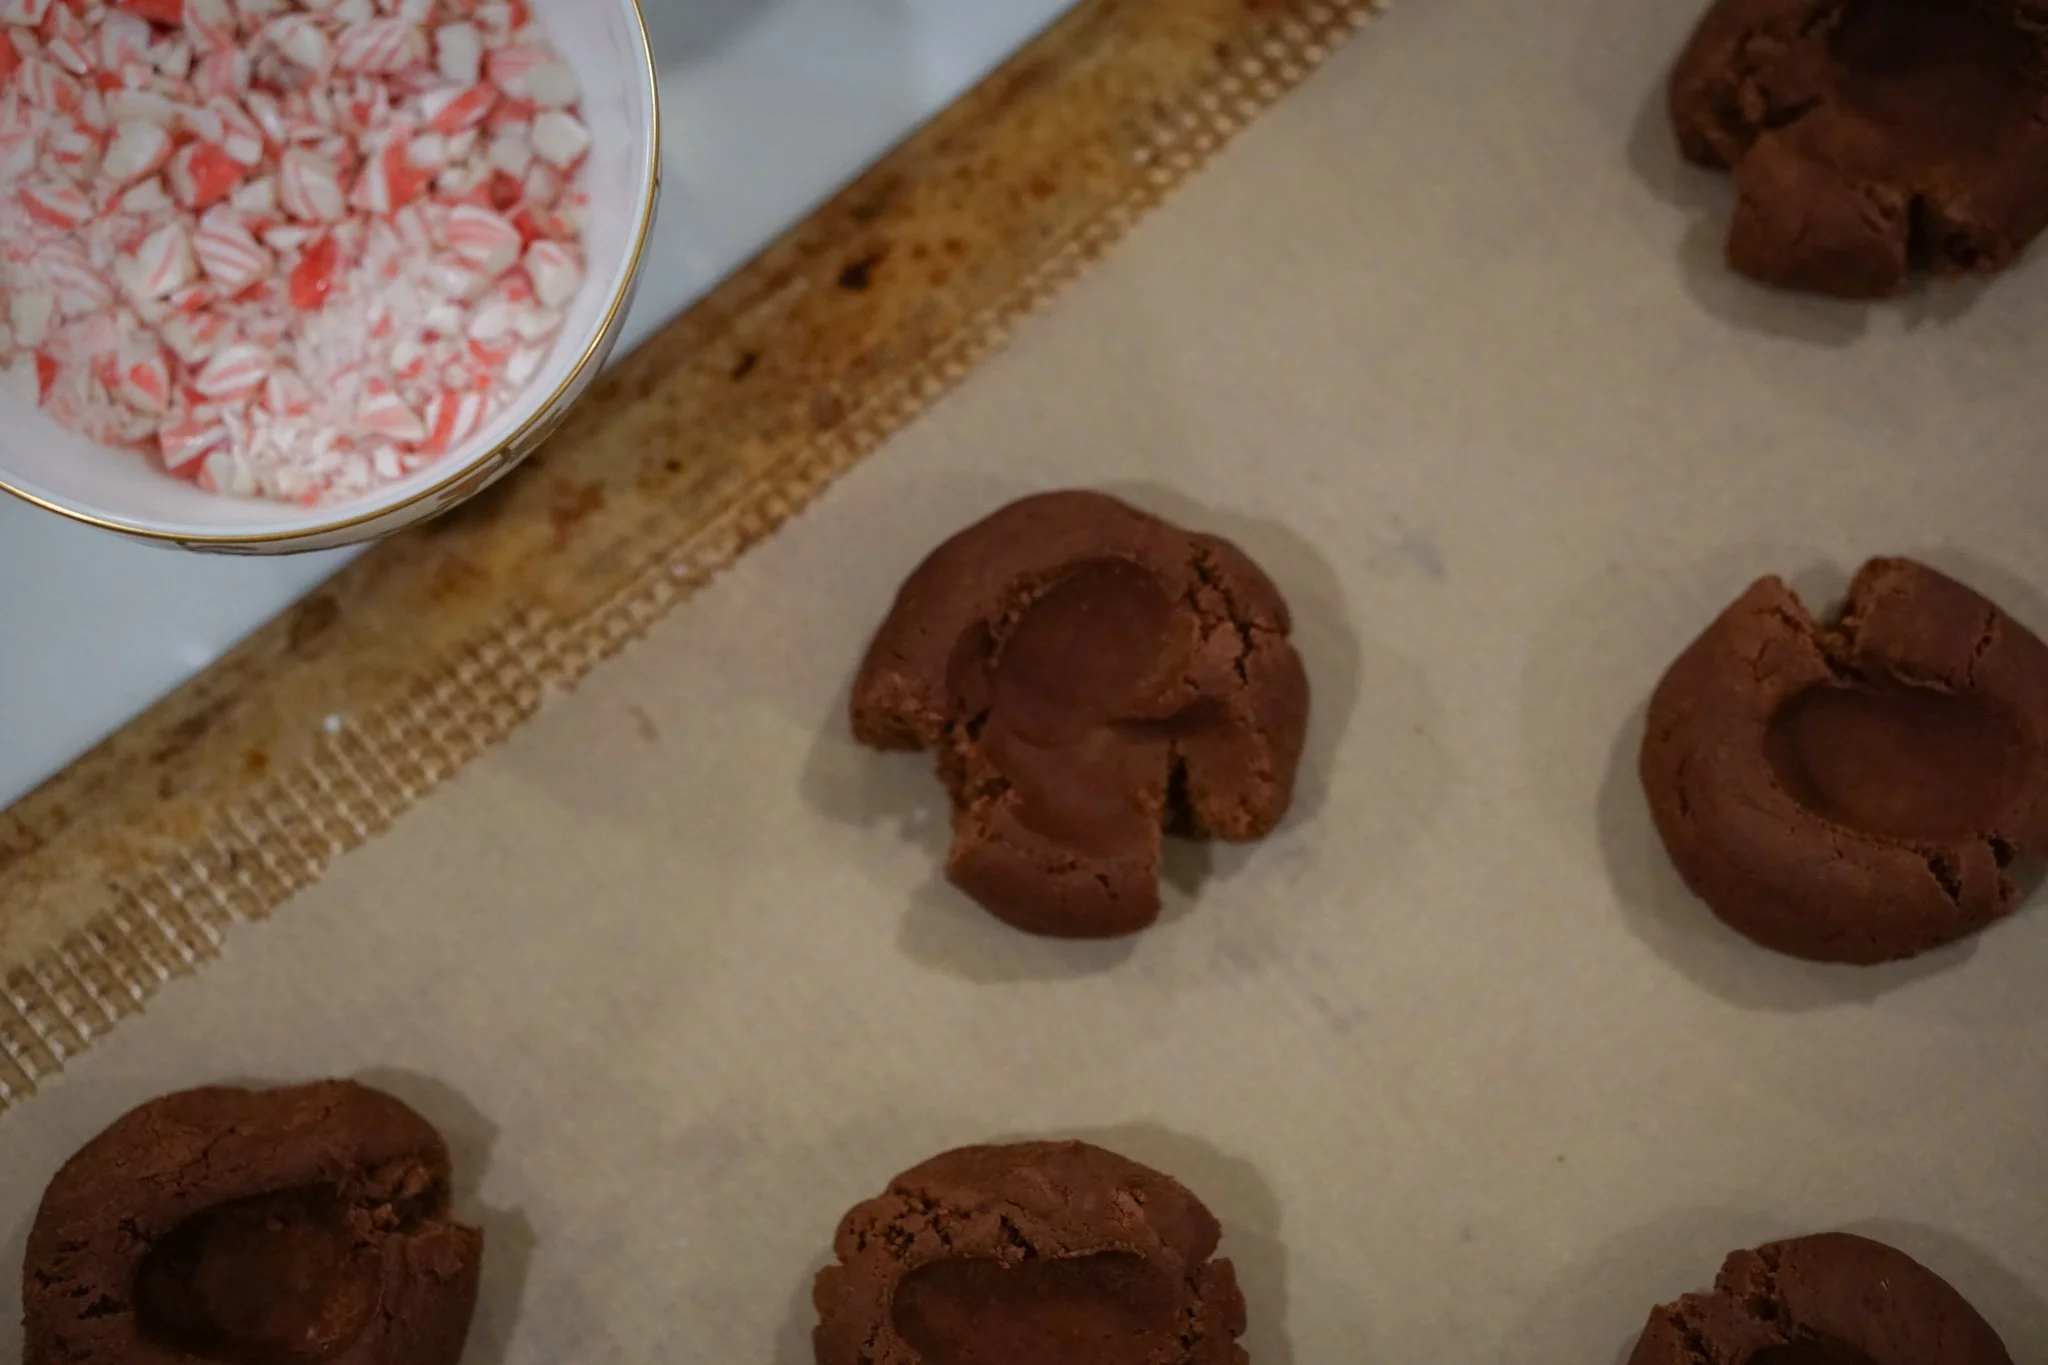
11. Press your thumb into the middle of each ball to make a well in the center, forming sort of nests.
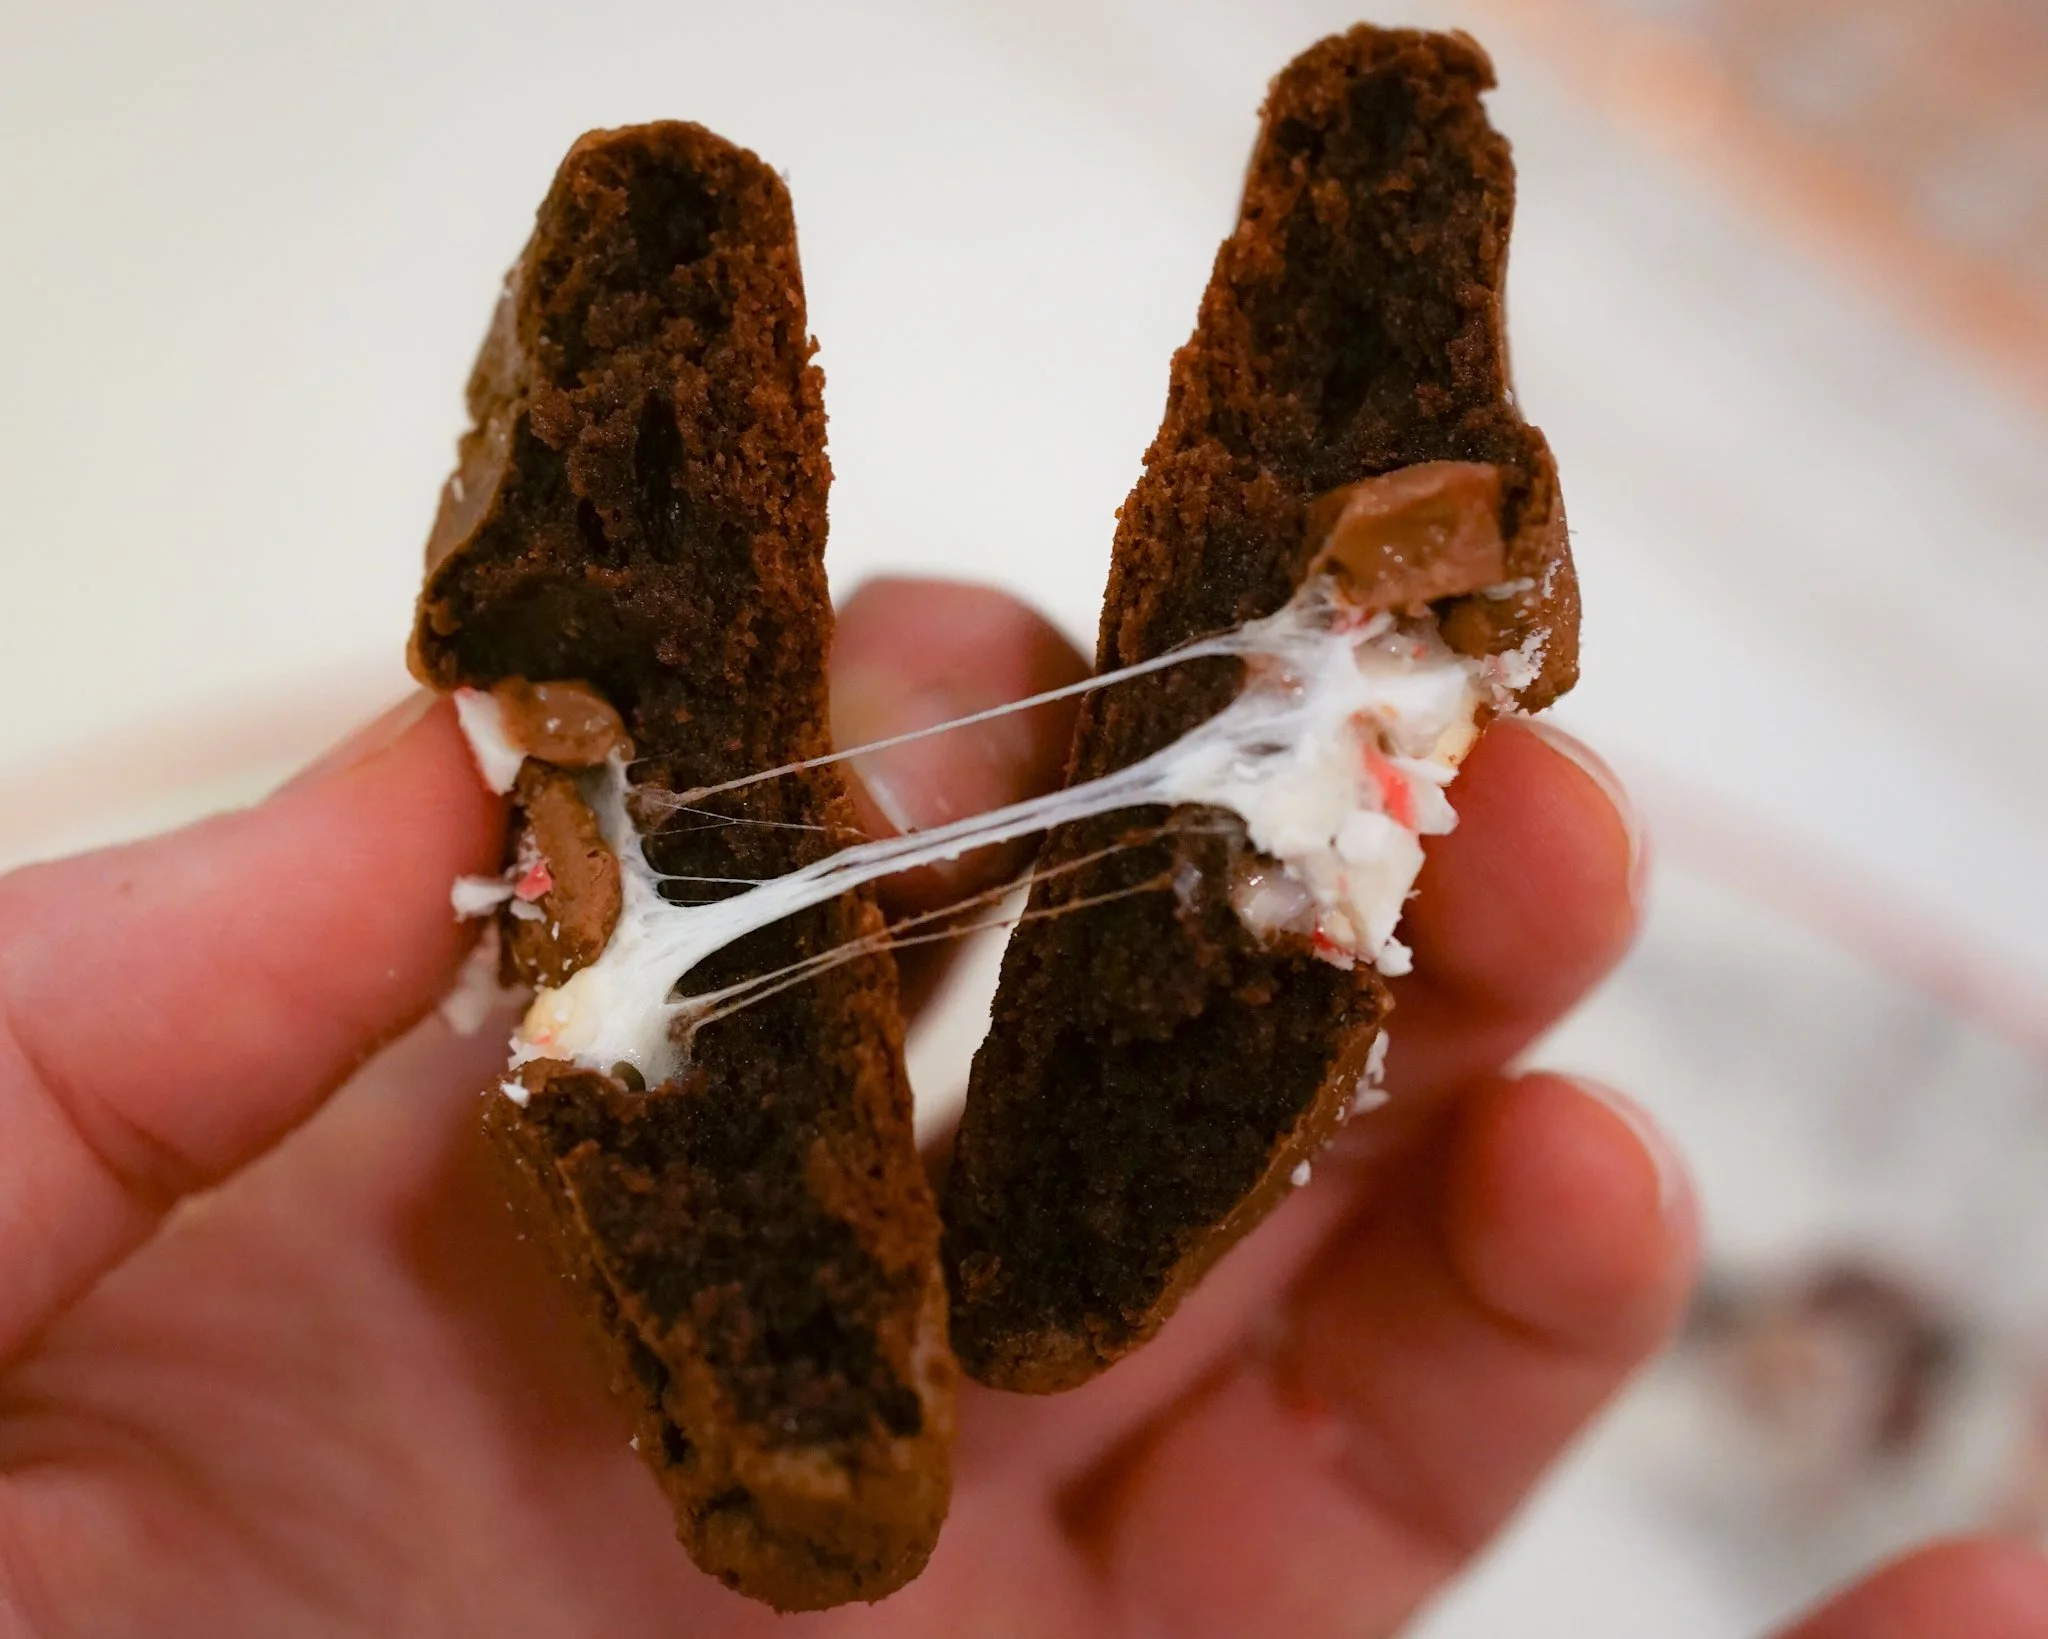
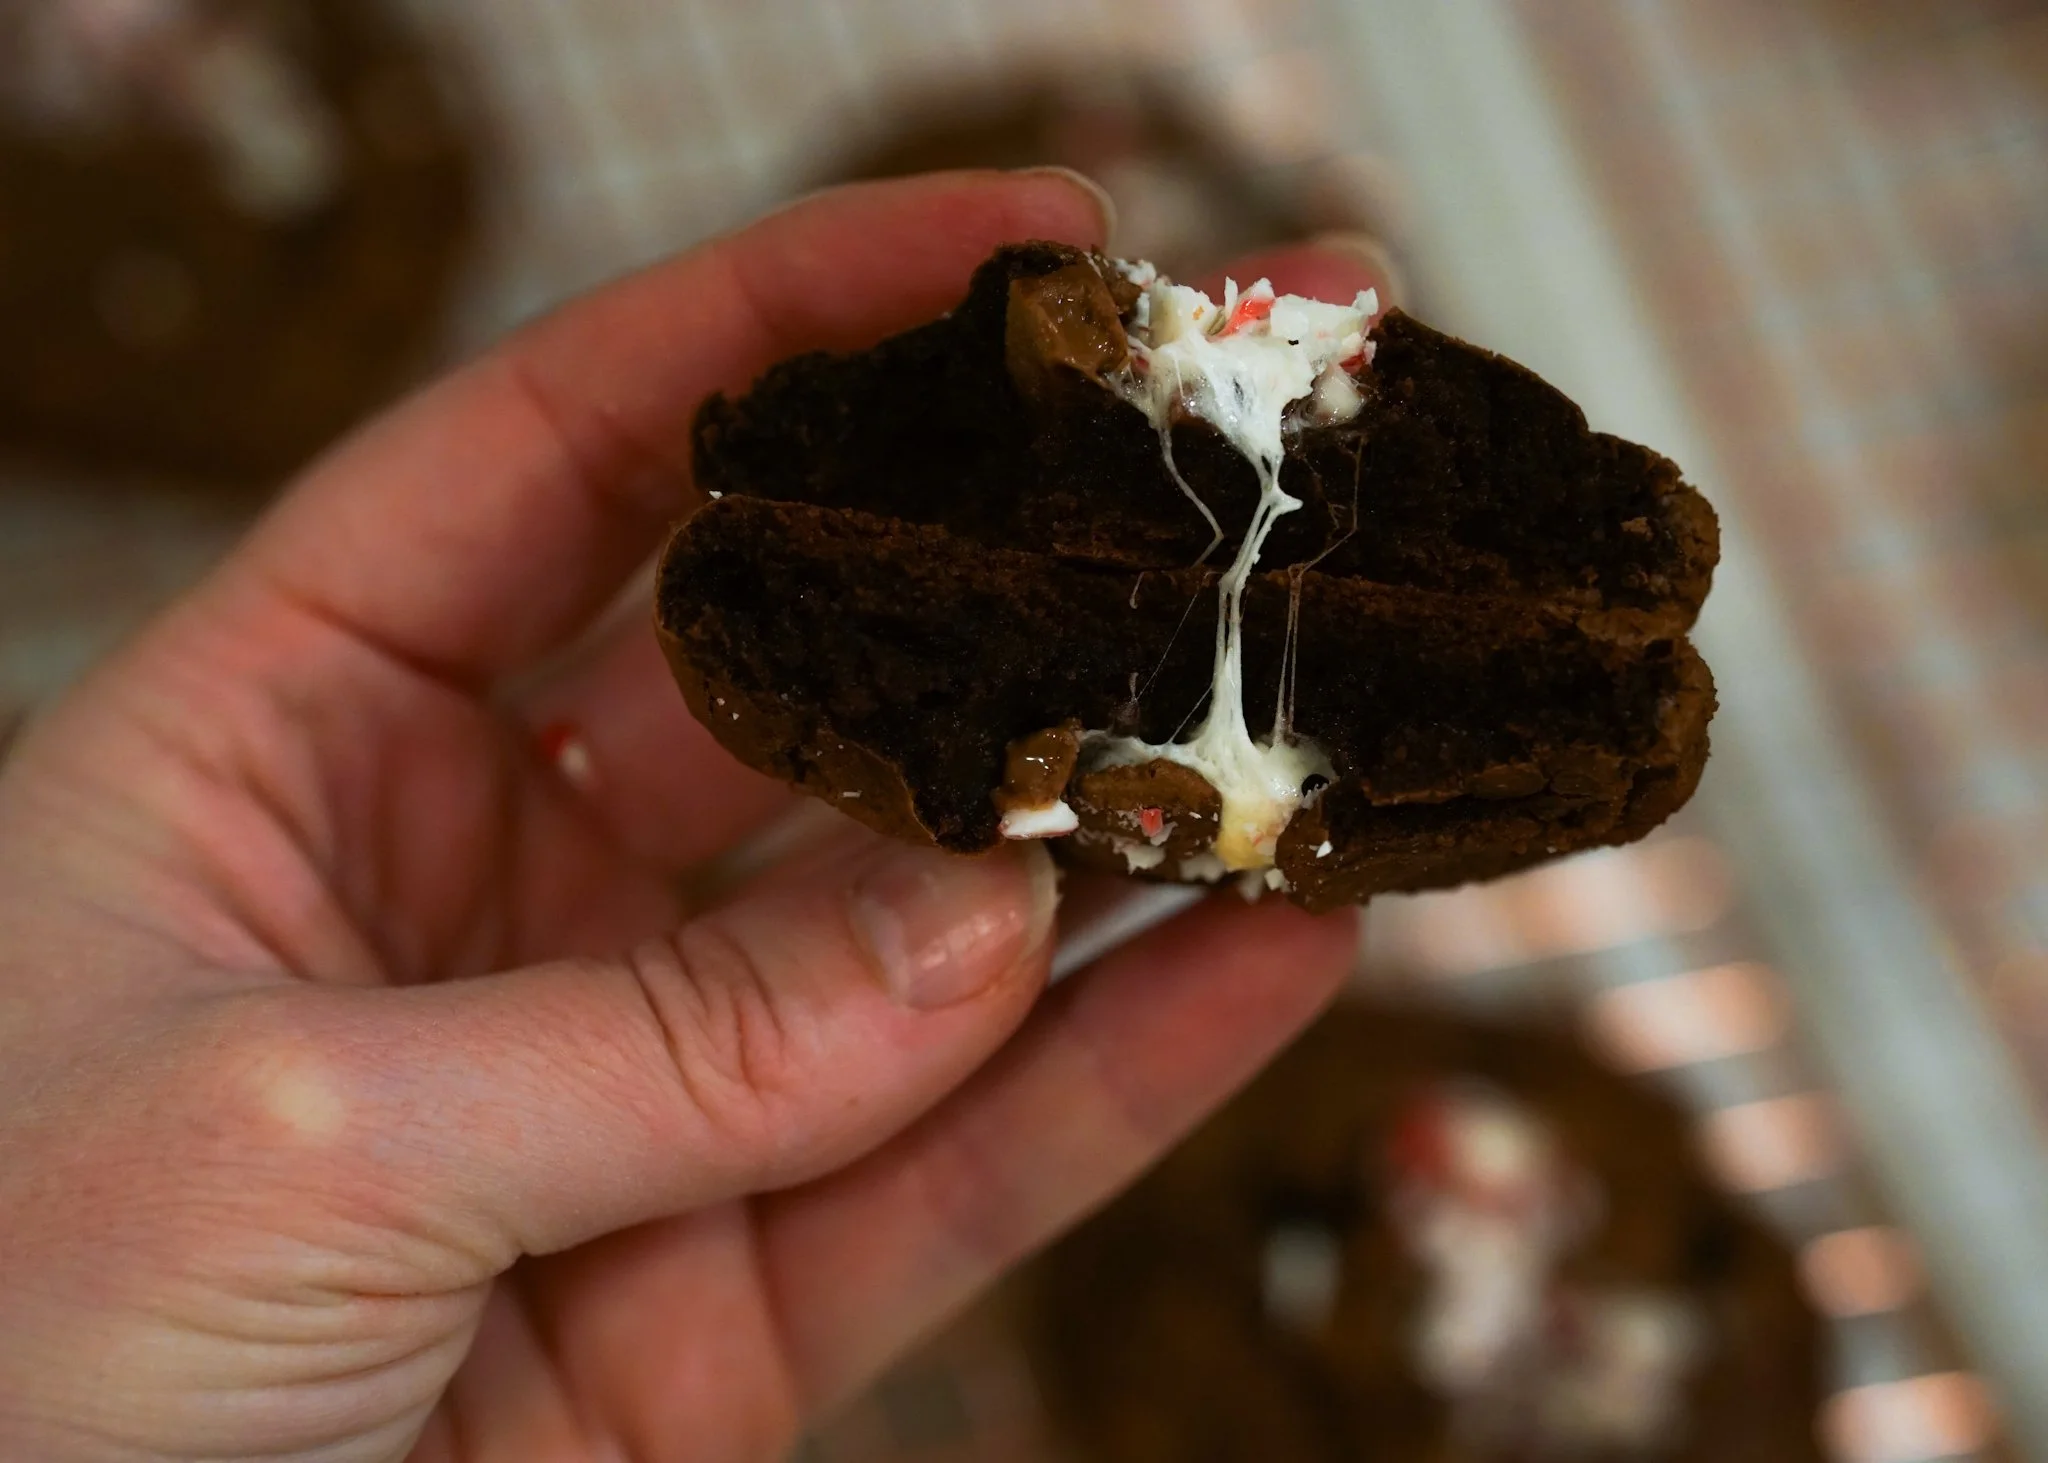
12. Here’s where the kids really had fun. Fill each “nest” with marshmallows and chocolate chunks (or whatever you are substituting in here!) We fit about 2-3 marshmallows and several chocolate chunks into each.
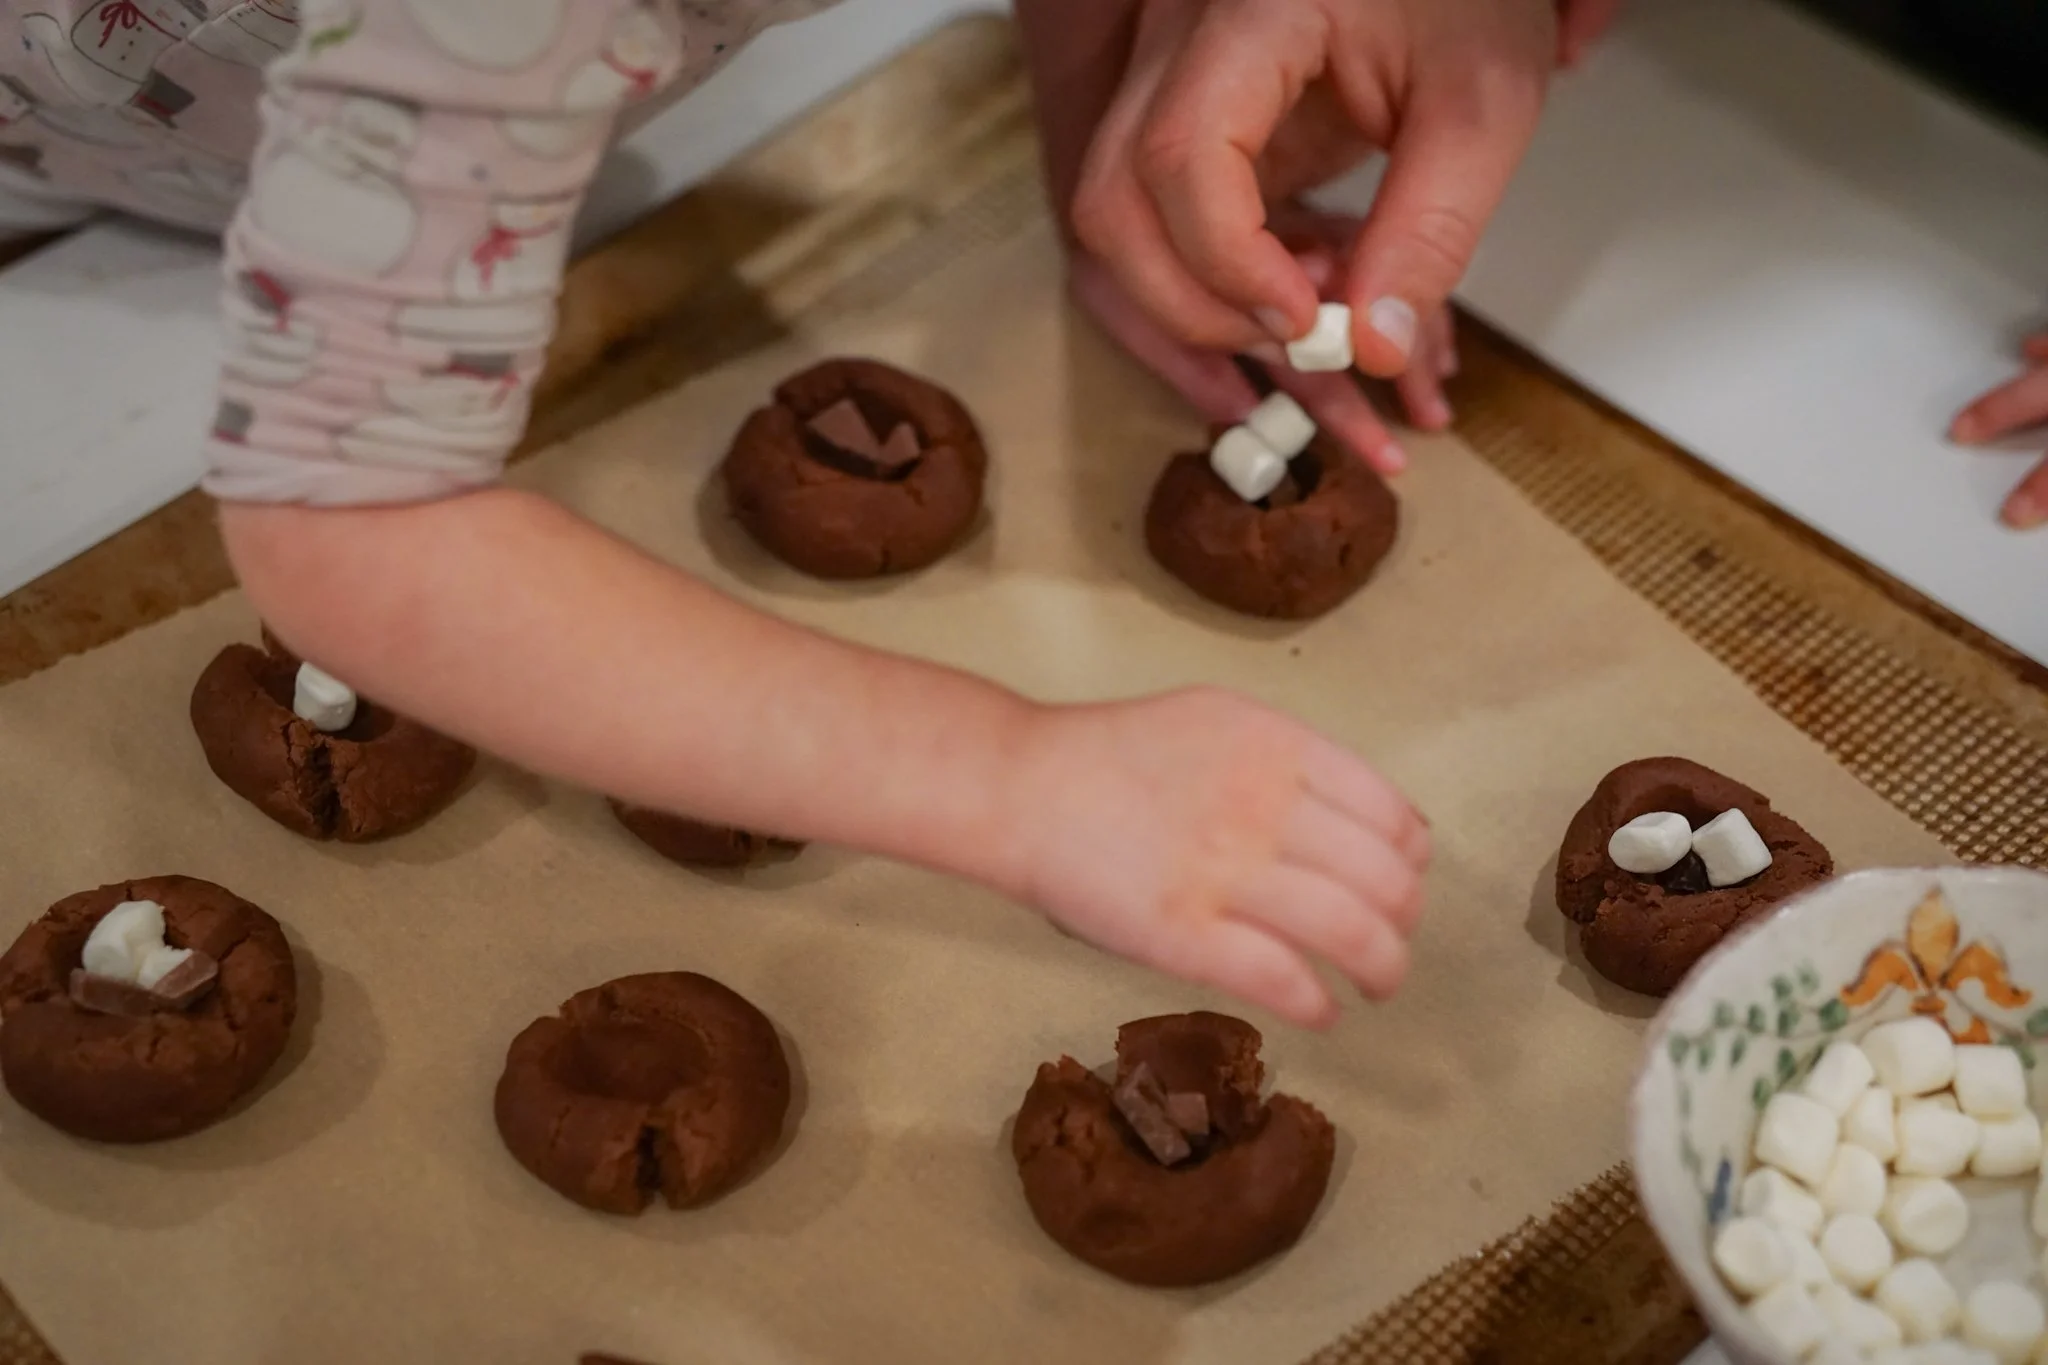
13. Pull the sides up and over the marshmallows and chocolate, so that they’re hidden within. I also tried a few with the marshmallows peeking out, and they turned out great and looked more like hot chocolate too—whatever method works! We used a combination of pulling the sides back up and over the marshmallow mixture and patching the top with the leftover cookie dough.
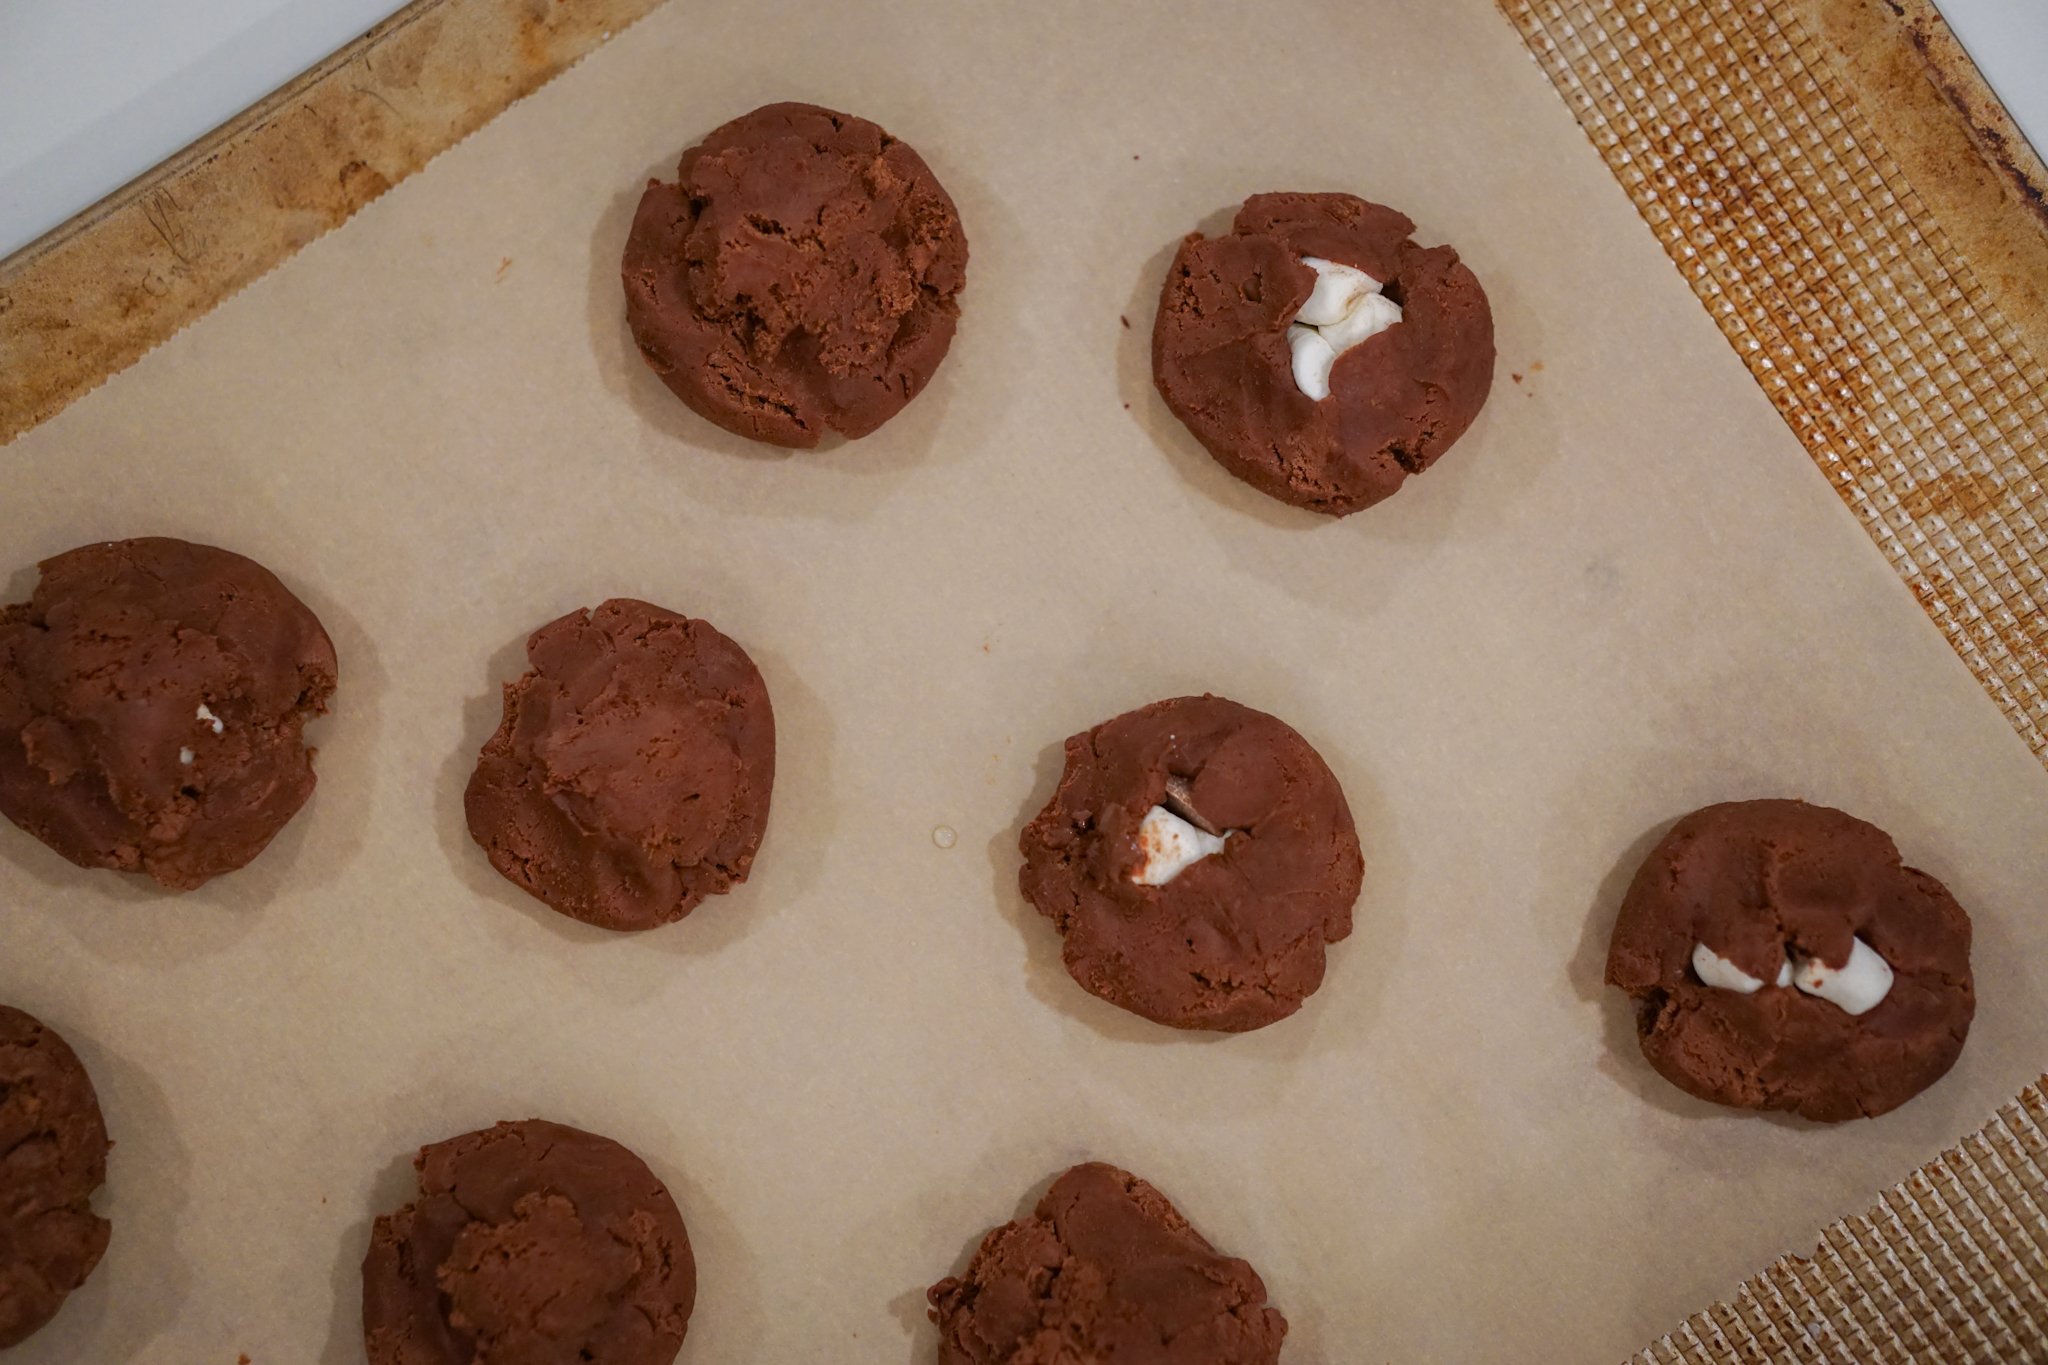
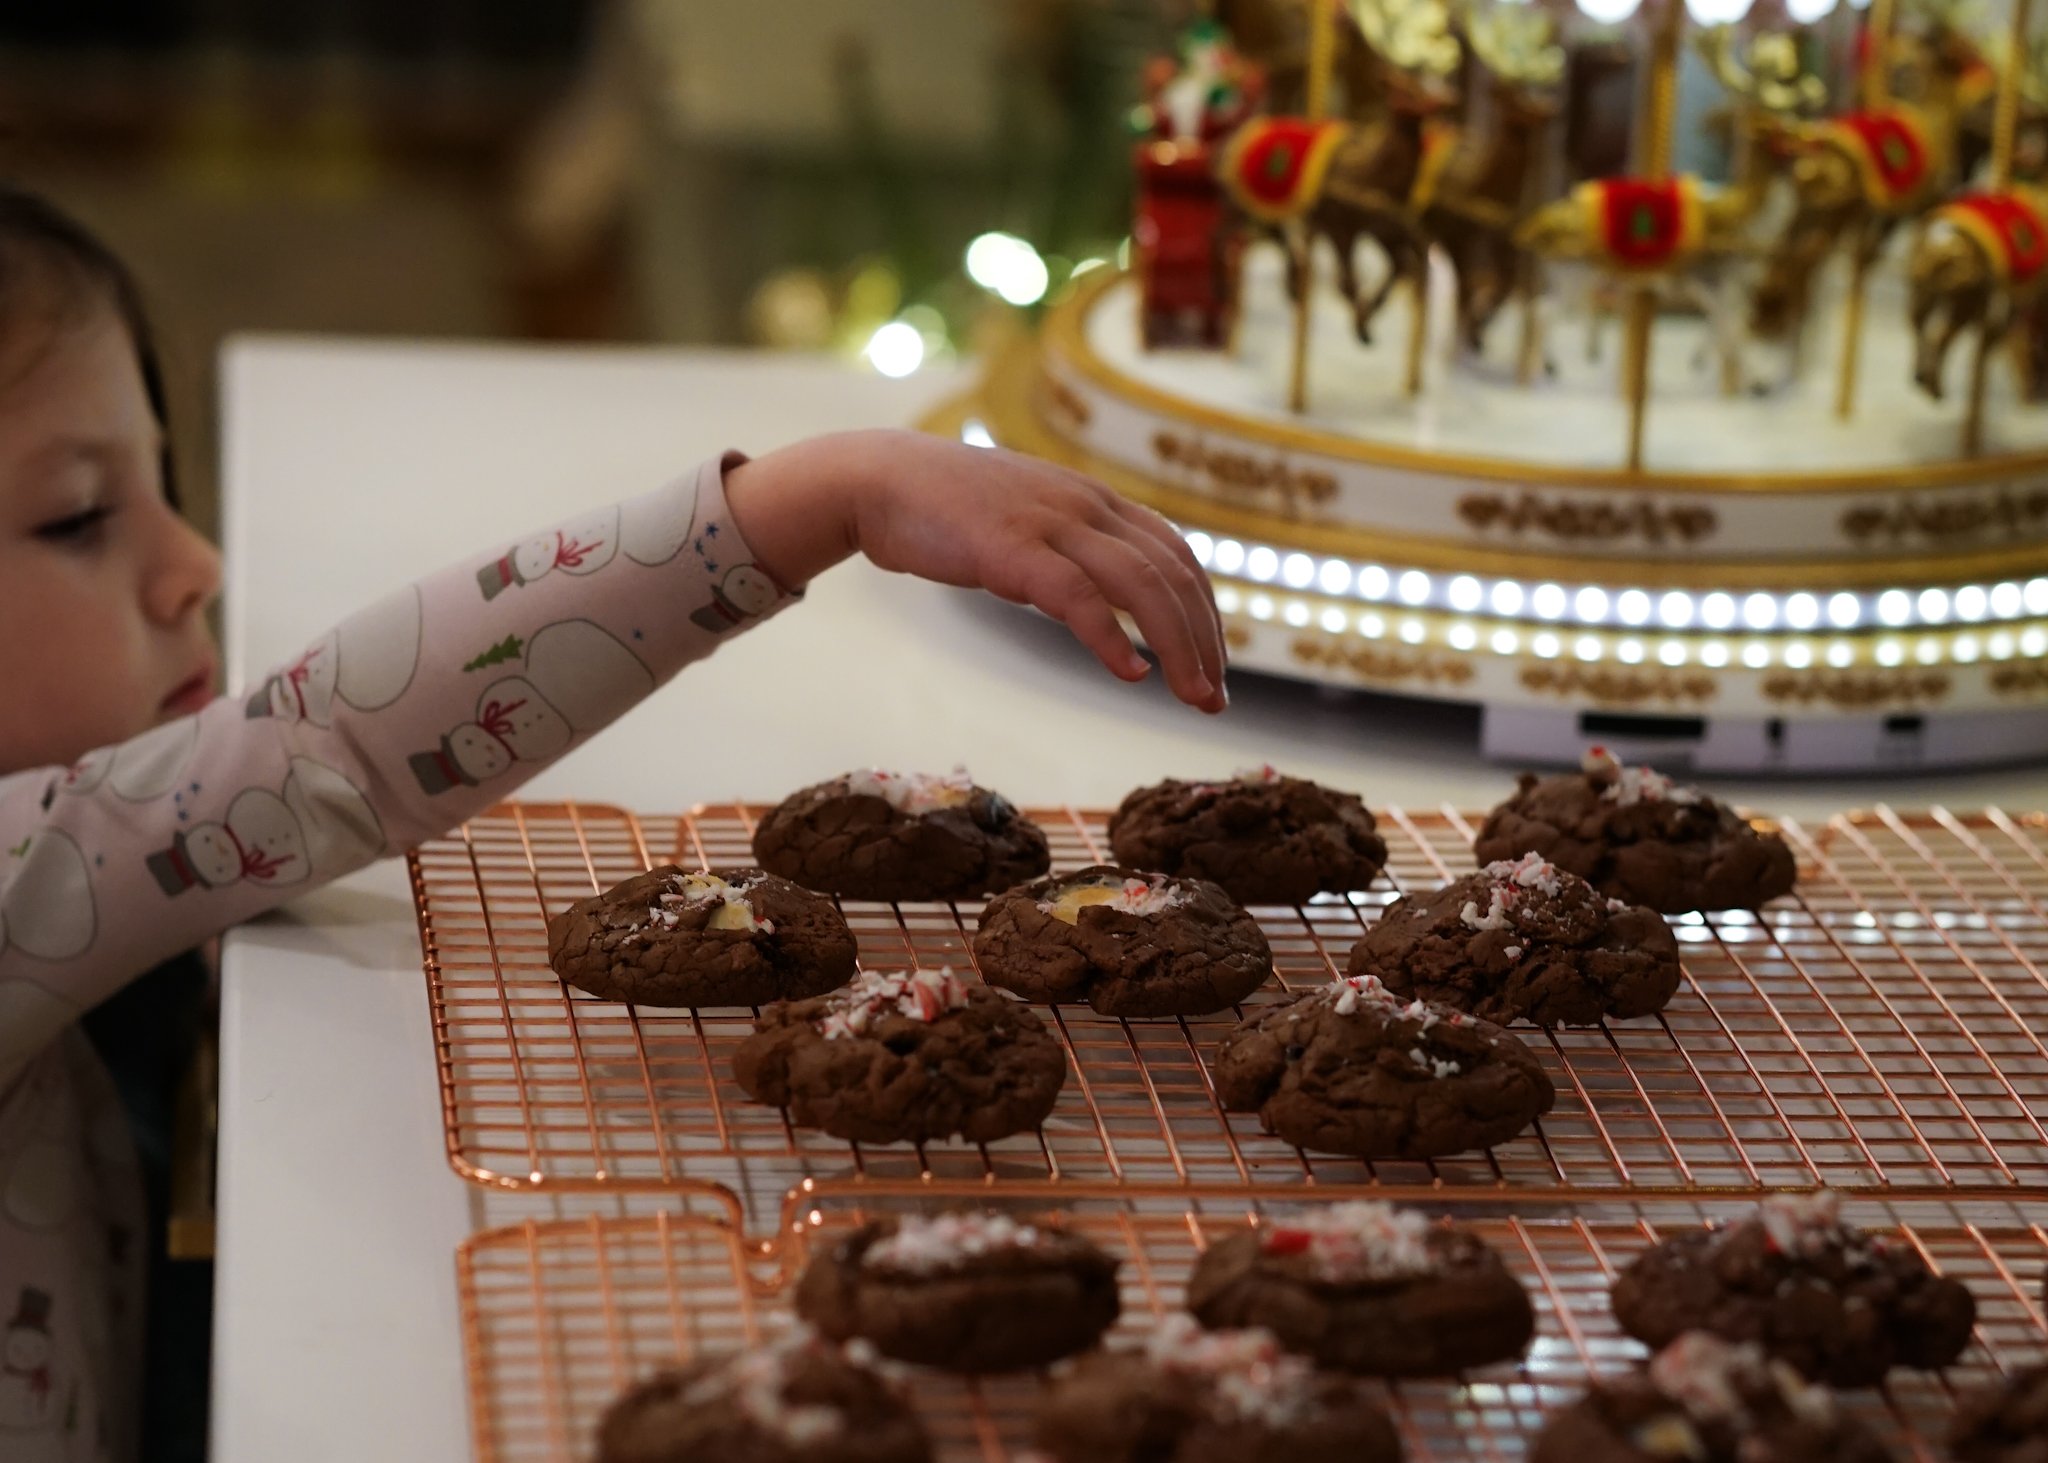
14. Bake for 10-12 minutes until the tops are beautifully cracked. After removing from the oven, quickly and carefully top with the crushed candy cane if you’re using it. You may need to gently press the candy cane into the cookie a bit.
15. Let the cookies rest on the tray for 5-10 minutes before transferring to a cooling rack.
Let that holiday magic sink in and enjoy.


Fresh greenery, dried oranges and other early December musings
Holiday season decorating, an ode to fresh greenery, and how we elevated our kitchen window garland this year
Holiday season decorating, an ode to fresh greenery, and how we elevated our kitchen window garland this year
The holidays are here. It’s December 4th, people. Even those who vehemently reject the notion that the holidays start before Thanksgiving can’t deny it any longer.
As always, I must point out that we are in the opposite camp: for us, the holiday season starts on November 1st. We decorate in waves, and each season we try to have our storage bins organized accordingly. Every year we tell ourselves the old mantra: if at first you don’t succeed, try, try again!
We opt for more “subtle” holiday decor between November 1st and mid-month-ish. Anything wintry, cozy. Think: glass trees, swans (okay, a singular gorgeous swan/sled situation I found last year), frosted decor. We swap out our orange candlesticks for burgundies and greens. We put a Frasier Fir candle in every major room. We start listening to the Christmas Coffeehouse playlist on Spotify every day; whoever gets downstairs first always asks Alexa to play it (and always with a “Please”—why do I feel like we need to be polite even to robots, especially in front of our kids?)
We had a faux flocked Christmas tree for years named “Elsa” that always went up on November 1st. At the end of the holiday season last year, Elsa’s lights went out. Her usual corner felt quite dark and empty for the first few weeks of November this year while we waited for her replacement (Elsa II). All of our Christmas trees are named after female characters from a winter-y or Christmas movie. I couldn’t tell you how that tradition started; all I can say is that it now feels WRONG to not name a tree and refer to her with reverence.
Around mid-November we ramp it up, bringing up more Santa and directly Christmas related decor. Outdoor lights go up. Christmas plates and mugs make their seasonal debut. Our Christmas carousel that my parents gifted a few years ago graces our countertops and we always have a little ceremony; it’s one of those Christmas decorations that never fails to bring out that pure Christmas magic in our kids’ eyes.
Usually at this point, the house is becoming so magical that we don’t hold back any longer. What we unpack, we decorate. On the day after Thanksgiving, we get our real, tall tree (Shelly—this year, Shelly VII) and we are in the full swing of things.
Which brings us to today. These early December days can feel fleeting, but they’re full of some sort of brightness, a buzzing energy. It still feels early in the season but you have a heightened awareness that this year’s core Christmas memories and activities are within reach and happening now.
If you’re one of those lucky people who got to see snow in past couple of days—we envy you! Last weekend, my 4-year-old burst into my bedroom to tell me “MOMMY! Daddy says that it’s raining but it MIGHT turn into snow! HURRY! Come see!”
Sadly, the cold rain did not transform into snow that morning, but our family’s excitement for that first snowflake has not dwindled.
So… the house is decorated, snow is on the horizon. A blog post that I intended to be about how we did our kitchen window garland this year grew into a post that also includes our holiday decorating strategy; thank you for enduring that.
Onto greenery!
There’s something so energizing about having fresh greenery around the house. People have been bringing nature indoors for centuries. In ancient times, people would hang greenery in windows and doorways to keep away evil spirits and illness. I think many of us can relate in this world so full of hate right now. If greenery can help ward away that kind of energy (and cold + flu season too, please!), sign me up. I also like to believe it when I hear that having real greens in your house helps purify the air.
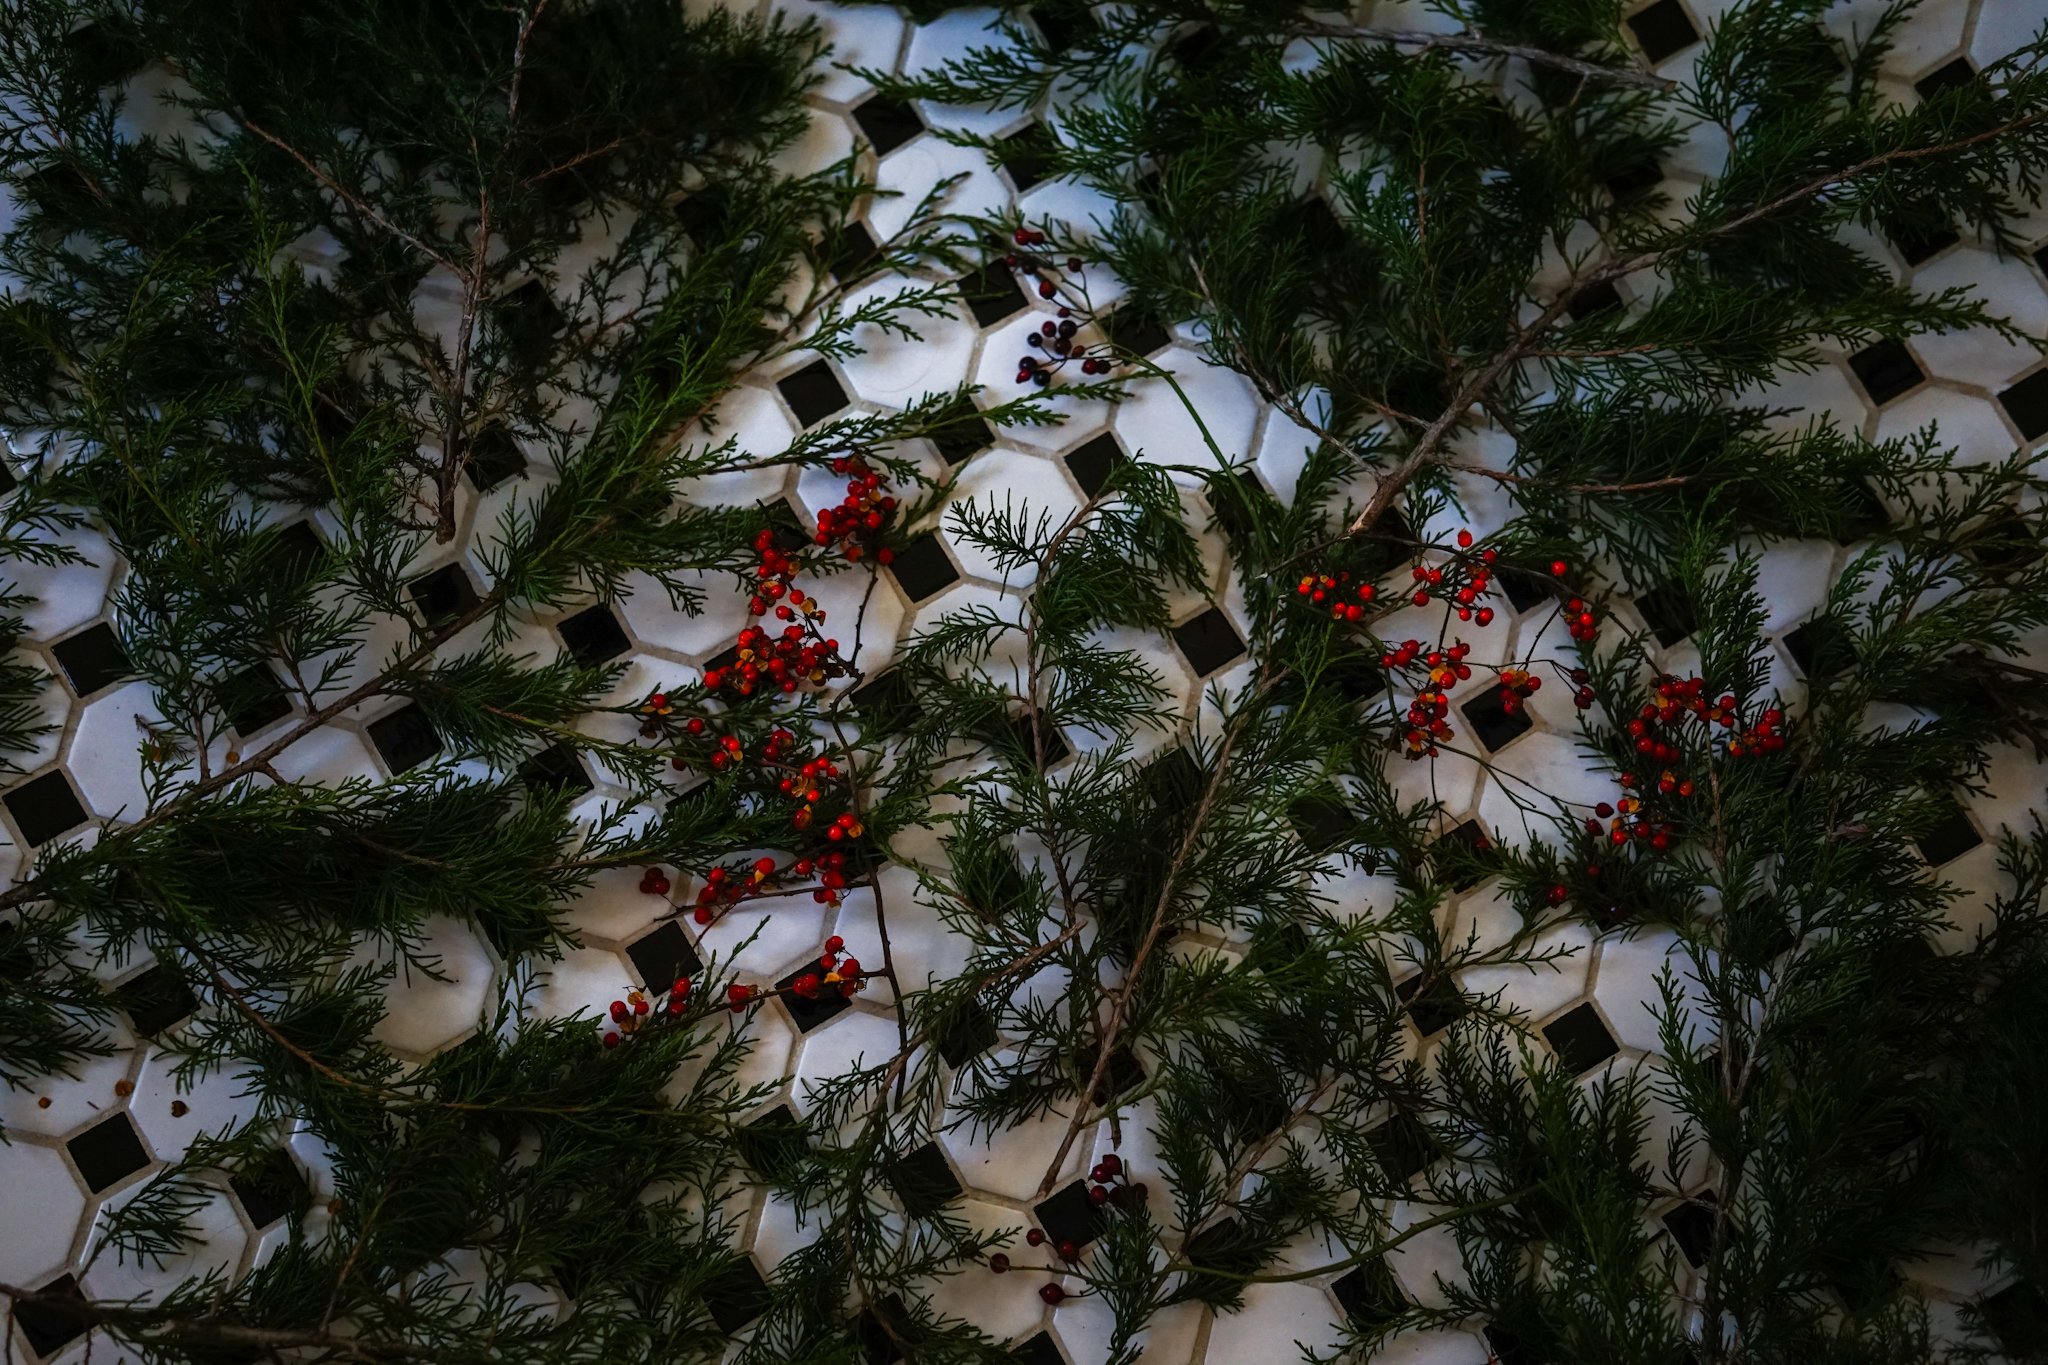
For the past few years we’ve been doing more fresh greenery around the house. Banisters, mirrors, windows, whatever we have time for. Some greenery is purchased and some we forage from our own backyard.
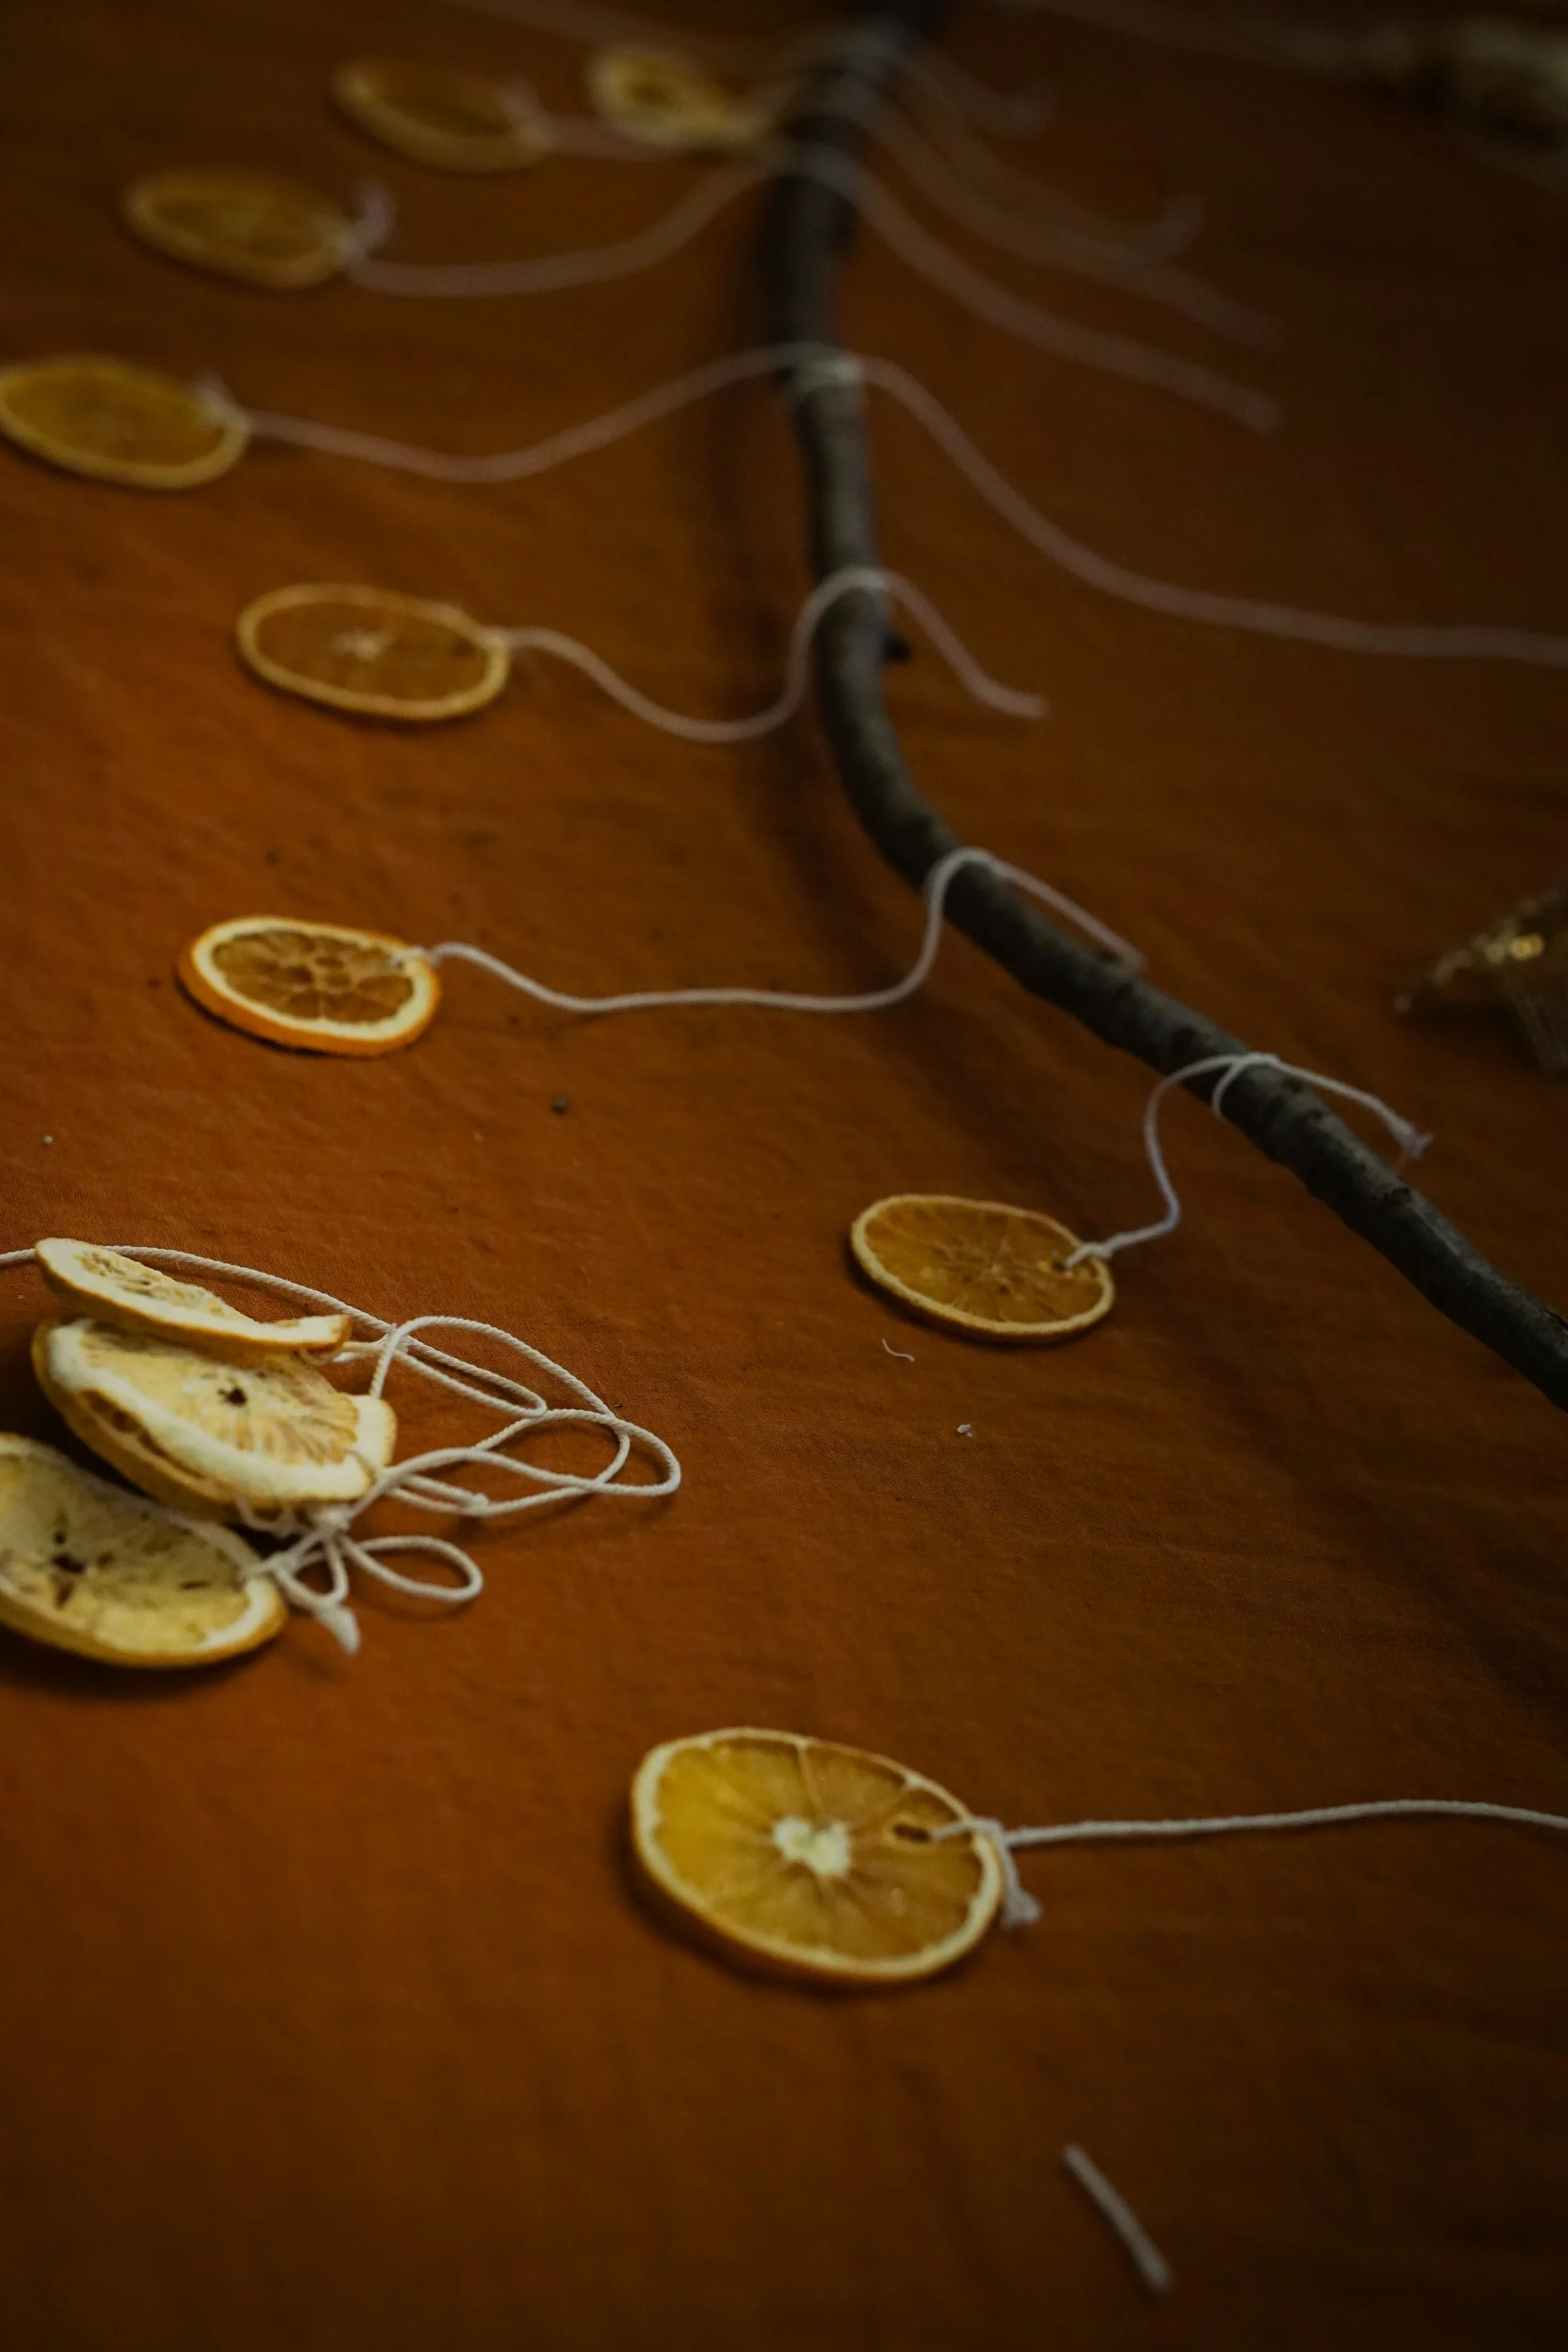
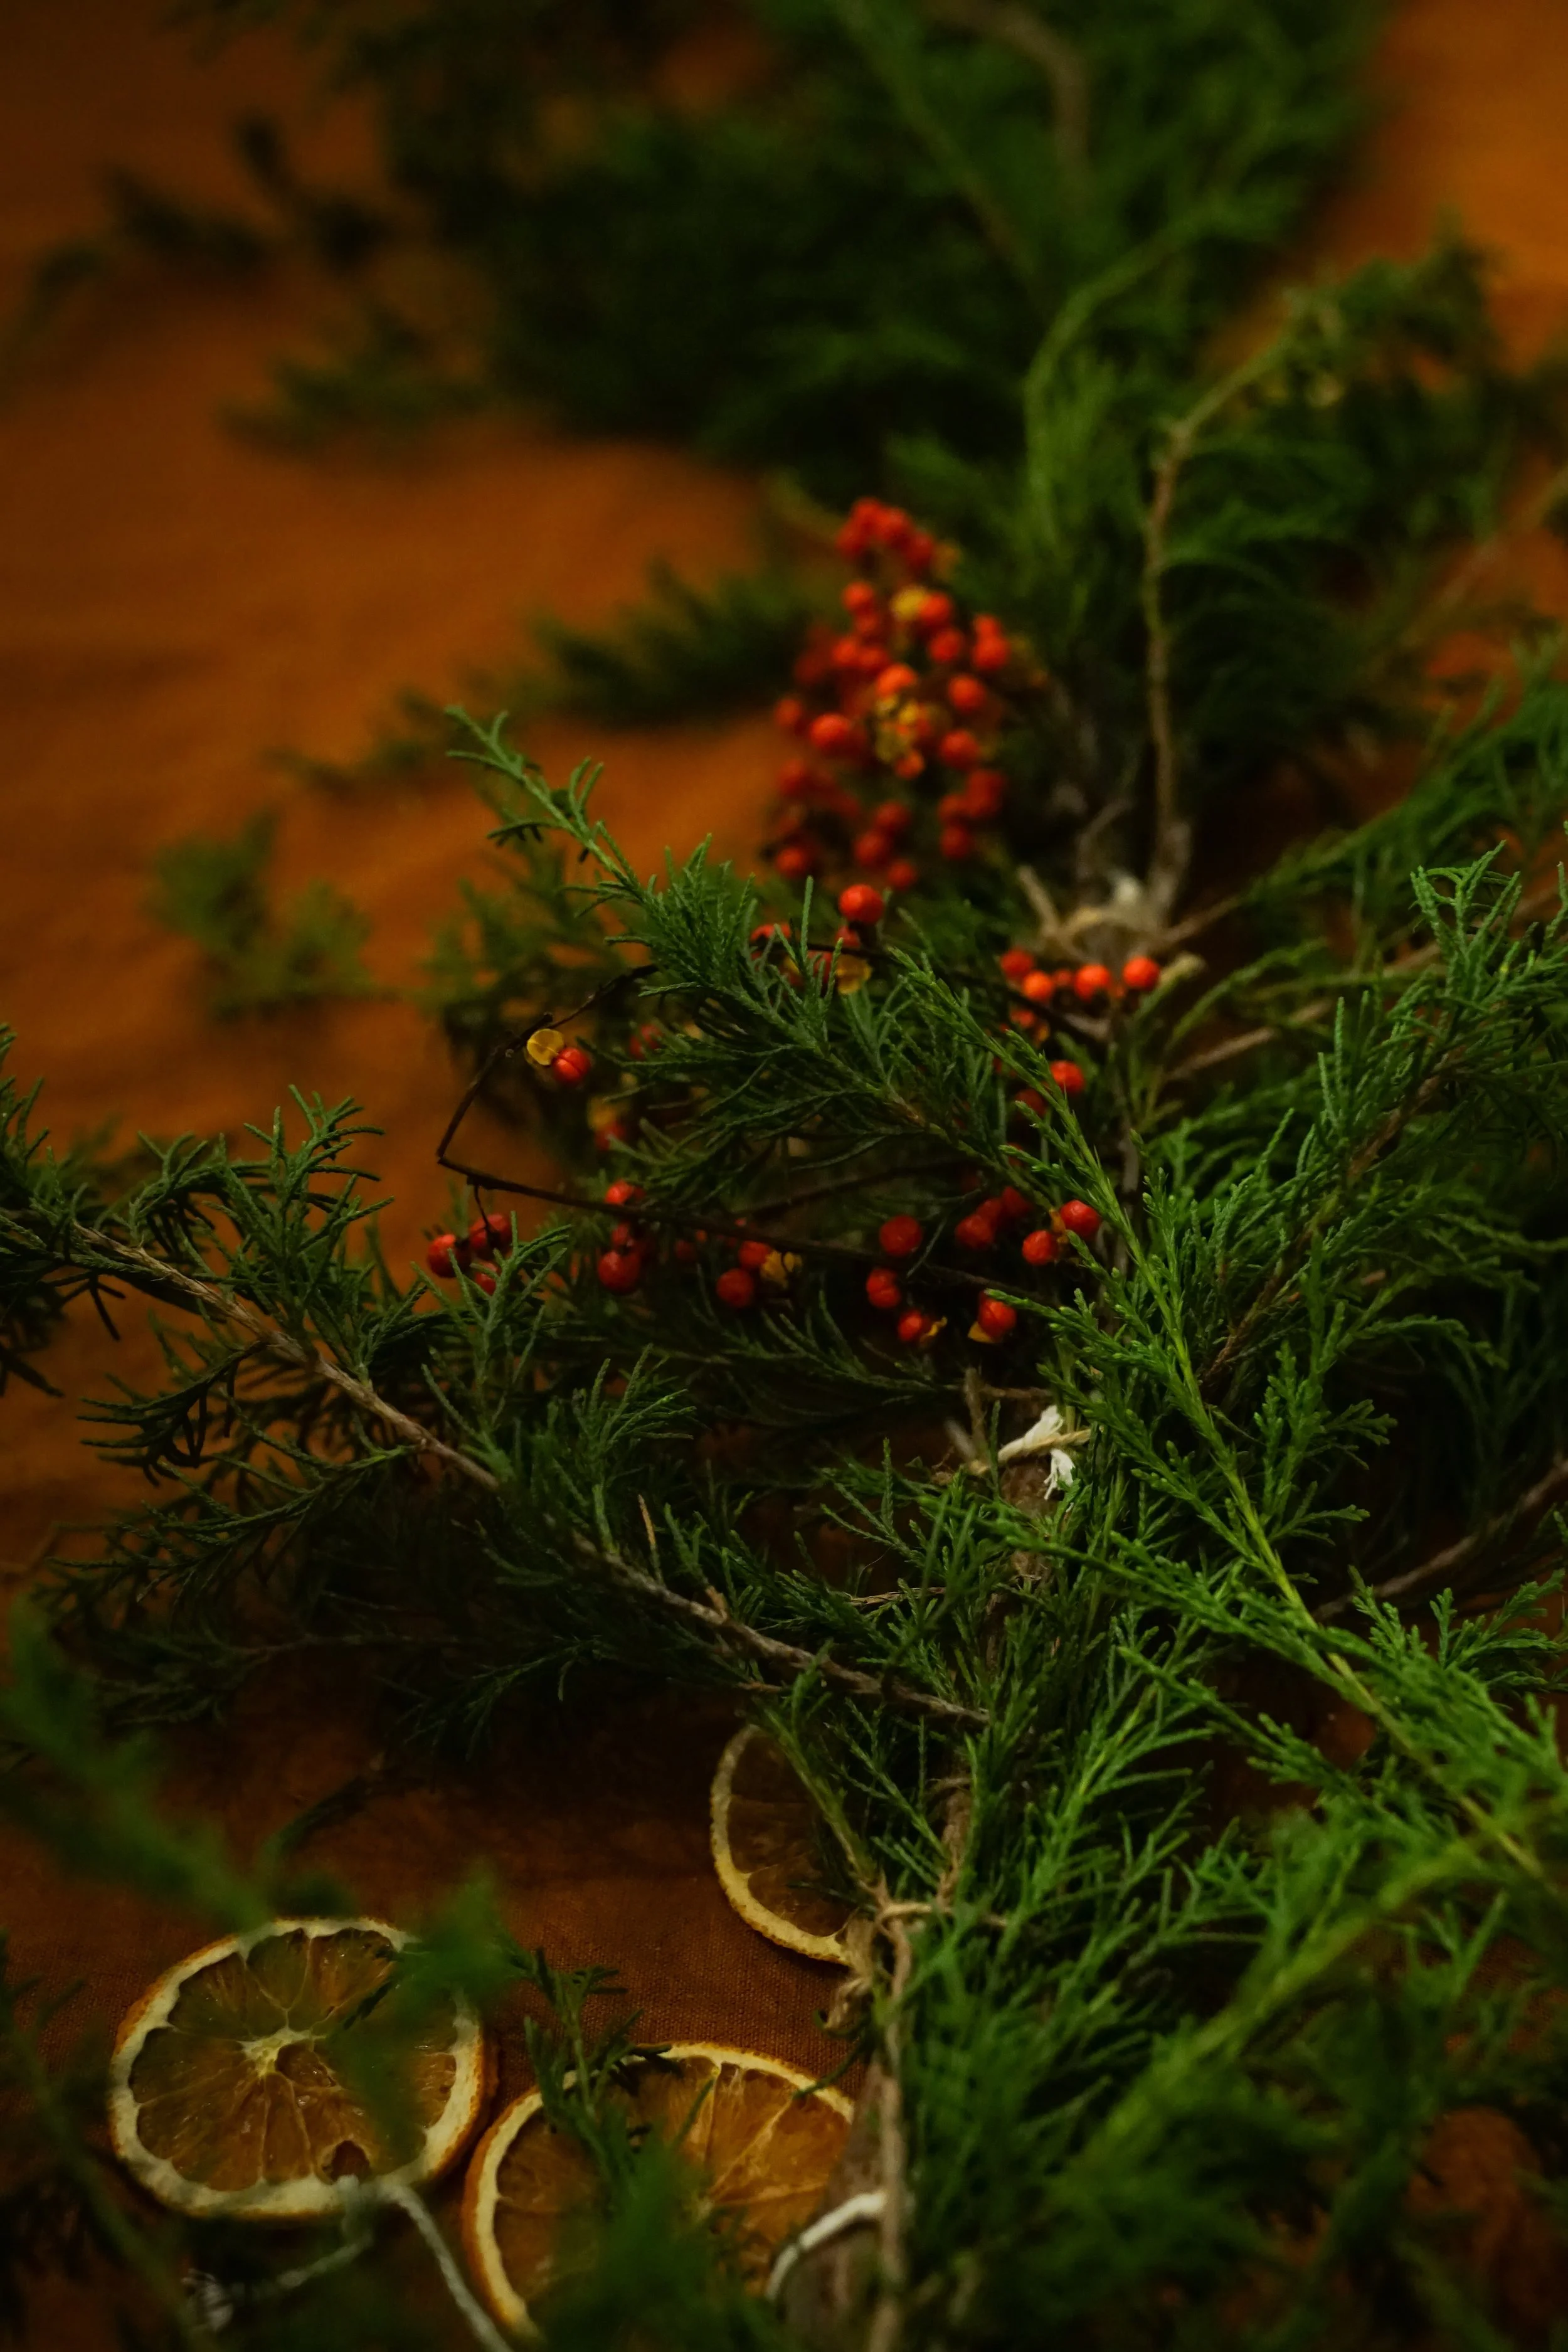
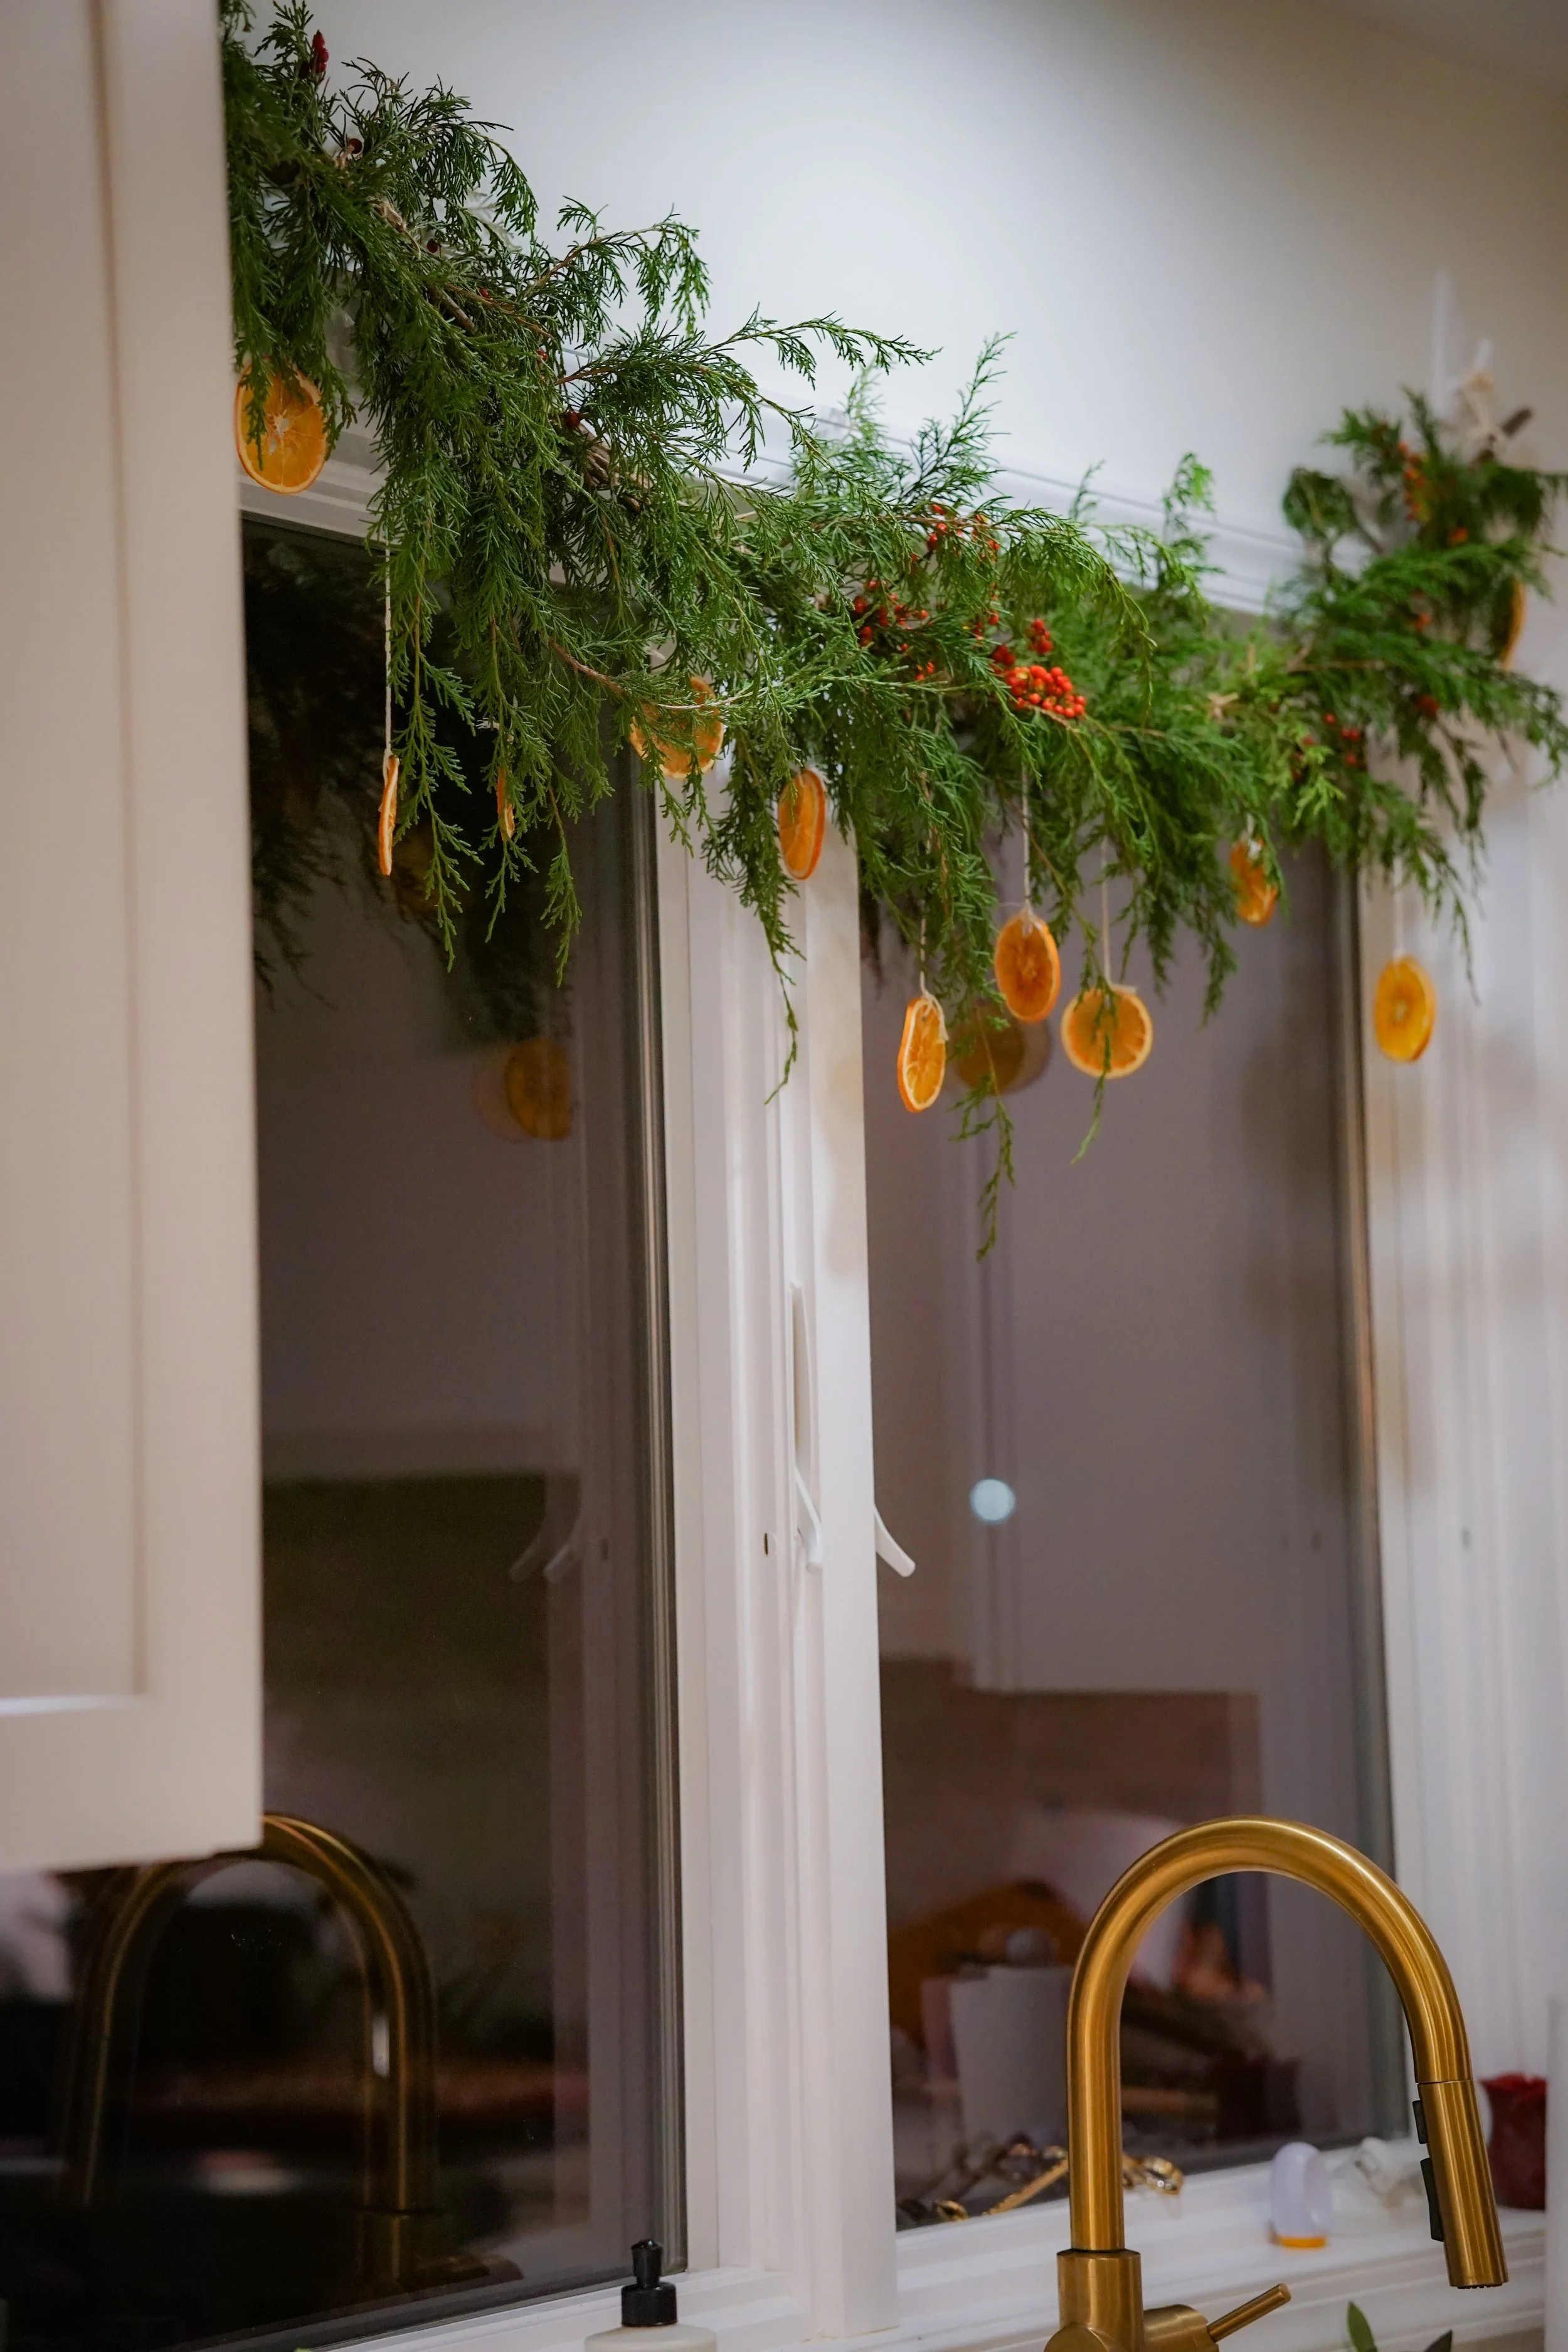
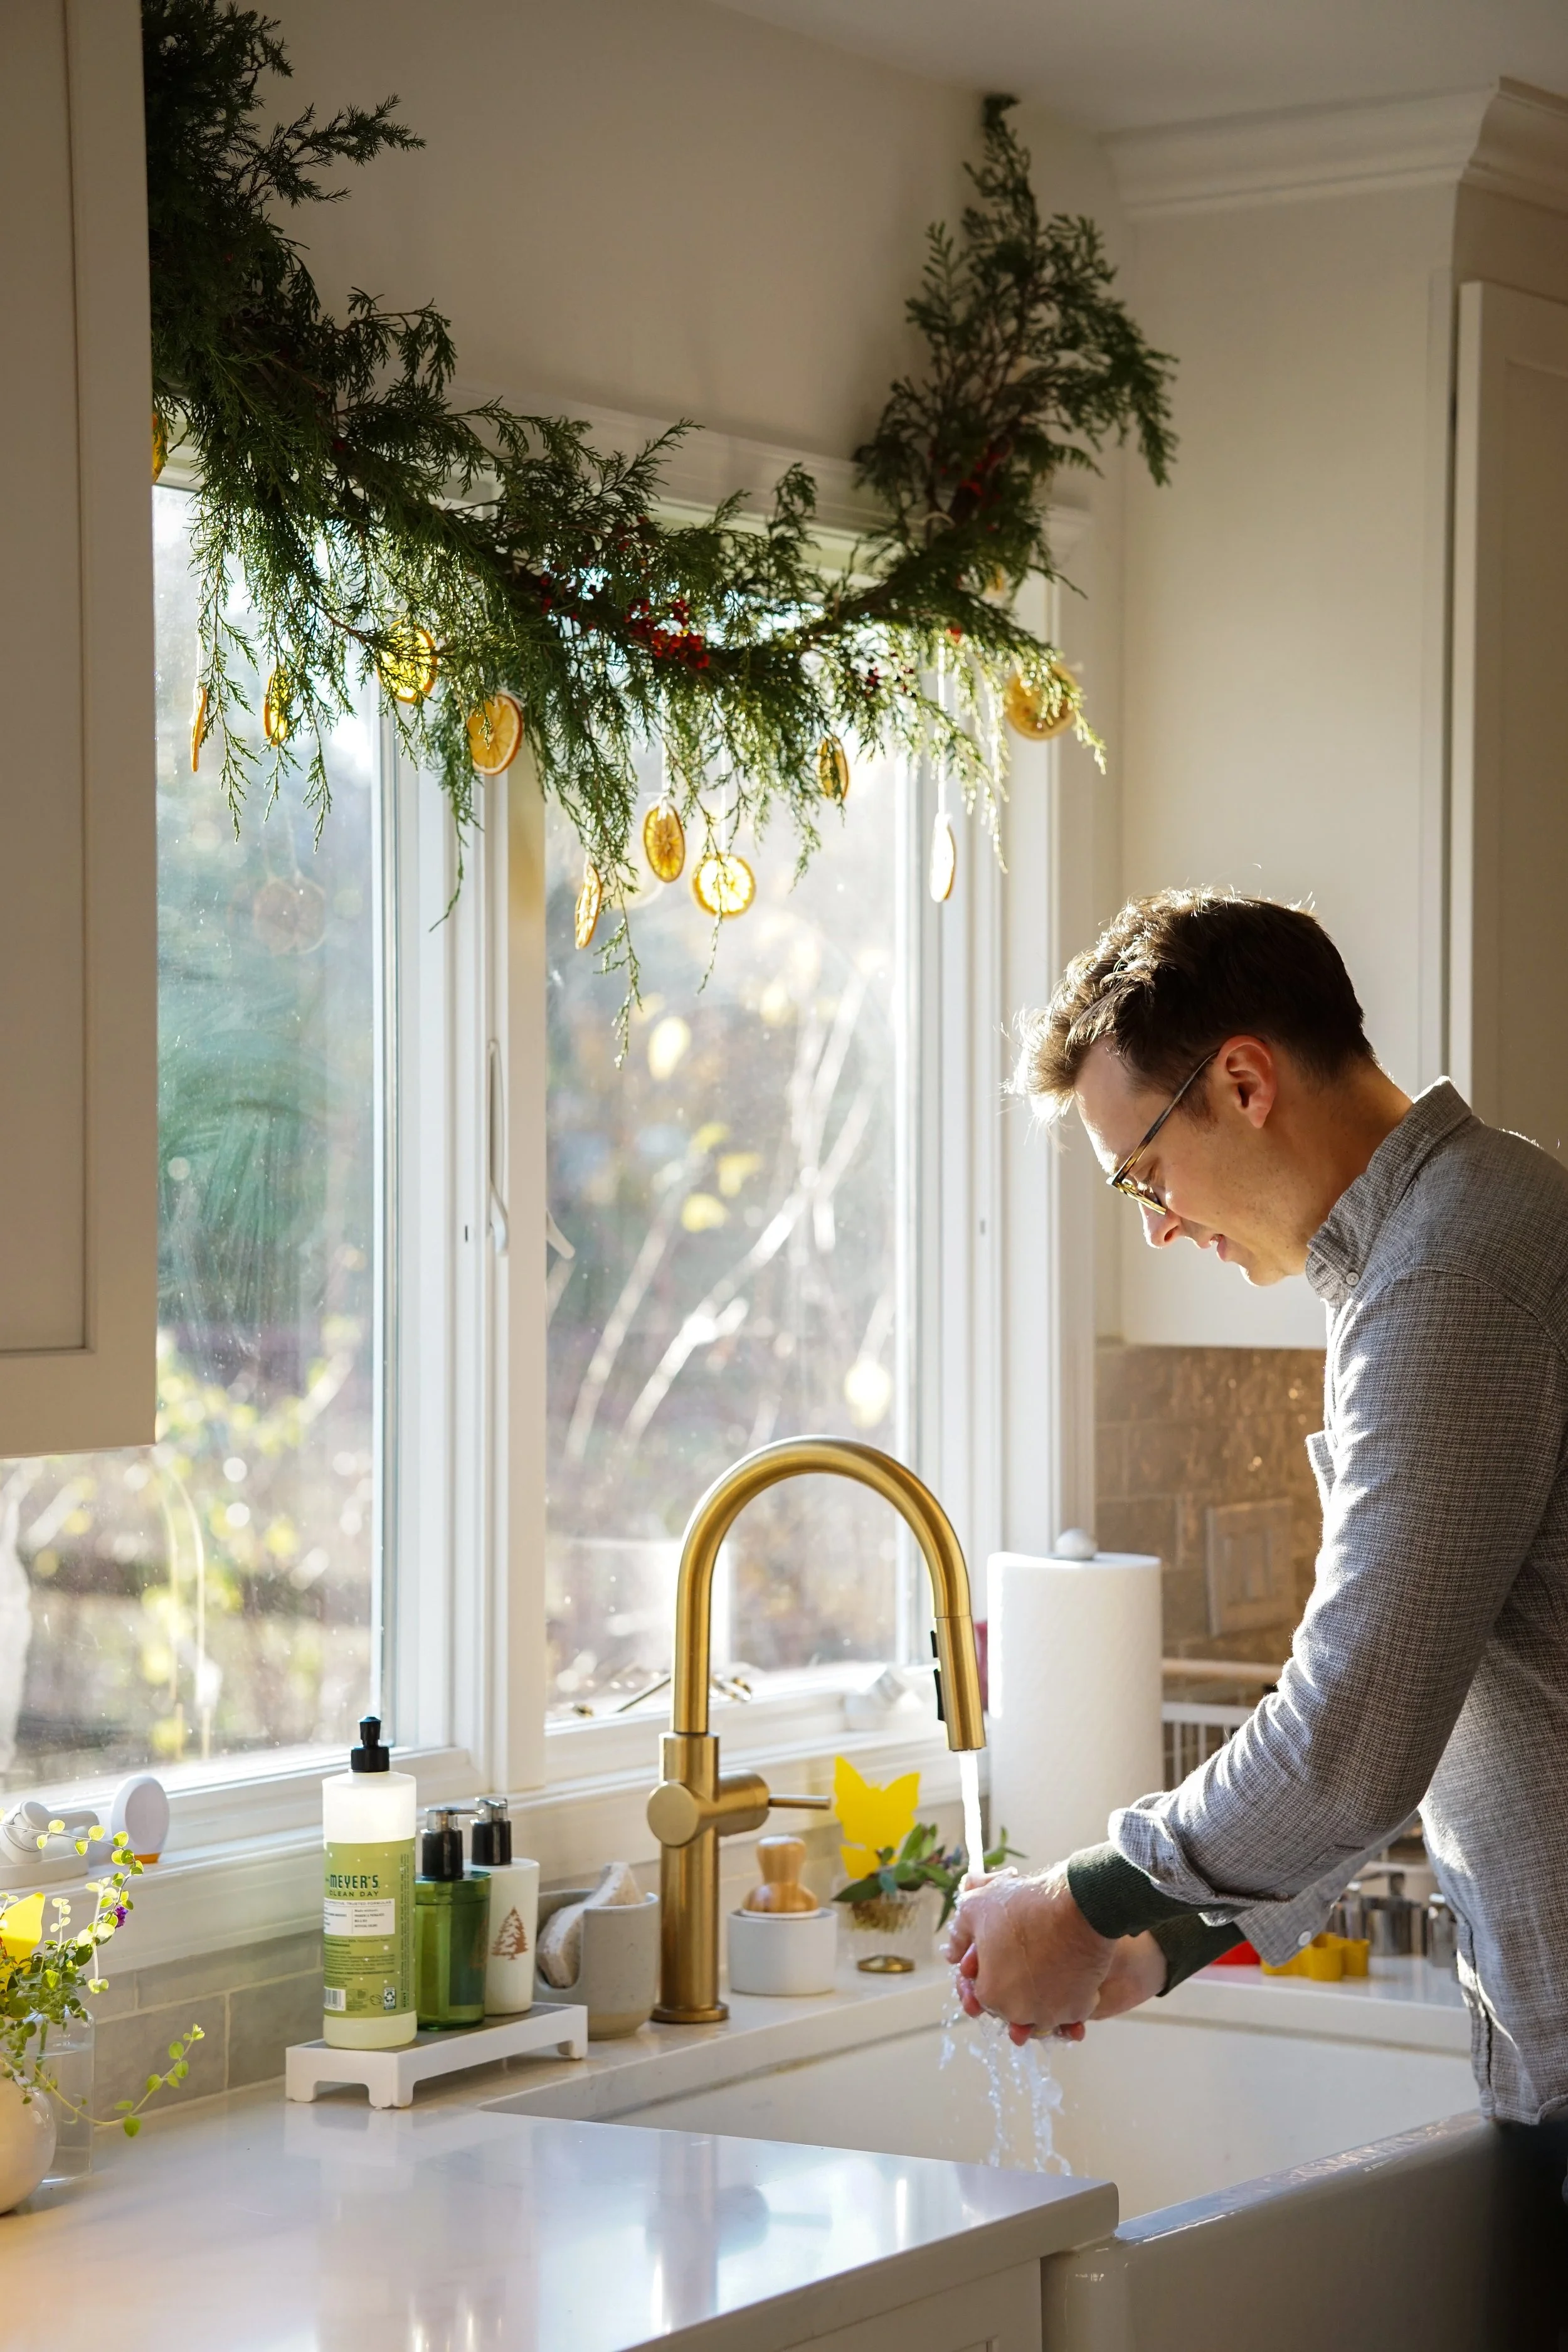
After a super windy day a few weeks ago, the kids and I found a long, smooth stick in our yard with a cool shape. This stick became the inspiration for a new garland to go over our kitchen sink—it happened to be the exact length of our double kitchen window, and I thought it would give the garland a nice swooping shape.
We went a step beyond a traditional green garland this year by adding a few extras, including dried oranges. Oranges date far back in Christmas lore, too, allegedly representing a more affordable version of the gold that Saint Nicholas is said to have gifted to the poor. Oranges in stockings became a tradition, and at various times throughout history oranges have been seen as a rarity and a luxury. It was fun to decorate with something with historic holiday significance and that brings warmth, color and light to our kitchen.
This garland is straightforward, maybe a step above your average (and just as beautiful) garland. Everyone had fun helping to make it, and it truly sparkles in the sunlight that streams through our windows every morning. I think that any variation on this garland—whether simpler or more maximalist—would be beautiful. Here’s how we did ours.
Materials we used:
Long stick (cut down to window size if needed)
Evergreen branches (any kind would be beautiful!)
Twine / string (I used both twine and white kitchen string for this project)
Command hooks (I got white to match our walls and blend in more). You only need this if you don’t already have a curtain rod or other place to secure your garland
Oranges
Optional: berry branches, stems with pinecones, ornaments, battery pack string lights, etc.
Drying your orange slices
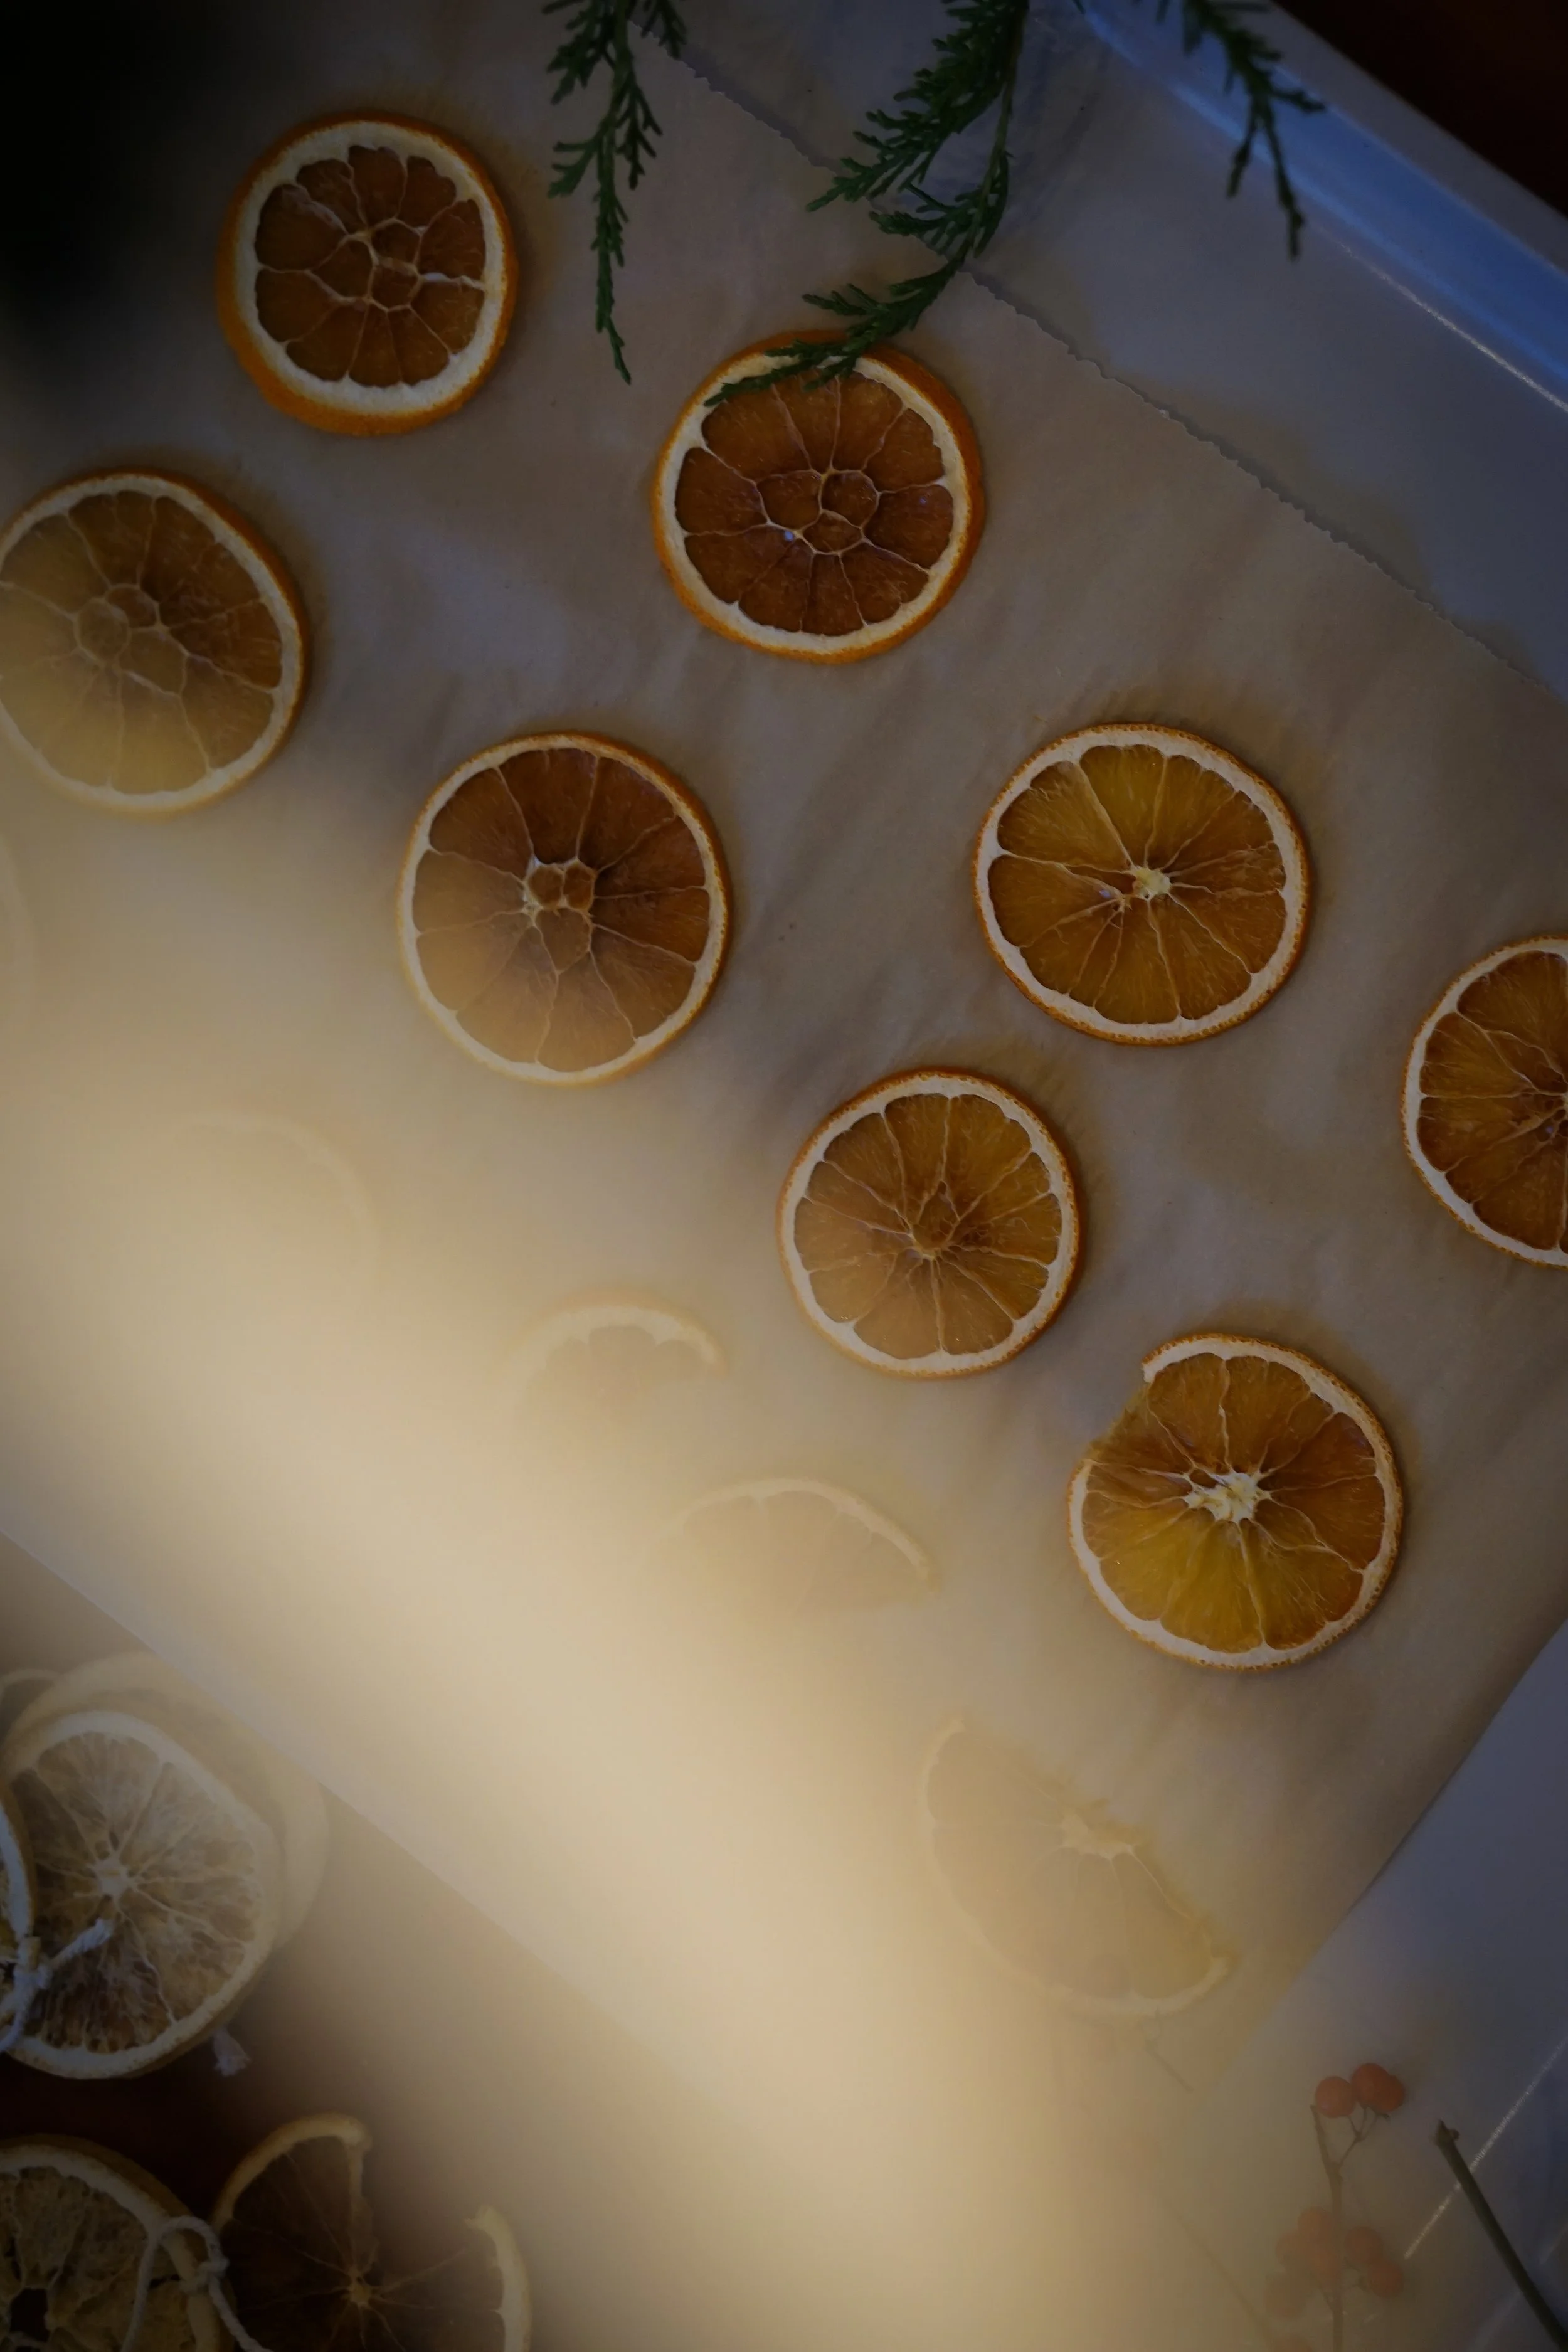
You can do this while your branches are soaking or anytime beforehand! You just need a chunk of at least 4 hours of being home. Pop these in the oven on a weekend morning with nowhere to be, and your house will have a lovely orange smell for the whole day.
This was our first time drying orange slices, and aside from almost slicing my finger off, it was amazing. My number one piece of advice here to avoid slicing your finger off is to only take a few slices of each orange. Don’t push yourself too far. Give up!! When you think you might be able to get just one more slice off of your orange, don’t do it! This is a slippery task, and you can use the other parts of your orange in a smoothie or as a snack. Don’t risk it!!
To safely dry your oranges:
Preheat your oven to a low temperature, 175 or 180 degrees Fahrenheit. Line enough trays with parchment paper to accommodate the number of oranges you’ll have (2 trays worked for us for 4 oranges).
Thinly and carefully (repeat: carefully) slice your oranges into rounds. If you want to be super safe, even half circles work here.
Pat the orange slices dry with a paper towel to jumpstart the drying process.
Place the orange slices in a single layer on the trays and pop into the oven. Let these bake for at least 4 hours to dry out, longer if the slices were thicker.
Assembling your garland

STEP 1: GATHER MATERIALS
Harvest or purchase your greenery, find a stick and trim it down to size if needed. Note that if you don’t have a stick, tying your greens together and artfully draping is totally fine!
STEP 2: SOAK YOUR GREENERY
The first thing we do if we’ve harvested our own greenery branches is soak them. We’ve done this for a few years and it basically feels like giving the branches one nice, long drink before they’re hung up for the season. I asked my floral designer mother-in-law this year if that’s something that actually helps and she said yes. Yay!
We just toss the greens into a bathtub, fill it up, and let it sit there for a day or so. I also threw some berry branches in the tub. We pull them out and set them on towels to thoroughly dry.
If you’re buying branches, I think many are pre-soaked, but if you’re not sure—you could give them a quick bath!
STEP 3: MAKE SURE THE GARLAND WILL HANG
I placed my command hooks where I thought the draping would look best, and then tied string onto each end of the stick to loop over those hooks. I figured I’d use greenery to cover the hook where possible.
STEP 4: TIE YOUR ORANGES
I cleared our kitchen table and laid a tablecloth down to consolidate any mess. I laid the stick across the table and started to place the oranges. I wanted them to hang in a non-uniform way, so staggered them to have some with longer strings, and some with shorter strings.
My 4 year old was a huge help here. She loved poking a hole through the oranges with a pen and then looping string that I pre-cut through them. We worked together to do this for all of the oranges and tie them onto the stick.
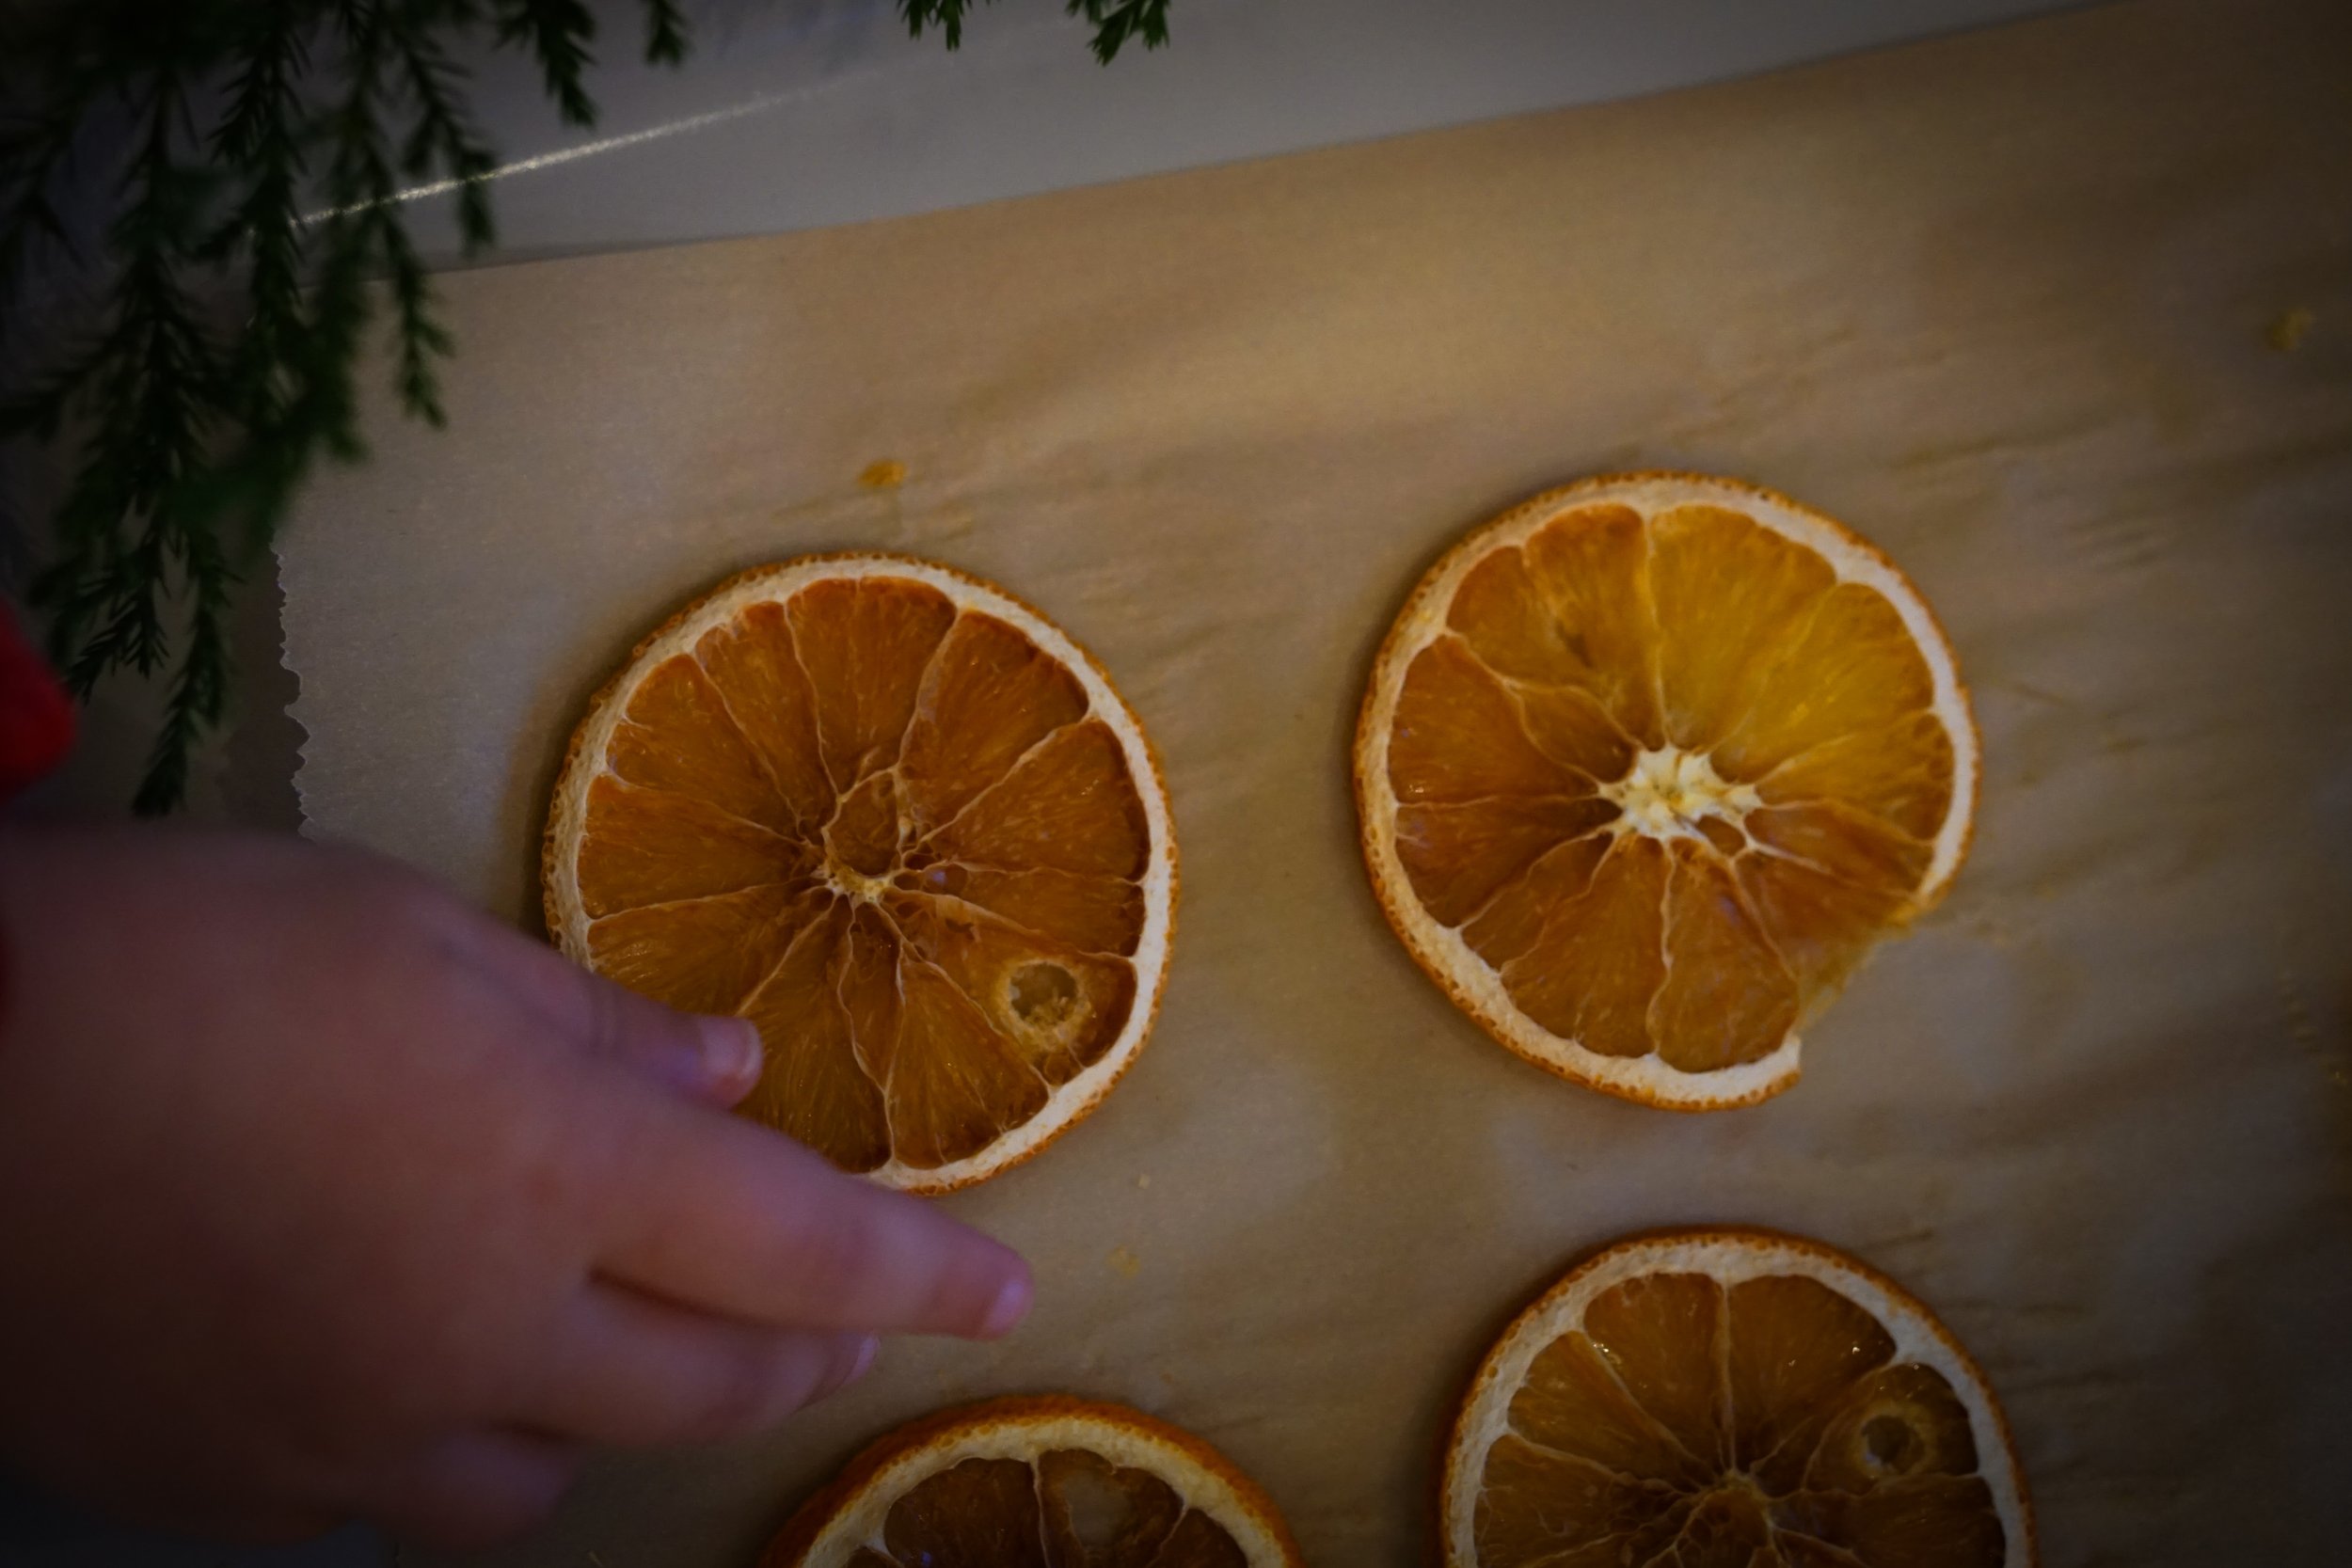


Note: make sure you string the oranges at least long enough to fall into the window! The light coming through the window and oranges is where the magic happens.
STEP 5: POSITION YOUR GREENERY
Next, figure out the direction you want your greenery to travel. Place the greenery across the stick, overlapping each other to create one long garland effect.
Once you have your garland placed, tie the branches together and to the stick using twine. I tried to do a little string every 6 inches or so, or wherever I had overlapping branches, so that the greenery would hold in place.
STEP 6: ADD ANY ACCESSORIES
I slid some of the berry branches into place at this point. If you have other decorative items — pinecones, ornaments, etc. - this is a great time to place them.
I added battery pack string lights to our garland later on, and have some glittering gold ornaments I might add, but adding some of these before the garland goes up (and trying to strategically cover the battery pack with greens) could be a good idea! I like the idea of it with and without lights - our lights have gone up and down a few times.
STEP 7: HANG YOUR GARLAND
Hang your garland using the string you looped onto your stick. Step back and admire! We put the garland together at night so it was fun to wake up the next morning and get the full effect of the sunlight streaming through.
My mother-in-law sent a document that recommends spraying your greens with water to keep them fresh. Writing this post is a great reminder for me to do that this evening!

Though we have a decorating strategy, we never decorate exactly the same—and I love finding new ways to decorate, especially using more natural materials. We loved doing the oranges this year and just today bought a huge bag of oranges to dry more to hang in more windows.
However you decorate your home and celebrate the holidays, I hope you find your own kind of magic.
xo,
Shannon


Coming soon…
Coming soon…
As soon as I could piece together letters that vaguely sounded like words, I started my first diary. I still have that very first one. I wish I could say I never looked back—I certainly didn’t look back for a long time, filling the pages of diaries and writing endless stories—but now in my mid-30s, I more often reminisce about what I will write when I have time.
I had a blog for about a year and a half that fizzled out around the beginning of the Covid pandemic (which is when many people started blogging, I think? hmm…) As they say, there’s no time like like the present; it’s time to resurrect my writing endeavors.
Recipes, life, love, parenting, gardening, home renovations, decorating, and more—I hope to share my thoughts on things that bring magic to my life and allow me to live a little deeper.
See you soon.